49332I-MN EN User manual
www.aeg.com CONTENTS 1. 2. 3. 4. 5. 6. 7. 8. 9. 10. 11. 12. 13. 14. 15. SAFETY INFORMATION . . . . . . . . . . . . . . . . . . . . . . . . . . . . . . . . . . . . . . . . . . . . . . . . . . . . . . 3 SAFETY INSTRUCTIONS . . . . . . . . . . . . . . . . . . . . . . . . . . . . . . . . . . . . . . . . . . . . . . . . . . . . . . 4 PRODUCT DESCRIPTION . . . . . . . . . . . . . . . . . . . . . . . . . . . . . . . . . . . . . . . . . . . . . . . . . . . . . 7 BEFORE FIRST USE . . . . . . . . . . . . . . . .
ENGLISH 3 1. SAFETY INFORMATION Before the installation and use of the appliance, carefully read the supplied instructions. The manufacturer is not responsible if an incorrect installation and use causes injuries and damages. Always keep the instructions with the appliance for future reference. 1.1 Children and vulnerable people safety WARNING! Risk of suffocation, injury or permanent disability.
www.aeg.com • Never try to extinguish a fire with water, but switch off the appliance and then cover flame e.g. with a lid or a fire blanket. • Do not store items on the cooking surfaces. • Do not use a steam cleaner to clean the appliance. • Metallic objects such as knives, forks, spoons and lids should not be placed on the hob surface since they can get hot.
ENGLISH WARNING! Make sure to install a stabilizing means in order to prevent tipping of the appliance. Refer to Installation chapter. Electrical connection WARNING! Risk of fire and electrical shock. • All electrical connections should be made by a qualified electrician. • The appliance must be earthed. • Make sure that the electrical information on the rating plate agrees with the power supply. If not, contact an electrician. • Always use a correctly installed shockproof socket.
www.aeg.com • Fats and oil when heated can release flammable vapours. Keep flames or heated objects away from fats and oils when you cook with them. • The vapours that very hot oil releases can cause spontaneous combustion. • Used oil, that can contain food remnants, can cause fire at a lower temperature than oil used for the first time. • Do not put flammable products or items that are wet with flammable products in, near or on the appliance.
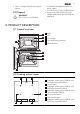
ENGLISH • Only use lamps with the same specifications. 7 • Disconnect the appliance from the mains supply. • Cut off the mains cable and discard it. • Remove the door catch to prevent children and pets to get closed in the appliance. 2.5 Disposal WARNING! Risk of injury or suffocation. 3. PRODUCT DESCRIPTION 3.1 General overview 1 2 3 5 3 2 1 1 Hob 2 Grill 3 Oven lamp 4 Fan and heating element 5 Shelf positions 2 5 4 3 2 1 3 4 5 3.
www.aeg.com To bake and roast or as a pan to collect fat. • Roasting pan grid To put in the deep roasting pan. 3.3 Accessories • Oven shelf For cookware, cake tins, roasts. • Deep roasting pan 4. BEFORE FIRST USE WARNING! Refer to the Safety chapters. 4.1 Initial Cleaning Press the + or - button to set the correct time. After approximately five seconds, the flashing stops and the display shows the time of day you set. • Remove all accessories and removable shelf supports (if applicable).
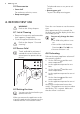
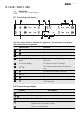
ENGLISH 9 5. HOB - DAILY USE WARNING! Refer to the Safety chapters. 5.1 Control panel layout 1 2 3 10 4 9 5 6 7 8 Use the sensor fields to operate the appliance. The indicators and display show which function operates. Sensor field Function 1 To activate and deactivate the hob. 2 To lock/unlock the control panel. 3 A heat setting display To show the heat setting. 4 Timer indicators of cooking zones To show for which cooking zone you set the time.
www.aeg.com Display Description A cooking zone is still hot (residual heat). The Lock / The Child Safety Device operates. The Power function operates. The Automatic Heat Up function operates. 5.3 Activating and deactivating the hob and at the same time to Touch deactivate the cooking zone. Touch for 2 seconds to activate the hob. Touch for 1 second to deactivate the hob. 5.5 Automatic heat up 5.4 Heat setting Touch to increase the heat setting. Touch to decrease the heat setting.
ENGLISH ond cooking zone. The display for the reduced zone changes between two levels. 5.8 Power management for the right cooking zones and the top oven The right cooking zones and the top oven use the same energy source (the same electrical phase) when they operate at the same time. The power management prevents a circuit overload. The more power the top oven uses during its operation, the less is available for the right cooking zones.
www.aeg.com 5.12 Child safety device 5.14 Automatic switch-off This function prevents an accidental operation of the hob. The hob deactivates automatically if: • All cooking zones are deactivated. • You do not set the heat setting after you activate the hob. • You spill something or put something on the hob control panel for more than 10 seconds (a pan, a cloth, etc.). An acoustic signal sounds and the hob deactivates. Remove the object or clean the control panel. • The hob becomes too hot (e.g.
ENGLISH Cookware material • correct: cast iron, steel, enamelled steel, stainless steel, a multi-layer bottom (marked as correct by a manufacturer). • not correct: aluminium, copper, brass, glass, ceramic, porcelain. Cookware is correct for an induction hob if … • ... some water boils very quickly on a zone set to the highest heat setting • ... a magnet pulls on to the bottom of the cookware.
www.aeg.com Heat setting Use to: Time Hints 4-5 Steam potatoes 20-60 min Use max.
ENGLISH 15 8.1 Control panel 1 6 Number Button 1 – 5 4 3 Function 2 Description Display To show the current settings of the oven. 2 Setting buttons To set the temperature and time. 3 Selection/ Clock function To move between the oven functions and clock functions. Down,Up To set an oven function or programme. 5 Oven selection To switch between top and main oven. 6 On/Off To activate or deactivate the oven. 4 8.
www.aeg.com Number Name Description 4 Heat indicator Shows the heat setting. 5 Temperature/Clock indicator Shows the temperature and the time in minutes. 6 Keep warm indicator Shows that keep warm function is active. 7 Cooking time/End time/Period of operation Shows the time setting for clock functions. 8 Clock function indicator To set the clock function and minute minder. 8.3 Top oven functions Oven function Application Conventional To bake and roast on one oven level.
ENGLISH Oven function 17 Application Rotitherm To cook large pieces of meat. The grill element and the oven fan operate one after the other and circulate hot air around the food. Dual Grill To grill flat food items in large quantities. To make toast. The full grill element operates. Keep Warm To keep the food warm. Drying To dry sliced fruit (e.g. apples, plums, peaches) and vegetables (e.g. tomatoes, zucchini, mushrooms). Defrost To thaw frozen food.
www.aeg.com 8.14 Oven automatic switchoff The appliance switches off after some time: • if you do not switch off the appliance. • if you do not change the oven temperature. Oven temperature Switch-off time 30 - 120 °C 12.5 h 120 - 200 °C 8.5 h Oven temperature Switch-off time 200 - 250 °C 5.5 h 250 - max. °C 3.0 h To operate the appliance after an automatic switch-off, first deactivate the appliance fully.
ENGLISH 19 To roast larger pieces of meat or poultry on one level: 1. Put the roasting pan grid in the deep roasting pan. The supports of the roasting pan grid must point up. 2. Put the deep roasting pan in the appliance and on the necessary shelf level. To grill flat dishes in large quantities and to toast: 1. Put the roasting pan grid in the deep roasting pan. The supports of the roasting pan grid must point down. 2. Put the deep roasting pan in the appliance and on the necessary shelf level. 9.
www.aeg.com 4. Press a button to stop the acoustic signal. With Minute Minder , you must activate the oven to set the clock function. With Duration and End , the oven deactivates automatically. You must set the oven function and the temperature first before you can set the clock function. 9.2 Heat+Hold The Heat+Hold function keeps prepared food warm for 30 minutes after the cooking is completed. Activating Heat+Hold 1. Set the time with the clock functions and/or End . Duration 2.
ENGLISH 21 Tips on baking Baking results Possible cause Remedy The cake is not browned sufficiently below Incorrect oven level Put the cake on a lower oven level The cake sinks (becomes soggy, lumpy, streaky) Oven temperature too high Use a lower setting The cake sinks (becomes soggy, lumpy, streaky) Baking time is too short Set a longer baking time Do not set higher temperatures to decrease baking times The cake sinks (becomes soggy, lumpy, streaky) Too much liquid in the mixture Use less l
www.aeg.
ENGLISH Food Shelf Position Temperature [°C] Approx Cook Time (mins) Vegetables: Roast Potatos 2 180 - 190 60 - 90 Yorkshire Pudding Large 2 220 - 210 25 - 40 Yorkshire Pudding Individual 2 210 - 220 15 - 25 Roasting Meat, Poultry 2 23 See roasting chart 10.6 Main oven 10.
www.aeg.
ENGLISH 25 10.9 Pizza Setting Food Shelf Position Temperature Approx. Cook Time (min) Apple Pie 2 160 - 180 50 - 60 Plate Tart 2 180 - 200 25 - 50 Pizza, frozen 3 Pizza, home made 2 Follow manufacturer`s instructions 200 - 230 15 - 25 Quiches/Tarts 2 180 - 200 30 - 50 10.10 Roasting Roasting dishes • Use heat-resistant ovenware to roast (please read the instructions of the manufacturer).
www.aeg.com Always pre-heat the empty oven with the grill functions for 5 minutes. • Set the shelf in the shelf level as recommended in the grilling table. • Always set the pan to collect the fat into the first shelf level. • Grill only flat pieces of meat or fish. The grilling area is set in centre of the shelf 10.13 Top oven 10.14 Dual Circuit Grill Shelf Position Adjust shelf position and grilling set to suit different thicknesses of food.
ENGLISH 10.16 Rotitherm Roasting Food Shelf Position Quantity [kg] Temperature [°C] Time (min) 180 - 230 150 - 180 Beef: Pot roast 3 Beef: Topside beef or filler rare 3 per cm of thickness 190 - 200 5-6 Beef: Topside beef or filler medium 3 per cm of thickness 180 - 190 6-8 Beef: Topside beef or filler well done 3 per cm of thickness 170 - 180 8 - 10 Pork: Shoulder, neck, ham 2 1-1.5 160 - 180 90 - 120 Pork: Pork chop 2 1-1.5 160 - 180 60 - 90 Pork: Meatloaf 2 0.
www.aeg.com 10.17 Defrosting • Put the food out of the packaging and set it on a plate on the oven shelf. • Do not cover with a plate or bowl. This can extend the time to defrost very much. • Put the oven shelf in the first shelf level from the bottom. Type of food Shel f Time in minutes Final defrosting mins Comments Chicken, 1000 g 2 120-140 20-30 Place the chicken on an upturned saucer on a larger plate. Turn half way through. Meat, 1000g 2 100-140 20-30 Turn half way through.
ENGLISH • Set the oven temperature to 250 °C and let the oven operate for 1 hour. • Clean the oven cavity with a soft and damp sponge. WARNING! Do not attempt to clean the catalytic surface with oven sprays, abrasive cleaners, soap or other cleaning agents. This will damage the catalytic surface. 29 Discolouration of the catalytic surface has no effect on the catalytic properties. 11.2 Shelf supports You can remove the shelf supports to clean the side walls. Removing the shelf supports 1 1.
www.aeg.com 1 2 Removing the glass: 1. Open the door. 2. Push the door trim at both sides to release the clips. Refer to the picture. 3. Pull the door trim to the front to remove it. 4. Remove the glass panels. 1 To install panels, do the above steps in the opposite sequence. 11.4 Main oven 11.5 Cleaning the door glass panels The door glass on your product can be different in type and shape from the example you see in the diagram. The number of glasses can also be different. Removing the glass: 1.
ENGLISH • Remove the fuses in the fuse box or deactivate the circuit breaker. 2. 3. Put a cloth on the bottom of the oven to prevent damage to the oven light and glass cover. Replacing the oven lamp You can find the lamp glass cover at the back of the cavity. Turn the lamp glass cover counterclockwise to remove it. 1. 31 Clean the glass cover. Replace the oven lamp with an applicable 300 °C heat-resistant oven lamp. Use the same oven lamp type. 4. Install the glass cover. 12.
www.aeg.
ENGLISH Dimensions Depth 600 mm Top oven capacity 40 l Main oven capacity 74 l 13.2 Location of the appliance Dimension mm B 685 33 13.3 Levelling Use small feet on the bottom of appliance to set the appliance top surface level with other surfaces. You can install your freestanding appliance with cabinets on one or two sides and in the corner. B 13.4 The anti-tilt protection A A Minimum distances Dimension mm A 2 CAUTION! You must install the anti-tilt protection.
www.aeg.com 50 mm 1. 60 mm 60 mm 50 mm A A B 13.5 Electrical installation The manufacturer is not responsible if you do not follow the safety precautions from the chapter "Safety information". Set the correct height and area for the appliance before you attach the anti-tilt protection. 2. The anti-tilt protection has two parts (A+B). You can find the anti-tilt protection (B) on the right or left side of the rear wall of the appliance (See fig. 1).
ENGLISH 35 13.7 Terminal board Make sure that the links are fitted as shown. Do not remove blanking plates. L L N N N 14. GB IE GREAT BRITAIN & IRELAND - GUARANTEE/ CUSTOMER SERVICE 14.
www.aeg.com Customer Care.Please contact our Customer Care Department: Electrolux Major Appliances, Addington Way, Luton, Bedfordshire, LU4 9QQ or visit our website at www.electrolux.co.
ENGLISH 37 Belgique/België/Belgien +32 2 7162444 Raketstraat 40, 1130 Brussel/ Bruxelles Česká Republika +420 261 302 261 Budějovická 3, Praha 4, 140 21 Danmark +45 70 11 74 00 Strevelinsvej 38-40, 7000 Fredericia Deutschland +49 180 32 26 622 Fürther Str. 246, 90429 Nürnberg Eesti +37 2 66 50 030 Pärnu mnt. 153, 11624 Tallinn España +34 902 11 63 88 Carretera M-300, Km. 29,900 Alcalá de Henares Madrid France 08 92 68 24 33 (0.34€/min) www.electrolux.
www.aeg.com Slovenija +38 61 24 25 731 Gerbičeva ulica 110, 1000 Ljubl‐ jana Slovensko +421 2 32 14 13 34-5 Electrolux Slovakia s.r.o.
ENGLISH 39
892957317-A-442012 www.aeg.