Keraamiline pliit COMPETENCE 5120V-ma Kasutusjuhend
Lugege seda kasutusjuhendit hoolikalt enne pliidi esimest kasutamist, et saaksite teada praeahju kõikidest võimalustest ja omadustest. Erilist tähelepanu pöörake sümboliga tähistatud hoiatustele, mis sisaldavad kasutaja ohutuse ja seadme töökorras oleku seisukohast olulisi juhiseid. Hoidke kasutusjuhend alles võimaliku hilisema vajamineku puhuks ja andke see koos seadmega edasi järgmisele omanikule. Kasutusjuhendis on kõigepealt kirjeldatud uut pliiti üldiselt.
Sisu Lk nr Kasutajale Hea klient ................................................................................................................ 2 Ohutusnõuded ........................................................................................................ 5 Seadme kujutis ...................................................................................................... 7 Keraamiline keedupind .................................................................................. 7 Keedualad .....
Sisu Lk nr Praeahi ......................................................................................................... Küpsetustabel ..................................................................................... Toiduvalmistamistabel ........................................................................ Ahjuprae küpsetamise tabel ............................................................... Grillimistabel ....................................................................................
Ohutusnõuded Pliit on mõeldud normaalseks toiduvalmistamiseks ja küpsetamiseks koduses majapidamises. Lapsed Kui pliit töötab, hoidke lastel silm peal, kuna keedupind ja ahi kuumenevad kasutamise ajal. Need on kuumad ka mõnda aega pärast väljalülitamist. Ärge laske lastel mängida nuppudega, lülititega ega praeahju uksega. Kontrollige, kas ümbermineku tõkesti ja keedupinna kate (lisaseade) on õigesti paigaldatud ja et ahjuukse riiv töötab.
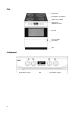
. Pliit Auruventiil Keraamiline keedupind Jääksoojuse näidik Nupud, kell (SMART-kontroll) Praeahi Transpordiriiv Hoiusahtel Alus Juhtpaneel Keedualade nupud 6 Kell Keedualade nupud
Keraamiline keedupind Praeahi Keraamilisel keedupinnal on neli keeduala. Kui lülitate keeduala sisse, on see erineva pikkusega perioodide jooksul valgustatud, sõltuvalt nupu keeramisega valitud võimsusest. Ülekuumenemise vältimiseks lülitub keeduala aegajalt välja, kuigi olete valinud suurima võimaliku võimsuse. Keedupinna klaas on tugev ja talub hästi nii kuuma, külma kui temperatuurimuutusi, kuid puruneb kergesti löögi tagajärjel.
Hoiusahtel Sahtli kohta leiate informatsiooni peatükis "Pliidi kasutamine". Sein Alus Aluse abil saab pliidi kõrgust reguleerida vahemikus 85 … 93,5 cm. Turvavarustus Pliidil on ümbermineku tõkesti, mis takistab pliidi ümberkukkumist normaalsest suurema koormuse tõttu, näiteks kui laps istub lahtise praeahjuukse peale. Ümberkukkumistõkesti Põrand Mööbel Sein Ümbermineku tõkesti töötab ainult siis, kui pliit on oma kohal ja mutter on kinni keeratud.
Enne pliidi esimest kasutamist Turvaluku sisselülitamine Lülitage turvalukk sisse, keerates näiteks mündiga väikest kruvi ukse siseküljel. Ukse avamisel lükake samaaegselt riivi vasakule. Pliit on mõeldud kasutamiseks vaid koduses majapidamises normaalseks toiduvalmistamiseks ja küpsetamiseks. Sees V Väljas Keraamilise pinna ettevalmistamine Enne esimest kasutamist tuleb keraamiline pind ette valmistada, et seda oleks kergem puhastada ja toit ei kõrbeks kõvasti kinni. Kella näit Toimige nii: 1.
Ahju kasutamiseelne kuumutamine 1. Vajutage nuppu . 2. Vajutage , kuni displeil on: 3. Jätke ahi kuumenema umbes tunniks ajaks. Käivitage ahjuventilaator või avage aken, et ruumi ventilatsioon oleks võimalikult hea. 4. Lülitage ahi välja, vajutades nuppu . 5. Jätke ahju uks lahti umbes kaheks tunniks ja tuulutage kööki. 6. Puhastage praeahju, praeahju ust ja tugireste sooja vee ja nõudepesemisvahendiga. Pühkige kuivaks. Ahi võib esimesel kasutuskorral veel lõhna/haisu tekitada.
Keedualad Soovitava võimsuse saate valida nuppude abil astmeteta vahemikus 1…12, kusjuures 12 on kõige kuumem. Valige alguses suurim temperatuur ja vähendage seda toiduvalmistamise ajal (vaadake Võimsustabelit). Topeltkeedualade valik Väike keeduala: keerake nupp soovitud asendisse (vaadake Võimsustabelit). Suur keeduala: keerake nuppu asendist "12" edasi nii palju kui annab. Seejärel valige soovitud võimsus (vaadake Võimsustabelit).
Keedualad suurusega 14 ja 18 cm sobivad hästi keetmiseks ja tavaliseks toiduvalmistamiseks. 21sentimeetrine keeduala sobib praadimiseks ja suurte koguste valmistamiseks. 12-sentimeetrine keeduala ei sobi keetmiseks, kuid seda võib kasutada rasva sulatamisel, hautamisel, kastmete ning muude toitude valmistamisel, mis ei pea kõvasti keema. Keedunõude valimine Keraamiline keedupind esitab keedunõudele suuremaid nõudmisi kui malmist keedualadega pliit.
Nõuandeid ja soovitusi keedualade kasutamisel Järgmised juhised aitavad kokku hoida energiat ja hõlbustavad puhastamist. Valige õige võimsus Valige alguses suurim võimsus. Kui toit hakkab keema, vähendage kuumust nii, et keemine kestab edasi. Kasutage tasapinnalise põhjaga keedunõusid. Energiakulu võib suureneda kuni 50%, kui keedunõu põhi on ebatasane. Keedunõu peab olema vähemalt sama suur kui keeduala – või natuke suurem. Suures nõus võib valmistada ka väikeses koguses toitu.
Kell Näit ja nupud VÄLJA LÜLITATUD SISSE LÜLITATUD Toimingu valiku nupp Vähenda Suurenda Praetermomeeter Valmistusaeg Lõpetamisaeg Munakell 14
Kella seadmine / kellaaja muutmine Näidik Näide: kell 17:00 1. Vajutage üheaegselt nuppe nupud lahti. ja . Laske 2. Seadke kell õigeks, vajutades nuppe ja . Viie sekundi möödudes lakkab kaksikpunkt vilkumast. 3. Ahi on kasutamiseks valmis. Munakell Näide: Etteantav aeg on 10 minutit. Käivitage munakell, vajutades nuppu . Vabastage nupp. Seadke aeg, vajutades nuppe ja . Kui etteantud aeg on läbi, kostab kolm lühikest helisignaali. Seejärel kostab veel lühikeste ajavahemike tagant üks helisignaal.
Näidik Temperatuuri seadmine 1. Vajutage nuppu õhk ja 175°C. . Ahju algseades on ringlev 2. Temperatuuri muutmiseks vajutage nuppe ja . Ahju käivitamisel ilmub näidikule 40°C. Kui ahju temperatuur tõuseb, hakkab näidik näitama ahju tegelikku temperatuuri. Kui etteantud temperatuur on saavutatud, kostub üks helisignaal. Kui soovite vähendada kuuma ahju temperatuuri, ei saa selle langemist vaadata näidikult. Näidik näitab vaid teie seatud madalamat temperatuuri.
Prae küpsetamise automaatika Näidik Näide: Te soovite valmistada ahjus praadi, mille sisetemperatuur peab olema 65°C. Prae valmistate ringleva õhuga ja 175°C juures. 1. Lükake praetermomeetri andur prae keskele. 2. Ühendage termomeeter ahju parempoolsel siseseinal asuvasse pistikusse. 3. Lülitage ahi tööle, vajutades nuppu . 4. Seadke ahju tegevus, vajutades nuppu . Seadke soovitav temperatuur nuppudega ja . 5. Seadke prae sisetemperatuur. Vajutage nuppu ja seejärel vabastage. 6.
Ahju automaatne väljalülitumine Näide: Te soovite valmistada toitu ringleva õhuga 175°C juures 30 minutit. Kell on 17.00. 1. Lülitage ahi tööle, vajutades nuppu . 2. Seadke ahju toiming, vajutades nuppu 3. Seadke soovitav temperatuur nuppudega . ja . 4. Valige küpsetamise kestus, vajutades nuppu . 5. Seadke soovitud küpsetamise kestus, vajutades nuppe ja . Kui etteantud küpsetamisaeg on möödas, kostub kolm lühikest helisignaali ja ahi lülitub välja.
1. Lülitage ahi tööle, vajutades nuppu . 2. Seadke ahju toiming, vajutades nuppu 3. Seadke soovitav temperatuur nuppudega . Näidik . ja 4. Valige küpsetamise kestus, vajutades nuppu . Seadke soovitud küpsetamise kestus, vajutades nuppe ja . . 5. Valige lõpetamise kellaaeg, vajutades nuppu Seadke soovitud lõpetamise kellaaeg, vajutades nuppe ja . Nüüd on ahi seatud käivituma automaatselt. Kui kell on 17.30, käivitub ahi automaatselt ringleva õhu reþ iimis temperatuuril 175°C.
Praeahi Ärge kunagi asetage fooliumi, küpsetusplaati ega ahjupanni vahetult praeahju põhjale. Ahju põhja email võib ülekuumenemise tõttu saada kahjustatud. Kasutamise käigus ahi kuumeneb. Hoidke lastel silm peal. Ringlev õhk Praeahju kuumutavad üla- ja alatakistid ning ventilaatori ümber olev takisti. Kuum õhk ringleb ahjus. Toidu valmistamisel ja küpsetamisel võib kasutada üheaegselt kahte küpsetusplaati, mis lühendab küpsetamisaega tervikuna.
Pitsa/pirukarežiim Selle režiimi korral on ühendatud tugev alumine kuumus ja madal ülemine kuumus. Tänu tugevale alumisele kuumusele küpsevad pitsade ja pirukate põhjad muredaks. Liivataignast pirukat küpsetades pole vaja põhja ette küpsetada. Madalam ülemine temperatuur küpsetab piruka pealmise kihi pehmeks, aga pruunikaks. Pitsa/pirukarežiimi kasutamisel tuleb praeahi eelnevalt kuumaks ajada. Ahi kuumeneb temperatuurini 200°C umbes 20 minutiga.
Küpsetustabel Ülemine/alumine kuumutus Ringlev õhk Küpsetamine Leivad Tumedad väikesed leivad 3 200 12-15 2+5 170-190 12-15 Heledad väikesed leivad 3 225 8-12 2+5 190-200 10-14 Kohevad leivapätsikesed, 1 190-200 35-40 1+4 175-185 40-45 vormileivad 1 175-200 50-60 1+4 160-185 60-75 2-3 200-225 10-15 2+5 170-190 15-20 Saiataignast küpsetised 3 210-225 8-10 2+5 180-190 10-15 Väikesed saiad 2 190-200 18-25 2 180-190 20-25 Suhkrukoogid 3 200 12-15 5+6 175-1
Toiduvalmistamistabel Toidu valmistamine Kala, keetmine Kala, küpsetamine Lihatäidis (hakkliha) Gratiinid Maksapasteet Pitsa Pirukad Lasanja Kartuligratiinid 1-2 1-2 3-4 2-3 2-3 3-4 3-4 3-4 3-4 170-180 190-210 190-210 190-210 190-210 210-235 210-235 210-235 210-235 ** ** 50-65 50-65 50-65 30-40 35-45 50-60 65-70 Kui valmistate toitu kahe küpsetusrestiga, valige tugiresti vahed 1+4 või 2+5. ** Praeahjus keedetava või küpsetatava kala valmistamise aeg sõltub kala paksusest.
Praetermomeetri kasutamine Parima lõpptulemuse saamiseks peab praetermomeetri ots olema prae kõige paksemas kohas. Ots ei tohi olla vastu luud ega rasva, mis muudaks praetermomeetri näidu valeks. Praetermomeetri tervik tuleb prae sisse vajutada üleni, et ahju sisetemperatuur ei mõjutaks mõõtmistulemust. Kui seatud temperatuur on saavutatud, võtke praad ahjust välja, pakkige fooliumisse ja laske seista umbes 15 minutit. Siis on praadi kergem lõigata ja liha seest tilgub vähem mahla.
Ahjuprae küpsetamise tabel Küpsetamine Tavaline Ringlev õhk Küpsetamine unnu Loomalihapraad, keskmine 2 55-60 70-85 125 120 Loomalihapraad, küpse 2 65 85-100 125 120 Põrsapraad 2 70-75 100-110 125 120 Sea seljapraad kontidega 1-2 80 90-105 170 160 Küpsetatud ribi, paks 1-2 85 105 170 160 Värskelt soolatud sink 2 90 175 165 Lamba/vasikapraad, 2 73-75 60-70 170 160 keskmine Lamba/vasikapraad, küpse 2 70 90 170 160 Kana, tükkidena 1-2 75 105 170 160 Kalkun, tervelt, 3 45 200 175 täidetud 1-2 50 160 150 Kalkun
Kala ja valge liha (linnud, vasikas, põrsas) ei pruunistu nii kergesti kui punane liha (veis, ulukid). Grillimistabel Grillimine 1. pool Põrsaribi Lambaribi T-kondiga biifsteek Kana, tükkidena Grillvorst Grillribi (eelnevalt 20 minutit keedetud) Kala (tursk või lõhe tükkidena) Röstitud leib 3-4 3-4 2-3 2-3 3-4 250 250 250 250 250 2.
Nõuandeid ja soovitusi ahju kasutamisel Küpsetamine Kui võtate kasutusele uue praeahju, täpsustage küpsetusaegu. Mõnedes vanemates toiduretseptides antud temperatuurid võivad olla liiga kõrged, kuna tänapäevased ahjud küpsetavad madalama temperatuuri juures. Kui küpsetamisaeg on liiga lühike, kasutage madalamat temperatuuri. Liiga kõrge temperatuuri juures ei küpse toit ühtlaselt. Ringlev õhk Kasutage ära kogu praeahju maht, valmistades toitu mitmel küpsetusplaadil/ ahjurestil korraga.
Tuulutamine Iga kasutuskorra järel tuleb praeahju uks jätta praokile, kuna muidu võib ahju tekkida niiskus. Toimige nii: 1. Avage praeahju uks ja tõstke üles riivid (2 tk). 2. Sulgege ust niipalju, kuni riiv selle peatab. Jätke praeahju uks sellesse asendisse niikauaks, kuni ahi on jahtunud. Hoiusahtel Hoiusahtel on mõeldud ahju lisavarustuse hoidmiseks.
Hooldus ja puhastamine Keraamiline keedupind Ümbermineku tõkesti toimib ainult siis, kui pliit on kohale lükatud ja mutter kinni keeratud. Pidage seda meeles, kui nihutate pliiti, et selle tagant koristada. Hügieenilistel põhjustel ja ohutuse tagamiseks hoidke keedupind ja ahi puhtad. Rasva- ja muud pritsmed lähevad pliidi kuumutamisel kõrbema ja halvimal juhul tekitavad tuleohtliku olukorra. Roostevabast terasest pinnad Pühkige puhastatavat pinda iga päev niisutatud puhastuslapiga.
Praeahi Praeahju puhastamisel on soovitav eemaldada tugirestid. Ahju siseseinad, lagi ja tagasein on katalüüsemailist, mis temperatuuril üle 200°C puhastub mingil määral ise. Kui olete valmistanud palju toitu madalal temperatuuril ja ahjus on palju rasvapritsmeid, kasutage puhastusrezhiimi. Toimige järgnevalt: 1. Lülitage ahi tööle, vajutades nuppu . 2. Puhastamise valimiseks vajutage nuppu kuus (6) korda. Ahju temperatuur tõuseb automaatselt 300 kraadini. Temperatuuri ei saa muuta.
Enne puhastustoimingu käivitamist eemaldage suuremad ülekeemisplekid ja rasvapritsmed. Toimige järgnevalt: 1. Eemaldage kõigepealt võimalikult palju kinnijäänud pritsmeid puitkaabitsaga. 2. Niisutage ahju sise- ja tagaseina sooja veega, millesse on segatud palju nõudepesuvahendit. Kasutage selleks pehmet käsna või harja. 3. Hõõruge tugevalt. Laske pesemisvahendil umbes tund aega mõjuda. 4. Käivitage puhastustoiming. Kui puhastus on lõppenud, võib ahju põhjal olla söetolmu, mis on põlenud mustuse jäänused.
Ringleva õhu ventilaator Liha küpsetamisel võib pritsiv rasv määrida ventilaatori. Kontrollige ja vajadusel puhastage ventilaatorit iga kuu. Ohutuse tagamiseks lülitage ahju toitepinge välja. Keerake kork välja. Ventilaator eemaldage järgnevalt: 1. Avage ahjuuks. 2. Keerake vedrulukku (1), kuni kaitseplaat tuleb tagaseinast lahti. 3. Tõstke kaitseplaat õõnsustest (2) välja. 4. Ventilaatorit kinnitav mutril on vasakpoolne keere. 5. Hoidke käega ventilaatorit kinni. 6.
Ukse keskmine klaas 1. Võtke kinni klaasi kummaski servas asuvatest vedrudest. 2. Tõstke klaas ära. Ukse välimine klaas 1. Asetage ahjuuks lauale. 2. Võtke kinni ahjuukse raamist ja vajutage klaas ettevaatlikult raamist välja. Klaaside puhastamine Puhastage klaasid märja lapi ja nõudepesuvahendiga. Pühkige kuivaks. Klaase võib pesta ka aknapesuvahendiga. Kui klaasid on väga mustad, toimige järgnevalt: 1. Laotage vee ja nõudepesuvahendiga märjaks kastetud lapp tunniks ajaks klaasi peale. 2.
Ahju lambi vahetamine Ohutuse tagamiseks tuleb ahi vooluvõrgust välja lülitada. Keerake kaitsekork välja. Kontrollige ka seda, et ahi ei oleks kuum. Külgseina lamp 1. Eemaldage tugirestid. 2. Eemaldage ettevaatlikult kaitseklaas, lükates näiteks noa klaasi ja ahju seina vahele (vaadake joonist 1). 3. Võtke katkine pirn ära. 4. Pange asemele uus E-14 sokliga pirn, millel on märgistus 230-240 V, 15W, 300°C. 5. Puhastage lambi kaitseklaas, kuivatage hoolikalt ja pange kohale tagasi. Ahju laelamp 1.
Hoiusahtel Hoiusahtlit on lihtsam puhastada, kui see välja võtta. Toimige järgnevalt: 1. Avage sahtel. 2. Tõmmake seda välja, kuni see peatub. 3. Tõstke sahtlit kaldu ülespoole ja tõmmake see välja. Puhastage sahtlit lapi, sooja vee ja nõudepesuvahendiga. Enne sahtli kohale tagasipanemist kontrollige, kas see on kuiv. Sahtel pange tagasi järgnevalt: 1. Hoidke sahtlit kaldasendis, nagu pildil näidatud. 2. Asetage sahtli rattad juhtrelssidele ja lükake sahtel kohale.
Tehnilised andmed Mudel 5120V-ma Pliit Mõõtmed: Laius 60 cm Sügavus 60 cm Kõrgus 85…93,5 cm Kaal 60 kg Koguvõimsus 11,0 kW Keedualad Mõõdud/võimsus: Vasakul ees 14/21 cm 2200 W Vasakul taga 14/18 cm 1700 W Paremal taga 17/26 cm 2200 W Paremal ees 14 cm 1200 W Praeahi Maht 57 liitrit/bruto Võimsus Ülemine/alumine kuumutus 2000 W Ringlev õhk 3650 W Infratermiline grill 2300 W Grillimine 2300 W Pitsa/pirukarežiim 1850 W Röstimine 2000 W Alumine kuumutus 1300 W Sulatamine 1350 W Praeahju lam
Paigaldamine Aluse kõrguse seadmine Pliidi tarnitakse nii, et töötasapind on seatud kõige madalamasse asendisse, kõrgusele 85 cm. Kõrgust saab muuta vahemikus 85…93,5 cm. Pliidi seesmises aluses on viis auku. Aukude abil saab kõrgust muuta 85 – 86,5 – 87,5 – 88,5 – 91 cm. Pliidi seadmiseks kõrgusele 93,5 cm keerake aluse esiküljel asuvaid rattaid ja reguleeritavaid jalgu, mida kasutatakse pliidi loodimisel horisontaalasendisse. Toimige järgnevalt: 1. Laske pliit ettevaatlikult tagaküljele.
Loodimine horisontaalasendisse Pliit paigaldamiseks horisontaalasendisse kasutatakse vaaderpassi. Asetage vaaderpass pliidi pealispinna servadele (esiservale, külgedele, tagaservale). Reguleerimine teostatakse pliidi rataste ja reguleeritavate jalgade abil. Rattad on pliidi tagumiste nurkade all. Neid saab reguleerida aluse esiküljelt astmeteta (sujuvalt), lükates kruvikeeraja aluse avadesse. Jalgu reguleeritakse käsitsi.
Kui pliit ei tööta Lahendusi kasutamisega seotud probleemidele Probleem Põhjus - Parandamine Leivad, saiad, pehmed koogid ei kerki. Liiga madal temperatuur. Küpsetised alguses küll kerkivad, kuid vajuvad siis tagasi. Tõstke temperatuuri. Olete kasutanud liiga vähe pärmi või küpsetuspulbrit. Leiva/saia tainas ei ole korralikult kerkinud. Liiga pikk järelkergitamine jätab küpsetised lamedateks. Rasv/vedelik on olnud liiga kuum. Vedeliku temperatuur toorpärmile peab olema 37°C ja kuivpärmile 45…50°C.
Lahendusi tehnilistele probleemidele Probleem Põhjus - Parandamine Pliit/praeahi ei tööta. Kontrollige, kas olete pliidi sisse lülitanud. Kontrollige korteri/maja kaitsmeid. Kontrollige pliidi kaitsmeid. Tähelepanu! Kaitsmeid on 3 tk. Praeahi ei lähe piisavalt kiiresti kuumaks. Tavalise ahju kuumenemisaeg temperatuurini 200°C on 13 minutit. Ringleva õhu kasutamisel on ahju kuumenemisaeg temperatuurini 200°C 7 minutit. Keedupind läheb kuumaks. Keedupind tohib kuumeneda temperatuurini 80°C.
ELECTROLUX EESTI AS GARANTIIREMONDI EESKIRJAD Kõikidele Electrolux Eesti AS poolt Eestisse toodud profi- ja kodumasinatele kehtib garantiiaeg 12 kuud arvestades toodete üleandmist ostjale (arve-saateleht), kodumasinatele - müügipäevast (ostukviitung). Vahetult enne garantiiaja lõppu remonditud toodetele pikeneb garantiiaeg sama vea esinemise puhul lisaks 31 päeva. Garantiiremondi sisuks on: ∗ toote varjatud konstruktsiooni-, valmistamis- ja toorainedefektide avastamine ning nende likvideerimine.
tööseisak ületab 7 tööpäeva, on kliendil õigus nõuda garantiiaja pikendamist vastavalt seisakule täisnädalates, kuid summaarselt mitte rohkem kui kuu võrra. Kui on tegemist kodumasina garantii alla kuuluva suure ulatusega veaga või ühe kodumasina korduva garantiiremondiga, siis on ostjal õigus nõuda toote ümbervahetamist või tagasivõtmist. Toote tagasivõtmisel hüvitatakse ostjale toote müügihind, millest on maha arvestatud toote tegelik kulumine kasutamise ajal. Garantiiremont on kliendile tasuta.
Electrolux Eesti AS volitatud teenindajad: Tallinn, Harjumaa E-LUX Kodutehnika Mustamäe tee 24, 10621 TALLINN Tel. 6650090 Fax 6650076 OÜ GASPRE Õle 27, Tallinn Gaasiseadmed, remont ja müük Tel. 6507580 Fax 6507589 Lääne-Virumaa FIE JÜRI NIRGI Tedre 11, RAKVERE Kodumasinad Tel. 032 40472, 051 75742 Ida-Virumaa OÜ SIPELGAS MAURINTE Tallinna mnt. 6a 19, NARVA Kodumasinad Tel. 035 60708, 056 486164 OÜ ALBAVIS PRO Pikk 11 – 4, KOHTLAJÄRVE Töökoda: Ritsika 20-1, VanaAhtme Kodumasinad Tel.