MSS 5572 Bedienungsanleitung/ Garantie Gebruiksaanwijzing • Mode d’emploi • Instrucciones de servicio Manual de instruções • Istruzioni per l’uso • Instruction Manual Instrukcja obsługi/Gwarancja • Használati utasítás Інструкція з експлуатації • Руководство по эксплуатации Messer- und Scherenschleifer Messen- en scharenslijper • Aiguiseur à couteaux et à ciseaux Afilador de cuchillos y de tijeras • Amolador de facas e tesouras Affilacoltelli e forbici • Knife and Scissor Grinder Ostrzałka do noży i nożycze
Inhalt English Contents Українська Page Overview of the Components................ 3 Instruction Manual.........42 Technical Data..................46 Strona Przegląd elementów obłsugi................................... 3 Instrukcja obsługi............48 Dane techniczne..............52 Ogólne warunki gwarancji............................52 Magyarul Tartalom сторінка Огляд елементів управління.................... 3 Інструкція з експлуатації................ 59 Технічні параметри....
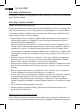
Übersicht der Bedienelemente Overzicht van de bedieningselementen Liste des différents éléments de commande Indicación de los elementos de manejo Descrição dos elementos Elementi di comando Overview of the Components Przegląd elementów obłsugi A kezelőelemek áttekintése Огляд елементів управління Обзор деталей прибора
2 English Instruction Manual Thank you for choosing our product. We hope you will enjoy using the appliance. Safety instructions General Safety Instructions Read the operating instructions carefully before putting the appliance into operation and keep the instructions including the warranty, the receipt and, if possible, the box with the internal packing. If you give this device to other people, please also pass on the operating instructions.
English 43 NOTE: This highlights tips and information. Children and Frail Individuals • In order to ensure your children’s safety, please keep all packaging (plastic bags, boxes, polystyrene etc.) out of their reach.
44 English Power supply • Insert the mains plug into a correctly installed 230 V, 50 Hz power socket. Ensure that the voltage is the same as that indicated on the model identification plate. Switching on To start the device, press the on/off button. NOTE: For safety reasons the device only runs for as long as you press the switch. Stopping Operation • After use remove the plug from the socket. Sharpening NOTE: • Only light pressure should be applied to the grinding stone of the device.
English 45 NOTE: Serrated knives are only sharpened from one side. 1. Turn the guide cap with the symbol “knives with serrated blades” as far as the dot on the device 2. Insert the teeth of the knife into the guide mechanism and sharpen them on the grinding stone. Then proceed as described under points 3 to 5 in the “Kitchen Knives” section. Scissors 1. Open the blades of the scissors completely. 2. Hold the housing in your hand so that you can press the on/off button with your thumb. 3.
46 English Cleaning ► ► ► ► WARNING: Remove the mains plug from the socket. Under no circumstances should you place the device in water for cleaning. Otherwise this might result in an electric shock or fire. CAUTION: Do not use a wire brush or any abrasive items. Do not use any acidic or abrasive detergents. • The housing of the knife grinder should be cleaned on the outside with a slightly damp cloth. • The guide cap can be removed from the housing for cleaning purposes.
English 47 Disposal- Meaning of the “Dustbin” Symbol Protect our environment: do not dispose of electrical equipment in the domestic waste. Please return any electrical equipment that you will no longer use to the collection points provided for their disposal. This helps avoid the potential effects of incorrect disposal on the environment and human health. This will contribute to the recycling and other forms of reutilisation of electrical and electronic equipment.
48 Język polski Instrukcja użytkowania Dziękujemy za wybór naszego produktu. Mamy nadzieję, że korzystanie z urządzenia sprawi Państwu radość. Instrukcje bezpieczeństwa Ogólne wskazówki bezpieczeństwa Przed uruchomieniem urządzenia proszę bardzo dokładnie przeczytać instrukcję obsługi. Proszę zachować ją wraz z kartą gwarancyjną, paragonem i w miarę możliwości również kartonem z opakowaniem wewnętrznym. Przekazując urządzenie innej osobie, oddaj jej także instrukcję obsługi.
Język polski 49 OSTRZEŻENIE: Ostrzega przed zagrożeniami dla zdrowia i wskazuje na potencjalne ryzyka obrażeń. UWAGA: Wskazuje na potencjalne zagrożenia dla urządzenia lub innych przedmiotów. WSKAZÓWKA: Wyróżnia porady i informacje ważne dla użytkownika. Dzieci i osoby niepełnosprawne • Dla bezpieczeństwa dzieci proszę nie zostawiać swobodnie dostępnych części opakowania (torby plastikowe, kartony, styropian itp.). OSTRZEŻENIE: Uwaga! Nie pozwalaj dzieciom bawić się folią.
50 Język polski Uruchomienie Przed pierwszym uruchomieniem • Ostrożnie rozpakuj urządzenie i usuń wszystkie materiały opakowaniowe. • Proszę wybrać odpowiednie miejsce dla urządzenia, najlepiej suchą, płaską, bezpoślizgową powierzchnię, na której łatwo będzie Państwu obsługiwać urządzenie. Zasilanie prądem • Wtyczkę sieciową proszę włożyć do przepisowo zainstalowanego gniazdka ze stykiem uziemiającym na 230 V, 50 Hz.
Język polski 51 4. Naostrz 4-5 razy prawą stronę noża w prawej prowadnicy a lewą w lewej prowadnicy. 5. Aby zakończyć ostrzenie, puść przycisk włącznika i wyciągnij wtyczkę sieciową z gniazda. Noże ze szlifem falistym Ustaw urządzenie na równej powierzchni i trzymaj urządzenie ręką tak, aby przycisk można było włączać kciukiem. WSKAZÓWKA: Ząbkowane noże naostrzone są tylko z jednej strony. 1. Obróć głowicę prowadzącą z symbolem „Nóż ze szlifem falistym” do punktu widocznego na urządzeniu. 2.
52 Język polski Czyszczenie ► ► ► ► OSTRZEŻENIE: Wyjąć wtyczkę z gniazdka. Urządzenia nie wolno do czyszczenia zanurzać w wodzie. Może to doprowadzić do porażenia elektrycznego lub pożaru. UWAGA: Nie używaj szczotki drucianej ani innych podobnych przed-miotów. Nie używaj ostrych lub ściernych środków czyszczących. • Obudowę ostrzałki czyść zewnętrznie lekko zwilżoną ściereczką. • Do czyszczenia można zdjąć z obudowy kołpak prowadnic.
Język polski 53 Gwarancją nie są objęte uszkodzenia mechaniczne, chemiczne, termiczne, powstałe w wyniku działania sił zewnętrznych (np. przepięcie w sieci energetycznej czy wyładowania atmosferyczne), jak również wady powstałe w wyniku obsługi niezgodnej z instrukcją obsługi urządzenia.
54 Magyarul Használati útmutató Köszönjük, hogy a termékünket választotta. Reméljük, elégedetten használja majd a készüléket. Biztonsági utasítások Általános biztonsági rendszabályok A készülék használatba vétele előtt gondosan olvassa végig a használati utasítást, és őrizze meg a garancialevéllel, a pénztári nyugtával és lehetőleg a csomagolókartonnal, ill. az abban lévő bélésanyaggal együtt! Amenynyiben a készüléket harmadik személynek adja tovább, a használati útmutatót is adja a készülékhez.
Magyarul 55 VIGYÁZAT: Lehetéges veszélyre utal, mely a készülékben vagy más tárgyakban kárt tehet. MEGJEGYZÉS: Tippeket és információkat emel ki. Gyermekek és legyengült személyek • Gyermekei biztonsága érdekében ne hagyja általuk elérhető helyen a csomagolóelemeket (műanyag zacskó, karton, sztiropor stb.). FIGYELMEZTETÉS: Kisgyermekeket ne engedjen a fóliával játszani.
56 Magyarul Áramellátás • Dugja a hálózati csatlakozó dugaszt előírásszerűen szerelt, 230 V, 50 Hz-es földelt konnektorba! Ügyeljen rá, hogy a hálózati feszültség egyezzen a típuscímke adataival! Bekapcsolás A készülék indításához nyomja meg a Ki-/bekapcsoló gombot. MEGJEGYZÉS: Biztonsági okokból a készülék csak akkor működik, ha lenyomva tartja a kapcsolót. Az üzemeltetés befejezése • Használat után húzza ki a csatlakozót a konnektorból.
Magyarul 57 MEGJEGYZÉS: A fűrészélű késeknek csak az egyik oldalát lehet megélezni. 1. Fordítsa el a „Hullámos kések“ jelű vezetőfedelet a készüléken lévő pontra. 2. Helyezze be a kés egyes fogazatát a vezetésbe és dolgozza meg a köszörűkövön. A továbbiakban a “Konyhai kés” fejezet 3-5. pontjában leírtak szerint járjon el. Ollók 1. Teljesen nyissa ki az olló szárait. 2. Fogja a házat oly módon a kezébe, hogy a hüvelykujjával elérje a ki-/bekap-csoló gombot. 3.
58 ► ► Magyarul VIGYÁZAT: Ne használjon drótkefét vagy más súroló hatású tárgyat. Ne használjon agresszív vagy súroló hatású tisztítószert. • A késélező házát kívülről benedvesített kendővel törölheti tisztára. • A vezető fedelét tisztításkor le lehet húzni. Eltávolításához addig csavarjuk, amíg a jel egy vonalba kerül a készüléken található ponttal. • Mossa el a fedelet folyó víz alatt és szárítsa meg. • Visszatenni éppen ellenkező irányban kell, ezután pedig csavarja vissza erősen.
Українська 59 Посібник користувача Дякуємо, що вибрали наш виріб. Сподіваємось, що ви будете задоволені його можливостями. Вказівки з безпеки Загальні вказівки щодо безпеки Перед прийняттям в експлуатацію цього приладу дуже уважно читайте інструкцію з експлуатації та зберігайте її разом з гарантійним талоном, касовим чеком та, по мірі можливості, з картонною коробкою і внутрішньою упаковкою. У разі, що прилад буде передано третім особам, слід передавати його разом з цією інструкцією з експлуатації.
60 Українська Символи в цій інструкції з експлуатації Важливі вказівки для Вашої безпеки спеціально відмічені. Для запобігання нещасних випадків та пошкоджень приладу обов’язково притримуйтесь цих вказівок. ПОПЕРЕДЖЕННЯ. Попереджує про загрози для Вашого здоров’я та вказує на можливі ризики травм. УВАГА. Вказує на можливі загрози для приладу або інших предметів. ПРИМІТКА. Виділяє підказки та інформацію для Вас.
Українська 4 5 6 7 61 Напрямна для ножівз хвилястим лезом Напрямна для великої/маленької викрутки Напрямна для кухонних ножів Клавіша вмикання/вимикання Введення в експлуатацію Перед першим використанням • Обережно розпакуйте прилад і зніміть всі пакувальні матеріали. • Виберіть придатне місце для розташування приладу. Придатною буде суха, полога, нековзка поверхня, на якій ним можна добре користуватися.
62 Українська 1. Крутіть напрямний ковпак із символом “ніж” до точки на приладі. 2. Натисніть клавішу вмикання/вимикання. Клавішу треба тримати в цій позиції. 3. Покладіть лезо ножа або у праву або у ліву напрямну леза та тягніть ніж рівно-мірно на себе. 4. Заточуйте правий бік леза 4-5 разів на правій напрямній, а лівий бік на лівій. 5. Для припинення експлуатації, відпустіть клавішу вмикання/вимикання і витягніть вилку із розетки.
Українська 63 3. Натисніть кнопку увімкнення/вимкнення. Кнопку слід утримувати натиснутою в цьому положенні. УВАГА. Використовуйте прилад максимум 3 хвилини. Перед повторним використанням дайте йому 30 хвилин на охолодження. Пристрій для намотки кабеля живлення від мережі Намотати кабель живлення від мережі можна на основу приладу. Очищення ► ► ► ► ПОПЕРЕДЖЕННЯ. Витягніть штепсельну вилку з штепсельної розетки. В жодному разі не опускайте прилад для очищення в воду.
64 Українська Технічні параметри Модель:............................................................................................MSS 5572 Подання живлення:...................................................................230 В ~ 50 Гц Споживання потужності:........................................................................ 60 Вт Короткочасний режим:.........................................................................3 хвил Ггрупа електробезпечності:............................................
Русский 65 Руководство по эксплуатации Спасибо за выбор нашего продукта. Надеемся, он вам понравится. Указания по технике безопасности Общие указания по технике безопасности Перед началом эксплуатации прибора внимательно прочитайте прилагаемую инструкцию по эксплуатации и сохраните ее в надежном месте, вместе с гарантийным талоном, кассовым чеком и, по возможности, картонной коробкой с упаковочным материалом.
66 Русский Символы применяемые в данном руководстве пользователя Важные рекомендации для обеспечения вашей безопасности обозначены по особенному. Обязательно следуйте этим рекомендациям, чтобы преотвратить несчастный случай или поломку изделия: ПРЕДУПРЕЖДЕНИЕ: Предупреждает об опасности для здоровья и возможном риске получения травмы. ВНИМАНИЕ: Указывает на возможную опасность для изделия и других окружающих предметов. ПРИМЕЧАНИЯ: Дает советы и информацию.
Русский 67 Обзор деталей прибора 1 2 3 4 5 6 7 Корпус Направляющая крышка Направляющая для ножниц Прорезь для ножас волнообразным лезвием Направляющая для большой/маленькой отвертки Направляющая для кухонных ножей Кнопка включения/выключения Ввод в эксплуатацию Перед первым вводом в эксплуатацию • Осторожно извлеките точилку из упаковки и удалите упаковочные материалы. • Подберите подходящее место для установки магнитолы.
68 Русский Заточка ПРИМЕЧАНИЯ: • На точильный камень надавливайте только слегка. Иначе может заблокироваться мотор. • В случае необходимости уменьшите силу давления. Кухонные ножи Установите точилку на ровную поверхность и удерживайте её корпус в руке таким образом, чтобы Вы могли нажимать на кнопку большим пальцем. 1. Поверните направляющюю крышку таким образом, чтобы символ “Нож” совпал с белой отметкой на приборе. 2. Нажмите на кнопку включения/выключения и удерживайте её в нажатом положении. 3.
Русский 69 Ножницы 1. Полностью раскройте лезвия ножниц. 2. Удерживайте корпус точилки в руке таким образом, чтобы Вы могли нажимать на кнопку большим пальцем. 3. Поверните направляющюю крышку таким образом, чтобы символ “Ножницы” совпал с белой отметкой на приборе. 4. Вложите лезвия по одному в прорезь для ножниц и проведите ножницами с равномерной скоростью по направлению к себе. Дальше действуйте также как это указано в разделе “Кухонные ножи”.
70 Русский • Корпус точилки для ножей протирайте снаружи влажной салфеткой. • Направляющую крышку для очистки от загрязнений можно снять с корпуса точилки. Для этого поворачивайте направляющую крышку до тех пор, пока символ не окажется напротив точки на корпусе точилки. • Промойте крышку под струёй воды и вытрите её насухо. • Установите крышку на место в обратной последовательности, а затем снова плотно зажмите её. Технические данные Модель:................................................................
MSS 5572 GARANTIE-KARTE Garantiebewijs • Carte de garantie Certifi cato di garanzia • Tarjeta de garantia Cartão de garantia • Guarantee card Karta gwarancyjna • Záruční list • Garancia lap Гарантійний талон • Гарантийная карточка MSS 5572 24 Monate Garantie gemäß Garantie-Erklärung • 24 maanden garantie overeenkomstig schriftelijke garantie • 24 mois de garantie conformément à la déclaration de garantie • 24 meses de garantie según la declaratión de garantía • 24 meses de garantia, conforme a declaração