
Owner manual


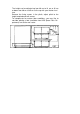
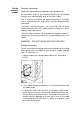

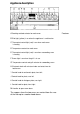
Table Of Contents
- Congratulations!
- Contents
- Appliance description
- First use
- Operating the electronic timer
- The Hob
- General - the correct pans
- Ovens
- Conventional electric cooking
- Hot air cooking
- Rotitherrn roastlng/grilllng
- Grilling
- Oven Interior Light Switching
- Secondary oven @
- Main oven Q
- Bakeware
- Baking on one level provides the best results in the conventional mode.
- Baking times and temperatures
- Recommendations
- Baking times and temperatures
- Baking on one or more levels
- Cooking method
- Roasting and stewing
- Ovenware
- Cleaning and care
- Boiled over food
- Sugar and foodstuffs containing sugar - Plastic materials
- Stains
- Recommended Cleaners
- These instructions refer to a large range of AEG double and single ovens.
- Before cleaning the ovens
- Cleaning
- Do not use any detergents, abrasives or oven cleaners on catalytic liners.
- Warning! Isolate the oven from supply before replacing the oven lamp(s).
- Optional extras
- What to do if... (something goes wrong?)
- Service
- KD - ... /

For the
electrical
installer
Electrical connection
Local and national electrical regulations must be observed.
All instructions given by the Electricity Board must be followed
carefully when connecting the oven to the mains supply,
This is a job for a qualified and approved electrician. The appli-
ance is rated for 240 volts single phase and must be permanently
connected.
The cooker must be installed in such a way that it can be easily
disconnected from the mains supply before servicing, e.g., by an
adjacent cooker oontrol unit.
Sufficient cable should be iett to enable the appliance to be re
moved from the housing unit whilst still connected to the mains
supply.
WARNING - THIS APPLIANCE MUST BE EARTHED!
Voltage and current
Please ensure that the voltage and current indicated on the rating
plate agrees with the voltage of your electricity supply, 220-240
volts i.e., 220-240 V a.c.
1, Open the cover of the terminal box sideways as illustrated in
fig. G, ' -
2. Pass cable through the grommet in the lower back panel and
the cable clamp.
3. Connect the wires to the terminals in accordance with the dia
gram. Ensure that links are correctly positioned between ter
minals (5 or 6 way terminal block). The length of the earth con
ductor must be adequate to ensure that in case of the cable
clamp breaking the earth wire is subject to mechanic strain
only after the live wires.