COMPETENCE 5210 V Free-Standing Slot-in Electric Cooker Instruction Book
Congratulations! You are now the owner of a high quality, efficient and exciting cooking applianoe. From nowon cooking should not only be made easier, but we believe you wili find the new cooker a joy to use. The cooker will pro vide you with very good cooking results, is easy to use and main tain, if you take a little time to study the information contained in the instruction booklet, as well as In the lead-in pages of the ac companying recipe book.
Contents Safety instructions 4-7 For the installer For the user 8 Appliance description Features 9 First use Operating the controls Switching on the electronic timer Precleaning the ovens Operating the eiectronic timer for both ovens 10 11 11 12-15 Hob Features Vapour Vent General Operating the plates , 16 16 17 18-^1 How to use the ovens General How to use the cooking functions for the ovens Fat lilter Switching on and off Baking Roasting and stewing Grilling Specialised applications of the hot
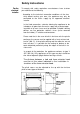
Safety Instructions For the electrical installer To comply with safety regulations manufacturers have to draw your attention to the following: - According to the technical connection conditions of the elec tricity board serving your area, the appliance may only be connected to the mains supply by an approved electrical installer. In the fixed connection, a device allowing the appliance to be isolated on ail poles from the mains supply with a contact open ing width of at least 3 mm must be provided.
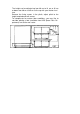
The height can be adjusted up Irom 90 cm to 91 cm or 92 cm or down from 90 cm to 85 cm to line up with your kitchen furni ture. Remove the fixing screws in the plinth, adjust plinth to the height required and refit screws. To compensate for uneven floor conditions, you may like to consider placing a foot (available from AEG Spare Parts De partment) next to the rear castor.
For the electrical installer Electrical connection Local and national electrical regulations must be observed. All instructions given by the Electricity Board must be followed carefully when connecting the oven to the mains supply, This is a job for a qualified and approved electrician. The appliance is rated for 240 volts single phase and must be permanently connected. The cooker must be installed in such a way that it can be easily disconnected from the mains supply before servicing, e.g.
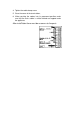
4. Tighten the cable damp screw. 5. Close the cover of the terminal box, 6. When pushing the cooker into its permanent position make sure that the mains cable is neither kinked nor trapped under the appliance.
Safety Instructions For the - When you use the appliance to prepare your food, the user oven doors and cooking plates become hot. Therefore keep small children well away from the appliance. This especially applies when you are grilling or pyrolyticaiiy cleaning the oven (where applicable). - Overheated fat and cooking oil may ignite. Prepare foods re quiring fat or oil (chips) only under constant supervision. - Do not use the appliance to heat your room.
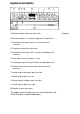
Appliance description A Cooking method selector for main oven B Pilot light (yellow) is on when the appliance is switched on C Thermostat control light (red) Is on when main oven is heating D Temperature control tor main oven E Thermostat control light (red) is on when secondary oven is heating F Green light is on when the grill is in use G Temperature control and grill selector for secondary oven H Electronic dock with minute minder and auto-timer for both ovens 1 Control knob for auftomatlc plate, fro
First use operating The control knobs A, J, K and L can be turned clockwise or antitKe control clockwise to any position, For further information to this can be knobs found in die "hob” and “oven” sections. However, the oven temperature control knobs D and G and also the control tor the automatic plate I must be turned clockwise to switch on and anti^clockwise to switch off.
As soon as the appliance is connected to the mains supply (and also after a power cut), the indicator in the electronic timer flashes |jM]rg|, Switching on the electronic tinier When you have set the correct time of day the appliance is ready to operate. Press knob E to release. {This does not apply to appliances with an enamelled control panel.) When finished with knob E press to retract. (This does not apply to appliances with an enamelled control panel).
Operating the electronic timer Setting the minute minder Press button A [o), hold It in position and set the required time with knob E l^, The duration appears in display F. The time of day reappears in display F after release of button A, To check the cooking time, press button A [o). The remaining cooking time now appears in display F.
The electronic timer is designed to switch the oven on and off automaticaiiy.
BCDE 462 How to programme the oven to switch off automatically Select the cooking method and temperature as required. Press button B hold it depressed, and enter the required duration with knob E [^, The cooking duration appears in dis play F and symbol H is illuminated. When button B is released the time of day appears in display F. Symbol @ shows throughout time controlled cooking.
ВСDE 462 Set the cooking method selector and temperature control as required. Press button B 0, hold it depressed and enter the required duration with knob E [^, and then, by pressing button C 0, set the cooking end time. When buttons B 0 and C 0 are released, the time of day re appears in display F Symbol 0 is illuminated. The oven switches on automaticatty at the correct time, having deducted the cooking duration from the cooking end. It then switches off automatically at the cooking end.
The Hob Ceramic cooking zones ■ Single-circuit plate The plate is controlled by the knob on the control panel. ■ Halogen plate Ha Id^Sn O l40l ] Special halogen lamps provide the plate with rapid heating pro perties. The plate is regulated by the relevant control knob or the control panel. ■ Residual heat indicators There is a residual heat indicator for each of the cooking plates on the ceramic hob (2 lights on the left and 2 on the right).
General - the correct pans ■ For best results use good quality pans with smooth flat bases. ■ The pan base should be thick and flat. Pans with uneven, dis torted or rough bases (e. g., cast iron) should not be used as they extend the cooking times and may cause damage to the cooking plates. Ji Cooking plates and pan base should be of the same or similar diameter, The pan should be placed centrally on the cooking plate.
Important (Ceramic and solid plates) information After you have switched on one of the ceramic plates you will whan using hear a faint hum caused by the radiant heating elements, the cooking Do not place aluminium foii or piastic containers on the hot plates ceramic hob. Do not aiiow sugar or foodstuffs containing sugar to come in contact with the hot ceramic hob - it will damage the hob.
Using the automatic cooking plate To use the automatic cooking plate on a manual basis proceed as follows; Frying - Place the frying pan on the hob and turn the control knob to 9 to heat the pan. Place the food to be fried into the pan and lower the heat setting to 6. If this is too high or low adjust ac cordingly. Cooking - To bring the food to the boil turn the control to setting 9. To reduce the heat turn the control to a setting between 1 and 5 as required. Intermediate settings, e.
Guidelines for automatic cooking plate Switch settings 9 Fast frying, deep fat frying, to bring large quantities of liquid to the boil 7-8 Deep fat frying, sealing of meat, fast frying of meat, pancakes 6-7 Slow frying of eggs, liver, preparing roux, frying of meat, fish, sausages and pan cakes, hamburgers 4-5 Cooking larger quantities of food, stews and soups, potatoes 3-4 Steaming vegetables or fish in own juice, pot roasting 2-3 Re-heating food, cooking rice, small amounts of potatoes, veget
Using the cooking plate To use the cooking plate on a manual basis proceed as fol lows: Switch settings 9 Suggested uses Fast frying, deep fat frying, to bring large quantities of liquid to the boil 7-8 Deep fat frying, sealing of meat, fast frying of meat, pancakes 6-7 Slow frying of eggs, liver, preparing roux, frying of meat, fish, sausages and pan cakes, hamburgers 4-5 Cooking larger quantities of food, stews and soups, potatoes 3-4 Steaming vegetables or fish in own juice, pot roasting 2-3
Ovens General Before using for the first time, refer to the section describing pre cleaning of the ovens. The secondary oven is a conventional one with top and bottom heat and grili. The main oven is a multi-function oven which features conventionai cooking with top and bottom heat, hot air cooking and three grilling options, For further details consult the relevant sections in this booklet.
Cooking methods for the main oven The different cooking options Conventional electric cooking This method of cooking uniformiy radiates heat from above and beiow. You should however make sure that you only cook on one level to ensure a uniform distribution of heat. Hot air cooking A fan ensures that hot air is continuousiy circuiated around the oven aiiowing you to cook, bake and roast at severai ievels simultaneousiy.
Fat filter The fat filter supplied protects the fan against soiling, it mus! al ways be in place when: - Meat is cooked in uncovered containers using the hot air mode (do not insert when bakingl); - During Rotitherm roasting/grilling (on multi-function ovens only) or traditional grilling. How to insert the fat filter: Hold the fat filter by the handle and insert the two tabs (see illus trations) info the slots in the back panel of the oven thereby cover ing the fan opening.
Oven Interior Light Switching The main oven is illunninated during cooking and aiso when you on and off turn the cooking method selector to the lamp symbol g], Secondary oven @ Decide whether you want to use the conventionai oven or the grill. To use the conventional oven, turn the temperature control to the required temperature, To use the grill, turn the temperature cón tro! passed the normal cooking temperatures until you see 0 on the dial. The grill wili now come on.
Baking with conven tional top/ bottom heat Bakeware Cakes are baked either in cake tins or alternatively on bakingsheets, lull width baking sheets are available from AEG Spare Parts as an optional extra. How bakeware affects browning; 1. Bakeware, which is dark in colour, has a non-stick coating or is made from aiuminium is the best as heat is absorbed and then transferred to the oake resulting in shorter cook ing times, lower energy consumption and better browning. 2.
Baking times and temperatures When baking with hot air it is often unnecessary to pre-heat the oven. For exceptions see enclosed baking charts. If you use the oven for batch baking, choose cakes which re quire similar temperatures. Different cooking times can be overcome by either placing cakes into the oven later or by re moving them earlier. The baking chart is provided as a quick reference to keep near the oven.
Roasting, Rotitherm roasting/ grilling and stewing In the main oven Cooking method ■ Choose the most suitable cooking method from the various options; Conventional top/botton heat 1^— Hot air Rotitherm roasting/grilling Where the attached cooking charts highiight sheif positions and temperatures in boid print the oven may give you the bet ter resuit when using this cooking method. However you may wish to experiment and decide for yourself which cooking method gives the best resuit.
The times and temperatures given in the roasting chart provide a guide only to cooking meat. Some adjustments may be neces sary, depending on the type of meat to be cooked. Cooking times have been given for meat which is at room temperature. Prime cuts can be cooked at higher temperatures than cheaper cuts that require a longer cooking time to tenderise the meat.
Ovenware Never use stainless steel ovenware in the oven, since it reflects the heat. Meat, poultry, and fish should be cooked in. ovenproof dishes or in the meat pan for large quantities. Choose a dish which is just a little larger than the joint itseif. This will contain any fat in a smaller area and reduce splashing. If you wish to roast potatoes in the same dish around the joint rather than in a separate one you need to make allowances for this whenjselecting a suitable dish.
Warning! The handle must l3e removed whilst grilling. Failing to do so will result in overheating of the handle. This may cause damage leading to breakage of the handle. Inserting/ removing grill handle Inserting the handle Lock it into the grip at the front of the pan. See illustration. Make sure that the handle is firmly attached to the pan! Removing the handle Press the button on the handle. See illustration.
Traditional grilling and How to use the grill Prime cuts of meat such as steaks and chops or fish weighing less than 1 kg can either be fried or grilled. Sait large pieces short' ly before grilling and small ones just after grilling, Turn meat/fish after half the grilling time so that both sides are uni formly browned. Turn thin pieces once: thicker pieces need turn ing more often.
The hot air oven is extremeiy versatiie since you can cook a compiete meai in it. You can cook different foods at the same time, such as fish and cakes, without any transfer of smeii or taste from one to the other. When menu cooking try to choose foods which require simiiar cooking temperatures. When cooking meat in uncovered containers the fat filter must be inserted.
Defrosting by Hot Air In the main oven Food in flat aluminium containers defrosts especially well since aluminium is a good heat conductor. For freezing and subsequent defrosting of meat and vegetable dishes, flat alu minium containers should therefore be used. For defrosting uncooked frozen meat and fruit, closed ovenproof dishes are especially well suited. Position the containers on the wire shelf or in the meat pan 4f h from the top. 34 Food Temp.
For bottling, use only jars with rubber seals and glass lids. Never use jars with screw fittings or bayonet catches or metal tins. And make sure you use fresh foodstuffs! The oven holds 6 bottling jars of 1-1.5 litres capacity. Place 1 cup of hot water in the drip-pan so that the necessary humidity is retained in the oven. Position the jars in the enamelled pan on the 4th level from the top.
Cleaning and care Ceramic Although ceramic hobs are easy to dean they require reguiar hob - care and cleaning to maintain them in good condition. Let the hob general cool down before cleaning, 1. Never use abrasive cleaners or scouring powders or scouring pads, 2. Clean the hob after every use while the soilage is still minimal. Use a soft damp cloth and a little washing up liquid. Rub the hob dry using a soft clean cloth. Make sure that no residual cleaning material is left on the hob, 3.
These instructions refer to a large range of AEG double and single ovens. Ovens ■ Ail secondary ovens have a catalytic roof panel as stan dard. Some models have a complete catalytic set provided as stan dard, For those models which do not have It as standard it is avallabie as an optional extra.
Secondary oven Main oven !t should not normally be necessary to dean the catalytic roof.ln water. If you feel you would like to do so, take out the roof and wash In warm, soapy water, followed by rinsing in clear water. If your oven has a catalytic roof, sides and back panel either as standard equipment or if you have bought these parts separately and fitted them, then the following information will be of interest to you.
Removing the oven door Fully open the oven door. 1. Pull the door catch on both door hinges towards you (see illustration). 2. Lift the door up and pull forward away from the oven (grip Removing the oven door {main and/or secondary ovens} the sides - do not pull ort the door handle!}. Replacing the oven door 1. Insert both brackets into the oven frame. 2. Fully open the door and return door catches to their work ing positions (see illustration).
Removing the shelf supports To clean the sides of the oven, the shelf supports can be rennoved (see illustration). Pull the shelf support at the bottom towards the centre of the oven and unhook from the top. Replace in reverse order.
The catalytic roof of your oven may require cleaning from time to time.
Cleaning The fat filter should be cleaned after every use. To remove filter, the fat hold It by the handle and lift upwards. Place the fat filter in a filter saucepan, add approximately 1 tsp. of automatic washing pow der or 1 tsp, of dishwasher powder and cover filter with water. Bring to the boil and leave to soak for approx. 30 mins, or longer depending on the degree of soiling. Make sure the solution does not boil over as it could mark your hob, Rinse filter in Clearwater and dry.
Optional extras Additional wire shelf ET No. 661 307 541 Full width universal roasting/baking pan E No. 611 898 626 Ceramic oven dish E No.
What to do if... (something goes wrong?) Faults you ... the pilot lamps do not show? can rectify ... the oven does not heat? yourself 1. All the relevant switches may not have been operated, 2. The fuse in the fuse box hay have blown. 3. IMPORTANT - Make sure that the oven door is closed completely. ... the fuses keep blowing? Please call an approved and qualified electrician. ... the oven lamp fails? See cleaning and care on page 38.
Service Should you be unable 1o locate the cause of the problem in spite of the above check list, please contact your AEG Service Depart ment, quoting the E and F numbers, or the KD number which you will find on the rating plate (see illustration/arrow). Please transfer these numbers to the space provided below for your convenience. These numbers enable the Service Department to prepare as far as possible any spare parts required to rectify the fault on first call. This may save you money. E-No..........
AEG Hausgeräte GmbH Postfach 1036 D-90327 Nürnberg AUS ERf AHBUNO GUT © Copyright by AEG H 260 290 140 - 02970.