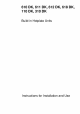
It is essential to read this instructions and keep them in a safe place Consents Page Illustrations {food out) 445 Equipment and description 14 Using the hotplates 1417 Cleaning and maintenance 18/18 important instructions Please note before commencing installation and connection {Clearances, bracing elements, installation kit 20 installation instructions 20-22 What to do if...
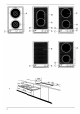
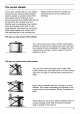
Equipment and description Figure 1 A Hobs with associated controls {high-speed hob{s) on 110 DK / 310 DK} B Fryer with separate control C Operating pilot lamp, amber D Residual heat indicator lamp, red E Warming plate with associated control F Halogen hob (1800 W) with associated control Before using for the first time Note A burning smell will initially be noticed with the hotplates; this will disappear completely after using the hotplates several times.
The correct utensils in any case, utensils with an even bottom should be used (commercially available electric utensils or utensils made of the Please make sure that the utensils are precisely placed on the cooking zone markings, same glass ceramic material), since uneven pots and pans insufficiently absorb the heat from the cooking zone and thereby lead 16 excessively long cooking times and damage to the hob.
Using the hotplates Hinduism for cooking on hotplates W Protect your hotplates from moisture otherwise the plates will start o rust. W Keep the hotplates clean at all times because dirty plates wail not produce full heating power. # Take advantage of the after heat: Turn the hotplates off 5-10 minutes before end of cooking time. Overheated fat or oil can ignite very easily. You should therefore never leave dishes which are being cocked in fat or oil unattended (e.g. chippie.
Using the hotplates General The heating power of the hotplates can be verier continuously by turning the control knobs clockwise or counterclockwise. As soon as you switch on a hotplate the indicator light (figure 1/C) comes on. Boiling and frying on the hotplates (610 DK/ 811 DK) {High speed hotplate(s} at 110 DK/ 310 DK} boating. To parboil, select setting 3 and firm back to 1 for billing; use higher or lower setting as required.
Cleaning and maintenance General Always switch ¢ff the cooking areas and let them cool down before cleaning. Never use abrasive cleaners or scouring powders. bleach, rust or stain removers. Never place aluminum foll over the cooking areas. Wipe control panel with soft cloth, lukewarm water and washing up liquid. Ceramic hob Ceramic surfaces McGuire regular care and cleaning although they are easier to clean than your “old cooking areas”.
Cleaning and maintenance Hotplates Remove stubborn dirt from the hotplates with fine souring powder or pad. Afterwards warm up gently and allow to dry. From time to time apply a little sewing machine oil to the hotplates {polishing with paper afterwards) or use a suitable cleaner/cunditioner, like “C era-fix", to keep them in good condition. Never use butter, bacon, fat ete: Recommended cleaners Stael-fix for normal or heavy silage, C era-tix or Prolific for light collage and conditioning.
Installation instructions Electrical connection Warning! All appliances with 3 core lead must be earthed Please ensure that the voltage and current indicated on the rating plate agrees with the voltage of your electricity supply. 2201240 volts {i. e, 220:240 ¥V AT i your appliance has been equipped with a mains lead with a molded-on type plug. you must comply with the following regulations: The plug molded on to the cord incorporates a fuse. For replacement, use a 13 amp BS 1362 fuse.
Installation instructions Please note before commencing installation and connection! in all cases the appliance may only be connected to the electricity supply by an approved electrician. This will ensure that the legal requirements and conditions of connection of your local electricity supply authority are observed installation Please note that with flush fitting appliances the plastic covering or veneer must be applied with a heat resistant adhesive {1000 C).
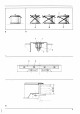
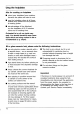
Installation instructions Bracing elements Figure 6 There must not be any cross strips underpart bracing range of the bracing elements neath the worktop cutout They should be extends from With thicker swan back at East to worktop cut oul size. worktops recesses should be provided in . the worktop at suitable points.
What (something does not work)? . the yellow indicator light does not come on? M Check that you have followed all points of the operating procedure. W Check that the fuses of the installation are OK. .. the indicator light for residual heat does not come on? The bulb is defective. It must be exchanged by an electrician.