BRUKSANVISNING 6130 V-w 1 SE 948290347
Bästa Kund, Det är viktigt att du lär känna spisens funktioner och finesser. Läs därför noga denna bruksanvisning, och var särskilt uppmärksam på de avsnitt som är markerade med . Detta är varningstexter för undvikande av skador på person eller egendom. Spara bruksanvisningen. Den är bra att ha vid tveksamhet och måsta alltid följa med spisen vid ev ägarbyte. Bruksanvisningens första del innehåller en allmän beskrivning av din nya produkt.
Innehållsförteckning Innehåll Page No. Till användaren Grattis önskar AEG ..................................................................................... 2 Säkerhetsanvisningar .................................................................................. 5 Beskrivning av produkten ......................................................................... 7 Glaskeramikhäll .................................................................................... 9 Kokzonerna ...........................
Innehåll Sidnr. Val av ugnstemperatur ........................................................................ 30 Stekautomatik ..................................................................................... 31 Automatiskt stopp av ugnen ............................................................... 33 Automatisk start och stopp av ugnen ................................................. 34 Ugnen .................................................................................................
Säkerhetsinformation Spisen får endast användas i enskilt hushåll och för normal hushållsanvändning. Används den för andra ändamål gäller inte Konsumentköp EHL. Rengöring och underhåll * Av hygien- och säkerhetsmässiga skäl ska häll och ugn hållas rena. Fettfläckar och matrester avger os vid upphettning och kan i värsta fall medföra brandfara. Barn * Håll uppsikt över barn under tiden spisen används. Häll och ugn blir mycket varma vid användning och förblir varma en tid efter det att spisen stängts av.
* Spisen får inte ställas på en extra sockel, eftersom tippskyddet då kan sättas ur funktion. Se till att elsladden inte kommer i kläm vid installationen. Skrotning * Hjälp till att undvika olyckor när spisen ska kasseras. Lossa stickkontakten från vägguttaget, klipp av sladden alldeles intill spisen och sätt barnsäkringen ur funktion.
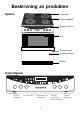
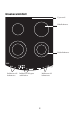
Beskrivning av produkten Ugnsventil Spisen Glaskeramikhäll Knappar, klocka Ugn Transportspärr Förvaringslådan Sockel Kontrollpanel Vred till Vred till ugnen kokzonerna Kontrollknappar till klockan 7 Vred för Vred till inställning av kokzonerna tid och temperatur
Glaskeramikhäll Ugnsventil Enkelkokzoner Dubbelkokzoner Indikatorer till kokzonerna Indikatorer till ugnen och klockan Indikatorer till kokzonerna 8
Glaskeramikhäll Glaskeramikhällen har fyra kokzoner. När du tänder en kokzon lyser den i olika intervaller beroende på vilken inställning du har valt. Även om du har valt den högsta inställningen släcks kokzonen ibland för att hällen inte ska överhettas. Glaset är hårt och härdat mot värme, kyla och temperaturchocker, men är som allt glas ömtåligt när det gäller slag. Stå inte på keramikhällen, den tål inte onormal belastning. Kokzonerna De två bakre kokzonerna är enkelkokzoner.
Ugn Sockel Information om hur du använder ugnen hittar du under avsnittet ”Så här använder du”. Du kan välja mellan följande ugnsfunktioner: Sockeln kan höjdjusteras från 85 cm till 93,5 cm. varmluft över-/undervärme grill intervallgrill pizza/pajprogram program för långtidsstekning Ugnens sidor, tak och bakvägg är av katalysemalj som har en viss självrenande effekt. Bottnen i ugnen är tillverkad av slät och rengöringsvänlig emalj.
Säkerhetsutrustning Spisen har ett tippskydd som förhindrar att den tippar vid onormal belastning, t.ex. om ett barn sätter sig på en öppen ugnslucka. Vägg Tippskyddet måste monteras och fungerar endast när spisen har skjutits på plats och skruven är iskruvad. tippskydd Golv 90 mm Ugnsluckan är försedd med en luckspärr som gör det svårare för barn att öppna ugnsluckan. Kokzonerna är barnsäkrade i och med att två vred måste vridas samtidigt för att kokzonerna ska låsas upp.
Easy-Access I ugnsutrymmet är några av ribborna monterade med Easy-Access. När du placerar mat/bakverk på Easy-Access har du möjlighet att dra ut maten/bakverket från den varma ugnen, om du t ex vill se till maten/bakverket eller ta den/det ut ur ugnen. Du undviker därigenom att behöva sträcka in handen i den varma ugnen. Easy-Access är monterat med stopp såväl längst fram som längst bak på varje skena samt en styrning just bakom det främre stoppet.
Automatisk avstängning av inkopplad zon Temperatur Om du glömmer att stänga av en kokzon efter användning kommer kokzonen att stängas av automatiskt efter en viss tid. Ju högre inställning desto kortare tid passerar innan kokzonen stängs av. Under 120˚C 120 - 200˚C 200 - 250˚C över 250˚C Inställning 1 2 3 4 5 6 7 8 9 Automatisk avstängning efter 12½ timme efter 8½ timme efter 5½ timme efter 1½ timme När funktionen är aktiverad kommer ugnen att stängas av.
Tillbehör 2 bakplåtar 1 ugnspanna 1 galler Tippskydd Rakbladskrapa och rengöringsmedel till glaskeramikhällen 1 Stektermometern 14
Före första användning Inkoppling av luckspärr Koppla in luckspärren genom att vrida på den lilla skruv som sitter på luckans insida. Använd ett mynt för att vrida på skruven. För att öppna ugnsluckan ska du nu trycka spärren åt vänster samtidigt som luckan öppnas. Spisen får endast användas i enskilt hushåll och för normal hushållsanvändning.
Koppla in barnskydden på kokzonerna Vrid de två vreden åt vänster och håll dem i det läget i två sekunder. På displayen visas: När du tänder en kokzon kommer displayen att visa: Om du nu vill tända en kokzon måste du vrida de två vreden åt vänster och hålla dem i det läget i två sekunder. Sedan ska du tända en av kokzonerna inom tio sekunder. Symbolen att försvinna. på displayen kommer Du kan koppla ifrån barnskyddet genom att: 1. Vrida de två vreden åt vänster och hålla dem i det läget i två sekunder.
Koppla in ugnens barnskydd Barnskyddet är inkopplat när ugnen inte används. 1. Tryck samtidigt på knapparna och och håll dem intryckta i tre sekunder. 2. Du kan höra en pipsignal och på displayen visas ”SAFE”. Du kan koppla från barnskyddet genom att: 1. Trycka samtidigt på knapparna och och hålla dem intryckta i tre sekunder.
Skydda glaskeramikhällen Lägg en skyddande hinna över glaskeramikhällen innan du använder den. På så vis blir det lättare att rengöra hällen och du förhindrar att mat som kokar över bränner sig fast hårt. Så här gör du: 1. Häll några droppar av det bifogade rengöringsmedlet på en bit hushållspapper och stryk ut rengöringsmedlet över hela hällen. 2. Polera hällen med en ren trasa tills den är torr. Ställ in klockan Exempel: kl 17:00 1. Tryck samtidigt på knapparna och tills siffrorna börjar blinka.
Bränn ugnen ren 1. Tryck på . 2. Vrid knappen tills symbolen tänds. 3. Låt ugnen stå på den här inställningen i ca 1 timme. Se till att det är bra ventilation genom att antingen slå på fläkten eller öppna ett fönster. 4. Stäng av ugnen genom att trycka på . 5. Låt sedan ugnsluckan stå öppen i ca 2 timmar och lufta ut i köket. 6. Rengör ugnen, luckan och falserna med varmt vatten och diskmedel. Torka av ugnen. Ugnen kan fortfarande lukta något under den första tiden du använder den.
Så här använder du liknande) eller om plast och aluminiumfolie smälter på den. Glaskeramikhällen Använd aldrig en sprucken glaskeramikhäll. Vid rengöring och/eller då mat kokar över kan vätska tränga ner till de spänningsförande delarna. Stäng av strömmen till spisen och kontakta service. Ställ aldrig våta kokkärl på glaskeramikhällen. Kontrollera att det inte finns sand, socker och salt på kokkärlen. Sand kan repa hällen och socker och salt kan förstöra den.
Kokzonerna Det går att ställa in vreden steglöst från 1 till 9 där 9 är den högsta inställningen. Det finns AUTOMAX på alla lägen så att du från början kan ställa in det läge du vill ha för den fortsatta tillagningen. Se inställningstabellen. Kokzonerna på 14 och 18 cm är lämpliga för uppkok och tillagning av små och mellanstora portioner. Kokzonen på 21 cm är lämplig för stekning samt uppkok och tillagning av stora portioner.
AUTOMAX Du kan välja AUTOMAX på alla kokzoner och på alla lägen. AUTOMAX ger kokzonen högsta värme under en specificerad tidsperiod och sänker därefter värmen till det läge du har valt för tillagningen. 1. Vrid vredet åt höger. På displayen visas . Vrid vredet tills du hör ett klick. AUTOMAX-symbolen kommer upp på displayen och AUTOMAX-lampan blinkar. 2. Vrid sedan vredet till önskad inställning (här läge 3).
Barnskydd Anvisningar om hur du kopplar in och ur barnskyddet hittar du i avsnittet ”Innan du börjar”. När barnskyddet är aktiverat visar displayen: För att du ska kunna använda en kokzon måste du vrida de två vreden samtidigt åt vänster och hålla dem i det läget i två sekunder. Sedan måste du tända en av kokzonerna inom 10 sekunder.
Kokzonerna på 14 och 18 cm är lämpliga för uppkok och tillagning. Kokzonen på 21 cm är lämplig för stekning och tillagning av stora portioner. Kokzonen på 12 cm är inte lämplig för uppkok, men kan användas till smältning av smör, sjudning samt tillagning av såser etc. som inte får stormkoka. Val av kokkärl Glaskeramikhällen ställer större krav på kokkärlen än traditionella plattor. Var uppmärksam på följande: - Aluminium har bra värmeledningsförmåga men kan ge silverliknande fläckar på hällen.
Kokkärl som ska användas på keramikhällen ska: - Täcka hela kokzonen, det får gärna vara lite större. - Vara plant eller bukta svagt inåt (max. 1 mm) eftersom bottnen kommer att bukta utåt då kokkärlet värms upp. - Ha tjock botten: - Aluminiumgrytor min. 3,5 mm bottentjocklek. - Stålgrytor min. 5 mm bottentjocklek. - Pannor min. 5-7 mm bottentjocklek. - Ha helt slät eller finmönstrad botten.
Råd och tips vid användning av kokzonerna Om du följer nedanstående råd kommer du att spara energi och underlätta rengöringsarbetet. Använd plana grytor. En gryta med ojämn botten kan öka elförbrukningen med 50%. Grytan ska passa till kokzonen – eller vara något större. Kom ihåg att det kan vara lite mat i en stor gryta. Använd tättslutande lock på grytan. Utan lock på grytan används det mer än tre gånger så mycket el. Spara på vattnet. Koka potatis och grönsaker med 1, 2 eller 3 dl vatten.
Klockan Display och knappar 17 00 AV/PÅ Timer Tillagningstid Stopptid Temperaturdisplay 27
Inställning/ändring av klockslag 17 00 Exempel: Klockan är 17:00 1. Tryck samtidigt på knapparna och tills siffrorna börjar blinka. Släpp knapparna. 2. Vrid på tills rätt klockslag i timmar och minuter visas på displayen. Efter fem sekunder börjar punkten att blinka. 3. Ugnen är klar för användning. Timer Exempel: Timern ska ställas in på 10 minuter. Du startar timern genom att trycka på . Släpp knappen. Ställ in tiden genom att vrida på . Displayen kommer att visa den aktuella tiden.
Val av ugnsfunktion Du kan ändra ugnsfunktionen genom att vrida på ugnsvredet.
Val av temperatur 17 00 1. Tryck på . 2. Du kan ställa in ugnsfunktion genom att vrida på Ugnsvredet 3. Du kan ändra temperaturen genom att vrida på . När ugnen startar kommer displayen att visa den inställda temperaturen. Efterhand som temperaturen i ugnen stiger kan du läsa av den aktuella temperaturen på displayen genom att trycka på . När ugnen har kommit upp på den inställda temperaturen kommer det att höras en pipsignal. Stektermometer Du kan ställa in köttets innertemperatur mellan 31˚C och 95˚C.
Stekautomatik Exempel: Du ska steka en stek i ugnen och den ska ha en innertemperatur på 65˚C. Du ska tillaga steken i varmluftsugn i 175˚C. 1. Stick in stektermometerns spets mitt i steken. 2. Sätt stektermometerns kontakt i uttaget på ugnens högra sida. 3. Starta ugnen genom att trycka på . 4. Välj ugnsfunktion och ugnstemperatur. De ugnsfunktioner som blinkar kan användas tillsammans med stektermometern. 5. Vänta tills displayen visar 60˚C. 6. Ställ in stekens temperatur med hjälp av .
Displayen visar den önskade innertemperaturen. Tryck på för att se stekens aktuella innertemperatur, temperaturen som ugnen är inställd på och ugnens aktuella temperatur. Ett tryck på visar stekens aktuella innertemperatur (när temperaturen väl har kommit över 31˚C) i fem sekunder. Två tryck på visar temperaturen som ugnen är inställd på i fem sekunder. Tre tryck på visar ugnens aktuella temperatur i fem sekunder. När ugnen har stängts av blinkar ugnssymbolen.
Automatiskt stopp av ugnen Exempel: Du ska tillaga en rätt i varmluft i 175˚C i 30 min. Klockan är 17:00. 1. Starta ugnen genom att trycka på . 2. Välj ugnsfunktion genom att vrida på vredet tills symbolen tänds. 3. Ställ in tillagningstiden. Tryck på . Släpp knappen. 4. Ställ in tiden med hjälp av . 30 175 Displayen visar den aktuella tiden. Tryck på för att se den återstående tiden.
Automatisk start och stopp av ugnen Exempel: Klockan är 17:00. Ugnen ska starta automatiskt med att tillaga en rätt. Rätten ska tillagas i varmluft i 175˚C i 30 min. Rätten ska vara klar kl 18:00. 1. Starta ugnen genom att trycka på . 2. Välj ugnsfunktion genom att vrida på vredet tills symbolen tænds. 3. Ställ in tillagningstiden. Tryck på . Släpp knappen. Ställ in tiden med hjälp av . 30 175 4. Välj stopptid genom att trycka på . Ställ in tiden med hjälp av . Ugnen är nu inställd på automatisk start.
När den inställda tillagningstiden har gått kommer det att höras pipsignaler och ugnen kommer att stängas av. Med korta mellanrum kommer det att höras en enda pipsignal som indikering på att maten är klar. Ugnssymbolen försvinner först när du trycker på -knappen. Kom ihåg att räkna med ugnens uppvärmningstid när du ställer in tillagningstiden.
Ugnen Lägg aldrig aluminiumfolie, en plåt eller ugnspanna direkt på ugnens botten. Emaljen kan skadas på grund av överhettning. Ugnen blir varm under användning, håll uppsikt över barnen. Över/undervärme Tak- och bottenelement är inkopplade. Kan i princip användas vid all matlagning och bakning. Resultatet kan påverkas av inställd temperatur, formars material och färg. Vid gräddning i ljusa aluminiumformar får undersidan bättre färg om formen placeras på en plåt istället för på gallret.
Temperaturen skall vara ca. 15-20% lägre än vid över/undervärme. Vid bakning bör ugnen vara uppvärmd men vid matlagning kan start ske från kall ugn. OBS! Vid gräddning av bakverk som skall ha hög temperatur och kort gräddningstid rekommenderas inte varmluft. En för hög ugnstemperatur ger ojämn färgsättning (Se vidare under tips och råd). Gratinering/Intervallgrill Intervallgrill är en kombination mellan varmluft och grill.
Temperaturen är förinställd och kan inte ändras. Med det här programmet börjar du alltid i kall ugn. Om du ska steka mindre köttstycken som väger upp till 800 g rekommenderar vi att du först bryner köttet på spisen innan du steker det i ugnen. Använd alltid den elektroniska stektermometern till hela köttstycken. Det är svårt att uppge exakta stektider för olika köttstycken eftersom tiderna beror på köttets form och struktur. Översikten över lågtemperatur anger stekning endast ungefärliga tider.
Bakning/matlagning Vid temperaturskillnader och/eller ojämn placering av matvaror på bakplåtarna kan plåtarna ”slå sig”. Detta gäller framförallt vid tillagning av djupfryst pizza, pommes frites och liknande. Stick in en provsticka i mjuka kakor ca 5 min. före full tid så att du har möjlighet att förkorta/förlänga baktiden. Resultatet kan påverkas av recept, formarnas material, färg, form och storlek. Om du bakar i ljusa metallformar samt i formar av keramik och glas ska du placera formen på en bakplåt.
Med över-/undervärme får hela ytan en jämn färg. Med varmluft blir bakning/ matlagning mer rationell, men färgen blir ojämnare. För att resultatet ska bli så bra som möjligt ska du placera bakverket/maträtten så att luftströmmen inte spärras, dvs att du placerar bullar och liknande i jämna rader. Pain riche, brödstänger, sockerkaka etc ska placeras med ändarna mot bakväggen och ugnsluckan. Varmluft är inte så lämpligt till bakning med högt sockerinnehåll som ska ha hög temperatur under kort tid.
Inställningsschema för bakning Bakning Över/undervärme Varmluft ˚C ˚C Minut Matbröd Mörka portionsbröd Ljusa portionsbröd Lätta limpor, formbröd Tunga limpor, Hålkakor, tekakar Vetebröd Bullar Längder, kransar Mjuka kakor Muffins Rulltårta Mjuk kaka med lite fett** Mjuk kaka med mycket fett** Småkakor Mördegskakor Maränger Pepparkakor Minut 3 3 1 1 2-3 200 225 190-200 175-200 200-225 12-15 8-12 35-40 50-60 10-15 2+5 2+5 1+4 1+4 2+5 170-190 190-200 175-185 160-185 170-190 12-15 10-14 40-45 60-75
Inställningsschema för matlagning ˚C Matlagning Minut Fisk, kokning Fisk, stekning Köttfärslimpa Gratäng Leverpastej Pizza Pajer Lasagne Potatisgratäng 1-2 1-2 3-4 2-3 2-3 3-4 3-4 3-4 3-4 170-180 190-210 190-210 190-210 190-210 210-235 210-235 200-225 200-225 ** ** 50-65 55-65 55-65 30-40 35-45 50-60 65-70 Vid tillagning på 2 bakplåtar skall man välja fals 1+4 eller 2+5 ** När man steker eller kokar fisk i ugnen är tillagningstiden beroende av fiskens tjocklek.
Stekning Denna ugn är väl isolerad. Det medför att det blir relativt hög fuktighet i ugnen. Därför skall vatten inte tillsättas vid stekning. Om du vill ha steksky till sås så lägg steken i en ugnssäker form som passar till steken och häll i max 5 dl vatten. Ytterligare vatten skall ej tillsättas under tillagningen. Om du använder för mycket vatten i ugnen bildas kondensvatten, vilket kan rinna ut på golvet, och du måste använda onödigt mycket energi. Max 5 dl Max.
Användning av stektermometer För att få bästa resultatet skall spetsen på stektermometern sitta i den tjockaste delen av steken. Spetsen får inte stöta emot fett eller ben, då termometern i så fall kommer att visa fel. Hela spjutspetsen skall var inne i köttet, eftersom ugnsvärmen påverkar termometern. När den önskade temperaturen har nåtts tas steken ut, täcks med aluminiumfolie och vilar ca 20 min. Steken är därefter lättare att skära upp och mindre köttsaft går till spillo. Max 55 dl dl vand Max.
Inställningsschema för stekning (i över-/undervärme, varmluft och intervallgrill) Stekning ˚C ˚C I ugnen Mins kött Nöt Rostbiff Nötstek, (bryning) (stekning) (genomstekt) Kalv Filé Lamm Stek/bog/sadel Fläsk Revbensspjäll, Fläskstek Skinka Fågel Kyckling, delad Anka* Anka (långtidsstekt) Kalkon, helstekt, färserad Kalkonbröst per kg kött 3 90 65 3 10 totalt 65 50-60 1-2 70-75 90-120 över/ varmluft intervall undervärme grill 125 225 160 180 125 200 150 160 125 200 150 160 3 65 50-60 180 160 16
Inställningsschema för långtidsstekning Det här programmet är lämpligt för magert och rött kött. Kött som ska långtidsstekas bör inte väga mer än 2,5 kg. ˚C Stekning Min kött per kg kött Nöt Fransyska ca 1000-1500g Nötstek Gammaldags nötstek 2500g Bog med ben ca 800g, Brynt på spisen 4 entrecôter 1-1.5 cm, brynta på spisen T-benstek ca 700 g, 2.
Grillning Vid grillning bör ugnstemperaturen vara 250˚C. Om du vill ha skonsammare grillning kan du välja en lägre temperatur. Torka av det som ska grillas med hushållspapper eftersom fuktigt kött annars ångkoks i stället för att grillas. Värm upp ugnen i fem minuter innan du ställer in maten. Lägg maten på gallret som du sedan placerar på den fals som rekommenderas i tabellen. Sätt en aluminiumklädd långpanna under gallret för att samla upp fettstänk etc, vilket underlättar rengöringen.
Fisk och ljust kött (fågel), kalv och gris) får inte färg lika lätt som mörkt kött (nötkött och vilt).
Råd och tips Allmänt om bakning Tänk på att kontrollera gräddningstiden när du börjar använda en ny ugn. I många äldre recept finns ofta angivet en något högre ugnstemperatur. I dagens moderna ugnar sker gräddningen vid lägre temperatur. Sänk därför temperaturen om gräddningstiden är för kort. En för hög temperatur ger ett ojämnare resultat. Varmluft Utnyttja ugnsutrymmet genom att laga mat på flera plåtar/galler samtidigt.
* Häll inte t ex kall pannkakssmet i en het långpanna. * Det är bättre att grädda t ex två limpor på en plåt, än en stor mitt på plåten. * En djupfryst pizza, direkt från frysen, innebär stora spänningar i plåten och därmed risk för skevhet. Upptining/värmning Välj varmluft och temperaturen 200˚C. Maten tinas i täckta formar. Om du använder plastkärl, kontrollera att det tål minst 200˚C. Placera formarna på ugnsgaller i en eller flera nivåer. Tiden varierar beroende på mängd och typ av mat.
Vädringsläge Utluftning Varje gång du har använt ugnen ska luckan ställas på glänt annars finns risk för fukt i ugnsutrymmet. Gör så här: 1. Öppna luckan och fäll upp de två låsspärrarna. 2. Stäng luckan tills spärrarna tar stopp. Lämna ugnsluckan i detta läge till dess att ugnen svalnat. Förvaringslåda Förvaringslådan är avsedd att förvara ugnstillbehören i.
Skötsel och rengöring värmeöverföringen mellan kokzon och kokkärl. Efter användning bör du torka av kokzonerna med en fuktig disktrasa och diskmedel. Om hällen är mycket smutsig kan du göra följande: Tippspärren fungerar bara när spisen har skjutits på plats och skruven har monterats. Kom ihåg det när du flyttar spisen för att städa bakom den. Av hygien- och säkerhetsmässiga skäl ska glaskeramikhällen och ugnen hållas rena.
Ugn När du ska göra ren ugnen är det en fördel att ta av ugnsluckan och ugnsstegarna. Ugnens sidor, tak och bakvägg är av katalysemalj som delvis rengör sig själv vid temperaturer över 200˚C. Efter att du har lagat mat i låga temperaturer och med mycket fettstänk bör du använda rensningsprogrammet. Låt inte barn vara i närheten av spisen medan rengöring sker eftersom spisens front blir varmare än vid normal användning.
5. Starta ugnen genom att trycka på . Vrid vredet till . Ställ in temperaturen på 300˚C genom att vrida på . 6. Låt ugnen vara tänd med den här inställningen i 1½ timme. Tack vare ugnens automatiska avstängningsfunktion kommer ugnen att stängas av efter 1½ timme. 7. Om du vill att rensningsprogrammet ska köra i mer än 1½ timme måste du programmera in automatiskt stopp av ugnen. Se hur du programmerar i avsnittet "Så här använder du Automatiskt stopp av ugnen". 8. Montera åter Easy-Access falsen.
Varmluftfläkten Fläkten kan bli smutsig av fettstänk från stekning. Kontrollera fläkten var fjärde månad och rengör den vid behov. Ur säkerhetssynpunkt skall ugnen först kopplas ur. Dra ut stickkontakten eller skruva ur säkringarna Ta ut fläkten så här: 1. Öppna ugnsluckan 2. Skruva ut skruven (1) upptill och avlägsna skivan som håller skärmen. 3. Skärmen lyfts ur de två hållarna (2) 4. Muttern som håller fast fläkten har vänstergängning. 5. Håll fast fläkten med handen. 6.
Ugnsluckan Rengör emaljen med en ren trasa, varmt vatten och handdiskmedel. Ta bort ugnsluckan så här: 1. Ställ ugnsluckan i vädringsläget. 2. Dra den snett uppåt. 3. Lägg ugnsluckan på ett stabilt underlag t ex på ett bord. Ta bort luckans glas så här: Hantera glasen varsamt. Glasen är härdade, men tål inte stötar och slag eller rengöringsmedel med slipmedel. Sådan påverkan kan leda till att glasen spräcks omedelbart eller vid senare tillfälle. Luckans invändiga glas 1.
Luckans mellersta glas 1. Ta tag i fjädrarna på varje sida om glaset. 2. Lyft av glaset. Luckans utvändiga glas 1. Lägg ned ugnsluckan på bordet. 2. Ta tag i luckans ram och pressa försiktigt glaset ur ramen. Rengöring av luckans glas Rengör glasen med en våt trasa och handdiskmedel. Torka efteråt. Putsa eventuellt glasen med ett fönsterputsmedel. Vid kraftig nedsmutsning: 1. Lägg en våt trasa med handdiskmedel på glaset under 1 timme. 2.
Ugnsutrustningen Stegarna lossas genom att dra de ut/upp i pilens riktning. Diskas för hand eller diskmaskin men vid kraftig nedsmutsning behöver de ligga i blöt och sedan rengöras ev med tvålull. Montering sker genom att först haka fast stegarna i de översta hålen och sedan trycka in de på plats igen. Emaljerad plåt och långpanna rengörs efter användning med hushållspapper och ev en bakplåtsskrapa. De kan vid behov diskas för hand eller i diskmaskin.
Byte av ugnslampa Ur säkerhetssynpunkt skall ugnen först kopplas ur. Dra ut stickkontakten eller skruva ur säkringarna. Kontrollera även att ugnen inte är varm. Lampan i sidovägg 1. Ta först bort stegen. 2. Lossa lampglaset försiktigt genom att sticka in t ex en kniv mellan lampglas och vägg. (se bild 1) 3. Skruva ur den trasiga lampan. 4. Sätt i en ny ugnslampa märkt 230-240 V 25W, 300˚C, med E14sockel. 5. Rengör lampglaset, torka det torrt och återmontera. 1. Lampan i taket 1.
Rengöring av tätningslist Tätningslisten mellan ugnen och ugnsluckan är fastsatt i de fyra hörnen. Ta av tätningslisten genom att lyfta ut krokarna ur hålen i hörnen. Rengör tätningslisten genom att dra en våt trasa med lite handdiskmedel över listen. Torka efteråt. Tätningslisten skall vara torr innan den åter monteras. Sätt på listen genom att hänga krokarna i hålen och rikta upp den, så den löper parallellt med ugnens sidor. Lucktätningens öppning skall vara nedtill.
Förvaringslådan Det är lättast att rengöra förvaringslådan om denna tas ut. Du gör på följande vis: 1. Öppna lådan 2. Dra ut lådan till stopp. 3. Lyft lådan snett uppåt och dra den utåt. Rengör lådan med en trasa, varmt vatten och handdiskmedel. Lådan ska vara torr innan den sätts i igen. Förvaringslåda styrskena Lådan sätts i så här: 1. Håll lådan snett såsom visas ovan. 2. Placera lådans hjul i styrskenorna och skjut in lådan. Transportskador Kontrollera att ugnen är utan skador.
Tekniska data Modell 6130V-w Förvaringslåda: Volym: Mått: Bredd: Djup: Höjd: Vikt: Total effekt: 60 cm 60 cm 85 – 93,5 cm 60 kilo 10,3 kW Kokzoner: Mått/effekt: Vänster fram: Vänster fram: Vänster bak: Höger bak: Höger fram: Höger fram: 14 cm- 1100 W 21 cm- 2200 W 14 cm- 1200 W 18 cm- 1800 W 12 cm- 700 W 18 cm- 1800 W Ugn: Volym: 57 liter/brutto 45 liter Rätt till ändringar förbehålles.
Montering Höjdjustering Spisen levereras med en lägsta höjd av 85 cm, men kan regleras i höjd från 85 cm till 93,5 cm. I spisens inre sockel finns 5 hål. Varje hål ger möjlighet att reglera höjden till 85 - 86,5 -87,5 - 88,5 och 91 cm. Höjden 93,5 cm får du genom att från sockelns framsida skruva på hjul och justerfötter, som även används vid nivåjustering. Gör så här: 1. Lägg ned spisen på dess baksida. Använd eventuellt en matta eller frigolitplattor som mellanlägg mellan spis och golv.
2. Skruva ut de fyra skruvarna, två i vardera sidan av sockeln. 3. Dra ut den inre sockeln. Passa in de önskade hålen med de i den yttre sockeln. 4. Skruva i skruvarna och res upp spisen. Vägg Montering av tippskydd Tippskyddet förhindrar att spisen kan tippa framåt. tippskydd Golv 90 mm Så här gör Du: 1. Skruva fast det bifogade vinkelbeslaget i golvet enligt ritningen. 2. Ta ut förvaringslådan ur spisen och skjut spisen på plats. 3.
Nivåjustering Spisen ställs i våg med hjälp av vattenpass. Lägg vattenpasset på ovansidans kanter (framkant, sidokanter, bakkant). Justering görs med hjälp av spisens hjul och justerbara fötter. Hjulen sitter i de bakre hörnen på sockeln och kan höjdjusteras steglöst från sockelns framsida, genom att föra en skruvmejsel in i hålen i spisens sockel. Fötterna ställs in med fingrarna.
Installation Elektrisk anslutning 1 2 Ingrepp i spisen skall utföras av behörig fackman. Arbete utfört av person utan tillräcklig kunskap kan försämra spisen och leda till skada på person eller egendom. 3 L1 L2 1 2 All elektrisk installation skall utföras i enlighet med gällande lokala bestämmelser. Inkopplingsalternativ för spisen framgår av skylten på bakstycket. Anslutningseffekt och spänning finns angivet på dataskylten (se spisens baksida).
Om spisen inte fungerar Innan du tillkallar service - Praktiska råd Mat-/vetebröd, mjuka kakor blir platta ………….. För låg temperatur. Bakverk jäser upp och sjunker därefter ihop. Höj temperaturen. Du har använt för lite jäst eller bakpulver. Kontrollera i receptet om du har använt rätt mängd. Fett/vätskeblandningen var för varm. Temperaturen måste vara 37˚C för färsk jäst och 45-50˚C för torrjäst. Mat-/vetebröd, mjuka kakor blir för torra………….. För låg temperatur.
Problem Orsak - Åtgärd Mat-/vetebröd, mjuka kakor blir platta ………….. Du har använt för lite jäst eller bakpulver. Kontrollera i receptet om du har använt rätt mängd. Fett/vätskeblandningen var för varm. Temperaturen måste vara 37˚C för färsk jäst och 45-50˚C för torrjäst. Mat-/vetebröd, mjuka kakor blir för torra………….. För låg temperatur. Bakverket behövde stå för länge i ugnen för att bli färdigt. Höj temperaturen. För lite vätska, för mycket mjöl eller fel slags mjöl kan ge torrt bröd.
Innan du tillkallar service – Tekniska råd Problem Åtgärd Spisen/ugnen fungerar inte................ Kontrollera om du har tänt spisen. Kontrollera husets proppar. Kontrollera spisens säkringar. (Obs: Det finns 3 säkringar.) Ugnen värms inte upp tillräckligt snabbt........... För traditionell ugn 200˚C är uppvärmningstiden ca 13 min. För varmluft 200˚C är uppvärmningstiden ca 7 min. Hällen blir varm......... Hällen kan bli upp till 80˚C.
Problem Orsak - Åtgärd Kokzonerna tänds och släcks hela tiden. Det är överhettningssäkringarna som slår till och från för att glaskeramikhällen inte ska överhettas. Det påverkar inte tillagningsresultatet. Kokzonerna går inte att tända och på displayen visas Barnskyddet är inkopplat. Vrid samtidigt de två vreden med barnskyddssymbolen till . Tänd sedan en av kokzonerna inom tio sekunder. Kokzonerna går inte att tända och på displayen visas Den automatiska avstängningsfunktionen är inkopplad.
Reklamation Vid försäljning till konsument i Sverige gäller den svenska konsumentlagstifningen. Kom ihåg att spara kvittot för eventuell reklamation. Konsumentkontakt Har du frågor angående produktens funktion eller användning ber vi dig att kontakta vår konsumentkontakt på tel. 08-672 53 60 eller via e-mail på vår hemsida www.aeg-hem.se få betala servicebesöket, även om produkten är ny. Innan du kontaktar service, skriv upp följande enligt dataskylten, denna hittar du på baksidan: Modellbeteckning.......
325 88-4580 Rev. 10-220 AEG-Hem & Hushåll S-105 45 Stockholm www. aeg-hem.