INSTRUCTIONBOOK 6130 V-ma 1 RUS 948290360
AEG offers its congratulations. Dear customer, Congratulations on purchasing your new AEG cooker. It is important you get to know your cooker’s functions and special features. Read these instructions, as they will help you to get the best of your new cooker. Please particularly note the sections marked . These contain warnings to help you avoid accidents. Save these instructions. They are handy to have by you in case of doubt, and should accompany the cooker if it is ever passed on to a new owner.
Table of contents Contents Page No. To the user AEG offers its congratulations ................................................................... 2 Safety information ........................................................................................ 5 Product description ..................................................................................... 7 Ceramic hob ......................................................................................... 9 Cooking zones .........................
Contents Page No. Automatic oven stop ........................................................................... 32 Automatic oven start and stop ............................................................ 33 The oven ............................................................................................. 35 Settings – baking ....................................................................... 39 Settings – other cooking ............................................................
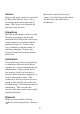
Safety information Stifle the flames with a lid and never use water. Use only pots and pans designed for ceramic cooking zones. Check that bases are flat. Pans with an uneven base give poor heat contact and can easily rotate on the ceramic surface. Use only oven-proof dishes in the oven. Check that the cooker is switched off when not in use. All controls must point to zero. The cooker is designed for normal Danish household use. If used in any other way there is a risk of accident.
the electric cable from the wall socket, cut it off close to the cooker and deactivate the child safety mechanism. Service Service and repairs must be carried out by Electrolux Service force or by a servicing organisation approved by them. Only spare parts supplied by the above may be used. Unpacking The whole packaging can be recycled. Wooden packaging is made from untreated wood and plastic and corner reinforcements are marked with the method of disposal.
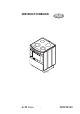
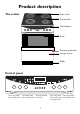
Product description The cooker Oven valve Ceramic hob Clock buttons Oven Transport protection storage drawer Plinth Control panel Operating knobs Operating knob Operating knobs for cooking zones for oven functions for clock 7 Operating knob Operating knobs for adjusting time for cooking zones and temperature
The hob Oven valve Single cooking zones Double cooking zones Cooking zone indicators Oven and clock indicators 8 Cooking zone indicators
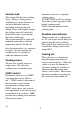
Automatic cut-out of “forgotten” cooking zones. QUICKSTART on all heat settings. Activation of the large zone on the double cooking zones Child safety mechanism for the cooking zones. Ceramic hob The ceramic hob has four cooking zones. When a cooking zone is switched on, its glow will turn on and off at different intervals, depending on the chosen heat setting. Even at the highest setting the cooking zone will switch off from time to time, to prevent the hob from overheating.
Oven Plinth Instructions on how to use the oven are given in the section: “How to use”. You can select from the following oven functions: The plinth is adjustable to give working heights from 85 cm to 93.5 cm. Fan oven Conventional oven Grill Combination oven Bottom heat Pizza/quiche programme Slow-cooker programme The sides, ceiling and rear wall of the oven are coated in catalytic enamel, which is partly self-cleaning. The oven base is coated in smooth and easily-cleaned enamel.
Safety devices The cooker has anti-tilt protection preventing it tipping over under abnormal load, e.g. if a child sits on top of the open oven door. Wall The anti-tilt protection must be mounted and only works when the cooker is pushed into position and the screw is fitted. Anti-tilt protection Floor 90 mm The oven door has child protection, making it more difficult for children to open the door.
Equipment Razor and cleaning fluid for the ceramic hob.
Before use Activating the child safety devices On the oven door The child safety device is located inside the handle on the left-hand side. Activate the child safety device by turning the small screw on the inside of the door. Use a coin to turn the screw. You now have to press the child safety device to the left before you can open the door. on off The cooker is designed for normal household use. Any other use may cause an accident.
On the cooking zones Turn the two operating knobs to the left and hold them there for two seconds. The display will show: When you switch on a cooking zone, the display will show: Now when you switch on a cooking zone you must turn the two operating knobs to the left and hold them there for two seconds. You must then turn on one of the cooking zones within ten seconds. The symbol disappear. on the display will You can deactivate the child safety device by: 1.
On the oven functions The child safety device operates when the oven is not in use. 1. Simultaneously press buttons and , holding them in for three seconds. 2. You will hear a “beep” and will see a "SAFE" on the display. You can deactivate the child safety device by: 1. Simultaneously pressing buttons and , and holding them in for three seconds.
Protecting the ceramic hob Apply a protective coating to your ceramic hob before using it. This will make it easier to clean and prevent any spillages burning on hard. What to do: 1. Pour a few drops of the cleaning fluid onto a piece of kitchen paper and rub over the whole hob. 2. Polish the hob with a clean cloth until dry. Setting the clock E.g. 17:00 hours Simultaneously press buttons and . Release. Turn until the proper time in hours and minutes appears on the display.
Heat-cleaning the oven 1. Press 2. Turn the knob until a light appears opposite : 3. Leave the oven in this setting for about one hour. Ensure good ventilation by turning on the cooker hood or opening a window 4. Turn off the oven by pressing 5. Then leave the oven door open for about two hours, while ventilating the kitchen. 6. Clean the oven, oven door and shelf rails with hot water and washing-up liquid. Dry off the oven. The oven may still give off an odour the first time it is used.
How to use Never place wet pans on the ceramic hob. Make sure pans have no sand, sugar or salt adhering to them. Sand can scratch the surface and sugar and salt damage it. Always dry pans before placing them on the ceramic hob. The hob’s coloured decoration may become worn and scratched from use. The ceramic hob Never use a cracked ceramic hob. Spillages or cleaning water could penetrate into voltage-bearing parts. Cut off the power supply to the appliance and contact Service.
The cooking zones The operating knobs can be turned continuously from levels one to nine, nine being the highest setting. There is QUICKSTART on all levels, so you can turn the zone to the required heat setting from the start. See heat settings table. The 14 and 18 cm cooking zones are suitable for heating up and cooking-on small and medium-sized quantities. The 21 cm cooking zone is suitable for frying and for heating and cooking-on large quantities.
CHEC control Autostop If you have forgotten to turn off one of the cooking zones, it will automatically cut out after a period of time. The higher the setting, the shorter the time will be before cut-out. Setting 1 2 3 4 5 6 7 8 9 AUTOSTOP 6 hours 6 hours 5 hours 5 hours 4 hours 1½ hours 1½ hours 1½ hours 1½ hours When autostop has been activated the display will show: The cooking zones will be inoperative. Turn all control knobs to 0. The cooking zones can now be used again.
1. Turn the operating knob to the right. will show on the display. Turn until the knob clicks. The QUICKSTART symbol will appear on the display and the QUICKSTART lamp will flash. 2. Then turn the operating knob to the desired heat setting (e.g. level 3). Level 3 will appear on the display, while the QUICKSTART light will continue flashing until the cooking zone has automatically cut back to level 3. Setting the double cooking zones to full-zone operation 1.
To switch on a cooking zone, you must now turn the two operating buttons to the left and hold them for two seconds. You must then turn on one of the cooking zones within ten seconds.
Choice of pans A ceramic hob requires a more careful selection of cooking pans than traditional cookers with elements. Please note the following: - Aluminium has good heat conductivity but may leave silver-coloured marks on the hob. The marks can be removed with the cleaning agent supplied with the cooker if this is rubbed in well with kitchen paper. - Pots and pans of glass or with a coarsely patterned enamel base create more wear on the hob than other materials. - Avoid pans with painted bases.
Check the flatness of the base by placing the pan upside down on a work surface and holding a ruler over the base. A curved base, whether inwards or outwards, will lengthen cooking times and increase energy consumption. If the base diameter is too small, energy consumption will go up and any spilled food will burn hard onto the hot cooking zone. Cooking pans with very smooth or light-coloured bases will give slightly longer cooking times than pans with a matt or dark surface.
Use 1 dl water on the 14 cm cooking zone. Use 2 dl water on the 18 cm cooking zone Use 3 dl water on the 21 cm cooking zone Advice and tips on using the cooking zones Following the advice below can help you save energy and make cleaning easier. Cover the pan with a tight-fitting lid. Bring to the boil at the maximum level and then turn down to the lowest possible level when steam starts pouring out under the lid.
The clock Display and buttons 17 00 ON/OFF Minute timer Cooking time Stop time Temperature display 26
Setting/altering the time 17 00 Example: The time is 17:00 1. Simultaneously press buttons and . The colon will begin to flash. Release the buttons. 2. Turn until the proper time in hours and minutes appears in the display. After 5 seconds the dot will stop flashing. 3. The oven is ready for use. Minute timer Example: To set the minute timer to 10 minutes. Start the timer by pressing . Release the button. Set the time by operating . The display will show the present time.
Oven function selection You alter the oven function by turning the oven control knob.
Temperature selection 17 00 1. Press 2. You alter the oven function by turning the oven control knob. 2. You can alter the temperature by turning . When the oven starts the display will show the set temperature. As the oven’s temperature rises you can read off the actual temperature by pressing . When the set temperature is reached, you will hear a single beep. Use of roasting thermometer The temperature in the centre of the meat can be set between 31˚C and 95˚C.
Automatic roasting E.g. To roast a joint to a centre temperature of 65˚C. The roast is to be cooked at 175˚C using the fan oven. 1. Insert the roasting thermometer sensor into the centre of the joint. 2. Plug the thermometer into the socket on the right side of the oven. 3. Switch on the oven by pressing . 4. Select the oven function and temperature. The flashing oven functions can be used in conjunction with the roasting thermometer. 5. Wait until the display shows 60˚C 6.
The display will show the desired centre temperature. Press to see the actual temperature in the centre of the joint, the oven’s set temperature and the current temperature of the oven. One press of will show the actual temperature in the centre of the meat (once the temperature is above 31˚C) for five seconds. Two presses of will show the oven’s set temperature for five seconds. Three presses of will show the oven’s current temperature for five seconds. When the oven turns off, the oven symbol will flash.
Automatic oven stop Eg. To operate the oven as a fan oven at 175˚C for 30 min. The time is 17:00. 1. Start the oven by pressing . 2. Select the oven function by turning the control knob until a light appears opposite . 3. Set the cooking time. Press . Release the button. 4. Set the time using . 30 175 The display will show the current time. Press to see the remaining time. When the set time is up, three beeps will sound, followed by single beeps at short intervals.
Automatic oven start and stop. Example: The time is 17:00. To start the oven automatically and cook the food with the fan oven at 175˚C for 30 min. The food is to be ready at 18:00. 1. Start the oven, by pressing . 2. Select the oven function by turning the control knob until a light shows opposite . 3. Select the cooking time. Press . Release the button. Set the time by using . 30 175 4. Select the stop time by pressing Set the time using . The oven is now set to start automatically.
When the set cooking time is up, the oven will three beeps. Single beeps will sound at short intervals as an indication that the food is ready. When the oven has turned off, The oven symbol will first disappear only when the button is pressed. Remember to add in the oven’s pre-heating time when setting the cooking time.
The oven Never put aluminium foil, a baking sheet or a roasting dish directly on the floor of the oven. The enamel could be damaged through overheating. The oven gets hot during use, so keep children under supervision. Conventional oven The oven has heating elements in the ceiling and floor which cook the food directly by radiated heat. Use only one shelf at a time for baking and roasting. Fan oven A fan behind the oven’s hot-air screen blows air out through air channels in the sides of the screen.
When using the fan oven, two shelves can be used simultaneously. The shelves must be placed on rails 2 and 5 or 1 and 4. When using the fan oven, cooking temperatures should be reduced by 15-20% in comparison with a conventional oven. Combination oven The combination oven combines a fan oven and a grill. The fan circulates air round the oven while the grill element heats the air to the desired temperature and maintains it there.
Defrosting Best results are obtained by preheating the oven. The pre-heating time for 220˚C is approximately 15 min. Use the temperature and time indicated in the recipe. Place the food to be cooked on shelf 3. The ring element and oven fan are used. This function ensures gentle thawing of frozen products. You can defrost on the grid or on several shelves at once if there is a great deal to be thawed up.
In a conventional oven, the whole surface will develop a uniform colour. In a fan oven baking and cooking is more rational, but the colour will be more uneven. To achieve the best results arrange the food so as not to block air flow. For instance, rolls must be arranged in straight rows. Rectangular items such as baguettes, oblong cakes etc. must be arranged with their narrow ends towards the rear wall of the oven and the door.
Settings - baking Baking Conventional oven Fan oven ˚C ˚C Mins White rolls Wholemeal rolls Small yeast cakes and filling Sweet pretzels White bread Wholemeal bread Rye bread Baguettes Low-sided sponge cakes High-sided sponge cakes Madeira cake Swiss roll sponge Choux buns Biscuits Gateau sponges Meringues Meringue bases Marzipan rings Mins 3 200-225 200 3 3 200-225 8-12 15-20 10-12 2&5 2&5 2&5 170-180 170-180 170-180 12-15 15-20 10-15 200-225 180-200 200 185-195 220-225 175-200 10-15 35-40 35-4
Settings – other cooking Madlavning ˚C In oven Mins Conv.
Roasting This oven is well insulated. That means that humidity in the oven will be relatively high and consequently no water should be added when roasting. If you want stock for making gravy, place the joint in a suitably sized oven-proof dish and add max. 5 dl water. No further water should be added during cooking. If you use too much water in the oven, condensation will form which may spill out onto the floor. You will also use excessive energy. Max 55 dl Max.
Use of the roasting thermometer To achieve the best results, the tip of the roasting thermometer must be buried in the thickest part of the joint. It must not rest in fat or against a bone, as this will give a false reading. The whole of the sensor pin must be inside the meat, as otherwise the heat from the oven will affect the thermometer. When the desired temperature is reached, take the joint out, cover it with aluminium foil and let it rest for about 20 min.
Settings – roasting (in traditional oven, fan oven and combination oven) Roasting ˚C ˚C In oven Mins of the meat per kg meat Conv.
Settings - slow-roasting These programmes are suitable for lean and red meat. Joints must weigh a maximum of 2.5 kg. Roasting ˚C Minut of the meat per kg meat Beef Beef joint approx. 1000-1500g Rump joint Old fashioned beef 2500g Boned shoulder approx. 800g, browned on the hob 4 entrecote steaks 1-1.5 cm, browned on the hob T-bone steak approx. 700 g, 2.5-3 cm, browned on the hob Lamb Leg of lamb approx. 2000 g Pork Tenderloin approx.
Grilling For grilling the temperature should be 250˚C. If you wish to grill more gently you may choose a lower temperature. Wipe the item to the grilled with kitchen paper as otherwise moist items will steam rather than grill. Allow the grill to warm up for five minutes before putting in the food. Arrange the food on the grid on the rail recommended on the settings table. Cover the roasting dish with aluminium foil and place below the grid to catch dripping fat etc., as this will make cleaning easier.
Grilling times depend on the size, fat marbling, quantity and temperature of the food to be grilled. Fish and white meat (poultry, veal and pork) will not take as pronounced a colour as dark meat (beef and game). Grilling oil and grilling spices will give a better colour but increase the risk of burning the food. Better results are obtained if the food to be grilled is not taken directly from the refrigerator.
Don’t roast at too high a temperature. Meat contains about 70% water. To get the juiciest meat, slow-roast it. The roasting time will be slightly longer and you will use slightly more energy at the lower temperature, but the result will be better. At the same time your oven will be easier to clean because fat droplets will not burn on so hard. Advice and tips on using the oven Use the following advice to save energy and make cleaning easier. Put food in a cold oven and use residual heat.
Ventilation position Each time you finish using your oven, put it in ventilation position. Otherwise there is a risk of humidity in the oven causing rust. What to do: 1. Open the oven door and lift the two stop catches. 2. Close the oven door until the stop catches engage with the side of the oven. Allow the oven door to remain open until the oven has cooled down. The storage drawer The storage drawer is designed for storage of oven equipment.
Cleaning and maintenance of The anti-tilt mechanism will only work when the cooker is pushed back into position and the screw has been mounted. Please remember this when moving the cooker to clean behind it. For hygienic and safety reasons the ceramic hob and oven must be kept clean. Fat droplets and food remnants will fume when heated up and in the worst case could cause a fire. Steel surfaces Carry out daily cleaning with a well wrung-out cloth.
The oven When cleaning the oven it is convenient to remove the door and shelf rails. The sides, ceiling and rear wall of the oven are of catalytic enamel which is partly self-cleaning at temperatures over 200˚C. After cooking at low temperatures and or where the oven is covered with fat, the oven must be heatcleaned. Keep children away from the cooker while the oven is being heat-cleaned, as the front of the cooker will get hotter than normal.
4. Set the oven to heat-clean. Switch on at . Turn the knob to . Select temperature 300˚C by turning knob . 5. Leave the oven at this setting for 1½ hours. The oven's AUTOSTOP function means the oven will automatically turn off after 1½ hours. 6. If you want the oven to self-clean for longer than 1½ hours you will need to program an automatic stop. See program instructions, "How to use - Automatic oven stop" 1. Carefully loosen the dirt with a wooden scraper. 2.
The oven fan The fan may get dirty from fat droplets from roasting. Check the fan every four months and clean if necessary. Switch off at the main switch before cleaning the oven fan, as no current may be connected when cleaning the oven fan. Remove the fan as follows: 1. Open the oven door. 2. Turn the spring lock (1) above until the screen comes free of the rear wall. 3. Lift the screen free of the two holders (2) below. 4. The nut holding the fan in place has a left-hand thread. 5.
The oven door Clean the enamel with a clean cloth, hot water and washing-up liquid. Removing the oven door 1. Set the door in ventilation position. 2. Pull it diagonally upwards towards you. 3. Place the door on a secure surface on a table. Removing the door glass Handle the glass panes carefully. The glass is hardened but will not withstand blows and impact or abrasive cleaners. Such treatment may cause the glass to shatter, either immediately or at a later time. Inner pane 1.
Middle pane 1. Hold the springs on either side of the glass 2. Lift the glass out. Outer pane 1. Lay the oven door on a table. 2. Grasp the door frame and carefully press the glass out of the frame. Cleaning the oven door panes. Clean the panes with a wet cloth and washing-up liquid. Wipe dry. If desired, polish the panes with a window cleaner. In case of severe soiling: 1. Lay a wet cloth with washing-up liquid on the pane for half an hour. 2. If necessary, use a razor to remove the softened dirt.
Oven equipment Removing the shelf rails 1. Pull the shelf rails out and up in the direction of the arrows. 2. Lift the shelf rails up. Cleaning of shelf rails and grid Wash the shelf rails and grid by hand or in a dish-washer. In the case of severe soiling, they may put to soak. If necessary use wire wool and rub well. After cleaning mount the shelf rails in the oven by inserting them in the top holes first. Cleaning of baking sheets and roasting dishes. Wipe with kitchen paper after use.
Replacing the oven light bulb Turn off the cooker at the main switch as no current may be connected when changing the light bulbs. 1. First remove the shelf rail. Prise out the lamp cover, e.g. by carefully inserting a screwdriver between the cover and the wall. (Protect the wall with an oven glove). Unscrew the bulb. 2. Unscrew the lamp cover and bulb in the direction of the arrow. 1. Use only original bulbs. Cleaning the lamp cover 1. Soak the lamp covers in hot water and washing-up liquid. 2.
The sealing strip must be dry before being reinstalled. Reinstall the strip by inserting the hooks in the holes and straightening the strip so that it lies parallel to the oven sides. The joint in the strip must be at the bottom. Indicator lamps These lamps are of the glow lamp type. In case of a fault, contact our Service Centre. The storage drawer The easiest way to clean the storage drawer is to take it out. This is done as follows: 1. Open the drawer and draw it out until it stops. 2.
Unpacking the front of these instructions so it is easy to find if you need to call Service. Check that the product is free of faults and undamaged on delivery. Transport damage Disposal of packaging Any transport damage incurred during transport which you yourself have not arranged must be notified to the dealer within a week of receipt. The model label on the back of the product bears the product’s serial number. Write the serial number on All the packaging can be recycled.
Installation Location of cooker in the kitchen If part of a fitted kitchen, the cooker must be located directly by a high kitchen cupboard. Height adjustment The cooker as supplied is at its lowest height of 85 cm. The cooker can be adjusted in height from 85 – 93.5 cm. In the cooker’s internal plinth there are four sets of holes, of five holes each. The holes allow the height to be adjusted to 85 – 86.5 – 87.5 – 88.5 and 91 cm. To achieve a height of 93.
Installation of anti-tilt device The anti-tilt device prevents the cooker tipping forward. Wall What to do: 1. Screw the attached angle fitting to the floor as shown. 2. Take the drawer out of the cooker and push the cooker into place. 3. Insert and tighten the screw provided in the hole in the angle fitting by stretching the arms into the space left by the drawer. 4. Replace the drawer.
Installation Electrical installation Installation may only be carried out by an authorised electrical installation engineer or a person authorised by the manufacturer.Work carried out by non-experts may lead to personal injury or damage to property, besides ruining the cooker. 1 2 3 4 N L1L2 L3 N 230/400V 3N PE 230/400V 2N 1 2 3 4 N L1 L2 Remove the back panel. Connect the cooker as shown on the diagram.
Service Problems Remedy Bread, rolls and soft cakes do not rise............................................... Temperature too low. The baking rises and then collapses again. Use a higher temperature. You have used too little yeast or baking powder. Check your recipe to see whether you have used enough. The fat/liquid mixture was too warm. The temperature must be 37˚C for fresh yeast and 45-50˚c for dried yeast. Bread, rolls and soft cakes are too dry...........
Problems Remedy Baking/food turns out too dark or unevenly baked............................. Wrong temperature. When cooking in the fan oven, temperatures should be reduced by 15-20% in comparison with a conventional oven. Note that a change of 5˚C can greatly affect the result. When the fan oven is in use, the result will generally be more uneven than in a conventional oven. Baking/food does not brown sufficiently..................................... Temperature too low.
Before calling service – Technical advice Problems Remedy The cooker/oven does not work Check that the cooker is switched on. Check the cooker’s fuses. (NB There are three fuses). The oven does not heat up quickly enough A conventional oven will heat up to 200˚C in approx. 13 mins. A fan oven will heat up to 200˚C in approx. 7 mins. The hob gets hot. Hob heat will reach 80˚C. However, it may become hotter if you use pans which do not have a flat base or which are too small to cover the cooking zones.
Problems Remedy The cooking zones keep switching on and off. This is the overheat mechanism cutting in and out to avoid overheating in the ceramic hob. It has no effect on cooking results. The cooking zones will not turn on and the display shows The child safety device is activated. Simultaneously turn the two operating knobs with the child safety symbol to . Then turn one of the cooking zones on within ten seconds. The cooking zones will not turn on and the display shows Autostop is activated.
325 88-7482 Rev.