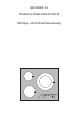
68100KF-N Induktions-Glaskeramik-Kochfeld Montage- und Gebrauchsanweisung
Sehr geehrte Kundin, sehr geehrter Kunde, lesen Sie bitte diese Gebrauchsanweisung sorgfältig durch. Beachten Sie vor allem den Abschnitt „Sicherheitshinweise“ auf den ersten Seiten. Bewahren Sie bitte diese Gebrauchsanweisung zum späteren Nachschlagen auf. Geben Sie sie an eventuelle Nachbesitzer des Gerätes weiter. 1 3 2 Folgende Symbole werden im Text verwendet: Sicherheitshinweise Warnung: Hinweise, die Ihrer persönlichen Sicherheit dienen.
Inhalt Gebrauchsanweisung. . . . . . . . . . . . . . . . . . . . . . . . . . . . . . . . . . . . . . . 5 Sicherheit. . . . . . . . . . . . . . . . . . . . . . . . . . . . . . . . . . . . . . . . . . . . . . . . . . . . . . 5 Entsorgung . . . . . . . . . . . . . . . . . . . . . . . . . . . . . . . . . . . . . . . . . . . . . . . . . . . . 7 Die wichtigsten Merkmale Ihres Gerätes . . . . . . . . . . . . . . . . . . . . . . . . . . 8 Gerätebeschreibung. . . . . . . . . . . . . . . . . . . . . . . . . .
Montageanweisung . . . . . . . . . . . . . . . . . . . . . . . . . . . . . . . . . . . . . . . . Technische Daten . . . . . . . . . . . . . . . . . . . . . . . . . . . . . . . . . . . . . . . . . . . . . . . . Bestimmungen, Normen, Richtlinien . . . . . . . . . . . . . . . . . . . . . . . . . . . . . . . . Sicherheitshinweise für den Installateur. . . . . . . . . . . . . . . . . . . . . . . . . . . . . Elektroanschluss. . . . . . . . . . . . . . . . . . . . . . . . . . . . . . . . . . . . . . . . . . . . .
Gebrauchsanweisung 1 Sicherheit Die Sicherheit dieses Gerätes entspricht den anerkannten Regeln der Technik und dem Gerätesicherheitsgesetz. Zusätzlich sehen wir uns jedoch als Hersteller veranlasst, Sie mit den nachfolgenden Sicherheitshinweisen vertraut zu machen. Elektrische Sicherheit 3 • Montage und Anschluss des neuen Gerätes dürfen nur durch einen konzessionierten Fachmann vorgenommen werden. • Reparaturen am Gerät dürfen nur von Fachkräften durchgeführt werden.
• Überhitzte Fette und Öle entzünden sich schnell. Wenn sie Speisen in Fett oder Öl (z.B. Pommes frites) zubereiten, sollten Sie den Kochvorgang beobachten. • Schalten Sie nach jedem Gebrauch die Kochzonen aus. Spezielle Hinweise für die Induktions-Kochzonen 3 • Wissenschaftliche Untersuchungen haben ergeben, dass eine Beeinflussung oder Gefährdung von Patienten mit implantierten Herzschrittmachern durch unsere Induktions-Kochzonen normalerweise nicht zu erwarten ist.
• Benutzen Sie keine Töpfe aus Gusseisen oder mit beschädigten Böden, die rau sind und Grate aufweisen. Beim Verschieben können Kratzer entstehen. • Wenn Zucker oder eine Zubereitung mit Zucker auf die heiße Kochzone gelangt und schmilzt, entfernen Sie diese sofort, noch im heißen Zustand, mit einem Reinigungsschaber. Erkaltet die Masse, kann es beim Entfernen zu Oberflächenschäden kommen. • Halten Sie alle Gegenstände und Materialien, die anschmelzen können, von der Glaskeramikfläche fern, z.B.
Die wichtigsten Merkmale Ihres Gerätes • Induktions-Kochzonen: Das Gerät verfügt über eine GlaskeramikKochfläche und Induktions-Kochzonen. Induktion erhitzt direkt den Boden des Kochgeschirrs und nicht erst die Glaskeramik. • Sensorfelder: Die Bedienung Ihres Gerätes erfolgt über Touch-Control-Sensorfelder. • Reinigung: Der Vorteil der Glaskeramik-Kochfläche und der Sensorfelder ist ihre Reinigungsfreundlichkeit. Die glatte Oberfläche lässt sich leicht reinigen.
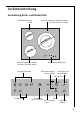
Gerätebeschreibung Ausstattung Koch- und Bedienfeld Induktions-Kochzone 1400W Zweikreis-Induktions-Kochzone 2400W mit Power-Funktion 3200W Induktions-Kochzone 1800W mit Power-Funktion 2400W Kochstufenanzeigen Touch-Control-Bedienfeld Kochzonenanzeigen Timer-Funktion Verriegelung mit Kontrolllampe Anzeige Timer Kochzonenwahl Zuschaltung Power-Funktion Timer Kochstufenwahl + und - Haupttaste „Ein/Aus“ 9
Die digitalen Anzeigen Es können Ziffern 1 bis 9 und vier verschiedene Buchstaben in der Anzeige erscheinen. • Die Ziffern zeigen die eingestellte Kochstufe an: 1 = kleinste Leistung 9 = höchste Leistung p = Powerstufe 1 • Bei den Kochzonen werden folgende Buchstaben und Funktionen angezeigt: h = Restwärme-Anzeige Achtung! Kochzone noch heiß; erlischt nach dem Abkühlen der Kochzone. Anzeige erfolgt nur bei ausgeschalteter Kochzone.
1 Sicherheitsabschaltung der Kochzonen Wird eine der Kochzonen nach einer bestimmten Zeit nicht ausgeschaltet oder die Kochstufe nicht verändert, schaltet sich die entsprechende Kochzone automatisch ab. In der Kochstufen-Anzeige aller eingeschalteten Kochzonen erscheint h und nach dem Abkühlen _.
Funktion und Wirkungsweise der Induktions-Kochzone Unter der Glaskeramik-Kochfläche befindet sich eine Induktionsspule aus Kupferdraht. Diese erzeugt elektromagnetische Felder, die direkt auf den Geschirrboden wirken und nicht, wie andere Aufheizverfahren, erst die Glaskeramik erhitzen. Das heißt, der Geschirrboden wird sofort erhitzt, damit wird Zeit und Energie gespart. Da die zum Kochen erforderliche Wärme direkt im Boden des Kochgeschirres erzeugt wird, erwärmt sich die Kochzone selbst kaum.
• Stellen Sie ein Gefäß mit geringem Wasserinhalt (3-5 mm Füllhöhe) auf die Kochzone. Schalten Sie die Kochzone auf volle Leistung (Schalterstellung 9). Achtung: Der Gefäßboden erwärmt sich bei geeignetem Geschirr innerhalb weniger Sekunden! • Sie können dies auch mit einem Magneten prüfen. Bleibt er am Boden haften, ist das Gefäß für Induktions-Kochzonen geeignet. Topfgröße 3 Die Induktions-Kochzone passt sich der Größe des Topfboden-Durchmessers bis zu einer bestimmten Grenze automatisch an.
Vor dem ersten Gebrauch Erstes Reinigen 1 Das Glaskeramik-Kochfeld feucht abwischen. Achtung: Benutzen Sie keine scharfen, scheuernden Reinigungsmittel! Die Oberfläche könnte beschädigt werden. Bedienung des Kochfeldes Touch Control-Sensorfelder Zur Bedienung der Touch Control-Sensorfelder legen Sie Ihren Finger von oben und flach auf das gewünschte Feld, bis entsprechende Anzeigen aufleuchten oder erlöschen, bzw. die gewünschte Funktion ausgeführt wird.
Gerät ausschalten Zum kompletten Ausschalten des Gerätes Sensorfeld „Ein/Aus“ I betätigen. Das Sensorfeld „Ein/Aus“ ca. eine Sekunde lang berühren. 3 Nach dem Abschalten einer einzelnen Kochzone oder des gesamten Kochfeldes wird vorhandene Restwärme mit h (wie „Heiß“) in den digitalen Anzeigen der entsprechenden Kochzonen angezeigt. Kochzonenwahl Zum Auswählen der gewünschten Kochzone das zugehörige Sensorfeld für ca. eine Sekunde berühren.
Kochstufenwahl Zum Einstellen bzw. Verstellen der Kochstufe (1 bis 9) für die gewählte Kochzone. Mit dem Sensorfeld + die Kochstufe erhöhen. Mit dem Sensorfeld - die Kochstufe verringern. 3 16 Wenn mehrere Kochzonen gleichzeitig in Betrieb sind, muss zum Verstellen der Kochstufe die gewünschte Kochzone durch Berühren des entsprechenden Sensorfeldes ausgewählt werden. Der Dezimalpunkt im Display zeigt die jeweils ausgewählte Kochzone an.
Power-Funktion aktivieren Durch die Power-Funktion können Sie die Leistung der Kochzone vorne links und der Kochzone rechts 10 Minuten lang erhöhen. Mit dieser Funktion können Sie beispielsweise eine große Menge Wasser schnell zum Kochen bringen oder Fleisch stark anbraten. 3 Zum Einschalten der Power-Funktion muss die Kochzone ausgewählt sein (Dezimalpunkt in der Anzeige). Berühren Sie das Sensorfeld PowerFunktion . In der Anzeige erscheint p und die Power-Funktion ist nun aktiv.
Kochzone ausschalten 1. Mit den Kochzonen-Sensorfeldern gewünschte Kochzone auswählen. 2. Zum Ausschalten die Sensorfelder + und - gleichzeitig berühren oder mit Sensorfeld - auf Null zurückstellen. 3 18 Eine Kochzone kann nur ausgeschaltet werden, wenn der Dezimalpunkt in der Kochzonenanzeige leuchtet.
Kochen mit der Ankochautomatik Alle vier Kochzonen des Kochfeldes sind in neun Stufen regelbar und sind mit einer Ankochautomatik ausgestattet: – 1, kleinste Kochstufe – 9, höchste Kochstufe – a, Ankochfunktion. Mit der Ankochautomatik (a) arbeitet die Kochzone für eine bestimmte Zeit mit der vollen Leistung und schaltet automatisch auf die eingestellte Fortkochstufe zurück. Die Dauer des automatischen Ankochstoßes ist abhängig von der gewählten Fortkochstufe. 1.
In der Kochstufenanzeige leuchtet jetzt a auf. 3. Dann Sensorfeld - drücken und auf die gewünschten Fortkochstufe 1 bis 8 stellen. Die eingestellte Fortgarstufe wird zunächst angezeigt. 3 20 Nach 5 Sekunden erscheint anstelle der Fortkochstufe wieder a in der Anzeige. Nach Ablauf der Ankochzeit wird wieder die Fortkochstufe angezeigt. Wenn Sie während der Automatik-Funktion eine höhere Stufe wählen, z.B. von 3 nach 5, wird die bisherige Ankochzeit berücksichtigt.
Kochen ohne Ankochautomatik 2 1. Zum Ankochen/Anbraten eine hohe Leistung wählen. 2. Sobald sich Dampf bildet bzw. das Fett heiß ist, auf die erforderliche Fortkochstufe zurückschalten. 3. Zur Beendigung des Kochvorgangs auf Null zurückschalten. Hinweis: Beim Arbeiten mit der Induktions-Kochzone sollten Sie beachten, dass – sich die Aufheizzeiten durch die direkte Energieübertragung auf das Kochgeschirr verkürzen! – der Garvorgang nach dem Ausschalten der Kochzone sofort beendet wird (kein Überkochen!).
Timer Mit dem integrierten Timer kann bei allen Kochzonen eine Gardauer eingestellt werden. Ist das Ende der Gardauer erreicht, schaltet sich die Kochzone automatisch ab. 1. Mit dem Sensorfeld Kochzone die gewünschte Kochzone auswählen und gewünschte Kochstufe einstellen. 2. Sensorfeld TIMER W berühren, um die Timerfunktion für diese Kochzone zu aktivieren. In der Anzeige erscheint 00. 3. Mit den Sensorfeldern + oder - die gewünschte Zeitdauer bis zum automatischen Ausschalten einstellen oder verändern (z.
3 Zur schnelleren Einstellung, belassen Sie den Finger solange auf dem Sensorfeld + oder -, bis der gewünschte Wert erreicht ist. Wenn zuerst das Sensorfeld - betätigt wird, beginnt die Zeiteinstellung bei 99 Minuten. Wird zuerst das Sensorfeld + betätigt, fängt die Zeiteinstellung bei 1 Minute an. Verbleibende Gardauer anzeigen Wenn Sie eine Kochzone anwählen, die sich im Timer-Betrieb befindet, erscheint im Timer-Anzeigefeld die noch verbleibende Gardauer.
Anwendung, Tabellen, Tipps Tipps zum Kochen mit und ohne Ankochautomatik Die automatische Ankochfunktion eignet sich für: • Gerichte, die kalt aufgesetzt werden, bei hoher Leistung erhitzt werden und auf der Fortgarstufe nicht ständig beobachtet werden müssen, • Gerichte, die in die heiße Pfanne gegeben werden.
Tabellen Hinweis: Die Angaben in der folgenden Tabelle sind Richtgrößen. Welche Schaltereinstellung für Kochvorgänge erforderlich ist, hängt von der Qualität der Töpfe und von der Art und Menge der Lebensmittel ab. Anhaltswerte für das Einstellen der Kochzonen Schalterstellung geeignet für Ankochen Ankochen großer Mengen Wasser, Spätzle kochen Starkes Anbraten Fritieren von Pommes frites, Anbraten von Fleisch, z. B. Gulasch, Ausbacken, z. B.
Anwendungsbeispiele für Ankoch-Automatik 26 Schalterstellung Garvorgänge Anwendungsbeispiele Dauer Hinweise/Tipps A7 bis A8 starkes Braten Steaks pro Pfanne 8-20 Min. Zwischendurch wenden A6 bis A7 Braten Schnitzel, Frikadellen, Spiegeleier, Bratwürste pro Pfanne 10-20 Min. Zwischendurch wenden A6 bis A7 Backen Pfannkuchen, Flädle fortlaufend backen Zwischendurch wenden A3 bis A5 Kochen Suppen 40-150 Min. Bis 3 l Flüssigkeit plus Zutaten 20-60 Min. Wenig Flüssigkeit verwenden! z.
Reinigung und Pflege Vorteile bei der Reinigung und Pflege der InduktionsKochzonen 2 Bei Induktions-Glaskeramik-Kochzonen ist der Reinigungsaufwand wesentlich geringer: – Die Induktions-Kochzone reagiert schneller auf Zurück- oder Abschalten. Ein Überkochen und Einbrennen von Speisen wird weitgehend vermieden. – Die Temperaturen an der Glaskeramik-Oberfläche sind beim induktiven Kochen deutlich geringer als bei herkömmlichen Strahlungsbeheizungen.
Festklebende Verschmutzungen 3 1. Zur Entfernung von übergekochten Speisen oder festgeklebten Spritzern einen Reinigungsschaber benutzen. 2. Den Reinigungsschaber schräg zur Glaskeramikfläche ansetzen. 3. Verschmutzungen mit gleitender Klinge entfernen. Reinigungsschaber und Glaskeramikreiniger erhalten Sie im Fachhandel. 1 Spezielle Verschmutzungen 1.
Was tun, wenn … Abhilfe bei Störungen 1 Möglicherweise handelt es sich bei einer Störung nur um einen kleinen Fehler, den Sie anhand nachfolgender Hinweise selbst beheben können. Führen Sie keine weiteren Arbeiten selbst aus, wenn nachstehende Informationen im konkreten Fall nicht weiterhelfen. Warnung! Reparaturen am Gerät dürfen nur von Fachkräften durchgeführt werden. Durch unsachgemäße Reparaturen können erhebliche Gefahren für den Benutzer entstehen.
… die Anzeige bis auf _ bzw. h für Restwärme plötzlich ausfällt? Überprüfen Sie, ob – aus Versehen die Ein-/Aus-Taste betätigt wurde. – die Sensorfelder durch ein feuchtes Tuch, Flüssigkeit oder ähnlichem teilweise bedeckt sind. – die Sicherheitsabschaltung aktiviert wurde. … nach dem Ausschalten der Kochzonen kein _ bzw. h für Restwärme in der Anzeige erscheint? Überprüfen Sie, ob – die Kochzone nur kurz in Betrieb gewesen und daher noch nicht heiß genug ist.
Montageanweisung 1 Achtung! Montage und Anschluss des neuen Gerätes dürfen nur durch einen konzessionierten Fachmann vorgenommen werden. Beachten Sie bitte diesen Hinweis, da sonst bei auftretenden Schäden der Garantieanspruch entfällt.
Bestimmungen, Normen, Richtlinien Dieses Gerät entspricht folgenden Normen: • EN 60335-1 und EN 60335-2-6 bezüglich der Sicherheit elektrischer Geräte für den Hausgebrauch und ähnliche Zwecke und • EN 60350 bzw. DIN 44546 / 44547 / 44548 bezüglich der Gebrauchseigenschaften von Elektroherden, Kochmulden, Backöfen und Grillgeräten für den Haushalt.
1 Sicherheitshinweise für den Installateur • In der elektrischen Installation ist eine Einrichtung vorzusehen, die es ermöglicht, das Gerät mit einer Kontaktöffnungsweite von mind. 3 mm allpolig vom Netz zu trennen. Als geeignete Trennvorrichtungen gelten z.B. LS-Schalter, Sicherungen (Schraubsicherungen sind aus der Fassung herauszunehmen), FISchalter und Schütze. • Dieses Gerät entspricht bezüglich des Schutzes gegen Feuergefahr der EN 60 335-2-6.
Elektroanschluss 1 34 Vor dem Anschluss ist zu prüfen, ob die Nennspannung des Gerätes, das ist die auf dem Typenschild angegebene Spannung, mit der vorhandenen Netzspannung übereinstimmt. Das Typenschild befindet sich auf der unteren Verkleidung des Kochteils. Die Heizkörperspannung beträgt AC230V~. Auch bei älteren Netzen mit AC220V~ arbeitet das Gerät einwandfrei.
Montage 36
Service Im Kapitel „Was tun, wenn …“ sind einige Störungen zusammengestellt, die Sie selbst beheben können. Sehen Sie im Störungsfall zunächst dort nach. Handelt es sich um eine technische Störung? Dann wenden Sie sich bitte an unseren Kundendienst oder einen unserer Service-Partner (Adressen und Telefonnummern finden Sie im Verzeichnis „Kundendienststellen“). Bereiten Sie das Gespräch in jedem Fall gut vor. Sie erleichtern so die Diagnose und die Entscheidung, ob ein Kundendienstbesuch nötig ist.
From the Electrolux GroupK=qÜÉ=ïçêäÇ…ë=kçKN=ÅÜçáÅÉK aáÉ=bäÉÅíêçäìñJdêìééÉ=áëí=ÇÉê=ïÉäíïÉáí=Öê∏≈íÉ=eÉêëíÉääÉê=îçå=Ö~ëJ=ìåÇ=ëíêçãÄÉíêáÉÄÉåÉå=dÉê®íÉå=ÑΩê=ÇáÉ=hΩÅÜÉI òìã= oÉáåáÖÉå= ìåÇ= ÑΩê= cçêëí= ìåÇ= d~êíÉåK=gÉÇÉë= g~Üê= îÉêâ~ìÑí= ÇáÉ=bäÉÅíêçäìñJdêìééÉ= áå= ΩÄÉê= NRM=i®åÇÉêå= ÇÉê bêÇÉ= ΩÄÉê= RR= jáääáçåÉå= mêçÇìâíÉ= EhΩÜäëÅÜê®åâÉI= eÉêÇÉI= t~ëÅÜã~ëÅÜáåÉåI= pí~ìÄë~ìÖÉêI= jçíçêë®ÖÉå= ìåÇ o~ëÉåã®ÜÉêF=ãáí=ÉáåÉã=tÉêí=îçå=êìåÇ=NQ=jêÇK=rpaK Hier Typenschild aufkleben (nur für Werk) AEG Hausgeräte GmbH Postfach 10