LAVAMAT 73742 VI EN WASHING MACHINE USER MANUAL
FOR PERFECT RESULTS Thank you for choosing this AEG product. We have created it to give you impeccable performance for many years, with innovative technologies that help make life simpler – features you might not find on ordinary appliances. Please spend a few minutes reading to get the very best from it. ACCESSORIES AND CONSUMABLES In the AEG webshop, you’ll find everything you need to keep all your AEG appliances looking spotless and working perfectly.
Contents 3 CONTENTS 4 6 6 8 10 10 11 16 20 20 22 27 31 36 37 38 Safety information Technical data Product description Control panel First use Personalization Daily use Washing programmes Consumption values Helpful hints and tips Care and cleaning What to do if… Installation Electrical connection Building-in Environment concerns The following symbols are used in this user manual: Important information concerning your personal safety and information on how to avoid damaging the appliance.
Safety information SAFETY INFORMATION Read carefully & keep for future reference. • The safety of Your appliance complies with the industry standards and with legal requirements on the safety of appliances. However, as manufacturers, we feel it is our duty to provide the following safety notes. • It is most important that this instruction book should be retained with the appliance for future reference.
Safety information 5 • After having installed the appliance, check that it is not standing on the inlet and drain hose and the worktop is not pressing the electrical supply cable against the wall. • If the machine is situated on a carpeted floor, please adjust the feet in order to allow air to circulate freely under the appliance. • Always be sure, that there is no water leakage from hoses and their connections after the installation.
Technical data been given supervision or instruction concerning use of the appliance by a person responsible for their safety. • The packaging components (e.g. plastic film, polystyrene) can be dangerous to children danger of suffocation! Keep them out of children's reach. • Keep all detergents in a safe place out of children’s reach. • Make sure that children or pets do not climb into the drum. To prevent children or pets becoming trapped inside the drum the machine incorporates a special feature.
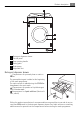
Product description 7 2 1 3 4 5 6 1 2 3 4 5 6 Detergent dispenser drawer Control panel Door opening handle Rating plate Drain pump Adjustable feet Detergent dispenser drawer Compartment for prewash phase or stain remover. The prewash detergent is added at the beginning of the wash programme. The stain remover is added during the STAIN-Action phase in the main wash. Compartment for powder or liquid detergent used for main wash. Compartment for liquid additives (fabric softener, starch).
Control panel CONTROL PANEL Below is a picture of the control panel. It shows the programme selector dial as well as the buttons and the display. These are presented by relevant numbers on the following pages.
Display 9.1 9.2 9.3 9.4 9.5 9.9 9.6 9.7 9.8 9.1 - Temperature indicator and COLD symbol 9.2 - Spin Speed indicator, RINSE HOLD , NIGHT CYCLE - symbols , SPIN , 9.3 - Programme progress display: PREWASH , MAIN WASH , RINSE DRAIN , OVERDOSAGE • The programme progress display shows the washing phases of the selected programme. • During a washing cycle, a black line blinks under the washing phase symbol of the running programme.
First use – If an option which is not compatible with the set wash programme is selected, the message Err is displayed for about 2 seconds and the yellow light of button 7 starts blinking. • Alarm codes – In the event of operating problems, some alarm codes can be displayed, for example (see chapter «What to do if...»). • End of the programme – When the programme has finished a blinking zero is displayed, the DOOR symbol disappears and the door can be opened. 9.8 - DELAY START - symbol 9.
Daily use 11 DAILY USE Load the laundry 1. Open the door by carefully pulling the door handle outwards. Place the laundry in the drum, one item at a time, shaking them out as much as possible. 2. Close firmly the door. You must hear a click during closing. WARNING! Do not embed the laundry between the door and the rubber joint. Measure out the detergent and the fabric softener Your new appliance was designed to reduce water, energy and detergent consumption. 1.
Daily use Select the required programme by means of programme selector dial (1) You can choose the right programme for any type of laundry following the descriptions on the washing programme tables (see «Washing Programmes»). Turn the programme selector dial to the required programme. The programme selector determines the type of washing cycle (e.g. water level, drum movement, number of rinses) and the washing temperature according to the type of laundry.
Daily use 13 To empty out the water, please read chapter «At the end of the programme». Programme option buttons Depending on the programme, different functions can be combined. WARNING! Not all the options are compatible among themselves. The symbols of the incompatible options disappear. Anyway, if an option, which is not compatible with the set washing programme or any other option, is selected, the Err message is displayed for few seconds and the yellow pilot of button 7 light starts blinking.
Daily use EXTRA RINSE option (additional rinse) This appliance is designed for saving water. However, for people with a very delicate skin (allergic to detergents) it may be necessary to rinse the laundry using an extra quantity of water (extra rinse). The relevant symbol will appear on the display and this option is active for selected washing programme. If you wish to activate this option permanently press simultaneously buttons 2 and 3 for some seconds: the relevant symbol appears on the display.
Daily use 15 Selecting the delayed start. • Select the programme and the required options. • Select the delay start. • Press button 7: the appliance starts its hourly countdown. The programme will start after the selected delay has expired. Cancelling the delayed start • Set the washing machine to PAUSE by pressing the button 7; • Press button 8until the symbol ’ is displayed; • Press the button 7 again to start the programme.
• • • • • turn the programme selector dial to select the DRAINING or SPINNING programme reduce the spin speed if needed, by means of the relevant button press the button 7 when the programme has finished the display shows a blinking . On the display the DOOR symbol disappears and the door can be opened. to switch the machine off. Remove the laundry Turn the programme selector dial to from the drum and carefully check that the drum is empty.
Washing programmes Programme Maximum and Minimum Temperature Cycle Description Maximum Spin Speed Maximum Fabrics Load Type of Laundry Options JEANS 60° - Cold Main wash - Rinses - Long spin Maximum spin speed 1200 rpm Max. load 3 kg With this programme it is possible to wash items like pants, shirts or jackets in Jeans and also jersey realized with hi-tech materials. (The Extra Rinse option will be activated automatically).
Washing programmes Programme Maximum and Minimum Temperature Cycle Description Maximum Spin Speed Maximum Fabrics Load Type of Laundry Options DRAIN Draining of water Max. load 6 kg For emptying out the water of the last rinse in programmes with the Rinse Hold or Night Cycle option selected. SPIN Drain and long spin Maximum spin speed 1400 rpm Max. load 6 kg Separate spin for hand washed cotton garments and after programmes with the Rinse Hold or Night Cycle option selected.
Washing programmes Programme Maximum and Minimum Temperature Cycle Description Maximum Spin Speed Maximum Fabrics Load Type of Laundry Options SILK/ HAND WASH 30° Prewash - Main wash - Rinses - Short spin Maximum spin speed 1200 rpm Max. load 1 kg Special programme is suitable for washing heavily soiled sport items. The machine will add automatically a prewash phase before the main wash to eliminate mud stains. We recommend you NOT to put the compartment of the detergent detergent into the drawer.
Consumption values CONSUMPTION VALUES Programme Energy consumption (KWh) Water consumption (litres) White Cottons 95° 2.1 57 Cottons 60° 1.2 53 Cotton Energy Saving Programme 60° 1) 1.02 42 Cottons 40° 0.7 53 Synthetics 40° 0.5 44 Delicates 40° 0.55 56 Wool/ Handwash 30° 0.25 58 Programme duration (Minutes) For the duration of the programmes, please refer to the display on the control panel.
Helpful hints and tips 21 Rust: oxalic acid dissolved in hot water or a rust removing product used cold. Be careful with rust stains which are not recent since the cellulose structure will already have been damaged and the fabric tends to hole. Mould stains: treat with bleach, rinse well (whites and fast coloureds only). Grass: soap lightly and treat with bleach (whites and fast coloureds only). Ball point pen and glue: moisten with acetone1), lay the garment on a soft cloth and dab the stain.
Care and cleaning Degrees of water hardness Water hardness is classified in so-called “degrees” of hardness. Information on hardness of the water in your area can be obtained from the relevant water supply company, or from your local authority. If the water hardness degree is medium or high we suggest you to add a water softener following always the manufacturer’s instructions. When the degree of hardness is soft, readjust the quantity of the detergent.
Care and cleaning 23 1. To aid cleaning, the top part of the additive compartment should be removed. Remove the detergent dispenser drawer by pressing the catch downwards and by pulling it out. 2. Flush it out under a tap, to remove any traces of accumulated powder. 3. Having removed the drawer, use a small brush to clean the recess, ensuring that all washing powder residue is removed from the upper and lower part of the recess. 4.
Care and cleaning Door seal Check from time to time the door seal and objects that could be trapped in the fold. Drain pump The pump should be inspected regularly and particularly if: • the appliance does not empty and/or spin; • the appliance makes an unusual noise during draining due to objects such as safety pins, coins etc. blocking the pump; • a problem with water draining is detected (see chapter “What to do if...” for more details).
Care and cleaning 25 5. When no more water comes out, unscrew the pump cover (A) by turning it anticlockwise and remove the filter. Use pliers, if necessary. Always keep a rag nearby to dry up any water spillages when removing the cover. Clean the filter under a tap, to remove any traces of fluff. 6. Remove foreign bodies and fluff from the filter seat and from the pump impeller. Check carefully whether the pump impeller rotates (it rotates jerkily).
Care and cleaning 1. Turn off the water tap. 2. Unscrew the hose from the tap. 3. Clean the filter in the hose with a stiff brush. 4. Screw the hose back onto the tap. Make sure the connection is tight. 5. Unscrew the hose from the machine. Keep a towel nearby because some water may flow. 6. Clean the filter in the valve with a stiff brush or with the piece of cloth. 7. Screw the hose back to the machine and make sure the connection is tight. 8. Turn on the water tap.
What to do if… 27 is full, put the cap back on the hose. Empty the bowl. Repeat the procedure until water stops flowing out; 5. clean the pump if necessary as previously described; 6. replace the emergency emptying hose in its seat after having plugged it; 7. screw the pump again. Frost precautions If the machine is installed in a place where the temperature could drop below 0°C, proceed as follows: 1. close the water tap and unscrew the water inlet hose from the tap; 2.
What to do if… Problem Possible cause/Solution The washing machine does not start: The door has not been closed. • Close the door firmly. The plug is not properly inserted in the power socket. • Insert the plug into the power socket. There is no power at the socket. • Please check your domestic electrical installation. The main fuse has blown. • Replace the fuse. The selector dial is not correctly positioned and the button 7 has not been pressed.
What to do if… Problem 29 Possible cause/Solution There is water on the floor: Too much detergent or unsuitable detergent (creates too much foam) has been used. • Reduce the detergent quantity or use another one. Check whether there are any leaks from one of the inlet hose fittings. It is not always easy to see this as the water runs down the hose; check to see if it is damp. • Check the water inlet hose connection. The drain or the inlet hose is damaged. • Replace it with a new one.
What to do if… Problem Possible cause/Solution The machine vibrates or is noisy: The transit bolts and packing have not been removed. • Check the correct installation of the appliance. The support feet have not been adjusted • Check the correct levelling of the appliance. The laundry is not evenly distributed in the drum. • Redistribute the laundry. Maybe there is very little laundry in the drum. • Load more laundry.
Installation 31 INSTALLATION Unpacking All transit bolts and packing must be removed before using the appliance. You are advised to keep all transit devices so that they can be refitted if the machine ever has to be transported again. 1. After removing all the packaging, carefully lay machine on it’s back to remove the polystyrene base from the bottom. 2. Remove the power supply cable and the draining and inlet hose from the hose holders on the rear of the appliance.
Installation 3. Unscrew the three bolts with the key supplied with the appliance. 4. Slide out the relevant plastic spacers. 5. Fill the smaller upper hole and the two large ones with the corresponding plastic plug caps supplied in the bag containing the instruction booklet. Positioning and levelling Install the machine on a flat hard floor. Make sure that air circulation around the machine is not impeded by carpets, rugs etc. Before placing it on small tiles, apply a rubber coating.
Installation 33 If it is impossible to avoid positioning the machine next to a gas cooker or coalburning stove, an insulating panel covered with aluminium foil on the side facing the cooker or stove, must be inserted between the two appliances. The machine must not be installed in rooms where the temperature can drop below 0°C. The water inlet hose and the drain hose must not be kinked.
Installation 1. Open the porthole and extract the inlet hose. 2. Connect the hose with the angled connection to the machine. Do not place the inlet hose downwards. Angle the hose to the left or right depending on the position of your water tap. 3. Set the hose correctly by loosening the ring nut. After positioning the inlet hose, be sure to tighten the ring nut again to prevent leaks. 4. Connect the hose to a tap with a 3/4” thread. Always use the hose supplied with the appliance.
Installation 35 Water-stop device The inlet hose is provided with a water stop device, which protects against damage caused by water leaks in the hose which could develop due to natural ageing of the hose. This fault is shown by a red sector in the window «A». Should this occur, turn the water tap off and refer to your Service Centre to replace the hose. A Water drainage The end of the drain hose can be positioned in three ways: 1.
Electrical connection The drain hose may be extended to a maximum of 4 metres. An additional drain hose and joining piece is available from your local Service Centre. ELECTRICAL CONNECTION Information on the electrical connection is given on the rating plate on the inner edge of the appliance door. Check that your domestic electrical installation can take the maximum load required, also taking into account any other appliances in use. WARNING! Connect the machine to an earthed socket.
Building-in BUILDING-IN This appliance has been designed to be built into the kitchen furniture. The recess should have the dimensions shown in picture A. Preparation and assembly of the door 600 min. 560 596 555 min. 820 176,5 416 75 60 100 The machine is originally pre-arranged for the assembly of a door opening from right to left. In this case it is sufficient to screw in the hinges (1) and the counter-magnet (6) provided with the appliance, at the right level (Fig. B).
Environment concerns Fix the hinges (1) to the machine by means of the M5x15 screws (3-Fig. B). The hinges can be adjusted to compensate for possible uneven thickness of the door. To align the door perfectly it is necessary to loosen the screw (3-Fig. B), adjust the door and tighten the screw again. • Counter-magnet (6) The appliance is prearranged for a magnetic closure of the door.
>PE<=polyethylene >PS<=polystyrene >PP<=polypropylene This means that they can be recycled by disposing of them properly in appropriate collection containers. Ecological hints To save water, energy and to help protect the environment, we recommend that you follow these tips: • Normally soiled laundry may be washed without prewashing in order to save detergent, water and time (the environment is protected too!). • The machine works more economically if it is fully loaded.
www.aeg.