
User manual


7
Hob burners control knobs
The symbols on the knobs mean that :
z there is no gas supply
there is maximum gas supply
there is minimum gas supply
Lighting the burners
For easier lighting, proceed before putting a pan
on the pan support.
To light a burner:
z turn the relevant knob anticlockwise to maximum
position (
).
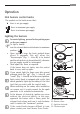
z Upon ignition, keep the knob pushed down
about 5 seconds. This will allow the
"thermocouple" (Fig. 1 - letter D) to be heated
and the safety device to be switched off, otherwise
the gas supply would be interrupted.
z Then adjust the flame as required.
If the burner does not ignite, turn the control
knob to zero, and try again.
If you cannot light the flame even after several
attempts, check the "cap" (Fig. 1 - letter A) and
“crown” (Fig. 1 - letter B) are in the correct position.
Each control knob is equipped with a pilot light
which gradually lights up according to the heat
level that you select with the control knob.
When switching on the mains, after installation
or a power cut, it is quite normal for the spark
generator to be activated automatically.
In the absence of electricity, ignition can occur
without the electrical device; in this case,
approach the burner with a flame, push the
relevant knob down and turn it anti-clockwise
until it reaches the “maximum” position.
If the control knobs become difficult to turn,
please contact your local Service Force Centre.
Operation
)
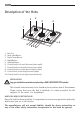
Fig. 1
A - Burner cap
B - Burner crown
C - Ignition electrode
D - Thermocouple
Triple Crown Burner
A
B
C
D