ARCTIS 1600-4 GS n DERIN DONDURUCU TABLE-TOP FREEZER KULLANIM KILAVUZU OPERATING INSTRUCTIONS Z t 2222696-01
3 4 4 4 5 5 5 5 6 6 6 7 7 7 8 8 8 8 8 2
Z 3
A B NP006 4 10 mm 10 mm 100 mm
Z 1 2 S 3 4 5 6 A 5 B C D E
“O” 6
Z 7
“O” PR001 8
t CONTENTS Important Safety Instructions 10 For the Installer For the User Description of the appliance Use Cleaning the interior Control panel Starting-up and Temperature Regulation Quick freezing Warning light Freezing of fresh food 12 12 12 12 12 13 Storage of commercially frozen food 13 Thawing 14 Ice-cube production 14 Defrosting 14 Maintenance Periodical cleaning Periods of non-operation Something not Working Technical Specifications Installation 11 12 Positioning Electrical connecti
IMPORTANT SAFETY INSTRUCTIONS It is most important that this instruction book should be retained with the appliance for future reference. Should the appliance be sold or transferred to another owner, or should you move house and leave the appliance, always ensure that the book is supplied with the appliance in order that the new owner can be acquainted with the functioning of the appliance and the relevant warnings. These warnings are provided in the interest of safety.
■ ■ ■ ■ t If the appliance is transported horizontally, it is possible that the oil contained in the compressor flows in the refrigerant circuit. It is advisable to wait at least two hours before connecting the appliance to allow the oil to flow back in the compressor. There are working parts in this product which heat up. Always ensure that there is adequate ventilation as a failure to do this will result in component failure and possible food loss. See installation instructions.
USE Cleaning the interior Before using the appliance for the first time, wash the interior and all internal accessories with lukewarm water and some neutral soap so as to remove the typical smell of a brand-new product, then dry thoroughly. Do not use detergents or abrasive powders, as these will damage the finish. The freezer is marked with the symbol, which means that the compartment is suitable for freezing fresie food and long-term storage of frozen food.
t Freezing of fresh foods To quick-freeze foods when the appliance has not been in use, switch on the freezer and let it run on the quick-freeze setting for at least three hours before putting the food to be frozen in the compartment. If instead the appliance is already in operation, it should run on the quick-freeze setting for at least 24 hours before the foods are put in the freezer. Once the foods have been placed in the freezer, the freezing operation can be considered to be complete 24 hours later.
Thawing Before being used, deep-frozen and frozen food can be thawed out either in the refrigerator or at room temperature, depending on the time available for this operation. Small pieces of food, such as hamburgers, cutlets chips, and fish fingers, for example, can be cooked straight out of the freezer, without any intermediate thawing operation. Clearly, cooking time will be marginally longer than in the case of thawed food.
t MAINTENANCE Before carrying out any maintenance operation, always disconnect the plug from the wall socket. Periods of non-operation When the appliance is not in use for long periods, take the following precautions: remove the plug from the wall socket; remove all food: defrost and clean the interior and all accessories; leave the door ajar to allow air to circulate to prevent unpleasant smells.
INSTALLATION lf this appliance featuring magnetic door seals is to replace an older appliance having a spring lock (latch) on the door or lid, be sure to make that spring lock unusable before you discard the old appliance. This will prevent it from becoming a death-trap for a child. This appliance complies with the following E.E.C. Directives: - 73/23 EEC of 19.2.73 (Low Voltage Directive) and subsequent modifications; - 89/336 EEC of 3.5.
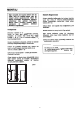
t Door reversibility The appliance must be unplugged before starting work. To reverse the opening direction of the door, proceed as follows: 1. Remove the bottom hinge (5). 2. Remove the door (4). 3. Unscrew pin (2) from hinge (1) and replace it on the opposite side. 4. Unscrew foot (6) and replace it on the opposite side. 5. Refit the door and bottom hinge (using the holes provided). 6. Remove the handle (3) and refit it on the opposite side.