
User manual


11
In gebruik nemen en temperatuurregeling
• Steek de stekker in een stopcontact met randaarde. Het groene lampje
licht op.
• Temperatuurregelaar (E) naar stand „1“ draaien, het rode lampje (A) gaan
branden, het koelaggregaat werkt automatisch.
• Bovendien schakelt u de snelvriesschakelaar (C) in, het gele lampje (B) gaat
branden, het koelaggregaat werkt kontinu.
• Pas als het rode lampje (A) niet meer brandt, schakelt u de snelvries-
schakelaar (C) uit, het gele lampje (B) gaat uit.
Stand „1“ betekent: hoogste, warmste binnentemperatuur.
Stand „4“ betekent: laagste, koudste binnentemperatuur. Bij het instellen
van de juiste stand dient u er rekening mee te houden dat de temperatuur
in het apparaat afhankelijk is van:
- de kamertemperatuur;
- de frequentie waarmee de deuren geopend worden;
- de hoeveelheid levensmiddelen in de kast;
- de plaats van het apparaat.portes;
Attentie: kontroleert u regelmatig aan de hand van het rode tempera-
tuurkontrolelampje (A) en de thermometer of de bewaartemperatuur laag
genoeg is.
Met de temperatuurregelaar (E) kan de energiezuinigste bewaartempera-
tuur traploos worden ingesteld.
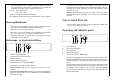
De optimale bewaartemperatuur is -18°C. Op de thermometer kunt u de
temperatuur kontroleren.
Snelvriesschakelaar (C) met geel kontrolelampje (B).
Het rood lampje brandt:
– bij in gebruik nemen van het toestel, als de bewaartemperatuur nog niet
bereikt is
– als de temperatuur niet laag genoeg meer is (storing)
– als grote hoeveelheden nog in te vriezen levensmiddelen in de kast wor-
den gelegd
– als de deur van het toestel te lang open staat.
Attentie: als u de snelvriesschakelaar inschakelt of de temperatuurregelaar
verstelt, kan het voorkomen dat het koelaggregaat van uw diepvrieskast
niet onmidddellijk, maar pas na enige tijd begint te werken. In dit geval is
er geen sprake van een storing.
26
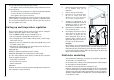
and remount them on the other
side.
5. Refit the door.
6. Refit bottom hinge (E) on the
opposite side, using the two
screws previously removed.
7. Remove blanking cover (F) from
ventilation grille (D) by pushing it
in the direction of the arrow and
refit it on the opposite side.
8. Refit ventilation grille (D), clip-
ping it into place.
9. Unscrew the handle. Refit it on
opposite side after having pierced
the plugs with a punch. Cover the
holes left open with the plugs
contained in the documentation
pack.
Attention:
After having reversed the ope-
ning direction of the doors check
that all the screws are
properly tightened and that the magnetic seal adheres to the cabinet. If the
ambient temperature is cold (i.e. in Winter), the gasket may not fit perfec-
tly to the cabinet. in that case, wait for the natural fitting of the gasket or
accelerate this process by heating up the part involved with a normal hair-
drier.
F
D
PR185
F
F
E
F
Electrical connection
Before initial start-up, refer to the appliance rating plate to ascertain if sup-
ply voltage and current values correspond with those of the mains at the
installation location.
e.g.: AC 220 ... 240 V 50 Hz or
220 ... 240 V~ 50 Hz
(i.e. 220 to 240 volts alternating current, 50 Hertz)
The rating plate is inside the appliance on the left.
A correctly installed, earthed socket is required for the electrical supply. The
supply must have a fuse rating of at least 10 Amps.
D162/1