ARCTIS Upright Freezer no_frost Operating Instructions 818 20 24-00/3
Dear customer, Before placing your new freezer into operation please read these operating instructions carefully. They contain important information for safe use, for installation and for care of the appliance. Please keep these operating instructions for future reference. Pass them on to possible new owners of the appliance. These operating instructions are for use with several technically comparable models with varying accessories. Please observe the notes which apply to your model.
Contents Important Safety Instructions . . . . . . . . . . . . . . . . . . . . . . . . . . . . . . . . . . . 5 Environmental Information . . . . . . . . . . . . . . . . . . . . . . . . . . . . . . . . . . . . . 7 Appliance Transport . . . . . . . . . . . . . . . . . . . . . . . . . . . . . . . . . . . . . . . . . . . 8 Before Use . . . . . . . . . . . . . . . . . . . . . . . . . . . . . . . . . . . . . . . . . . . . . . . . . . . . Packaging . . . . . . . . . . . . . . . . . . . . . . . . . . . . . .
Contents Freezing . . . . . . . . . . . . . . . . . . . . . . . . . . . . . . . . . . . . . . . . . . . . . . . . . . . . . . 23 Frozen Storage . . . . . . . . . . . . . . . . . . . . . . . . . . . . . . . . . . . . . . . . . . . . . . . . 24 Preparation of Ice Cubes . . . . . . . . . . . . . . . . . . . . . . . . . . . . . . . . . . . . . . . 24 Storage Goods Symbols/Freezing Calendar . . . . . . . . . . . . . . . . . . . . . . . . 25 Maximum Load . . . . . . . . . . . . . . . . . . . . . . . . . . . . .
1 Important Safety Instructions The safety of our appliances is in accordance with recognised technological standards and appliance safety legislation. We nevertheless feel that it is important to acquaint you with the following safety guidelines: Use for Intended Purpose • The appliance is intended for use at home. Depending on the preset operation mode, this appliance becomes suitable for freezing, for frozen storage of foods, for ice preparation or for cooling of foods.
Important Safety Instructions themselves into the appliance (danger of suffocation!) or place themselves into other life-endangering situations. • Children often do not recognise the dangers involved with household appliances. Please provide for the necessary supervision and do not allow children to play with the appliance! Daily Operation • Containers with flammable gases or fluids can develop leaks through contact with the cold.
In case of malfunction • If a malfunction should occur at the appliance, refer first to the section "What to do if ..." in these operating instruction. If the instructions in this section are not sufficient, do not undertake any further work on your own. • Refrigerators or feezers may only be repaired by trained personnel. Repairs carried out by untrained personnel can lead to substantial danger. Please contact your dealer or our customer service department for repairs.
Disposal: • The appliance may not be disposed of with domestic waste or bulky refuse. • The refrigerant circuit, especially the condenser at the back of the appliance, must not be damaged. • Information concerning collection schedules or locations can be obtained from the local disposal authorities or town hall. Appliance Transport Two persons are required for transport of the appliance.
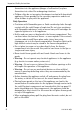
Before Use Packaging 0 1. Remove all adhesive tape and packaging from the interior of the appli- ance. 3 Any remnants of adhesive can be removed with white spirit. 2. Remove the transport protection pieces and pull off the adhesive tape. 3. Wash the inside of the appliance with lukewarm water with a little bicarbonate of soda added (5 ml to 0.5 litre of water). Do not use soap or detergent as the smell may linger. Dry the appliance thoroughly.
Installation Installation Location The appliance should be installed in a well ventilated, dry room. Energy use and efficient performance of the appliance is affected by the ambient temperature. The appliance should therefore – not be exposed to direct sunlight; – not be installed next to radiators, cookers or other sources of heat; – only be installed at a location whose ambient temperature corresponds to the climate classification, for which the appliance is designed.
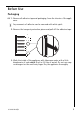
Installation The freezer needs ventilation Air is fed under the door through the vent slots in the base and is exhausted upwards along the back wall. To ensure proper air circulation never cover or alter the vent openings. Important! If the appliance is installed under, for example, a hanging cabinet, a clearance of at least 10 cm between the top of the appliance and the cabinet above it must be maintained.
Electrical Connection A properly installed socket outlet with earthing contact is required for electrical connection. Electrical fuse protection must be of at least 10 ampere. If the outlet socket is no longer accessible after installation of the appliance, appropriate measures must be taken during electrical installation to assure that the appliance can be disconnected from the mains (e.g. fuse, circuit breaker, non-operate current safety-switch or the like, with a contact opening of at least 3 mm).
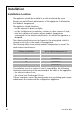
Reversing the door 0 1. With the door closed, remove the cross-head screws from the lower door bearing and remove the door bearing downwards. 2. Remove the door fitting from the door bearing (1, 2). Move the bearing pivot from the right to the left hand hole (3). Place the door fitting supplied on the bearing pivot (4, 5). 1 4 5 2 3 3.
Reversing the door 4. Move the upper bearing pivot to the left. 5. Carefully slide the door onto the top bearing pivot and close. 6. Place the lower door bearing with the bearing pivot in the lower left of the door and fasten. 7. Move the door handle from the left to the right and cover the remaining holes with the hole cover pins attached. 8. Open the door and fit the plinth cover.
Opening the door If the door is closed when the appliance is in operation, it cannot be immediately opened again, because a vacuum occurs which holds the door closed until pressure has been equalised. The door can be opened again after several minutes. If your appliance is equipped with a QUICK door opener - an opening mechanism integrated into the door handle the door can be opened easily at any time.
Description of the appliance View of the appliance (various models) ➀ ➁ ➂ ➃ ➄ å Control panel Interior Illumination Cold accumulation block (not on all models) Compartments with lids and drawers Maxi-Box Drawer (for frozen food storage only) Cold accumulation block (not on all models) There is one cold accumulation block in the freezer. Refer to the section “Prior to Initial Start–Up” concerning freezing of the cold accumulation block.
Description of the appliance Control Panel 1 2 3 4 5 ON/OFF button Temperature display Temperature setting buttons FROSTMATIC button and FROSTMATIC indicator light (yellow) WARNING OFF button and warning indicator light (red) (see section: "Control and Information Systems") Temperature setting buttons The temperature is adjusted using the „+“ (WARMER) and „-“ (COLDER) buttons. These buttons are connected to the temperature display.
Description of the appliance Temperature display The temperature display shows several types of information. • In normal operation the current freezer compartment temperature is displayed (ACTUAL temperature). • During temperature adjustment, a blinking display of the temperature selected at the moment occurs (DESIRED temperature).
Prior to Initial Start–Up 1 Before connecting the appliance to the mains and putting it into operation for the first time, leave the appliance to stand for 30 minutes if was transported upright. After transport on its side, the appliance must be left to stand for 4 hours before putting it into operation. This is necessary to allow the refrigerant to flow back into the compressor. Otherwise the compressor may be damaged. 0 1.
Initial use 0 1. Insert plug into mains socket. 2. Press ON/OFF button. A warning tone sounds and the red warning light flashes indicating that the required storage temperature has not yet been reached. The compressor starts and then runs automatically. 3. Press the WARNING OFF button to switch off the warning tone. 4. Set temperature to -18°C or colder (see section: "Temperature Adjustment").
Switching the Appliance Off In order to protect frozen goods, the appliance is guarded against accidental switching off (child-proof). 0 1. To switch off press and hold the ON/OFF button. A so-called "count down" is started in the temperature display, which counts backwards from "3" to "1". After "1" is reached the appliance switches off. Illumination at the temperature display goes off. Note: The appliance cannot be switched on or off if unplugged, or if there is no power being supplied to it.
Control and Information Systems Temperature Warning The red warning display and the temperature display flashes and an audible warning sounds, as soon as the temperature in the freezer compartment is warmer than -11 °C. A rise in temperature may be caused by: – frequent door opening for long periods of time; – loading with large quantities of warm foods; – high ambient temperature; – an error with the appliance. 0 1. You can cancel the warning tone with the WARNING OFF button.
Freezing Except for the bottom drawer, which serves for storage purposes, all compartments and drawers are suited for freezing small quantities of food. The two upper compartments are suited for freezing of large quantities of food. Important! • The temperature in the freezer compartment must be –18 °C or colder before freezing food. • Please observe the freezing capacity given on the rating plate. The freezing capacity is the maximum quantity of fresh food that can be frozen within a period of 24 hours.
Tips: • The following are suited for the packaging of frozen goods: – freezer bags and polyethylene wraps; – plastic containers for frozen goods; – extra–thick aluminium foil. • The following are suitable for sealing bags and wrap: plastic clips, rubber bands or tape. • Smooth the air out of the bag before sealing; air makes it easier for the frozen food to dry out. • Make flat packages, because these freeze more quickly.
Storage Goods Symbols/Freezing Calendar (not on all models) • The symbols on the drawers show different types of frozen goods. • The numbers indicate storage times in months for the appropriate types of frozen goods. Whether the upper or lower value of the indicated storage time is valid depends on the quality of the foods and pre-treating before freezing. The lower value applies to foods with high fat content.
Maintenance and Cleaning Before any maintenance or cleaning work is carried out DISCONNECT the appliance from the ELECTRICITY supply. 1 Warning! • Never clean the appliance with a steam cleaner. Moisture could accumulate in electrical components, danger of electrical shock! Hot vapours can lead to the damage of plastic parts. • The appliance must be dry before it is placed back into service. • The appliance defrosts automatically.
What to do if ... Correcting Malfunctions Perhaps a malfunction has been caused by a minor error, which you can correct yourself with the help of the following instructions. Do not attempt any further repairs if the following instructions do not help in each specific case. 1 Warning! Freezers may only be repaired by trained personnel. Repairs carried out by untrained personnel can lead to substantial danger for the user. Please contact your dealer or our customer service department for repairs.
What to do if ... Malfunction Possible cause Remedy Temperature is not properly Please refer to the section adjusted. "Temperature Adjustment". Door was open for a long time. The freezer compartment temperature is insufficient. Within the last 24 hours a large quantity of warm foods were loaded. Press FROSTMATIC button. Appliance is next to a source of warmth. Please refer to the section "Installation Location". Interior illumination does not function. Light bulb is defective.
Replacing the light bulb 1 Warning! Danger of electrical shock! Before replacing the light bulb switch appliance off and remove the mains plug, or switch off or turn out the circuit breaker or fuse. Light bulb specifications: 220-240 V, max. 25 W, socket: E 14 0 1. To switch the appliance off press and hold the ON/OFF button. 2. Remove mains plug. 3. For replacement of the light bulb press the cover and remove it like shown on the illustration. 4. Replace defective light bulb. 5. Place the cover again.
Regulations, Standards, Guidelines This appliance was designed for household use and was manufactured in accordance with the appropriate standards. The necessary measures in accordance with appliance safety legislation regulations (GSG), accident prevention regulations for refrigeration appliances (VBG 20) and the regulations of the German Society of Electrical Engineers (VDE) were observed in the manufacture of this appliance. The refrigerant circuit has been checked for leaks.
Customer Service If you cannot find the remedy for a malfunction in these operating instructions, please contact your dealer or our customer service department. Addresses and telephone numbers are listed in the accompanying booklet "Guarantee Conditions/Customer Service Locations". Selective ordering of replacement parts can save unnecessary travel and costs. For this reason always provide the following appliance information: • Model Name • Model Number (PNC) • Serial Number (S-No.
AEG Hausgeräte GmbH Postfach 1036 D-90327 Nürnberg http://www.aeg.hausgeraete.