NL EN FR DE Gebruiksaanwijzing Vriezer User Manual Freezer Notice d'utilisation Congélateur Benutzerinformation Gefriergerät 2 20 36 55 A72710GNW0 A72710GNX0
www.aeg.com INHOUDSOPGAVE 1. VEILIGHEIDSINFORMATIE.......................................................................................3 2. VEILIGHEIDSVOORSCHRIFTEN.............................................................................. 4 3. BESCHRIJVING VAN HET PRODUCT..................................................................... 6 4. BEDIENING............................................................................................................... 6 5. DAGELIJKS GEBRUIK............
NEDERLANDS 1. 3 VEILIGHEIDSINFORMATIE Lees zorgvuldig de meegeleverde instructies voor installatie en gebruik van het apparaat. De fabrikant is niet verantwoordelijk voor letsel en schade veroorzaakt door een foutieve installatie. Bewaar de instructies van het apparaat voor toekomstig gebruik. 1.
www.aeg.com • • • • Gebruik geen waterstralen of stoom om het apparaat te reinigen. Maak het apparaat schoon met een vochtige, zachte doek. Gebruik alleen neutrale schoonmaakmiddelen. Gebruik geen schuurmiddelen, schuursponsjes, oplosmiddelen of metalen voorwerpen. Bewaar geen explosieve substanties zoals spuitbussen met drijfgas in dit apparaat.
NEDERLANDS 2.3 Gebruik WAARSCHUWING! Gevaar op letsel, brandwonden of elektrische schokken. • De specificatie van het apparaat mag niet worden veranderd. • Plaats geen elektrische apparaten (bijv. ijsmachines) in het apparaat tenzij uitdrukkelijk geschikt verklaard door de fabrikant. • Zorg ervoor dat u het koelcircuit niet beschadigt. Het bevat isobutaan (R600a), aardgas met een hoge ecologische compatibiliteit. Dit gas is ontvlambaar.
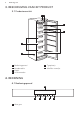
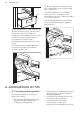
www.aeg.com 3. BESCHRIJVING VAN HET PRODUCT 3.1 Productoverzicht 1 2 3 4 6 5 1 2 3 4 Bedieningspaneel Koudemodule Klepje Vriezermanden 5 Typeplaatje 6 MaxiBox -mandjes 4. BEDIENING 4.
NEDERLANDS 2 Toets om de temperatuur hoger te zetten 3 Toets om de temperatuur lager te zetten 4 OK 5 Mode 6 ON/OFF Het is mogelijk om het vooraf ingestelde geluid van toetsen te wijzigen door de Mode-toets en de toets om de temperatuur kouder te zetten, tegelijkertijd gedurende enkele seconden in te drukken. U kunt deze wijziging ook weer ongedaan maken.
www.aeg.com • het geluid van de zoemer. 4.8 MinuteMinder -functie Druk op een willekeurige toets om het alarm te resetten. De zoemer gaat uit. Het temperatuurlampje van de vriezer toont de hoogste temperatuur gedurende een aantal seconden. En toont dan weer de ingestelde temperatuur. Het alarmindicatielampje blijft knipperen totdat de normale omstandigheden zijn hersteld. De MinuteMinder-functie moet worden gebruikt om een geluidsalarm op de gewenste tijd in te stellen.
NEDERLANDS Om de functie ChildLock uit te schakelen, herhaalt u de procedure 9 totdat het bijbehorende pictogram ChildLock uit gaat. 5. DAGELIJKS GEBRUIK WAARSCHUWING! Raadpleeg de hoofdstukken Veiligheid. 5.1 Het bewaren van ingevroren voedsel Als u het apparaat voor het eerst of na een periode dat het niet gebruikt is inschakelt, dient u het apparaat minstens 2 uur te laten werken met de FROSTMATIC functie ingeschakeld.
www.aeg.com De glazen legplanken die uitgerust zijn met uitschuifbare rollers zijn bevestigd d.m.v. slotpennen. 2 1 Als u de slotpennen wilt verwijderen, maakt u ze aan weerszijden van de uitschuifbare roller los. Gebruik zo nodig een schroevendraaier. Trek dan beide slotpennen naar buiten (1) en trek daarna de glazen legplank naar buiten (2). Bij het terugzetten tilt u de voorkant van de korf een beetje op en schuift u hem gekanteld in de vriezer.
NEDERLANDS • Een zacht klikkend geluid van de thermostaat als de compressor aan of uit gaat. 6.2 Tips voor energiebesparing • De deur niet vaker openen of open laten staan dan strikt noodzakelijk. • Verwijder indien aangebracht de koelelementen niet uit de vriesmand. 6.3 Tips voor het invriezen Om u te helpen het voedsel zo goed mogelijk in te vriezen, volgen hier een paar belangrijke tips: • De maximale hoeveelheid voedsel die in 24 uur ingevroren kan worden, wordt vermeld op het typeplaatje.
www.aeg.com 7.2 De binnenkant schoonmaken Voordat u het apparaat voor de eerste keer gebruikt, wast u de binnenkant en de interne accessoires met lauwwarm water en een beetje neutrale zeep om de typische geur van een nieuw product weg te nemen. Droog daarna grondig af. LET OP! Gebruik geen oplosmiddelen of schuurmiddelen. Deze beschadigen de lak. 7.3 Periodieke reiniging LET OP! Trek niet aan leidingen en/of kabels aan de binnenkant van de kast en verplaats of beschadig ze niet.
NEDERLANDS 13 8.1 Wat moet u doen als… Probleem Mogelijke oorzaak Oplossing Het apparaat werkt niet. Het apparaat is uitgeschakeld. Zet het apparaat aan. De stekker zit niet goed in het stopcontact. Steek de stekker goed in het stopcontact. Er staat geen spanning op het stopcontact. Sluit een ander elektrisch apparaat op het stopcontact aan. Neem contact op met een gekwalificeerd elektricien. Het apparaat maakt lawaai. Het apparaat is niet stevig en stabiel geplaatst.
www.aeg.com Probleem Mogelijke oorzaak Oplossing De deur is niet goed gesloten. Zie 'De deur sluiten'. De functie FROSTMATIC is Raadpleeg 'FROSTMATIC ingeschakeld. functie'. Er is te veel rijp en ijs. De deur is niet correct gesloten of de deurpakking is vervormd/vies. Zie 'De deur sluiten'. De compressor start niet on- Dit is normaal, er is geen middellijk na het drukken op storing. FROSTMATIC of na het veranderen van de temperatuur. De compressor start na enige tijd.
NEDERLANDS Bel, wanneer het advies niet tot resultaten leidt, de dichtstbijzijnde klantenservice voor dit merk. 8.2 De deur sluiten 1. Maak de afdichtingen van de deur schoon. 2. Stel de deur, indien nodig, af. Raadpleeg "Montage". 3. Vervang, indien nodig, de defecte deurafdichtingen. Neem contact op met de klantenservice. 15 8.3 Het lampje vervangen Het apparaat is uitgerust met een LEDbinnenlampje dat een lange levensduur heeft. Alleen een onderhoudsmonteur mag de verlichting vervangen.
100 mm min www.aeg.com 2 1 4 A 3 B 20 mm 16 9.3 Aansluiting op het elektriciteitsnet • Zorg er vóór het aansluiten voor dat het voltage en de frequentie op het typeplaatje overeenkomen met de stroomtoevoer in uw huis. • Dit apparaat moet worden aangesloten op een geaard stopcontact.
NEDERLANDS Zorg dat het apparaat leeg is voordat u werkzaamheden uitvoert. Zo niet, verplaats alle goederen naar de juiste temperatuur om de levensmiddelen goed te bewaren. 1. Kantel het apparaat voorzichtig naar achteren, zodat de compressor de vloer niet kan raken. 2. Verwijder de plint. (1) 3. Verwijder het kapje (2) en plaats het aan de tegenoverliggende kant. 4. Schroef de onderste pen los en verwijder de sluitringen (3) 17 8. Verwijder de handgreep.
www.aeg.com LET OP! Zet het apparaat op zijn plaats, zet het waterpas, wacht minstens vier uur en steek dan de stekker in het stopcontact. Voer een eindcontrole uit en verzeker u ervan dat: • Alle schroeven zijn aangedraaid. • De magnetische afdichtstrip vast zit aan de kast. • De deur goed open en dicht gaat. Als de omgevingstemperatuur laag is (bijv. in de winter), kan het zijn dat het deurrubber niet precies op de kast past. Wacht in dat geval tot de deurrubber zich op een natuurlijke wijze zet.
NEDERLANDS product naar het milieustation bij u in de buurt of neem contact op met de gemeente.
www.aeg.com CONTENTS 1. SAFETY INFORMATION.........................................................................................21 2. SAFETY INSTRUCTIONS........................................................................................ 22 3. PRODUCT DESCRIPTION...................................................................................... 24 4. OPERATION............................................................................................................ 24 5. DAILY USE...........
ENGLISH 1. 21 SAFETY INFORMATION Before the installation and use of the appliance, carefully read the supplied instructions. The manufacturer is not responsible if an incorrect installation and use causes injuries and damages. Always keep the instructions with the appliance for future reference. 1.
www.aeg.com • • • • Do not use water spray and steam to clean the appliance. Clean the appliance with a moist soft cloth. Only use neutral detergents. Do not use abrasive products, abrasive cleaning pads, solvents or metal objects. Do not store explosive substances such as aerosol cans with a flammable propellant in this appliance. If the supply cord is damaged, it must be replaced by the manufacturer, its Authorised Service Centre or similarly qualified persons in order to avoid a hazard. 2.
ENGLISH • Do not change the specification of this appliance. • Do not put electrical appliances (e.g. ice cream makers) in the appliance unless they are stated applicable by the manufacturer. • Be careful not to cause damage to the refrigerant circuit. It contains isobutane (R600a), a natural gas with a high level of environmental compatibility. This gas is flammable. • If damage occurs to the refrigerant circuit, make sure that there are no flames and sources of ignition in the room. Ventilate the room.
www.aeg.com 3. PRODUCT DESCRIPTION 3.1 Product overview 1 2 3 4 6 5 1 2 3 4 Control panel Cold module Flap Freezer baskets 5 Rating plate 6 MaxiBox baskets 4. OPERATION 4.
ENGLISH 25 3 Temperature colder button 4 OK 5 Mode 6 ON/OFF It is possible to change predefined sound of buttons by pressing together Mode and Temperature colder button for some seconds. Change is reversible. Display A B C F E D A) B) C) D) Timer function FROSTMATIC function Temperature indicator Alarm indicator 4.2 Switching on 1. Connect the mains plug to the power socket. 2. Press the appliance ON/OFF if the display is off. The alarm buzzer could operate after few seconds.
www.aeg.com same time, protects foodstuffs already stored from undesirable warming. 1. Press Mode button until the corresponding icon appears. The FROSTMATIC indicator flashes. 2. Press OK button to confirm. The FROSTMATIC indicator is shown. The FROSTMATIC function shuts off automatically after 52 hours. To switch off the function before its automatic end, repeat the steps until the FROSTMATIC indicator goes off. 4.7 Door open alarm 1. Press Mode until the corresponding icon appears.
ENGLISH WARNING! In the event of accidental defrosting, for example due to a power failure, if the power has been off for longer that the value shown in the technical characteristics chart under "rising time", the defrosted food must be consumed quickly or cooked immediately and then refrozen (after cooling). 5.2 Freezing fresh food The freezer compartment is suitable for freezing fresh food and storing frozen and deep-frozen food for a long time. 27 5.
www.aeg.com Afterwards pull out both locking pins (1) and pull the glass shelf outwards (2). 1 1 2 1 The glass shelves equipped with expander rollers are secured with locking pins. 1 1 2 To remove them, loose the locking pin on each side on the expander roller. If necessary, use a screwdriver. 6. HINTS AND TIPS 6.1 Normal operating sounds 6.
ENGLISH • water ices, if consumed immediately after removal from the freezer compartment, can possibly cause the skin to be freeze burnt; • it is advisable to show the freezing in date on each individual pack to enable you to keep tab of the storage time. 6.
www.aeg.com The absence of frost is due to the continuous circulation of cold air inside the compartment, driven by an automatically controlled fan. 7.5 Periods of non-operation 2. Remove all food. 3. Clean the appliance and all accessories. 4. Leave the door/doors open to prevent unpleasant smells. When the appliance is not in use for long periods, take the following precautions: 1. Disconnect the appliance from electricity supply.
ENGLISH Problem Possible cause 31 Solution A rectangular symbol is Temperature sensor probshown instead of numbers lem. on the Temperature Display. Contact the nearest Authorised Service Centre (the cooling system will continue to keep food products cold, but temperature adjustment will not be possible). The lamp does not work. The lamp is in stand-by. Close and open the door. The lamp does not work. The lamp is defective. Contact the nearest Authorised Service Centre.
www.aeg.com Problem Possible cause Solution DEMO appears on the display. The appliance is in demon- Keep the OK pressed for apstration mode. proximately 10 seconds until a long sound is heard and display shuts off for a short time. Door is misaligned or interferes with ventilation grill. The appliance is not levelled. The temperature in the appliance is too low/too high. The temperature regulator Set a higher/lower temperais not set correctly. ture. Refer to "Levelling".
ENGLISH Some functional problems might occur for some types of models when operating outside of that range. The correct operation can only be guaranteed within the specified temperature range. If you have any doubts regarding where to install the appliance, please turn to the vendor, to our customer service or to the nearest Authorised Service Centre. 9.2 Location The appliance should be installed well away from sources of heat such as radiators, boilers, direct sunlight etc.
www.aeg.com 9.6 Door reversibility WARNING! Before carrying out any operations, remove the plug from the power socket. CAUTION! To carry out the following operations, we suggest that this be made with another person that will keep a firm hold on the doors of the appliance during the operations. Before carrying out any operation, please be sure that the appliance is empty. If not, please move all goods into right temperature for proper food storage reason. 1.
ENGLISH 35 CAUTION! Reposition, level the appliance, wait for at least four hours and then connect it to the power socket. Do a final check to make sure that: • All screws are tightened. • The magnetic seal adheres to the cabinet. • The door opens and closes correctly. If the ambient temperature is cold (i.e. in Winter), the gasket may not fit perfectly to the cabinet. In that case, wait for the natural fitting of the gasket.
www.aeg.com TABLE DES MATIÈRES 1. CONSIGNES DE SÉCURITÉ................................................................................... 37 2. INSTRUCTIONS DE SÉCURITÉ.............................................................................. 38 3. DESCRIPTION DE L'APPAREIL.............................................................................. 40 4. FONCTIONNEMENT..............................................................................................41 5. UTILISATION QUOTIDIENNE......
FRANÇAIS 1. 37 CONSIGNES DE SÉCURITÉ Avant d'installer et d'utiliser cet appareil, lisez soigneusement les instructions fournies. Le fabricant ne peut être tenu pour responsable des dommages et blessures liés à une mauvaise installation ou utilisation. Conservez toujours cette notice avec votre appareil pour vous y référer ultérieurement. 1.
www.aeg.com • • • • • • N'endommagez pas le circuit frigorifique. N'utilisez pas d'appareils électriques à l'intérieur des compartiments de conservation des aliments de l'appareil, sauf s'ils sont du type recommandé par le fabricant. Ne pulvérisez pas d'eau ni de vapeur pour nettoyer l'appareil. Nettoyez l'appareil avec un chiffon doux humide. Utilisez uniquement des produits de nettoyage neutres. N'utilisez pas de produits abrasifs, de tampons à récurer, de solvants ni d'objets métalliques.
FRANÇAIS • Utilisez toujours une prise de courant de sécurité correctement installée. • N'utilisez pas d'adaptateurs multiprises ni de rallonges. • Veillez à ne pas endommager les composants électriques tels que la fiche secteur, le câble d'alimentation ou le compresseur. Contactez le service après-vente agréé ou un électricien pour changer les composants électriques. • Le câble d'alimentation doit rester en dessous du niveau de la fiche secteur.
www.aeg.com • La mousse isolante contient un gaz inflammable. Contactez votre service municipal pour obtenir des informations sur la marche à suivre pour mettre l'appareil au rebut. • N'endommagez pas la partie du circuit de réfrigération située à proximité du condenseur thermique. 3. DESCRIPTION DE L'APPAREIL 3.
FRANÇAIS 41 4. FONCTIONNEMENT 4.1 Panneau de commande 1 6 5 4 3 2 1 Affichage 2 Touche d'augmentation de la température 3 Touche de diminution de la température 4 OK 5 Mode 6 ON/OFF Pour augmenter le volume de la tonalité des touches, appuyez simultanément sur la touche Mode et la touche de diminution de la température pendant plusieurs secondes. Ce changement est réversible.
www.aeg.com 4.3 Mise hors tension 1. Appuyez sur la touche ON/OFF pendant quelques secondes. L'affichage s'éteint. 2. Débranchez la fiche électrique de l'appareil de la prise de courant. 4.4 Réglage de la température Le réglage de température du congélateur peut être modifié en appuyant sur la touche de température. Température par défaut : • -18 °C dans le congélateur L'indicateur de température indique la température programmée. La température programmée sera atteinte sous 24 heures.
FRANÇAIS programmée de la minuterie de 1 à 90 minutes. 3. Appuyez sur la touche OK pour confirmer. L'indicateur MinuteMinder s'affiche. Le minuteur se met à clignoter (min). Il est possible de modifier la durée à tout moment et avant la fin du décompte en appuyant sur la touche de diminution de la température et sur la touche d'augmentation de la température. Une fois le décompte terminé, le voyant MinuteMinder clignote et un signal sonore retentit.
www.aeg.com La quantité maximale de denrées que vous pouvez congeler par tranche de 24 heures figure sur la plaque signalétique, située à l'intérieur de l'appareil. 2 Le processus de congélation dure 24 heures : vous ne devez ajouter aucun autre aliment à congeler pendant cette période. Une fois le processus de congélation terminé, revenez à la température souhaitée (voir « Fonction FROSTMATIC »). 5.
FRANÇAIS 45 1 1 1 2 6. CONSEILS 6.1 Bruits normaux de fonctionnement 6.3 Conseils pour la congélation Les bruits suivants sont normaux lorsque l'appareil est en cours de fonctionnement : Voici quelques conseils importants pour obtenir un processus de congélation optimal : • Un léger gargouillis lorsque le liquide réfrigérant est pompé. • Un ronronnement et un bruit de pulsation provenant du compresseur lorsque le liquide réfrigérant est pompé.
www.aeg.com sont consommés dès leur sortie du compartiment congélateur, peut provoquer des brûlures ; • L'identification des emballages est importante : indiquez la date de congélation du produit et respectez la durée de conservation indiquée par le fabricant. • • 6.
FRANÇAIS Cette opération améliore les performances de l'appareil et permet des économies d'électricité. 7.4 Dégivrage du congélateur Le compartiment congélateur est sans givre. Cela signifie que le givre ne se forme pas pendant que l’appareil est en fonctionnement, que ce soit sur les parois internes ou sur les aliments. 47 1. Débranchez l'appareil de l'alimentation électrique. 2. Retirez tous les aliments. 3. Nettoyez l'appareil et tous les accessoires. 4.
www.aeg.com Problème Cause probable Solution La température à l'intérieur Consultez le paragraphe de l'appareil est trop éle« Alarme porte ouverte » ou vée. « Alarme haute température ». La porte est laissée ouverte. Fermez la porte. La température à l'intérieur Contactez un électricien qualide l'appareil est trop élefié ou le service après-vente vée. agréé le plus proche. Un symbole rectangulaire apparaît à la place des chiffres sur l'écran de température. Problème de capteur de température.
FRANÇAIS Problème Cause probable Le compresseur ne démarre Ce phénomène est norpas immédiatement après mal, il ne s'agit pas d'une avoir appuyé sur la touche anomalie. FROSTMATIC, ou après avoir changé la température. 49 Solution Le compresseur démarre au bout d'un certain temps. De l'eau coule sur le sol. Le tuyau d'évacuation de Fixez le tuyau d'évacuation de l'eau de dégivrage n'est l'eau au bac d'évaporation de pas raccordé au bac d'éva- l'eau de dégivrage.
www.aeg.com Si ces conseils n'apportent pas de solution à votre problème, veuillez contacter votre service après-vente agréé. 8.2 Fermeture de la porte 1. Nettoyez les joints de la porte. 2. Si nécessaire, ajustez la porte. Reportez-vous au chapitre « Installation ». 3. Si nécessaire, remplacez les joints de porte défectueux. Contactez le service après-vente agréé. 8.3 Remplacement de l'éclairage L'appareil est équipé d'un éclairage à DEL longue durée.
100 mm min FRANÇAIS 2 1 4 B 20 mm A 3 9.3 Branchement électrique • Avant de brancher l'appareil, assurezvous que la tension et la fréquence indiquées sur la plaque signalétique correspondent à celles de votre réseau électrique domestique. • L'appareil doit être relié à la terre. La fiche du cordon d'alimentation est fournie avec un contact à cette fin.
www.aeg.com Avant toute opération, assurez-vous que l'appareil est vide. Si ce n'est pas le cas, veuillez déplacer toutes les denrées à la température qui convient pour une conservation alimentaire adéquate. 1. Inclinez l'appareil avec précaution vers l'arrière pour que le compresseur ne touche pas le sol. 2. Retirez le socle. (1) 3. Démontez le cache (2) et placez-le sur le côté opposé. 4. Dévissez la goupille inférieure et retirez les rondelles (3). 8. Démontez la poignée.
FRANÇAIS 53 ATTENTION! Remettez l'appareil en place, mettez-le de niveau, attendez au moins quatre heures puis branchez-le à la prise de courant. Faites une dernière vérification pour vous assurer que : • Toutes les vis sont bien serrées. • Le joint magnétique adhère bien à l'appareil. • La porte s'ouvre et se ferme correctement. Si la température ambiante est basse (par exemple, en hiver), il se peut que le joint n'adhère pas parfaitement. Dans ce cas, attendez que le joint reprenne sa taille naturelle.
www.aeg.com ménagères. Emmenez un tel produit dans votre centre local de recyclage ou contactez vos services municipaux.
DEUTSCH 55 INHALTSVERZEICHNIS 1. SICHERHEITSINFORMATIONEN.......................................................................... 56 2. SICHERHEITSANWEISUNGEN.............................................................................. 57 3. GERÄTEBESCHREIBUNG.......................................................................................59 4. BETRIEB................................................................................................................... 60 5. TÄGLICHER GEBRAUCH.......
1. www.aeg.com SICHERHEITSINFORMATIONEN Lesen Sie vor der Montage und dem Gebrauch des Geräts zuerst die Gebrauchsanleitung. Der Hersteller übernimmt keine Verantwortung für Verletzungen und Beschädigungen durch unsachgemäße Montage. Bewahren Sie die Gebrauchsanleitung griffbereit auf. 1.
DEUTSCH • • • • • 57 Betreiben Sie in den Lebensmittelfächern des Geräts keine anderen als die vom Hersteller empfohlenen Elektrogeräte. Reinigen Sie das Gerät nicht mit einem Wasser- oder Dampfstrahl. Reinigen Sie das Gerät mit einem weichen, feuchten Tuch. Verwenden Sie ausschließlich Neutralreiniger. Benutzen Sie keine Scheuermittel, scheuernde Reinigungsschwämmchen, Lösungsmittel oder Metallgegenstände.
www.aeg.com • • • • • • Typenschild den Daten Ihrer Stromversorgung entsprechen. Wenden Sie sich andernfalls an eine Elektrofachkraft. Schließen Sie das Gerät nur an eine ordnungsgemäß installierte Schutzkontaktsteckdose an. Verwenden Sie keine Mehrfachsteckdosen oder Verlängerungskabel. Achten Sie darauf, elektrische Bauteile (wie Netzstecker, Netzkabel und Kompressor) nicht zu beschädigen.
DEUTSCH • Entfernen Sie die Tür, um zu verhindern, dass sich Kinder oder Haustiere in dem Gerät einschließen. • Der Kältekreislauf und die Isolierungsmaterialien dieses Gerätes sind ozonfreundlich. • Die Isolierung enthält entzündliches Gas. Für Informationen zur korrekten Entsorgung des Gerätes wenden Sie sich an Ihre kommunale Behörde. • Achten Sie darauf, dass die Kühleinheit in der Nähe des Wärmetauschers nicht beschädigt wird. 3. GERÄTEBESCHREIBUNG 3.
www.aeg.com 4. BETRIEB 4.1 Bedienfeld 1 6 1 2 3 4 5 Display Taste zum Erhöhen der Temperatur Taste zum Senken der Temperatur OK Der voreingestellte Tastenton lässt sich ändern. Halten Sie dazu Mode und die Taste zum Senken der Temperatur einige 4 3 2 5 Mode 6 ON/OFF Sekunden gedrückt. Die Änderung lässt sich rückgängig machen. Display A B C F E D A) B) C) D) Uhrfunktion Funktion FROSTMATIC Temperaturanzeige Alarmanzeige 4.2 Einschalten des Geräts 1.
DEUTSCH 4.4 Temperaturregelung Die Temperatur des Gefriergeräts wird mit der Temperaturtaste eingestellt. Standardtemperatur: • -18 °C für das Gefriergerät Die Temperaturanzeige zeigt die eingestellte Temperatur an. Die eingestellte Temperatur wird innerhalb von 24 Stunden erreicht. Nach einem Stromausfall bleibt die eingestellte Temperatur gespeichert. 4.
www.aeg.com Nach Ablauf des Countdowns blinkt die Anzeige MinuteMinder und es ertönt ein Alarmsignal. Schalten Sie den Alarmton und die Funktion mit OK aus. Diese Funktion kann während des Countdowns jederzeit ausgeschaltet werden. Wiederholen Sie hierzu die obigen Schritte, bis die Anzeige erlischt. 4.9 Funktion ChildLock Schalten Sie die Funktion ChildLock ein, um die Tasten gegen eine unbeabsichtigte Betätigung zu verriegeln. 1.
DEUTSCH Die maximale Menge an Lebensmitteln, die in 24 Stunden eingefroren werden kann, ist auf dem Typenschild angegeben, das sich im Innern des Gerätes befindet. 2 Der Gefriervorgang dauert 24 Stunden: legen Sie während dieses Zeitraums keine weiteren einzufrierenden Lebensmittel in das Gerät. Stellen Sie nach Abschluss des Gefriervorgangs wieder die gewünschte Temperatur ein (siehe „Funktion FROSTMATIC“). 5.
www.aeg.com 1 1 1 2 6. TIPPS UND HINWEISE 6.1 Normale Betriebsgeräusche Folgende Geräusche sind während des normalen Gerätebetriebs normal: • Ein leichtes Gurgeln und Blubbern, wenn das Kältemittel durch die Leitungen gepumpt wird. • Ein Surren und ein pulsierendes Geräusch vom Kompressor, wenn das Kältemittel durch die Leitungen gepumpt wird.
DEUTSCH • Magere Lebensmittel lassen sich besser und länger als fetthaltige lagern; durch Salz wird die maximale Lagerungsdauer verkürzt. • Wird Wassereis direkt nach der Entnahme aus dem Gefrierfach verzehrt, kann dies zu Frostbrand auf der Haut führen. • Es empfiehlt sich, das Einfrierdatum auf jeder einzelnen Packung zu notieren, um einen genauen Überblick über die Lagerzeit zu haben. 6.
www.aeg.com Das gesamte Gerät muss regelmäßig gereinigt werden: 1. Reinigen Sie die Innenseiten und die Zubehörteile mit lauwarmem Wasser und etwas Neutralseife. 2. Prüfen und säubern Sie die Türdichtungen in regelmäßigen Abständen, um zu gewährleisten, dass diese sauber und frei von Fremdkörpern sind. 3. Spülen und trocknen Sie diese sorgfältig ab. 4. Reinigen Sie den Kondensator und den Kompressor auf der Geräterückseite, falls diese zugänglich sind, mit einer Bürste.
DEUTSCH Problem Mögliche Ursache Es wird ein akustisches oder optisches Alarmsignal ausgelöst. Das Gerät wurde erst kür- Siehe „Alarm Tür offen“ oder zlich eingeschaltet oder „Temperaturwarnung“. die Temperatur ist noch zu hoch. 67 Abhilfe Die Temperatur im Gerät ist zu hoch. Siehe „Alarm Tür offen“ oder „Temperaturwarnung“. Die Tür ist geöffnet. Schließen Sie die Tür. Die Temperatur im Gerät ist zu hoch.
www.aeg.com Problem Mögliche Ursache Abhilfe Der Kompressor schaltet Dies ist normal, keine Stör- Der Kompressor schaltet sich sich nicht sofort ein, nachung. erst nach einer Weile ein. dem Sie FROSTMATIC gedrückt oder die Solltemperatur auf einen anderen Wert eingestellt haben. Wasser läuft auf den Boden. Der Tauwasserablauf ist Verbinden Sie den Tauwassernicht mit der Verdampfer- ablauf mit der Verdampferschale über dem Kompres- schale. sor verbunden.
DEUTSCH Bitte wenden Sie sich an den nächsten autorisierten Kundendienst, wenn alle genannten Abhilfemaßnahmen nicht zum gewünschten Erfolg führen. 8.2 Schließen der Tür 1. Reinigen Sie die Türdichtungen. 2. Stellen Sie die Tür nach Bedarf ein. Siehe hierzu „Montage“. 69 3. Ersetzen Sie die defekten Türdichtungen, falls erforderlich. Wenden Sie sich an den autorisierten Kundendienst. 8.3 Austauschen der Lampe Das Gerät ist mit einer langlebigen LEDInnenbeleuchtung ausgestattet.
www.aeg.com eines oder mehrerer verstellbarer Füße am Sockel des Gehäuses erfolgen. 100 mm min 2 1 4 A B 20 mm 70 9.3 Elektrischer Anschluss • Kontrollieren Sie vor der ersten Benutzung des Geräts, ob die Netzspannung und -frequenz Ihres Hausanschlusses mit den auf dem Typenschild angegebenen Anschlusswerten übereinstimmen. • Das Gerät muss geerdet sein. Zu diesem Zweck ist der Netzstecker mit einem Schutzkontakt ausgestattet.
DEUTSCH 71 Vor der Durchführung von Arbeiten am Gerät achten Sie darauf, dass es leer ist. Anderenfalls lagern Sie die Nahrungsmittel bei der richtigen Temperatur aus. 1. Neigen Sie das Gerät vorsichtig auf seine Rückseite, sodass der Kompressor den Boden nicht berührt. 2. Entfernen Sie die Sockelblende. (1) 3. Nehmen Sie die Kappe (2) ab, und bringen Sie sie auf der gegenüberliegenden Seite an. 4. Lösen Sie den unteren Bolzen und entfernen Sie die Unterlegscheiben (3). 2 1 8. Entfernen Sie den Griff.
www.aeg.com ACHTUNG! Rücken Sie das Gerät wieder an die richtige Stelle, und richten Sie es waagerecht aus. Warten Sie mindestens vier Stunden, bevor Sie es wieder an die Stromversorgung anschließen. ACHTUNG! Rücken Sie das Gerät wieder an die richtige Stelle, und richten Sie es waagerecht aus. Warten Sie mindestens vier Stunden, bevor Sie es wieder an die Stromversorgung anschließen.
DEUTSCH Die technischen Daten befinden sich auf dem Typenschild auf der Außen- oder 73 Innenseite des Geräts sowie auf der Energieplakette. 11. UMWELTTIPPS Recyceln Sie Materialien mit dem Symbol . Entsorgen Sie die Verpackung in den entsprechenden Recyclingbehältern. Recyceln Sie zum Umwelt- und Gesundheitsschutz elektrische und elektronische Geräte. Entsorgen Sie * Geräte mit diesem Symbol nicht mit dem Hausmüll.
www.aeg.
DEUTSCH 75
280155037-A-022015 www.aeg.