AGN71800F0 EN FREEZER USER MANUAL
FOR PERFECT RESULTS Thank you for choosing this AEG product. We have created it to give you impeccable performance for many years, with innovative technologies that help make life simpler – features you might not find on ordinary appliances. Please spend a few minutes reading to get the very best from it. ACCESSORIES AND CONSUMABLES In the AEG webshop, you’ll find everything you need to keep all your AEG appliances looking spotless and working perfectly.
Contents 3 CONTENTS 4 6 9 10 11 11 12 14 14 16 18 Safety information Control panel First use Daily use Helpful Hints and Tips Care and cleaning What to do if… Technical data Installation Noises Environmental concerns The following symbols are used in this user manual: Important information concerning your personal safety and information on how to avoid damaging the appliance.
Safety information SAFETY INFORMATION In the interest of your safety and to ensure the correct use, before installing and first using the appliance, read this user manual carefully, including its hints and warnings. To avoid unnecessary mistakes and accidents, it is important to ensure that all people using the appliance are thoroughly familiar with its operation and safety features.
Safety information 5 – thoroughly ventilate the room in which the appliance is situated • It is dangerous to alter the specifications or modify this product in any way. Any damage to the cord may cause a short-circuit, fire and/or electric shock. WARNING! Any electrical component (power cord, plug, compressor) must be replaced by a certified service agent or qualified service personnel to avoid hazard. 1. 2. • • • • Power cord must not be lengthened.
Control panel Installation For electrical connection carefully follow the instructions given in specific paragraphs. • Unpack the appliance and check if there are damages on it. Do not connect the appliance if it is damaged. Report possible damages immediately to the place you bought it. In that case retain packing. • It is advisable to wait at least four hours before connecting the appliance to allow the oil to flow back in the compressor.
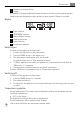
Control panel 7 5 Temperature warmer button 6 Display It is possible to change predefined sound of buttons to a loudly one by pressing together Mode button and Temperature colder button for some seconds. Change is reversible. Display 1 1 2 3 4 5 6 2 3 4 5 6 Timer function FROSTMATIC function Minute Minder function Child Lock function Alarm indicator Temperature indicator Switching on To switch on the appliance do these steps: 1. Connect the mains plug to the power socket. 2.
Control panel FROSTMATIC function To switch on the function: 1. Press the Mode button until the corresponding icon appears. The FROSTMATIC indicator flashes. 2. Press the OK button to confirm. The FROSTMATIC indicator is shown. This function stops automatically after 52 hours. To switch off the function before its automatic end: 1. Press the Mode button until the FROSTMATIC indicator flashes. 2. Press the OK button to confirm. 3. The FROSTMATIC indicator goes off.
First use 9 To switch on the function: 1. Press the Mode button until the corresponding icon appears. 2. The Child Lock indicator flashes. 3. Press the OK button to confirm. The Child Lock indicator is shown. To switch off the function: 1. Press the Mode button until the Child Lock indicator flashes. 2. Press the OK button to confirm. 3. The Child Lock indicator goes off.
Daily use DAILY USE Freezing fresh food The freezer compartment is suitable for freezing fresh food and storing frozen and deepfrozen food for a long time. To freeze fresh food activate the FROSTMATIC function at least 24 hours before placing the food to be frozen in the freezer compartment. Place the fresh food to be frozen in the two top compartments. The maximum amount of food that can be frozen in 24 hours is specified on the rating plate, a label located on the inside of the appliance.
Helpful Hints and Tips 11 Cold accumulators One or more cold accumulators are supplied in the freezer; these increase the length of time for which food will keep in the event of a power failure or breakdown. HELPFUL HINTS AND TIPS Hints for freezing To help you make the most of the freezing process, here are some important hints: • the maximum quantity of food which can be frozen in 24 hrs. is shown on the rating plate; • the freezing process takes 24 hours.
What to do if… Periodic cleaning The equipment has to be cleaned regularly: • clean the inside and accessories with lukewarm water and some neutral soap. • regularly check the door seals and wipe clean to ensure they are clean and free from debris. • rinse and dry thoroughly. Do not pull, move or damage any pipes and/or cables inside the cabinet.
What to do if… Problem The appliance does not operate. Possible cause 13 Solution The appliance is switched off. Switch on the appliance. The mains plug is not connected to the mains socket correctly. Connect the mains plug to the mains socket correctly. The appliance has no power. There is no voltage in the mains socket. Connect a different electrical appliance to the mains socket. Contact a qualified electrician. The Alarm light flashes.
Technical data Problem Possible cause Solution Upper or lower square is shown in the temperature Display. An error has occurred in measuring the temperature. Call your service representative (the cooling system will continue to keep food products cold, but temperature adjustment will not be possible). dEMo appears on the Display. The appliance is in demonstration mode (dEMo). Keep pressed approximately 10 sec.
Installation Climate class 15 Ambient temperature SN +10°C to + 32°C N +16°C to + 32°C ST +16°C to + 38°C T +16°C to + 43°C Electrical Connection CAUTION! Any electrical work required to install this appliance should be carried out by a qualified electrician or competent person. WARNING! This appliance must be earthed. The manufacturer declines any liability should these safety measures not be observed.
Noises 3. Connect the wire coloured brown to the terminal either marked with the “L“ or coloured red. 4. Check that no cut, or stray strands of wire is present and the cord clamp 4 is secure over the outer sheath. 5. Make sure the electricity supply voltage is the same as that indicated on the appliance rating plate. 6. Switch on the appliance. The appliance is supplied with a 13 amp plug fitted 2 .
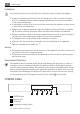
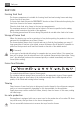
Noises CLICK! BRRR! BLUBB! HISSS! 17 CLICK! BRRR! BLUBB! HISSS!
Environmental concerns SSSRRR! CRACK! SSSRRR! CRACK! ENVIRONMENTAL CONCERNS The symbol on the product or on its packaging indicates that this product may not be treated as household waste. Instead it should be taken to the appropriate collection point for the recycling of electrical and electronic equipment.
www.aeg.