AR 4025 BT Bedienungsanleitung/Garantie Manual de instrucciones • Manual de instruções • Manuale d’istruzioni Instruction Manual • Instrukcja obsługi Autoradio mit CD/MP3 und Bluetooth Radio para coche con CD/MP3 y Bluetooth • Auto-rádio com CD/MP3 e Bluetooth Autoradio con CD/MP3 e Bluetooth • Car radio with CD/MP3 and Bluetooth Radio samochodowe z odtwarzaczem CD/MP3 i funkcją Bluetooth
Inhalt 2 Deutsch Italiano Inhalt Sommario Übersicht der Bedienelemente.......................................... Seite 3 Bedienungsanleitung............................................................ Seite 4 Technische Daten.................................................................... Seite 18 Garantiebedingungen........................................................... Seite 19 Panoramica dei Componenti..........................................Pagina 3 Manuale d’istruzioni..................
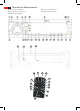
Übersicht der Bedienelemente Resumen de los componentes Descrição geral dos componentes Panoramica dei componenti Overview of the Components Przegląd elementów zestawu 29 30 31 32 33 43 34 42 35 41 36 40 37 38 39
Deutsch Inhaltsverzeichnis Einführung Einführung..............................................................................................4 Vorwort.....................................................................................................4 Informationen zu dieser Bedienungsanleitung.......................4 Urheberrecht..........................................................................................4 Haftungsbeschränkung............................................................
Deutsch ACHTUNG: Ein Warnhinweis dieser Gefahrenstufe kennzeichnet einen möglichen Sachschaden. Falls die Situation nicht vermieden wird, kann dies zu Sachschäden führen. ►► Die Anweisungen in diesem Warnhinweis befolgen, um Sachschäden zu vermeiden. HINWEIS: ►► Ein Hinweis kennzeichnet zusätzliche Informationen, die den Umgang mit dem Gerät erleichtern.
Deutsch Bedienelemente (siehe Ausklappseite) Autoradio 1 Taste MODE: Betriebsart einstellen 2 Taste PWR/MUTE: Gerät ausschalten/stummschalten 3 Multiregler: drehen, um die Lautstärke einzustellen drücken, um weitere Einstellmöglichkeiten aufzurufen 4 Taste DIS: Zusatzinformationen auf dem Display anzeigen 5 Taste PTY: Programmkennung 6 Display 7 Taste OPEN: Entriegelungstaste für Bedienteil 8 Taste : Anruf annehmen, ablehnen bzw.
Deutsch Lieferumfang und Transportinspektion Das Gerät wird standardmäßig mit folgenden Komponenten geliefert: ■■ Autoradio (inklusive Bedienteil) ■■ Einbaurahmen (aufgesteckt) ■■ Blendrahmen (aufgesteckt) ■■ Verankerungsblech (inkl. Befestigungsmaterial) ■■ Schlüssel für Einbaurahmen (2x) ■■ Etui für Bedienteil ■■ ISO-Stecker ■■ Fernbedienung ■■ Bedienungsanleitung 7 ACHTUNG: Die Verwendung von falschen Anschlüssen kann zu Beschädigungen am Gerät führen.
Deutsch ACHTUNG: ►► Verwenden Sie Lautsprecher mit einer Impedanz von midestens 4 Ohm. ►► Die Lautsprecherverkabelung mus Massefrei sein. HINWEIS: ►► Um das Gerät an zwei Lautsprecher anzuschließen, verwenden Sie nur die Kabel für die vorderen Lautsprecher. ►► Beachten Sie, dass zur Senderspeicherung der Anschluss 4 an Dauerplus angeschlossen sein muss. ►► In einigen Fahrzeugmodellen ist die standardmäßige Belegung der Anschlüsse [4] und [7] (ISO A) werkseitig vertauscht.
Deutsch Adapter für beide Formate bieten Zubehörhersteller und/oder Ihre KFZ Werkstatt an. HINWEIS: ►► Bei VW/Audi unbedingt beachten: Bei der Antenne in Ihrem Fahrzeug kann es sich um eine aktive Antenne handeln. Diese benötigt eine Spannungsversorgung die nur von den originalen Autoradios ausgegeben wird. Sollte dies der Fall sein, verwenden Sie einen Antennen-Adapter für Phantomspeisung. Antennen-Adapter erhalten Sie im Autozubehörhandel und/oder bei Ihrer KFZ Werkstatt.
Deutsch 10 Das Gerät ausbauen Wählen Sie die Wiedergabe des Audioeingangs aus, indem Sie mehrmals die Taste MODE (1) drücken, bis im Display AUX angezeigt wird. Batterie in die Fernbedienung einlegen Um das Gerät wieder auszubauen, gehen Sie wie folgt vor: Entfernen Sie den Blendrahmen. Führen Sie den rechten und den linken Schlüssel in den jeweiligen Schlitz an den Seiten des Gerätes ein. (Die Laschen sind nun zurückgebogen.) Ziehen Sie das Gerät heraus.
Deutsch 11 Einstellungen Lautstärke einstellen Ziehen Sie dann vorsichtig an der linken Seite des Bedienteils, um das Bedienteil abzunehmen. Batterie der Fernbedienung austauschen Bei der Batterie der Fernbedienung handelt es sich um eine langlebige Lithium-Zelle.
Deutsch PI RETUNE MASK TA VOL EON TA BEEP Stereo/ Mono Überfahren Sie einen Bereich, in dem zwei Sender mit gleichem AF-, jedoch unterschiedlichem PI-Code (PI = Programminformation) empfangen werden können, dann wird der Empfang instabil. In dieser Situation haben Sie die Auswahl zwischen: ■■ PI SOUND: Sollte dennoch eine Umschaltung stattfinden, wird der Klang eines anderen Senders nur für weniger als eine Sekunde eingeblendet. ■■ PI MUTE: Der Klang eines anderen Senders wird unterdrückt.
Deutsch Sender automatisch suchen Drücken Sie die Tasten (20) oder (19), um den Sendersuchlauf zu starten. SEARCH wird auf dem Display angezeigt. Bei einem gefundenen Sender wird die Suche angehalten. Sender manuell einstellen ■■ Halten Sie die Tasten (20) oder (19) gedrückt, bis MANUAL auf dem Display angezeigt wird. ■■ Drücken Sie die Tasten (26) oder (27), um die Frequenz in Schritten von 0,05 MHz (UKW) bzw. 9 kHz (MW) zu ändern, bis die gewünschte Frequenz eingestellt ist.
Deutsch Drücken Sie während der Wiedergabe von Verkehrsfunk die Taste TA (9), um die TA-Funktion zu unterbrechen, ohne das die Funktion abgeschaltet wird. Allgemeine CD-Funktionen Anti-Schock-Funktion (ESP - „Electric Shock Protection“) Das Gerät ist mit einer Anti-Schock-Funktion ausgestattet. Diese Funktion dient dazu Erschütterungen z. B. auf unebenen Straßen auszugleichen und eine unterbrechungsfreie Wiedergabe auch bei Bewegung des Geräts zu gewährleisten.
Deutsch Drücken Sie die Taste BAND (18), um die Auswahl zu bestätigen. Die ausgewählte Titelnummer wird gesucht und wiedergegeben. Suche nach Titel- bzw. Verzeichnisname Drücken Sie zweimal die Taste AS/PS (17). Drehen Sie den Multiregler (3), bis das gewünschte Zeichen auf dem Display angezeigt wird und bestätigen Sie die Einstellung durch Drücken des Multireglers (3). Wiederholen Sie diesen Schritt so oft, bis Sie die gewünschte Zeichenfolge eingegeben haben.
Deutsch Wiedergabe und Suchfunktionen ■■ Die Bedienung zum Abspielen von Dateien auf dem externen Datenträger sowie die Suchfunktion funktionieren genau wie bei MP3-CDs. ■■ Wenn eine andere Betriebsart eingestellt ist, können Sie den Kartenleser mit der Taste MODE (1) anwählen. Telefonieren via Bluetooth Bei Bluetooth handelt es sich um eine Technologie zur drahtlosen Funkverbindung von Geräten über eine kurze Distanz. Die Bluetooth Technologie ermöglicht den Freisprechbetrieb von Mobiltelefonen.
Deutsch Drücken Sie die Taste anzurufen. (8), um die Telefonnummer Gespräch beenden Halten Sie die Taste (8) gedrückt, um abgehende bzw. eingehende Gespräche zu beenden. Im Display wird CALL END angezeigt. HINWEIS: Um ein eingehendes Gespräch abzulehnen, halten Sie ebenfalls die Taste (8) gedrückt.
Deutsch Fehler Die CD wird nicht geladen oder ausgeworfen. Funktionstasten funktionieren nicht. Mögliche Ursache Lösung Das Format der CD Legen Sie eine wird vom Gerät andere CD ein. nicht unterstützt. Überprüfen Sie die Fehler bei selbstge- selbstgebrannte CD brannter CD. in einem anderen Abspielgerät. Lassen Sie das Fahrzeug auslüften, Die Temperatur bis die Tempeim Fahrzeug ist zu ratur wieder auf hoch. Betriebstemperatur abgekühlt ist.
Deutsch Garantie Garantiebedingungen 1. Gegenüber Verbrauchern gewähren wir bei privater Nutzung des Geräts eine Garantie von 24 Monaten ab Kaufdatum. Ist das Gerät zur gewerblichen Nutzung geeignet, gewähren wir beim Kauf durch Unternehmer für das Gerät eine Garantie von 12 Monaten. Die Garantiezeit für Verbraucher reduziert sich auf 12 Monate, sofern sie ein zur gewerblichen Nutzung geeignetes Gerät – auch teilweise – gewerblich nutzen. 2.
Deutsch Index A Alternative Frequenzen (AF)..........................................................13 Anschlüsse an der Geräterückseite................................................7 Anschluss eines externen Verstärkers...........................................8 Antennenstrom-Anschluss...............................................................8 Anti-Schock-Funktion......................................................................14 Ausbau....................................................
ESPAÑOL 21 Contenido Introducción Introducción.........................................................................................21 Prólogo....................................................................................................21 Información sobre este manual de instrucciones.................21 Copyright...............................................................................................21 Responsabilidad........................................................................
ESPAÑOL ATENCIÓN: Un símbolo de advertencia de este nivel de riesgo indica potenciales daños materiales. Si no se evita la situación, pueden provocarse daños materiales. ►► Siga las instrucciones de este símbolo de advertencia para evitar daños materiales. NOTA ►► Una nota recalca información adicional que puede facilitar manipular y usar la unidad.
ESPAÑOL Controles (ver página desplegable) Radio para coche 1 Botón MODE: Establecer el modo de funcionamiento 2 Botón PWR/MUTE: Apagar la unidad/pasar a silencio 3 Multicontrol: girar para ajustar el volumen pulsar para acceder a otras opciones de configuración 4 Botón DIS: Mostrar información adicional en pantalla 5 Botón PTY: Tipo de programa 6 Pantalla 7 Botón OPEN: Botón de liberación del panel de control 8 Botón : Aceptar/rechazar llamada, o marcar el número seleccionado, Finalizar llamada 9 Botón TA:
■■ ■■ ■■ ■■ ESPAÑOL Caja para el panel de control Conector ISO Mando a distancia Manual de instrucciones Conexiones en la parte posterior de la unidad NOTA: ►► Compruebe que todos los elementos estén en la caja y que no existan daños visibles. ►► Si observa daños de transporte, informe a su vendedor sin retraso. Eliminación del embalaje El embalaje protege la unidad de daños de transporte.
ESPAÑOL NOTA: ►► Use siempre el cable de los altavoces anteriores para conectar la unidad a dos altavoces. ►► Observe que la conexión 4 debe estar conectada a positivo permanente para la memoria automática. ►► En algunos modelos de coche la salida de las conexiones [4] y [7] (ISO A) se intercambia en la planta de montaje. Si es el caso, la memoria automática puede no funcionar. Para corregir el problemas las conexiones 7 (positivo con contacto) y 4 (positivo permanente) deben intercambiarse.
ESPAÑOL 26 NOTA: ►► Información importante para vehículos VW/Audi: La antena de su vehículo puede ser una antena activa. Precisa de una alimentación proporcionada solamente por la radio para coche original. Si es el caso, use un adaptador de antena para una alimentación virtual. Puede encontrar adaptadores de antena en tiendas de accesorios automovilísticos y/o su taller mecánico. Instrucciones de instalación ■■ Use solamente herramientas adecuadas para instalar HiFi para coche.
ESPAÑOL Para desmontar la unidad, proceda del modo siguiente: Retire el marco. Introduzca la llave de montaje derecha e izquierda en las ranuras correspondientes de los laterales de la unidad. (Las pestañas se habrán doblado hacia atrás). Saque la unidad. NOTA: ►► Si el chasis es irregular, las pestañas de la funda de montaje pueden encallarse. Use las llaves de montaje para soltar las pestañas. Instalación para Toyota o Nissan NOTA: ►► Funda de montaje, marco y tira de montaje no requerida.
ESPAÑOL Tire cuidadosamente del lado izquierdo del panel de control para desmontarlo. Sustitución La batería del mando a distancia es una batería de larga duración de litio. Si el alcance del mando a distancia se reduce con el uso, proceda del modo siguiente: Saque el compartimiento de baterías del mando a distancia pulsando el enganche lateral y tirando al mismo tiempo del compartimiento. Sustituya la batería con otra del mismo tipo (CR 2025). Asegúrese de que la polaridad sea correcta.
ESPAÑOL PI RETUNE MASK TA VOL EON TA BEEP Si conduce por una zona en la que se pueden recibir dos emisoras con la misma AF, pero con código PI distinto (PI = Información de programa), la recepción se volverá inestable. En esta situación puede elegir: ■■ PI SOUND: Si la unidad cambia en cualquier caso a la otra emisora, el sonido de la otra emisora solamente se escuchará menos de un segundo. ■■ PI MUTE: Se anulará el sonido de la otra emisora.
ESPAÑOL Emisoras preestablecidas Pueden preestablecerse 6 emisoras para cada rango de frecuencia. Mantenga pulsado el botón numérico correspondiente (11 a 16) durante aprox. 2 segundos para memorizar la emisora actual. Después de memorizarla se emitirá un pitido (a menos que se haya seleccionado BEEP OFF). Sintonizar emisoras preestablecidas Use el botón BAND (18) para seleccionar el rango de frecuencia deseado. Pulse uno de los botones numéricos (11 a 16) para sintonizar la emisora guardada.
ESPAÑOL Para sacar el CD, pulse el botón (24 con el panel de control bajado). Se expulsará el CD. La unidad pasará a modo radio. Saque el CD de inmediato de la ranura de CD. Si no se saca un CD expulsado en aproximadamente 15 segundos, la unidad volverá a introducir el CD pero no lo reproducirá. NOTA: ►► Observe: Existen diversos métodos de grabación y compresión, así como diferencias de calidad entre CD y CD grabados.
ESPAÑOL Puerto USB Puede conectar dispositivos de almacenamiento USB, así como un iPod/iPhone. NOTA: ►► La amplia variedad de dispositivos de almacenamiento USB de todo tipo actualmente en el mercado, por desgracia, no permiten garantizar una total compatibilidad con todos los dispositivos de almacenamiento USB. Por este motivo, en algunos casos puede haber problemas al reproducir archivos de algunos dispositivos de almacenamiento USB. No es un defecto del dispositivo.
ESPAÑOL Emparejamiento de dispositivos (PAIRING) Antes de poder usar la radio del coche para realizar llamadas debe emparejar las unidades. Seleccione el menú Bluetooth del teléfono móvil y registre la radio del coche en el teléfono móvil. Para hacerlo, consulte el manual del usuario de su teléfono móvil. El dispositivo ”CAR RADIO“ se seleccionará en su teléfono móvil. Según el fabricante del dispositivo, el modelo y la versión de software, introduzca la clave “0000” en su teléfono móvil.
ESPAÑOL Limpieza Avería Recomendaciones de seguridad ATENCIÓN: Posibles daños a la unidad. ►► Asegúrese de que no entre humedad en la unidad durante la limpieza para evitar daños irreparables. Limpieza Limpie el chasis con una gamuza ligeramente húmeda. Solución de problemas Este capítulo contiene información importante sobre la identificación de averías y solución de problemas. Siga las instrucciones para evitar riesgos y daños. El CD no carga o no se expulsa.
ESPAÑOL Avería Causa potencial El puerto USB está diseñado para dispositivos que cumplan con el estándar USB. No todos los La unidad no dispositivos del funciona en el mercado cumplen puerto USB. con él. Puede haber conectado un dispositivo que no funcione según el estándar USB. La tarjeta de memoria SD/MMC no funciona. El dispositivo no está leyendo la tarjeta. Solución Datos técnicos Conecte un dispositivo que cumpla con el estándar USB.
ESPAÑOL Índice A Apagado.................................................................................................28 Avance/retroceso rápido..................................................................31 B Botón RESET.........................................................................................26 Botón DSP.............................................................................................28 Búsqueda de emisora automática...............................................
PORTUGUÊS 37 Índice Introdução Introdução.............................................................................................37 Apresentação........................................................................................37 Informações sobre este Manual de instruções.......................37 Direitos de autor.................................................................................37 Responsabilidade legal.....................................................................
PORTUGUÊS ATENÇÃO: Um símbolo de advertência deste nível de perigo indica potenciais danos materiais. Se não se prevenir contra uma situação de perigo, podem resultar danos materiais. ►► Siga as instruções indicadas neste símbolo de advertência para prevenir danos materiais. INDICAÇÃO: ►► Uma nota destaca informações adicionais que podem facilitar o manuseamento e o funcionamento da unidade.
PORTUGUÊS Botões (ver página desdobrável) Auto-rádio 1 Botão MODE: Permite definir o modo de funcionamento 2 Botão PWR/MUTE: Permite ligar e desligar o som da unidade 3 Multicontrolo: rodar para ajustar o volume pressionar para aceder a outras opções de configuração 4 Botão DIS: Permite mostrar informações adicionais no visor 5 Botão PTY: Tipo de programas 6 Visor 7 Botão OPEN: Permite soltar o botão do painel de controlo 8 Botão : Permite aceitar/rejeitar chamada, ou marcar o número seleccionado e terminar
PORTUGUÊS Peças fornecidas e inspecção no transporte A unidade é fornecida normalmente com os seguintes componentes: ■■ Auto-rádio (painel de controlo incluído) ■■ Manga de montagem (incluída) ■■ Suporte (incluído) ■■ Banda de montagem (correias incluídas) ■■ Chave para a manga de montagem (2x) ■■ Estojo para o painel de controlo ■■ Conector ISO ■■ Controlo remoto ■■ Manual de instruções INDICAÇÃO: ►► Verifique se todas as peças estão dentro da caixa e que não há nenhum dano visível.
PORTUGUÊS INDICAÇÃO: ►► Em alguns modelos de automóveis o circuito integrado predefinido das ligações [4] e [7] (ISO A) está trocado no diagrama de montagem. Se for este o caso, a predefinição automática pode não funcionar. Para corrigir o problema, as ligações 7 (positiva com chave) e 4 (positiva e permanente) devem ser trocadas. Ligação eléctrica da antena A5 (ISO A) ATENÇÃO: Potenciais danos na unidade! ►► Nunca ligue a ligação eléctrica da antena ao cabo eléctrico do motor da antena.
PORTUGUÊS 42 INDICAÇÃO: ►► Informações importantes sobre veículos VW/ Audi A antena do seu veículo pode ser uma antena activa. A antena necessita de uma fonte de alimentação só fornecida para auto-rádios de origem. Se for este o caso, utilize um adaptador de antena para alimentação “fantasma“. Os adaptadores da antena podem ser encontrados em lojas de acessórios para automóveis e/ou na sua oficina de reparações automóveis.
PORTUGUÊS Para desmontar a unidade, proceda da seguinte maneira: Retire o suporte. Insira a chave de montagem do lado direito e esquerdo nas respectivas ranhuras da unidade. (As linguetas estão agora dobradas.) Retire a unidade. INDICAÇÃO: ►► Se a caixa estiver desnivelada, as linguetas da manga de montagem podem ficar obstruídas. Utilize as chaves de montagem para soltar as linguetas.
PORTUGUÊS Retire a tampa do compartimento das pilhas do controlo remoto pressionando a lingueta lateral e, ao mesmo tempo, puxando a tampa do compartimento. Substitua a célula da pilha por uma do mesmo tipo (CR 2025). Assegure-se de que a polaridade utilizada é a correcta. Volte a fechar a tampa do compartimento das pilhas do controlo remoto. Se o controlo remoto não estiver a ser utilizado por um longo período de tempo, retire as pilhas para evitar fuga do ácido das pilhas.
PORTUGUÊS RETUNE MASK TA VOL EON TA BEEP Intervalo de tempo durante a sintonização automática para informações de trânsito ou informações de programas: ■■ S (Short) (Curto) após cerca de 30 segundos ■■ L (Long) (Longo) após cerca de 90 segundos Esta opção determina quais as estações que devem ser excluídas da procura de estações: ■■ DPI: As frequências alternativas com um Código PI diferente são excluídas da procura.
PORTUGUÊS Mantenha os botões numéricos pretendidos (do 11 ao 16) pressionados durante cerca de 2 segundos para predefinir a estação. Depois de a predefinir, é emitido um sinal sonoro (salvo se BEEP OFF tiver sido seleccionado). Sintonizar estações predefinidas Utilize o botão BAND (18) para seleccionar a gama de frequências desejada. Pressione um dos botões numéricos (do 11 ao 16) para sintonizar a estação predefinida.
PORTUGUÊS Remova o CD imediatamente da ranhura de CD. Se um CD a ser ejectado não for removido durante cerca de 15 segundos, a unidade volta a inserir o CD mas não o reproduz. INDICAÇÃO: ►► Note que: Há vários métodos diferentes de gravar e comprimir, assim como diferenças na qualidade entre CDs normais e CDs regraváveis. O sector musical não adere a nenhuma norma definida (protecção de direitos e autor).
PORTUGUÊS Rode o botão “Multijog” (3) para seleccionar o título pretendido. Confirme a sua selecção pressionando o botão “Multijog” (3). É iniciada a reprodução. Porta USB Pode ligar dispositivos de armazenamento USB assim como um iPOD/iPhone. INDICAÇÃO: ►► O vasto leque de diferentes dispositivos de armazenamento USB de vários tipos à venda no mercado, infelizmente, não nos permitem garantir total compatibilidade.
PORTUGUÊS INDICAÇÃO: ►► A definição dos altifalantes depende da posição em que foram instalados no sentido dos microfones e, por isso, não pode ser determinada. Emparelhar dispositivos (PAIRING) Antes de utilizar o auto-rádio para fazer chamadas telefónicas, deve emparelhar as unidades. Seleccione o menu do Bluetooth no seu telemóvel e registe o auto-rádio no telemóvel. Para o fazer, consulte o manual do utilizador do seu telemóvel. O dispositivo ”CAR RADIO“ é seleccionado no seu telemóvel.
PORTUGUÊS As funcionalidades completas não podem ser asseguradas devido aos diferentes fabricantes de unidades, modelos e versões de software. Depois de ter ligado as unidades uma com a outra, inicie a reprodução de música no seu telemóvel. Utilize o botão (20) ou (19) para seleccionar o título da música anterior ou o seguinte. Erro O CD salta.
PORTUGUÊS Erro Causa possível A porta USB foi concebida para dispositivos que funcionem de acordo com as normas relativas a USBs. Nem todos os disA unidade não positivos à venda no funciona na mercado estão em porta USB. conformidade com essas normas. Pode ter sido ligado um dispositivo que não funcione de acordo com as normas de USBs. O cartão de memória SD/ MMC não funciona. Solução Ligue um dispositivo que funcione de acordo com as normas de USBs.
PORTUGUÊS Índice A Anexar o painel de controlo..........................................................43 Avançar/retroceder rápido..............................................................47 Avançar títulos....................................................................................47 I Inserir um CD.......................................................................................46 Instalação na ranhura do painel de instrumentos ISO.......42 Instalação (Toyota ou Nissan)............
ITALIANO 53 Sommario Introduzione Introduzione.........................................................................................53 Prefazione..............................................................................................53 Informazioni su questo Manuale d’Istruzioni.........................53 Diritto d’autore....................................................................................53 Responsabilità...........................................................................
ITALIANO ATTENZIONE: Un simbolo di avvertimento di questo livello di pericolo indica un potenziale danno alla proprietà. Se la situazione non viene prevenuta, questa potrebbe portare a un danno alla proprietà. ►► Seguite le istruzioni in questo simbolo di avvertimento per prevenire un danno alla proprietà. NOTA: ►► Una nota evidenzia informazioni aggiuntive che possono facilitare il trattamento e il funzionamento dell’unità.
ITALIANO Controlli (vedere pieghevole) Autoradio 1 Tasto MODE: Regola la modalità operativa 2 Tasto PWR/MUTE: Spegne l’unità / passa a modalità silenziosa 3 Multicontrollo: Girate per regolare il volume Premete per accedere ad altre opzioni di regolazione 4 Tasto DIS: Mostra ulteriori informazioni sullo schermo 5 Tasto PTY: Tipo di programma 6 Schermo 7 Tasto OPEN: Pulsante di sgancio del pannello di controllo 8 Tasto : Accetta / rifiuta una chiamata o compone il numero selezionato, termina la chiamata 9 Ta
ITALIANO Parti fornite e ispezione di trasporto Di base l’unità viene fornita con i seguenti component inclusi: ■■ Autoradio (incluso il pannello di controllo) ■■ Telaio di montaggio (incluso) ■■ Cornice (inclusa) ■■ Striscia di montaggio (inclusi i ganci) ■■ Chiavi di assemblaggio per il telaio di montaggio (2x) ■■ Custodia per il pannello di controllo ■■ Connettore ISO ■■ Telecomando ■■ Manuale d’istruzioni NOTA: ►► Controllate che tutte le parti siano nella scatola e che non ci sia nessun danno visi
ITALIANO NOTA: ►► In alcuni modelli di automobili il pinout di default delle connessioni [4] e [7] (ISO A) è scambiato nella fabbrica di assemblaggio. Se è questo il caso, la preimpostazione automatica può non funzionare. Per correggere il problema, le connessioni 7 (positivo sotto la chiave) e 4 (positivo permanente) devono essere scambiate.
ITALIANO 58 Sono disponibili adattatori per entrambi i formati presso i produttori di accessori e/o la vostra autofficina. NOTA: ►► Informazione importante per i veicoli VW/Audi: L’antenna del vostro veicolo può essere un’antenna attiva. Essa richiede un’alimentazione fornita solo dall’autoradio originale. Se è questo il caso, utilizzare un adattatore per antenna per un’alimentazione fantasma.
ITALIANO Smontaggio dell’unità 59 Inserimento delle batterie nel telecomando Per smontare l’unità, procedete come segue: Togliete il telaio. Inserite le chiavi di assemblaggio di destra e di sinistra nelle rispettive fessure ai lati dell’unità. (Ora le linguette sono piegate all’indietro). Tirate fuori l’unità. NOTA: ►► Se l’alloggiamento è irregolare, le linguette sulla cornice di montaggio possono incastrarsi. Usate le chiavi di assemblaggio per liberare le linguette.
ITALIANO Tirate quindi delicatamente il lato di sinistra del pannello di controllo per staccarlo. Sostituzione La batteria del telecomando è una cella al litio di lunga durata. Se la portata del telecomando si riduce durante l’utilizzo procedete come segue: Tirate fuori il vano delle batterie dal telecomando premendo il gancio laterale e spingendo in fuori il vano delle batterie allo stesso tempo. Sostituite la cella con una batteria dello stesso tipo (CR 2025).
ITALIANO PI RETUNE MASK TA VOL EON TA BEEP Se state guidando in una zona dove si possono ricevere due stazioni con la stessa AF, ma codici PI differenti (PI = Informazioni sui Programmi), la ricezione diverrà allora instabile. In questa situazione potete scegliere tra: ■■ PI SOUND: Se l’unità passa in ogni caso all’altra stazione, il suono dell’altra stazione verrà udito solo per meno di un secondo. ■■ PI MUTE: Il suono dell’altra stazione viene soppresso.
ITALIANO Stazioni preimpostate Possono essere preimpostate 6 stazioni per ogni banda di frequenza. Tenete premuto il tasto numerico richiesto (da 11a 16) per circa 2 secondi per preimpostare la stazioni attualmente impostata. Dopo aver preimpostato viene emesso 1 beep (a meno che non sia stato selezionato BEEP OFF). Sintonizzazione sulle stazioni preimpostate Utilizzate il tasto BAND (18) per selezionare la banda di frequenza desiderata.
ITALIANO Togliete immediatamente il CD dalla fessura per il CD. Se un CD espulso non viene tolto entro circa 15 secondi, l’unità riprende dentro il CD ma non inizia a riprodurlo. NOTA: ►► Fate attenzione: Ci sono diversi metodi di registrazione e compressione, come anche differenze nella qualità tra CD e CD masterizzati. L’industria musicale non aderisce a nessuno standard definito (protezione del diritto d’autore).
ITALIANO Porta USB Potete connettere i dispositivi di memoria USB come pure un iPOD/iPhone. NOTA: ►► L’ampia gamma di dispositivi di memoria USB di tutti i tipi disponibile oggi sul mercato non ci permette, sfortunatamente, di garantire la piena compatibilità con tutti i dispositivi di memoria USB. Per questa ragione, in rare circostanze possono esserci problemi nella riproduzione dei file di alcuni dispositivi di memoria USB. Questo non è un malfunzionamento dell’unità.
ITALIANO Selezionate il menu Bluetooth nel vostro telefono cellulare e registrate l’autoradio sul vostro telefono cellulare. Per far questo, fate riferimento al manuale dell’utente del vostro telefono cellulare. Il dispositivo “CAR RADIO” viene selezionato sul vostro telefono cellulare. A seconda del produttore del dispositivo, del modello e delle versioni del software, inserite ora la password “0000” sul vostro telefono cellulare.
ITALIANO Pulizia Guasto Consiglio di sicurezza ATTENZIONE: Possibile danno all’unità ►► Assicuratevi che non entri umidità nell’unità durante la pulizia per evitare un danno irreparabile all’unità. Pulizia Pulite sempre l’alloggiamento con un panno leggermente umido. Risoluzione dei problemi Questo capitolo contiene consigli importanti per identificare guasti e la risoluzione dei problemi. Seguite le istruzioni per prevenire pericoli e danni.
ITALIANO Guasto Causa potenziale La porta USB è progettata per dispositivi che funzionano conformemente allo standard USB. Non L’unità non tutti i dispositivi funziona sulla sul mercato sono porta USB. conformi a questo standard. Può essere stato connesso un dispositivo che non funziona in base allo standard USB. La scheda di memoria SD/ MMC non funziona. Non si può stabilire una connessione tramite Bluetooth. Soluzione Connettete un dispositivo che funzioni conformemente allo standard USB.
ITALIANO Indice A Accensione............................................................................................60 Attaccare il pannello di controllo................................................59 Avanzamento veloce/riavvolgimento........................................63 B Brani campione...................................................................................63 C Connessione di alimentazione dell’antenna A5 (ISO A)........57 Connessione di un amplificatore esterno.................
ENGLISH 69 Contents Introduction Introduction..........................................................................................69 Foreword................................................................................................69 Information about this Instruction Manual............................69 Copyright...............................................................................................69 Liability...........................................................................
ENGLISH CAUTION: A warning symbol of this level of hazard indicates potential damage to property. If the situation is not prevented, this may lead to damage to property. ►► Follow the instructions in this warning symbol to prevent damage to property. NOTE: ►► A note highlights additional information which may facilitate handling and operation of the unit.
ENGLISH 5 PTY Button: Program type 6 Display 7 OPEN Button: Release button for control panel 8 Button: Accept/reject call, or dial the selected number, End call 9 Button TA: Switch on/switch off traffic announcements 10 Button AF: Switch on/switch off alternative frequencies 11 Button 1/PAUSE: Access preset radio stations/pause playback/terminate Bluetooth connection 12 Button2/RPT: Access preset radio stations /Switch on/switch off repeat function 13 Button 3/INT: Access preset radio stations /activate SCA
ENGLISH Recycling the packaging conserves raw materials and reduces waste. Dispose of any unwanted packaging materials in accordance with local regulations. NOTE: ►► If possible keep the original packaging for the duration of the warranty period of the unit, in order that you can repack the unit properly in the event of a warranty claim. Connection WARNING: Damage to property may occur when installing the unit! ►► If possible have the unit installed by a qualified specialist.
ENGLISH Connecting an external amplifier To connect an external amplifier, use the LINE OUT connector cable. To do so, refer to the amplifier operating manual. Installation and disassembly The unit can be fitted into any standard ISO dashboard slot. If your car does not have an ISO dashboard slot, ask your repair shop, specialist retailer or relevant department in your nearest department store. NOTE: ►► Before installation, you must remove the two transport protection screws on the upper housing.
ENGLISH Installing the unit into the ISO dashboard slot D Attach the control panel (A), as described under „Attach control panel“. CAUTION: Possible damage to the cables! ►► When inserting the unit, pay attention to the cable routing to prevent damage. C B A Then mount the frame. C Detach the mounting sleeve (D) and frame (B) from the unit housing. Use the assembly keys (C) to do so. Fit the mounting sleeve into the ISO dashboard slot.
ENGLISH Use the screws (B) to fasten the unit to the mounting brackets (D). Connect an external audio device to the unit Connect the audio output of an external audio device to the AUX IN jack (21) on the front of the unit. Select playback of the audio input by pressing the MODE button (1) several times until the display shows AUX.
ENGLISH Settings Adjust the volume WARNING: Setting the volume too high may damage your hearing! If the volume is set too high your hearing may be permanently damaged. ►► Set the volume to a reasonable level. RETUNE Turn the multijog (3) to set the volume. Switch unit to mute Press the PWR/MUTE button (2) to switch the unit to mute. Press the PWR/MUTE button (2) again to deactivate the function. Sound settings Press the multijog (3). The current volume is displayed.
ENGLISH Time (is automatically set during RDS reception), radio station, programme type, frequency of the currently selected radio station, current DSP setting, information on file names (only for playback MP3 or WMA file). NOTE: ►► If no corresponding information is available, PTY NONE is shown on the display. ►► If the information on the display is too long it is shown as scrolling text. Reset radio (RESET) To restore the factory settings, press the RESET button (26) with a pointed object e.g.
ENGLISH These programme types may be e.g.: SPORT NEWS POP M CLASSICS After selecting a PTY identifier, press the button (26). PTY SEEK is shown on the display. The unit searches for stations which correspond to the selected PTY identifier and stops when a matching station has been found. If no station with the selected PTY identifier is found, PTY NONE appears on the display. The PTY function ends when the selected PTY identifier can no longer be received.
ENGLISH Additional functions for MP3/WMA-CDs Search functions Search for title number Press the AS/PS button (17). Turn the multijog (3) until the required title number is shown on the display. Press the BAND button (18) to confirm the selection. The unit searches for the selected title number and plays it. Search for title or directory name Press the AS/PS button twice (17).
ENGLISH ■■ If a different operating mode has been selected, you can select the card reader with the MODE button (1). Phoning via Bluetooth Bluetooth is a technology for wireless radio connection of devices over short distances. Bluetooth technology enables hands-free use of mobile phones. The driver can hold a conversation via his mobile phone without having to hold it to his ear. This unit offers you the option of using a Bluetoothenabled mobile phone.
ENGLISH Music playback via A2DP (Advanced Audio Distribution Profile) This involves a cross-manufacturer Bluetooth profile. Stereo-audio signals are transmitted wireless via streaming between the playback unit (source) and receiver unit. To control the source remotely, the playback unit must support the AVRCP profile (Audio Video Remote Control Profile). Full functionality cannot be guaranteed due to the different unit manufacturers, models and software versions.
ENGLISH Fault Potential cause Connection 4 in the ISO connection A Station preset (permanent posidoes not work. tive) is not properly connected. The USB port is designed for devices which work according to the USB standard. Not Unit does not all devices on the work on the market conform to this standard. A USB port. device which does not function according to the USB standard may have been connected. SD/MMC The device is not memory card reading the card. does not work.
ENGLISH 83 Index A Alternative Frequencies (AF)..........................................................77 Antenna power connection A5 (ISO A).....................................72 Anti-Shock Function.........................................................................78 Attach control panel.........................................................................75 Automatic Preset................................................................................77 Automatic station search.............
JĘZYK POLSKI Spis treści Wprowadzenie Wprowadzenie.....................................................................................84 Słowo wstępne....................................................................................84 Informacje dotyczące instrukcji obsługi...................................84 Prawa autorskie...................................................................................84 Odpowiedzialność.........................................................................
JĘZYK POLSKI 85 Przeznaczenie urządzenia Urządzenie jest przeznaczone do ■■ Odbioru radiostacji nadających na częstotliwościach UKF i MW ■■ Odtwarzania płyt Audio CD ■■ Odtwarzania plików MP3 i WMA z płyt CD, urządzeń pamięci przenośnej USB lub kart pamięci SD/MMC ■■ Odtwarzania dźwięku z zewnętrznych urządzeń audio ■■ Odtwarzania muzyki z użyciem profilu Bluetooth A2DP ■■ Wykonywania rozmów telefonicznych przez Bluetooth ■■ Uszkodzone kable lub złącza powinna wymienić upoważniona osoba lub punkt serwiso
JĘZYK POLSKI Sterowniki (patrz: okładka) Radioodbiornik samochodowy 1 Przycisk MODE: Tryb działania 2 Przycisk PWR/MUTE: Wyłączanie urządzenia/wyciszanie 3 Pokrętło wielofunkcyjne: przekręcić, aby wyregulować głośność wcisnąć, aby uzyskać dostęp do innych opcji ustawień 4 Przycisk DIS: wyświetla dodatkowe informacje na wyświetlaczu 5 Przycisk PTY: Rodzaj programu 6 Wyświetlacz 7 Przycisk OPEN: Zwalnia przycisk panelu sterującego 8 Przycisk : Odbieranie / odrzucanie połączenia lub wybieranie wybranego n
JĘZYK POLSKI Zawartość opakowania, kontrola transportowa Standardowo urządzenie jest dostarczane wraz z następującymi elementami: ■■ Radioodbiornik samochodowy (wraz z panelem kontrolnym) ■■ Tuleja montażowa ■■ Ramka ■■ Pas montażowy (z mocowaniami) ■■ Klucz montażowy do tulei montażowej (2x) ■■ Pudełko na panel kontrolny ■■ Złącze ISO ■■ Pilot ■■ Instrukcja obsługi WSKAZÓWKA: ►► Sprawdzić, czy w opakowaniu znajdują się wszystkie elementy oraz czy nie posiadają widocznych uszkodzeń.
JĘZYK POLSKI Złącze A5 (ISO A) zasilania anteny UWAGA: Potencjalne uszkodzenie urządzenia! ►► Nie podłączać złącza zasilania anteny do kabla zasilającego anteny. ►► Maks. natężenie prądu: 100 mA. Złącze zasilania anteny jest dostępne dla anteny sterowanej przekaźnikiem. Przekaźnik automatycznie wysunie antenę po włączeniu radia. Po wyłączeniu radia, antena schowa się. Tego złącza można również używać do sterowania zewnętrznego wzmacniacza.
JĘZYK POLSKI ■■ Umieścić urządzenie w szczelinie lub wybrać taką lokalizację, gdzie wszystkie przyciski będą łatwo dostępne oraz prowadzenie samochodu nie będzie utrudnione. ■■ Podłączyć urządzenie do prawidłowo zainstalowanego akumulatora 12 V. ■■ Zawsze podłączać urządzenie przez złącze ISO do samochodu. ■■ Zainstalować urządzenie w taki sposób, aby nie pojawił się nadmiar ciepła oraz w miejscu o dobrej wentylacji. ■■ Aby uniknąć nieprawidłowego działania, kąt montażu powinien być mniejszy niż 30°.
JĘZYK POLSKI 90 Użyć gwintowanych otworów montażowych znajdujących się po bokach urządzenia (A), aby przymocować wsporniki montażowe (znajdujące się w pojeździe). Otwory oznaczone są T (dla Toyoty) oraz N (dla Nissana). WSKAZÓWKA: ►► Dla ochrony, panel należy przechowywać w pudełku. ►► Nie dotykać przyłączy urządzenia na panelu kontrolnym. Montaż panelu sterującego A B D B C Odkręcić śruby montażowe haczyków, znajdujących się z przodu urządzenia i zdjąć haczyki.
JĘZYK POLSKI Obsługa W tym rozdziale znajdą Państwo ważne instrukcje dotyczące obsługi urządzenia. WSKAZÓWKA: ►► Niektóre przyciski znajdują się na samym urządzeniu, a niektóre na pilocie. Przyciski posiadające takie samo oznaczenie, posiadają taką samą funkcję. Dalsze strony zawierają szczegółowy opis obsługi urządzenia. ►► Sygnały z pilota nadawane są za pomocą podczerwieni.
BEEP JĘZYK POLSKI Dźwięk słyszany po wciśnięciu przycisku: ■■ BEEP 2ND: Dźwięk rozlega się po wciśnięciu przycisku wielofunkcyjnego. ■■ BEEP ALL: Dźwięk rozlega się po wciśnięciu każdego przycisku ■■ BEEP OFF: Brak dźwięku Przełącza pomiędzy Stereo i Mono Stereo/ Mono Loudness Włączenie tej funkcji powoduje wzmocnienie basów. ■■ LOUD ON: Podbicie basów jest włączone. ■■ LOUD OFF: Podbicie basów jest wyłączone. DX/LOCAL Przełącza pomiędzy stacjami lokalnymi a tymi o większym zasięgu nadawania.
JĘZYK POLSKI Wcisnąć przycisk AF (10), aby włączyć / wyłączyć tę funkcję. Na wyświetlaczu wyświetla się AF: Funkcja jest włączona i odbierane są informacje RDS. AF miga: Informacje RDS nie są odbierane. AF nie wyświetla się: Funkcja jest wyłączona. Programy regionalne Niektóre stacje dzielą swój program w pewnych przedziałach czasowych na programy regionalne z różną treścią.
JĘZYK POLSKI Funkcja powtarzania Wcisnąć przycisk 2/RPT (12), aby powtórzyć aktualnie odtwarzany utwór. Na wyświetlaczu pojawi się komunikat RPT. Powtórne wciśnięcie tego przycisku spowoduje powrót do zwykłego odtwarzania. Tylko dla plików MP3 oraz płyt CD nagranych w formacie MP3: Krótko przytrzymać przycisk 2/RPT (12), aby powtórzyć aktualnie odtwarzany katalog. Na wyświetlaczu pojawi się komunikat D-RPT oraz tytuł odtwarzanego utworu. Wcisnąć przycisk, aby powrócić do zwykłego odtwarzania.
JĘZYK POLSKI WSKAZÓWKA: ►► Przyciski znajdujące się na iPodzie stają się nieaktywne po podłączeniu iPoda do urządzenia. ►► Włączyć iPod i uruchomić aplikację Muzyka. ■■ Procedura odtwarzania plików z iPoda lub iPhona jest dokładnie taka sama, jak z płyt CD z plikami MP3. Menu iPoda Urządzenie może używać funkcji wyszukiwania do wyszukiwania utworów z menu iPoda. Wcisnąć przycisk AS/PS (17), aby uruchomić funkcję wyszukiwania.
JĘZYK POLSKI Ponownie podłączanie urządzeń Urządzenie posiada funkcję automatycznego ponownego podłączania. Wymagania: ■■ urządzenia były wcześniej sparowane ■■ w telefonie włączona jest funkcja Bluetooth ■■ telefon komórkowy obsługuje tę funkcję. Po wyłączeniu i ponownym włączeniu radia z panelu lub zapłonem, aktywuje się funkcja automatycznego ponownego podłączania. Może to trwać kilka sekund. Na wyświetlaczu (6) wyświetla się komunikat CONN TRY.
JĘZYK POLSKI Usterka Prawdopodobna przyczyna Rozwiązanie Nie można włączyć urządzenia. Zapłon nie jest włączony. Przekręcić kluczyk, aby włączyć zapłon. Brak dźwięku Płyta przeskakuje. Głośność jest ustawiona na poziom minimalny. Kabel jest podłączony nieprawidłowo. Kąt montażu jest większy niż 30°. Płyta jest zabrudzona lub uszkodzona. W napędzie jest już płyta. Płyta jest włożona etykietą w dół. Płyta jest zabrudzona lub uszkodzona. Format płyty nie jest obsługiwany.
JĘZYK POLSKI Dane techniczne Ogólne Napięcie wejściowe Pobór mocy Zakres temperatury roboczej Wilgotność (bez kondensacji) Wymiary (Dł. x Sz. x Wys.) Waga Maks. moc wyjściowa 12 V = < 10 A +5 ...
JĘZYK POLSKI 99 Indeks A Automatyczne ustawianie radiostacji........................................92 Automatyczne wyszukiwanie stacji............................................92 S Skanowanie zapamiętanych stacji..............................................92 Styki złączy ISO...................................................................................87 C Charakter programu (PTY)...............................................................93 Częstotliwości alternatywne (AF)..................
GARANTIE-KARTE Guarantee card AR 4025 BT 24 Monate Garantie gemäß Garantie-Erklärung 24 months guarantee according to guarantee declaration Kaufdatum, Händlerstempel, Unterschrift Purchase date, Dealer stamp, Signature Elektro-technische Vertriebsgesellschaft mbH Industriering Ost 40 47906 Kempen Elektro-technische Vertriebsges. mbH Industriering Ost 40 • 47906 Kempen Telefon 0 21 52/20 06-666 Hotline@etv.