COMPETENCE B1100-3 Elektro-Einbauherd Gebrauchsanweisung
Sehr geehrte Kundin, sehr geehrter Kunde, lesen Sie bitte diese Gebrauchsanweisung sorgfältig durch. Beachten Sie vor allem den Abschnitt „Sicherheitshinweise“ auf den ersten Seiten. Bewahren Sie bitte diese Gebrauchsanweisung zum späteren Nachschlagen auf. Geben Sie sie an eventuelle Nachbesitzer des Gerätes weiter. 1 3 2 Folgende Symbole werden im Text verwendet: Sicherheitshinweise Warnung: Hinweise, die Ihrer persönlichen Sicherheit dienen.
Inhalt Sicherheit. . . . . . . . . . . . . . . . . . . . . . . . . . . . . . . . . . . . . . . . . . . . . . . . . . . . . . 5 Entsorgung . . . . . . . . . . . . . . . . . . . . . . . . . . . . . . . . . . . . . . . . . . . . . . . . . . . . 6 Gerätebeschreibung. . . . . . . . . . . . . . . . . . . . . . . . . . . . . . . . . . . . . . . . . . . . . Gesamtansicht . . . . . . . . . . . . . . . . . . . . . . . . . . . . . . . . . . . . . . . . . . . . . . . . . . Bedienblende . . . . . . . . . . . . . . .
Was tun, wenn ... . . . . . . . . . . . . . . . . . . . . . . . . . . . . . . . . . . . . . . . . . . . . . . . 39 Technische Daten . . . . . . . . . . . . . . . . . . . . . . . . . . . . . . . . . . . . . . . . . . . . . . . 40 Backofen Innenmaße. . . . . . . . . . . . . . . . . . . . . . . . . . . . . . . . . . . . . . . . . . . . . 40 Bestimmungen, Normen, Richtlinien . . . . . . . . . . . . . . . . . . . . . . . . . . . . . . . . 40 Stichwortverzeichnis . . . . . . . . . . . . . . . . . . . . . . . . .
1 Sicherheit Elektrische Sicherheit • Das Gerät darf nur durch einen konzessionierten Fachmann angeschlossen werden. • Bei Störungen oder Beschädigungen am Gerät: Sicherungen herausdrehen bzw. ausschalten. • Die Reinigung des Gerätes mit einem Dampfstrahl- oder Hochdruckreiniger ist aus Sicherheitsgründen verboten. • Reparaturen am Gerät dürfen nur von Fachkräften durchgeführt werden. Durch unsachgemäße Reparaturen können erhebliche Gefahren entstehen.
So vermeiden Sie Schäden am Gerät • Legen Sie den Backofen nicht mit Alufolie aus und stellen Sie kein Backblech, keinen Topf etc. auf den Boden, da sonst das Backofenemail durch den entstehenden Hitzestau beschädigt wird. • Obstsäfte, die vom Backblech tropfen, hinterlassen Flecken, die sich nicht mehr entfernen lassen. Benutzen Sie für sehr feuchte Kuchen das Universalblech. • Die offene Backofentür nicht belasten. • Gießen Sie Wasser nie direkt in den heißen Backofen. Es können Emailschäden entstehen.
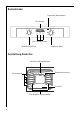
Gerätebeschreibung Gesamtansicht Bedienblende Türgriff Vollglastür 7
Bedienblende Temperatur-Kontrolllampe Zeit-Anzeige Uhr-Funktions-Tasten Backofen-Funktionen Temperatur-Wahl Ausstattung Backofen Oberhitze und Grillheizkörper Backofenbeleuchtung Einsatzebenen Unterhitze Einschubgitter, herausnehmbar 8
Zubehör Backofen Kombi-Rost Für Geschirr, Kuchenformen, Braten und Grillstücke. Universalblech Für saftige Kuchen, Braten oder als Backblech bzw. Auffanggefäß für Fett.
Vor dem ersten Gebrauch Tageszeit einstellen 3 Der Backofen funktioniert nur mit eingestellter Zeit. Nach dem elektrischen Anschluss oder einem Stromausfall blinkt die Funktionsleuchte Tageszeit W. Mit den Tasten + oder - die aktuelle Tageszeit einstellen. Nach ca. 5 Sekunden erlischt das Blinken und die Uhr zeigt die eingestellte Tageszeit an. Das Gerät ist betriebsbereit.
Erstes Reinigen 1 3 Bevor Sie den Backofen das erste Mal benutzen, sollten Sie ihn gründlich reinigen. Achtung: Benutzen Sie keine scharfen, scheuernden Reinigungsmittel! Die Oberfläche könnte beschädigt werden. Verwenden Sie bei Metallfronten handelsübliche Pflegemittel. 1. Schalter Backofen-Funktionen auf Beleuchtung L stellen. 2. Alle Zubehörteile und Einschubgitter entnehmen und mit warmer Spülmittellauge reinigen. 3. Backofen ebenfalls mit warmer Spülmittellauge auswaschen und trocknen. 4.
Bedienen des Backofens Backofen ein- und ausschalten Temperatur-Kontrolllampe Backofen-Funktionen Temperatur-Wahl 1. Drehen Sie den Schalter „Backofen-Funktionen“ auf die gewünschte Funktion. 2. Drehen Sie den Schalter „Temperaturwahl“ auf die gewünschte Temperatur. Die rote Temperatur-Kontrolllampe leuchtet, solange der Backofen aufheizt. 3. Zum Abschalten des Backofens den Schalter „Backofen-Funktionen“ und den Schalter „Temperaturwahl“ in die Null-Position drehen.
Backofen-Funktionen Für den Backofen stehen Ihnen folgende Funktionen zur Verfügung: L Backofenbeleuchtung Mit dieser Funktion können Sie den Backofeninnenraum, z.B. zum Reinigen, beleuchten. Es ist kein Heizkörper in Betrieb. ¡ Ober-/Unterhitze Zum Backen und Braten auf einer Ebene. Ober-und Unterhitzeheizkörper sind in Betrieb. O Oberhitze Zum Überbacken von Backwaren und für Aufläufe. Der Oberhitzeheizkörper ist in Betrieb. U Unterhitze Zum Nachbacken von Kuchen mit krossen Böden.
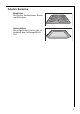
Rost und Universalblech einsetzen 3 Kippsicherung Alle Einschubteile sind mit einer kleinen Auswölbung rechts und links versehen. Diese Auswölbung dient als Kippsicherung und muss immer nach hinten weisen. Blech bzw. Universalblech einsetzen: Die Kippsicherung muss nach hinten weisen. Rost einsetzen: Rost so einsetzen, dass die beiden Führungsstäbe nach oben zeigen. Die Kippsicherung muss nach unten weisen und im Backraum hinten liegen.
Uhr-Funktionen Funktionsleuchten Taste - Zeit-Anzeige Funktionsleuchten Taste Auswahl Taste + Kurzzeit G Zum Einstellen einer Kurzzeit. Nach Ablauf ertönt ein Signal. Diese Funktion ist ohne Auswirkung auf den Backofenbetrieb. Dauer d Zum Einstellen wie lange der Backofen in Betrieb sein soll. Ende e Zum Einstellen wann sich der Backofen wieder ausschalten soll. Tageszeit W Zum Einstellen, Ändern oder Abfragen der Tageszeit (siehe auch Kapitel „Vor dem ersten Gebrauch“).
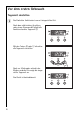
3 2 Allgemeine Hinweise • Nach dem Auswählen einer Funktion blinkt die dazugehörige Funktionsleuchte ca. 5 Sekunden. Während dieser Zeit können mit der + oder - -Taste die gewünschten Zeiten eingestellt werden. • Nach dem Einstellen der gewünschten Zeit blinkt die Funktionsleuchte nochmals ca. 5 Sekunden. Danach ist die Funktionsleuchte an. Die eingestellte Zeit beginnt abzulaufen. • Der Signalton kann durch Drücken einer beliebigen Taste beendet werden.
Kurzzeit G 1. Taste Auswahl T so oft drücken, bis die Funktionsleuchte Kurzzeit G blinkt. 2. Mit den Tasten + oder - die gewünschte Kurzzeit G einstellen (max. 2 Stunden 30 Minuten). Nach ca. 5 Sekunden zeigt die Anzeige die verbleibende Zeit. Die Funktionsleuchte Kurzzeit G leuchtet. Wenn die Zeit abgelaufen ist, blinkt die Funktionsleuchte und es ertönt für 2 Minuten ein Signal. Den Signalton durch Drücken einer beliebigen Taste abstellen.
Dauer d 1. Taste Auswahl T so oft drücken, bis die Funktionsleuchte Dauer d blinkt. 2. Mit den Tasten + oder - die gewünschte Gardauer einstellen. Nach ca. 5 Sekunden schaltet die Anzeige zurück auf die Tageszeit. Die Funktionsleuchte Dauer d leuchtet. Wenn die Zeit abgelaufen ist, blinkt die Funktionsleuchte, es ertönt für 2 Minuten ein Signal und der Backofen schaltet sich aus. 3. Den Signalton und das Programm durch Drücken einer beliebigen Taste abstellen.
Ende e 1. Taste Auswahl T so oft drücken, bis die Funktionsleuchte Ende e blinkt. 2. Mit den Tasten + oder - die gewünschte Abschaltzeit einstellen. Nach ca. 5 Sekunden schaltet die Anzeige zurück auf die Tageszeit. Die Funktionsleuchte Ende e leuchtet. Wenn die Zeit abgelaufen ist, blinkt die Funktionsleuchte, es ertönt für 2 Minuten ein Signal und der Backofen schaltet sich aus. 3. Den Signalton und das Programm durch Drücken einer beliebigen Taste abstellen.
3 Dauer d und Ende e kombiniert Dauer d und Ende e können gleichzeitig verwendet werden, wenn der Backofen zu einem späteren Zeitpunkt automatisch ein- und ausgeschaltet werden soll. 1. Mit der Funktion Dauer d Zeit einstellen, die das Gericht zum Garen benötigt. Hier 1 Stunde. 2. Mit der Funktion Ende e Zeit einstellen, zu der das Gericht fertig sein soll.. Hier 14:05 Uhr. Die Funktionsleuchten Dauer d und Ende e leuchten und im Display wird die Tageszeit angezeigt. Hier 12:05 Uhr.
3 Tageszeit W ändern Die Tageszeit kann nur verändert werden, wenn keine Automatikfunktion (Dauer d oder Ende e ) eingestellt ist. 1. Taste Auswahl T so oft drücken, bis die Funktionsleuchte Tageszeit W blinkt. 2. Mit den Tasten + oder - die aktuelle Tageszeit einstellen. Nach ca. 5 Sekunden erlischt das Blinken und die Uhr zeigt die eingestellte Tageszeit an. Das Gerät ist betriebsbereit.
Anwendungen, Tabellen und Tipps Backen Zum Backen die Backofen-Funktion Ober-/Unterhitze ¡ verwenden. Backformen Für Ober-/Unterhitze ¡ eignen sich Formen aus dunklem Metall und beschichtete Formen. Einsatzebenen Backen mit Ober-/Unterhitze ¡ ist jeweils nur auf einer Ebene möglich. 1 Backblech: z.B. Einsatzebene 3 1 Backform: z.B. Einsatzebene 1 3 22 Allgemeine Hinweise • Beachten Sie, dass die Einsatzebenen von unten nach oben gezählt werden.
2 Hinweise zu den Backtabellen In den Tabellen finden Sie für eine Auswahl an Gerichten die dafür erforderlichen Temperaturangaben, Garzeiten und Einsatzebenen. • Die Temperaturen und Backzeiten sind Richtwerte, da sie von der Zusammensetzung des Teiges, der Menge und der Backform abhängig sind. • Wir empfehlen, beim ersten Mal den kleineren Temperaturwert einzustellen, und erst bei Bedarf, z.B. wenn eine stärkere Bräunung gewünscht wird oder die Backzeit zu lange dauert, eine höhere Temperatur zu wählen.
Tabelle Backen Einsatzebene Temperatur ºC Zeit Napf- oder Rodonkuchen 1 160-180 0:50-1:10 Sandkuchen, Königskuchen 1 150-170 1:10-1:30 Biskuittorte 2 160-180 0:25-0:40 Art des Gebäcks Gebäck in Formen 1) Tortenboden Mürbeteig 3 190-210 0:10-0:25 Tortenboden Rührteig 3 170-190 0:20-0:25 Gedeckte Apfeltorte 1 170-190 0:50-1:00 Pikante Torte (z.B.
Einsatzebene Temperatur ºC Zeit Mürbeteigplätzchen 3 170-1901 0:06-0:20 Spritzgebäck 3 160-180 0:10-0:40 Rührteigplätzchen 3 170-190 0:15-0:20 Eiweißgebäck, Baiser 3 100-120 2:00-2:30 Makronen 3 120-140 0:30-0:60 Hefekleingebäck 3 170-190 0:20-0:40 3 1 0:20-0:30 1 0:20-0:35 Art des Gebäcks Kleingebäck Blätterteigkleingebäck Brötchen 3 190-210 180-220 1) Backofen vorheizen 2) Kombi-/Fettpfanne bzw.
Tipps zum Backen Backergebniss Mögliche Ursache Der Kuchen ist unten zu hell Falsche Einschubhöhe Kuchen tiefer einschieben Der Kuchen fällt zusammen (wird klitschig, spundig, Wasserstreifen) Zu hohe Backtemperatur Backtemperatur etwas niedriger einstellen Zu kurze Backzeit Backzeit verlängern Backzeiten können nicht durch eine höhere Backtemperatur verkürzt werden Zu viel Flüssigkeit im Teig Verwenden Sie beim nächsten Mal weniger Flüssigkeit.
Braten Zum Braten die Backofen-Funktion Ober-/Unterhitze ¡ verwenden. 3 Bratgeschirr • Zum Braten ist jedes hitzebeständige Geschirr geeignet. • Bei Geschirr mit Kunststoffgriffen darauf achten, dass diese hitze-beständig sind. • Große Braten können Sie direkt in der Fettpfanne oder auf dem Rost mit untergesetzter Fettpfanne braten (z.B. Pute, Gans, 3-4 Hähnchen, 3-4 Haxen). • Alle mageren Fleischarten empfehlen wir, im Bratentopf mit Deckel zu braten (z.B.
Tabelle Braten Fleischart Menge Gewicht EinsatzTemperatur ebene ºC von unten Zeit Std.:Min.
Fleischart Menge Gewicht EinsatzTemperatur ebene ºC von unten Zeit Std.:Min. Geflügel Geflügelteile 4-6 Stück je 200-250g 3 220-250 0:35-0:50 Hähnchenhälfte 2-4 Stück je 400-500 g 3 220-250 0:35-0:50 Hähnchen, Poularde 1-1,5 kg 1 220-250 0:45-1:15 Ente 1,5-2 kg 1 210-220 1:00-1:30 Gans 3,5-5 kg 1 200-210 2:30-3:00 2,5-3,5 kg 4-6 kg 1 200-210 180-200 1:30-2:00 2:30-4:00 1-1,5 kg 2/3 210-220 0:45-1:15 Truthahn/Pute Fisch (dünsten) Ganze Fische * Backofen vorheizen.
Flächengrillen 1 3 Zum Grillen die Backofen-Funktion Grill ¸ oder Großflächengrill º mit der Temperatureinstellung È verwenden. Achtung: Grillen immer bei geschlossener Backofentür. Den leeren Backofen mit den Grill-Funktionen immer 5 Minuten vorheizen! Grill-Geschirr • Zum Grillen Rost und Universalblech gemeinsam benutzen. Einsatzebenen • Zum Grillen flacher Lebensmittel überwiegend die 4. Einsatzebene von unten verwenden.
Einkochen Zum Einkochen die Backofen-Funktion Unterhitze U verwenden. 3 Einkoch-Geschirr • Zum Einkochen nur handelsübliche Gläser gleicher Größe verwenden. Gläser mit Twist-Off- oder Bajonettverschluss und Metalldosen sind ungeeignet. Einsatzebenen • Zum Einkochen die 1. Einsatzebene von unten verwenden. Hinweise zum Einkochen • Verwenden Sie zum Einkochen das Backblech. Darauf haben bis zu sechs Gläser mit je einem Liter Inhalt Platz. • Die Gläser sollten alle gleich hoch gefüllt und zugeklammert sein.
Einkochtabelle Die angegebenen Einkochzeiten und Temperaturen sind Richtwerte. Einkochgut Temperatur in°C Einkochen bis Perlbeginn Min. im ausgeschalteten Backofen stehen lassen Weiter kochen bei 100°C Min.
Reinigung und Pflege 1 Warnung: Die Reinigung des Gerätes mit einem Dampfstrahl- oder Hochdruckreiniger ist aus Sicherheitsgründen verboten! Gerät von außen • Die Frontseite des Gerätes mit einem weichen Tuch und warmer Spüllauge abwischen. • Verwenden Sie keine Scheuermittel, scharfen Reinigungsmittel oder scheuernden Gegenstände. • Bei Metallfronten verwenden Sie handelsübliche Pflegemittel. Backofeninnenraum 1 Warnung: Zur Reinigung muß der Backofen ausgeschaltet und abgekühlt sein.
Einschubgitter Zur Reinigung der Seitenwände lassen sich die Einschubgitter auf der linken und rechten Seite im Backofen abnehmen. Einschubgitter abnehmen Gitter zuerst vorne von der Backofenwand wegziehen (1) und dann hinten aushängen (2). 3 Einschubgitter einsetzen Wichtig! Die abgerundeten Enden der Führungsstäbe müssen nach vorne weisen! Zum Einbau Gitter zuerst hinten wieder einhängen (1) und dann vorne einstecken und andrücken (2).
Backofenbeleuchtung 1 3 Warnung: Stromschlaggefahr! Vor dem Austausch der Backofenlampe: – Backofen ausschalten! – Sicherungen am Sicherungskasten herausdrehen bzw. ausschalten. Zum Schutz der Backofenlampe und der Glasabdeckung ein Tuch auf den Boden des Backofens legen. Backofenlampe austauschen/ Glasabdeckung reinigen 1. Glasabdeckung durch drehen nach links abnehmen und reinigen. 2. Falls erforderlich: Backofen-Beleuchtung 25 Watt, 230 V, 300 °C, hitzebeständig, austauschen. 3.
Backofendecke Zur leichteren Reinigung der Backofendecke kann der obere Heizkörper abgeklappt werden. 1 Heizkörper abklappen Warnung: Heizkörper nur abklappen, wenn der Backofen ausgeschaltet ist und keine Verbrennungsgefahr mehr besteht! 1. Seitliche Einschubgitter abnehmen. 2. Den Heizkörper vorne anfassen und über die Prägung an der Backofeninnenwand hinaus nach vorne ziehen. 3. Der Heizkörper klappt nun nach unten.
Backofen-Tür Zum Reinigen lässt sich die Backofen-Tür Ihres Gerätes aushängen. Backofen-Tür aushängen 1. Backofen-Tür vollständig öffnen. 2. Messingfarbenen Klemmhebel an beiden Türscharnieren ganz aufklappen. 3. Backofen-Tür mit beiden Händen an den Seiten anfassen und über den Widerstand hinaus etwa 3/4 schließen. 4. Tür vom Backofen wegziehen (Vorsicht: schwer!). 5. Tür mit der Außenseite nach unten auf eine weiche, ebene Unterlage ablegen, beispielsweise auf eine Decke, um Kratzer zu vermeiden.
Backofen-Türglas 1 1 Die Backofen-Tür ist mit zwei hintereinander angebrachten Glasscheiben ausgestattet. Die innere Scheibe ist zur Reinigung abnehmbar. Warnung: Führen Sie die folgenden Schritte grundsätzlich nur an der ausgehängten Backofen-Tür aus! Im eingehängten Zustand könnte die Tür beim Wegnehmen der Verglasung durch die Gewichtserleichterung hochschnellen und Sie gefährden. Achtung: Bei Gewalteinwirkung, vor allem auf die Kanten der Frontscheibe, kann das Glas brechen. Türglas ausbauen 1.
Was tun, wenn ... Störung Der Backofen heizt nicht auf. Mögliche Ursache Abhilfe Der Backofen ist nicht ein- Backofen einschalten. geschaltet. Die Tageszeit ist nicht eingestellt. Tageszeit einstellen. Die erforderlichen Einstellungen sind nicht erfolgt. Einstellungen nachprüfen. Die Sicherung in der Haus- Sicherung überprüfen. installation (SicherungsSollten die Sicherungen kasten) hat ausgelöst. mehrfach auslösen, rufen Sie bitte einen zugelassenen Elektroinstallateur.
Technische Daten Backofen Innenmaße Höhe x Breite x Tiefe Volumen (Nutzinhalt) 31 cm x 41 cm x 44 cm 55 l Bestimmungen, Normen, Richtlinien Dieses Gerät entspricht folgenden Normen: • EN 60335-1 und EN 60335-2-6 bezüglich der Sicherheit elektrischer Geräte für den Hausgebrauch und ähnliche Zwecke und • EN 60350 bzw. DIN 44546 / 44547 / 44548 bezüglich der Gebrauchseigenschaften von Elektroherden, Kochmulden, Backöfen und Grillgeräten für den Haushalt.
Stichwortverzeichnis B W Backofen Bedienen . . . . . . . . . . . . . . . . . . . . . . . . . . 12 Funktionen . . . . . . . . . . . . . . . . . . . . . . . . 13 Lampe . . . . . . . . . . . . . . . . . . . . . . . . . . . . 35 Zubehör . . . . . . . . . . . . . . . . . . . . . . . . . . . . 9 Bedienblende . . . . . . . . . . . . . . . . . . . . . . . . . 8 Was tun, wenn ... . . . . . . . . . . . . . . . . . . . . . .39 E Einkochen . . . . . . . . . . . . . . . . . . . . . . . . . . . 31 Einkochtabelle . .
Service Im Kapitel „Was tun, wenn …“ sind einige Störungen zusammengestellt, die Sie selbst beheben können. Sehen Sie im Störungsfall zunächst dort nach. Handelt es sich um eine technische Störung? Dann wenden Sie sich bitte an unseren Kundendienst oder einen unserer Service-Partner (Adressen und Telefonnummern finden Sie im Verzeichnis „Kundendienststellen“). Bereiten Sie das Gespräch in jedem Fall gut vor. Sie erleichtern so die Diagnose und die Entscheidung, ob ein Kundendienstbesuch nötig ist.
From the Electrolux Group. The world´s No.1 choice. Die Electrolux-Gruppe ist der weltweit größte Hersteller von gas- und strombetriebenen Geräten für die Küche, zum Reinigen und für Forst und Garten. Jedes Jahr verkauft die Electrolux-Gruppe in über 150 Ländern der Erde über 55 Millionen Produkte (Kühlschränke, Herde, Waschmaschinen, Staubsauger, Motorsägen und Rasenmäher) mit einem Wert von rund 14 Mrd. USD. AEG Hausgeräte GmbH Postfach 1036 D-90327 Nürnberg http://www.aeg.hausgeraete.