BCB331051M EN FR USER MANUAL User Manual Oven Notice d'utilisation Four 2 28
www.aeg.com CONTENTS 1. SAFETY INFORMATION............................................................................................. 3 2. SAFETY INSTRUCTIONS.............................................................................................4 3. PRODUCT DESCRIPTION...........................................................................................6 4. BEFORE FIRST USE..................................................................................................... 7 5. DAILY USE...
ENGLISH 1. 3 SAFETY INFORMATION Before the installation and use of the appliance, carefully read the supplied instructions. The manufacturer is not responsible for any injuries or damages that are the result of incorrect installation or usage. Always keep the instructions in a safe and accessible location for future reference. 1.
www.aeg.com • • • • • • Always use oven gloves to remove or put in accessories or ovenware. Before carrying out any maintenance, disconnect the appliance from the power supply. Ensure that the appliance is switched off before replacing the lamp to avoid the possibility of electric shock. Do not use a steam cleaner to clean the appliance. Do not use harsh abrasive cleaners or sharp metal scrapers to clean the glass door since they can scratch the surface, which may result in shattering of the glass.
ENGLISH • • • • • installation. Make sure that there is access to the mains plug after the installation. If the mains socket is loose, do not connect the mains plug. Do not pull the mains cable to disconnect the appliance. Always pull the mains plug. Use only correct isolation devices: line protecting cut-outs, fuses (screw type fuses removed from the holder), earth leakage trips and contactors.
www.aeg.com • Replace immediately the door glass panels when they are damaged. Contact the Authorised Service Centre. • Be careful when you remove the door from the appliance. The door is heavy! • Clean regularly the appliance to prevent the deterioration of the surface material. • Clean the appliance with a moist soft cloth. Only use neutral detergents. Do not use any abrasive products, abrasive cleaning pads, solvents or metal objects.
ENGLISH 7 4. BEFORE FIRST USE WARNING! Refer to Safety chapters. To set the Time of day refer to "Clock functions" chapter. 4.1 Initial Cleaning Remove all accessories from the appliance. Refer to "Care and cleaning" chapter. Clean the appliance and the accessories before first use. Put the accessories back to their initial position. 4.2 Preheating Preheat the empty appliance to burn off the remaining grease. 1. Set the function and the maximum temperature. 2. Let the appliance operate for 1 hour. 3.
www.aeg.com 5.3 Oven functions Oven function Application Off position The appliance is off. Light To activate the lamp without a cooking function. True Fan Cooking To bake on up to three shelf positions at the same time and to dry food. Set the temperature 20 - 40 °C lower than for Top / Bottom Heat. Top / Bottom Heat To bake and roast food on one shelf position. Moist Fan Baking To prepare baked goods in tin on one shelf position. To save energy during cooking.
ENGLISH 9 5.4 Display A G B F E C D A. B. C. D. Timer Heat-up and residual heat indicator Water drawer (selected models only) Core temperature sensor (selected models only) E. Door lock (selected models only) F. Hours / minutes G. Clock functions 5.5 Buttons Button Function Description MINUS To set the time. CLOCK To set a clock function. PLUS To set the time. 5.6 Heat-up indicator When you activate an oven function, the bars in the display one.
www.aeg.com Clock function 00:00 Application COUNT UP TIMER If you do not set any other clock function the COUNT UP TIMER automatically monitor how long the appliance operates. It is on immediately when the oven starts to heat. The Count Up Timer cannot be used with the functions: DURATION, END. 6.2 Setting and changing the time 2. Press again and again until starts to flash. After the first connection to the mains, 3. Press or to set the hours and the minutes for END time.
ENGLISH 6.6 Setting the MINUTE MINDER 1. Press again and again until "00" flash in the display. and or to set the MINUTE 2. Press MINDER. First you set the seconds, then the minutes. When the time you set is longer than 60 minutes, flash in the display. 3. Set the hours. 4. The MINUTE MINDER starts automatically after 5 seconds. 11 After 90% of the set time, an acoustic signal sounds. 5. When the set time ends, an acoustic signal sounds for 2 minutes. "00:00" and flash in the display.
www.aeg.com 8.3 Automatic Switch-off 8.4 Cooling fan For safety reasons the appliance deactivates automatically after some time if an oven function operates and you do not change any settings. Temperature (°C) Switch-off time (h) When the appliance operates, the cooling fan activates automatically to keep the surfaces of the appliance cool. If you deactivate the appliance, the cooling fan can continue to operate until the appliance cools down. 30 - 115 12.5 8.5 Safety thermostat 120 - 195 8.
ENGLISH • To prevent too much smoke in the oven during roasting, add some water into the deep pan. To prevent the smoke condensation, add water each time after it dries up. 13 Initially, monitor the performance when you cook. Find the best settings (heat setting, cooking time, etc.) for your cookware, recipes and quantities when you use this appliance. 9.4 Cooking times Cooking times depend on the type of food, its consistency, and volume. 9.
www.aeg.
ENGLISH 15 Bread and pizza Food Top / Bottom Heat True Fan Cooking Time (min) Comments Temperature (°C) Shelf posi- Temperation ture (°C) Shelf position 190 1 190 1 60 - 70 1-2 pieces, 500 gr per piece Rye bread 190 1 180 1 30 - 45 In a bread tin Bread 190 2 180 2 (2 and 4) 25 - 40 6 - 8 rolls in a baking tray Pizza1) 230 - 250 1 230 - 250 1 10 - 20 In a baking tray or a deep pan Scones1) 200 3 190 3 10 - 20 In a baking tray White bread1) rolls 1) 1) Preheat the
www.aeg.
ENGLISH 17 9.6 Grilling Preheat the empty oven for 3 minutes before cooking. Food Quantity Temperature (°C) Time (min) 1st side 2nd side Shelf position Pieces (g) 4 800 max. 12 - 15 12 - 14 4 Beef steaks 4 600 max. 10 - 12 6-8 4 Sausages - max. 12 - 15 10 - 12 4 Pork chops 4 600 max. 12 - 16 12 - 14 4 Chicken (cut in 2) 2 1000 max. 30 - 35 25 - 30 4 Kebabs 4 - max. 10 - 15 10 - 12 4 Breast of chicken 4 400 max. 12 - 15 12 - 14 4 Hamburger 6 600 max.
www.aeg.com Pork Food Quantity (kg) Temperature (°C) Time (min) Shelf position Shoulder, neck, ham joint 1 - 1.5 160 - 180 90 - 120 1 or 2 Chop, spare rib 1 - 1.5 170 - 180 60 - 90 1 or 2 Meat loaf 0.75 - 1 160 - 170 50 - 60 1 or 2 Pork knuckle (precooked) 0.75 - 1 150 - 170 90 - 120 1 or 2 Food Quantity (kg) Temperature (°C) Time (min) Shelf position Roast veal 1 160 - 180 90 - 120 1 or 2 Knuckle of veal 1.
ENGLISH 9.8 Moist Fan Baking 19 During cooking, open the appliance door only when necessary. For best results follow the baking times listed in the table below.
www.aeg.com Food Temperature (°C) Time (h) Apricots 60 - 70 Apple slices Pears Shelf position 1 position 2 positions 8 - 10 3 1/4 60 - 70 6-8 3 1/4 60 - 70 6-9 3 1/4 10. CARE AND CLEANING WARNING! Refer to Safety chapters. 10.1 Notes on cleaning • Clean the front of the appliance with a soft cloth with warm water and a cleaning agent. • To clean metal surfaces, use a dedicated cleaning agent. • Clean the appliance interior after each use.
ENGLISH 21 An acoustic signal sounds after the time ends. The appliance deactivates. 2. Push a button to stop the acoustic signal. 3. Clean the bottom of the appliance with a damp soft sponge. To stop Catalysis before it finishes, turn the knob for the oven functions to the off position. 10.5 Cleaning reminder As a reminder that catalytic cleaning is necessary, CATA flashes in the display for 10 seconds after each activation and deactivation of the appliance.
www.aeg.com 5. Hold the door trim (B) on the top edge of the door at the two sides and push inwards to release the clip seal. A B 2 B 1 6. Pull the door trim to the front to remove it. 7. Hold the door glass panels by their top edge and carefully pull them out one by one. Start from the top panel. Make sure the glass slides out of the supports completely. Make sure that you install the middle panel of glass in the seats correctly. A B 10.7 Replacing the lamp 8.
ENGLISH 23 11. TROUBLESHOOTING WARNING! Refer to Safety chapters. 11.1 What to do if... Problem Possible cause Remedy You cannot activate or oper- The oven is not connected Check if the oven is correctly ate the oven. to an electrical supply or it is connected to the electrical connected incorrectly. supply (refer to the connection diagram if available). The oven does not heat up. The oven is deactivated. Activate the oven. The oven does not heat up. The clock is not set. Set the clock.
www.aeg.com Problem Possible cause Remedy The appliance is activated and does not heat up. The fan does not operate. The display shows "Demo". The demo mode is activated. 1. 2. 3. 4. Deactivate the oven. Press and hold the button . The first digit on the display and Demo indicator start to blink. Enter the code 2468 by pressing the buttons or 5. 6. 11.2 Service data If you cannot find a solution to the problem yourself, contact your dealer or an Authorised Service Centre.
ENGLISH 12.1 Building In 12.3 Electrical installation The manufacturer is not responsible if you do not follow the safety precautions from the Safety chapters. 548 21 558 min. 550 114 16 20 600 25 min. 560 589 594 573 This appliance is supplied only with a main cable. 12.4 Cable 595 +/-1 5 3 Cable types applicable for installation or replacement: H07 RN-F, H05 RN-F, H05 RRF, H05 VV-F, H05 V2V2-F (T90), H05 BB-F For the section of the cable refer to the total power on the rating plate.
www.aeg.com 13. ENERGY EFFICIENCY 13.1 Product Fiche and information according to EU 65-66/2014 Supplier's name AEG Model identification BCB331051M Energy Efficiency Index 81.2 Energy efficiency class A+ Energy consumption with a standard load, conventional mode 0.93 kWh/cycle Energy consumption with a standard load, fan-forced 0.69 kWh/cycle mode Number of cavities 1 Heat source Electricity Volume 72 l Type of oven Built-In Oven Mass 31.
ENGLISH 27 When you use Moist Fan Baking, the lamp automatically deactivates after 30 seconds. 14. ENVIRONMENTAL CONCERNS Recycle the materials with the symbol . Put the packaging in applicable containers to recycle it. Help protect the environment and human health and to recycle waste of electrical and electronic appliances. Do not dispose appliances marked with the symbol with the household waste. Return the product to your local recycling facility or contact your municipal office.
www.aeg.com TABLE DES MATIÈRES 1. INFORMATIONS DE SÉCURITÉ...............................................................................29 2. CONSIGNES DE SÉCURITÉ......................................................................................30 3. DESCRIPTION DE L'APPAREIL.................................................................................33 4. AVANT LA PREMIÈRE UTILISATION....................................................................... 33 5. UTILISATION QUOTIDIENNE.........
FRANÇAIS 1. 29 INFORMATIONS DE SÉCURITÉ Avant d'installer et d'utiliser cet appareil, lisez soigneusement les instructions fournies. Le fabricant ne pourra être tenu pour responsable des blessures et dégâts résultant d'une mauvaise installation ou utilisation. Conservez toujours les instructions dans un lieu sûr et accessible pour vous y référer ultérieurement. 1.
www.aeg.com • • • • • • fonctionnement. Veillez à ne pas toucher les éléments chauffants. Les enfants de moins de 8 ans doivent être tenus à l'écart, à moins d'être surveillés en permanence. Utilisez toujours des gants de cuisine pour retirer ou enfourner des accessoires ou des plats allant au four. Avant d'effectuer une opération de maintenance, débranchez l'appareil de la prise secteur.
FRANÇAIS • • • • • • • • • • • correspondent aux données électriques de votre réseau. Utilisez toujours une prise de courant de sécurité correctement installée. N'utilisez pas d'adaptateurs multiprises ni de rallonges. Veillez à ne pas endommager la fiche secteur ni le câble d'alimentation. Le remplacement du cordon d'alimentation de l'appareil doit être effectué par notre service après-vente agréé.
www.aeg.com • • • • • – faites attention lorsque vous retirez ou remettez en place les accessoires. La décoloration de l'émail ou de l'acier inoxydable est sans effet sur les performances de l'appareil. Utilisez un plat à rôtir pour obtenir des gâteaux moelleux. Les jus de fruits causent des taches qui peuvent être permanentes. Cet appareil est exclusivement destiné à un usage culinaire.
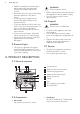
FRANÇAIS 33 3. DESCRIPTION DE L'APPAREIL 3.1 Vue d'ensemble 1 2 3 4 5 5 6 4 9 3 7 2 1 1 Bandeau de commande 2 Manette de sélection des fonctions du four 3 Programmateur électronique 4 Manette du thermostat 5 Résistance 6 Éclairage 7 Ventilateur 8 Support de grille amovible 9 Position des grilles 8 3.2 Accessoires • Grille métallique Permet de poser des plats (à rôti, à gratin) et des moules à gâteau/ pâtisserie. • Plat multi-usages Pour la cuisson de gâteaux et de biscuits/gâteaux secs.
www.aeg.com 5. UTILISATION QUOTIDIENNE AVERTISSEMENT! Reportez-vous aux chapitres concernant la sécurité. 5.1 Manettes rétractables Pour utiliser l'appareil, appuyez sur la manette de commande. La manette de commande sort de son logement. 1. Tournez la manette des fonctions du four pour sélectionner une fonction. 2. Tournez la manette du thermostat pour sélectionner la température souhaitée. 3.
FRANÇAIS Fonction du four 35 Utilisation Chaleur Tournan- Pour cuire des pâtisseries dans des moules sur un seul te Humide niveau. Pour économiser de l'énergie en cours de cuisson. Cette fonction doit être utilisée en suivant les indications des tableaux de cuisson afin d'atteindre les résultats de cuisson souhaités. Pour obtenir plus d'informations sur les réglages recommandés, reportez-vous aux tableaux de cuisson.
www.aeg.com 5.5 Touches Touche Fonction Description MOINS Pour régler l'heure. HORLOGE Pour régler une fonction de l'horloge. PLUS Pour régler l'heure. 5.6 Indicateur de chauffe Les barres indiquent l'augmentation ou la diminution de la température du four. Lorsque vous activez une fonction du four, les segments s'affichent un à un . 6. FONCTIONS DE L'HORLOGE 6.1 Tableau des fonctions de l'horloge Fonction de l'horloge 00:00 Utilisation HEURE Pour afficher ou modifier l'heure.
FRANÇAIS 3. Appuyez sur minutes. ou pour régler les 4. Appuyez sur pour confirmer, ou l'heure réglée sera enregistrée automatiquement au bout de 5 secondes. L'affichage indique la nouvelle heure. Pour changer l'heure, appuyez à plusieurs reprises sur jusqu'à ce que l'indicateur de l'heure l'affichage. clignote sur 6.3 Réglage de la DURÉE 1. Régler une fonction du four. 2. Appuyez sur jusqu'à ce que clignoter. à plusieurs reprises commence à ou pour régler les 3.
www.aeg.com 6.7 MINUTEUR DE DURÉE DE FONCTIONNEMENT et et maintenez-les enfoncées. Le minuteur redémarre. Pour réinitialiser le minuteur de durée de fonctionnement, appuyez sur les touches 7. UTILISATION DES ACCESSOIRES AVERTISSEMENT! Reportez-vous aux chapitres concernant la sécurité. Plat à rôtir : Poussez le plat à rôtir entre les rails du support de grille choisi. 7.
FRANÇAIS Température (°C) Arrêt automatique au bout de (h) 30 - 115 12.5 120 - 195 8.5 200 - 245 5.5 250 - Maximum 1.5 Après un arrêt automatique, appuyez sur une touche pour faire de nouveau fonctionner l'appareil. L'arrêt automatique ne fonctionne pas avec les fonctions : Éclairage, Durée, Fin. 39 refroidissement se met automatiquement en marche pour refroidir les surfaces de l'appareil.
www.aeg.com rôtir. Pour éviter que la fumée ne se condense, ajoutez à nouveau de l'eau dans le plat à rôtir à chaque fois qu'il n'en contient plus. • La fonction Convection naturelle avec la température par défaut est idéale pour cuire du pain. 9.3 Cuisson de viande et de poisson 9.4 Temps de cuisson • Pour les aliments très gras, utilisez un plat à rôtir pour éviter de salir le four de manière irréversible.
FRANÇAIS Plat Voûte Température (°C) Chaleur tournante Durée (min) Commentaires 41 Positions Tempérades grilles ture (°C) Positions des grilles Génoise/ 170 Gâteau Savoie 2 160 2 50 - 60 Dans un moule à gâteau de 26 cm Gâteau de 160 Noël/Cake 2 150 2 90 - 120 Dans un moule à gâteau de 20 cm 175 1 160 2 50 - 60 Dans un moule à pain Petits gâteaux - sur un seul niveau 170 3 140 - 150 3 20 - 30 Sur un plateau de cuisson Petits gâteaux - sur deux niveaux - - 140 - 150 2 et
www.aeg.
FRANÇAIS 43 Pain et pizza Plat Voûte Chaleur tournante Durée (min) Commentaires Température (°C) Positions des grilles Température (°C) Positions des grilles 190 1 190 1 60 - 70 1 à 2 pièces, 500 g par pièce Pain de seigle 190 1 180 1 30 - 45 Dans un moule à pain Petits 190 2 180 2 (2 et 4) 25 - 40 6 à 8 petits pains sur un plateau de cuisson Pizza1) 230 - 250 1 230 - 250 1 10 - 20 Sur un plateau de cuisson ou un plat à rôtir Scones1) 200 3 190 3 10 - 20 Sur un pl
www.aeg.
FRANÇAIS 45 Poisson Plat Voûte Chaleur tournante Durée (min) Commentaires Température (°C) Positions des grilles Température (°C) Positions des grilles Truite/ daurade 190 2 175 2 40 - 55 3 - 4 poissons Thon/ saumon 190 2 175 2 35 - 60 4 - 6 filets Température (°C) Durée (min) 1re face 2e face 9.6 Gril Préchauffez votre four à vide pendant 3 minutes avant la cuisson. Plat Quantité Positions des grilles Morceaux (g) Filet de bœuf 4 800 max.
www.aeg.com 9.7 Turbo gril Viande de bœuf Plat Quantité Rôti ou filet de Durée (min) Positions des grilles Par cm d’épais- 190 - 200 seur 5-6 1 ou 2 Par cm d’épais- 180 - 190 seur 6-8 1 ou 2 Par cm d’épais- 170 - 180 seur 8 - 10 1 ou 2 Quantité (kg) Température (°C) Durée (min) Positions des grilles Épaule, collier, jam- 1 - 1.5 bon à l'os 160 - 180 90 - 120 1 ou 2 Côtelette, côte levée 1 - 1.5 170 - 180 60 - 90 1 ou 2 Pâté à la viande 0.
FRANÇAIS 47 Volaille Plat Quantité (kg) Morceaux de volaille Température (°C) Durée (min) Positions des grilles 0,2 - 0,25 chacun 200 - 220 30 - 50 1 ou 2 Demi-poulet 0.4 - 0.5 chacun 190 - 210 35 - 50 1 ou 2 Volaille, poularde 1 - 1.5 190 - 210 50 - 70 1 ou 2 Canard 1.5 - 2 180 - 200 80 - 100 1 ou 2 Oie 3.5 - 5 160 - 180 120 - 180 1 ou 2 Dinde 2.5 - 3.
www.aeg.com 9.9 Déshydratation - Chaleur tournante de déshydratation, ouvrez la porte et laissez refroidir pendant une nuit pour terminer le séchage. • Utilisez des plaques recouvertes de papier sulfurisé.
FRANÇAIS 10.2 Appareils en acier inoxydable ou en aluminium Nettoyez la porte uniquement avec une éponge ou un chiffon humides. Séchez-la avec un chiffon doux. N'utilisez jamais de produits abrasifs ou acides ni d'éponges métalliques car ils peuvent endommager la surface du four. Nettoyez le bandeau de commande du four en observant ces mêmes recommandations. 10.3 Nettoyage du joint d'étanchéité de la porte • Vérifiez régulièrement le joint d'étanchéité de la porte.
www.aeg.com Si vous tentez d'extraire les panneaux de verre sans avoir au préalable retiré la porte du four, celle-ci peut se refermer brusquement. ATTENTION! N'utilisez pas l'appareil sans les panneaux de verre. 1. Ouvrez complètement la porte et saisissez les 2 charnières de porte. 4. Déposez la porte sur une surface stable recouverte d'un tissu doux. 5.
FRANÇAIS Une fois le nettoyage terminé, remettez les panneaux de verre et la porte du four en place. Suivez les étapes ci-dessus dans l'ordre inverse. Veillez à remettre les panneaux de verre (A et B) dans le bon ordre.Le premier panneau (A) est décoré d'un motif ornemental. La zone imprimée doit faire face à l'intérieur de la porte. Après l'installation, vérifiez que la surface du panneau de verre (A) où se trouve la zone imprimée est lisse au toucher (le relief doit être de l'autre côté). A 10.
www.aeg.com 11.1 En cas d'anomalie de fonctionnement Anomalie Cause possible Solution Vous ne pouvez pas allumer Le four n'est pas branché à le four ni le faire fonctionner. une source d'alimentation électrique ou le branchement est incorrect. Vérifiez que le four est correctement branché à une source d'alimentation électrique (reportez-vous au schéma de branchement). Le four ne chauffe pas. Le four est désactivé. Mettez le four en marche. Le four ne chauffe pas. L'horloge n'est pas réglée.
FRANÇAIS Anomalie Cause possible Solution L'appareil est allumé mais il ne chauffe pas. Le ventilateur ne fonctionne pas. L'affichage indique "Demo". Le mode démo est activé. 1. 2. 3. 4. Éteignez le four. Appuyez sur la touche et maintenez-la enfoncée. Le premier chiffre sur l'affichage et le voyant Demo commencent à clignoter. Entrez le code 2468 en appuyant sur les touches ou 5. 6. 11.
www.aeg.com 12.1 Encastrement 12.3 Installation électrique 548 21 558 min. 550 114 16 20 600 min. 560 589 594 573 595 +/-1 5 Le fabricant ne pourra être tenu pour responsable si vous ne respectez pas les précautions de sécurité du chapitre « Consignes de sécurité ». Cet appareil n'est fourni qu'avec un câble d'alimentation. 12.4 Câble Types de câbles compatibles pour l'installation ou le remplacement : 3 H07 RN-F, H05 RN-F, H05 RRF, H05 VV-F, H05 V2V2-F (T90), H05 BB-F 548 21 min.
FRANÇAIS 55 13. RENDEMENT ÉNERGÉTIQUE 13.1 Fiche du produit et informations conformément à la norme EU 65-66/2014 Nom du fournisseur AEG Identification du modèle BCB331051M Index d'efficacité énergétique 81.2 Classe d'efficacité énergétique A+ Consommation d'énergie avec charge standard et mode traditionnel 0.93 kWh/cycle Consommation d'énergie avec charge standard et mode air pulsé 0.
www.aeg.com Chaleur tournante humide Fonction conçue pour économiser de l'énergie en cours de cuisson. Son fonctionnement est tel que la température dans la cavité du four peut être différente de la température affichée durant le cycle de cuisson et les temps de cuisson peuvent différer des temps de cuisson d'autres programmes. Lorsque vous utilisez la fonction Chaleur tournante humide, l'éclairage s'éteint au bout de 30 secondes. 14.
FRANÇAIS 57
www.aeg.
FRANÇAIS 59
867340987-A-142017 www.aeg.