BEK555320M USER MANUAL EN User Manual Oven
www.aeg.com CONTENTS 1. SAFETY INFORMATION............................................................................................. 2 2. SAFETY INSTRUCTIONS.............................................................................................4 3. PRODUCT DESCRIPTION...........................................................................................6 4. CONTROL PANEL....................................................................................................... 7 5.
ENGLISH 3 manufacturer is not responsible for any injuries or damages that are the result of incorrect installation or usage. Always keep the instructions in a safe and accessible location for future reference. 1.
www.aeg.com • • • • • • Ensure that the appliance is switched off before replacing the lamp to avoid the possibility of electric shock. Do not use a steam cleaner to clean the appliance. Do not use harsh abrasive cleaners or sharp metal scrapers to clean the glass door since they can scratch the surface, which may result in shattering of the glass.
ENGLISH • • • • • • such a way that it cannot be removed without tools. Connect the mains plug to the mains socket only at the end of the installation. Make sure that there is access to the mains plug after the installation. If the mains socket is loose, do not connect the mains plug. Do not pull the mains cable to disconnect the appliance. Always pull the mains plug.
www.aeg.com • Before maintenance, deactivate the appliance and disconnect the mains plug from the mains socket. • Make sure the appliance is cold. There is the risk that the glass panels can break. • Replace immediately the door glass panels when they are damaged. Contact the Authorised Service Centre. • Be careful when you remove the door from the appliance. The door is heavy! • Clean regularly the appliance to prevent the deterioration of the surface material.
ENGLISH 7 14 Shelf positions 3.2 Accessories To bake and roast or as a pan to collect fat. Wire shelf Food Sensor For cookware, cake tins, roasts. Baking tray To measure the temperature inside the food. Telescopic runners For cakes and biscuits. Grill- / Roasting pan For shelves and trays. 4. CONTROL PANEL 4.1 Buttons Sensor field / Button Function Description MINUTE MINDER To set the MINUTE MINDER. Hold it for more than 3 seconds to turn on or turn off the oven lamp.
www.aeg.com Sensor field / Button Function Description PLUS STEAM To turn on the True Fan Cooking PLUS function. 4.2 Display A H G F B E C D A. Timer / Temperature B. Heat-up and residual heat indicator C. Core temperature sensor (selected models only) D. Door lock (selected models only) E. Hours / minutes F. Demo mode (selected models only) G. Clock functions 5. BEFORE FIRST USE WARNING! Refer to Safety chapters. To set the Time of day refer to "Clock functions" chapter. 5.
ENGLISH 9 Oven function Application Oven function Application To bake on up to three shelf positions at the same time and to dry food. Set the temperature 20 40 °C lower than for ConTrue Fan ventional Cooking. Cooking / To add humidity during True Fan the cooking. To get the Cooking PLUS right colour and crispy crust during baking. To give more juiciness during reheating. This function is designed to save energy during Moist Fan Bak- cooking.
www.aeg.com 2. Turn the control knob to select the temperature. The lamp turns on when the oven operates. 3. To turn off the oven, turn the knobs to the off position. 6.4 Setting the function:True Fan Cooking PLUS This function allows to improve humidity during the cooking. WARNING! Risk of burns and damage to the appliance. Released humidity can cause burns: • Do not open the oven door when the function operates. • Open the oven door with care after the function stops.
ENGLISH 11 7. CLOCK FUNCTIONS 7.1 Clock functions table Clock function Application 1. Set a heating function. To show or change the TIME OF DAY time of day. You can change the time of day only when the oven is off. DURATION To set how long the oven works. Use only when a heating function is set. END To set when the oven turns off. Use only when a heating function is set. TIME DELAY MINUTE MINDER Combination of DURATION and END function. Use to set a countdown time.
www.aeg.com The display shows flashing . 4. Turn the knob for the temperature to set the hours for END time and press to confirm. Turn the knob for the temperature to set the minutes for END time and press to confirm. The display shows and the set temperature. Oven turns on automatically later on, works for the set DURATION time and stops at the set END time. At the set END time the signal sounds for 2 minutes. and time setting flash in the display. The oven turns off. 5.
ENGLISH temperature sensor is inside of the dish. 3. Put the plug of the core temperature sensor into the socket located in the front frame of the appliance. 13 6. Remove the core temperature sensor plug from the socket and remove the dish from the appliance. WARNING! There is a risk of burns as the core temperature sensor becomes hot. Be careful when you unplug it and remove it from the dish. Food category: casserole 1. Set the oven function and temperature. 2.
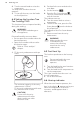
www.aeg.com 2. Use the knob for the temperature to change the temperature. 8.2 Inserting the accessories Wire shelf: Push the shelf between the guide bars of the shelf support . The display shows the core temperature sensor symbol. to save the new core 6. Press temperature, or wait 10 seconds for the setting to be saved automatically. The new default core temperature is displayed during the next use of the core temperature sensor.
ENGLISH Small indentation at the top increase safety. The indentations are also anti-tip devices. The high rim around the shelf prevents cookware from slipping of the shelf. Deep pan: Put the deep pan on the telescopic runners. 8.3 Telescopic runners inserting the accessories With the telescopic runners you can put in and remove the shelves more easily. CAUTION! Do not clean the telescopic runners in the dishwasher. Do not lubricate the telescopic runners.
www.aeg.com The signal sounds. SAFE appears on the display. To turn off the Child Lock, repeat step 2. 9.2 Residual heat indicator When you turn off the oven, the display shows the residual heat indicator if the temperature in the oven is more than 40 °C. Temperature (°C) Switch-off time (h) 120 - 195 8.5 200 - 245 5.5 250 - maximum 1.5 After an automatic switch-off, press any button to operate the oven again. 9.
ENGLISH Food Plum cake, apple pie, cinnamon rolls baked in a cake mould Temperature (°C) Time (min) 160 180 30 - 60 Frozen ready meals Preheat the empty oven for 10 minutes. Use the second shelf position. Food Time (min) Meat 15 - 25 Pasta 15 - 25 Pizza 15 - 25 Rice 15 - 25 Vegetables 15 - 25 17 Roasting Use the glass baking dish. Use 200 ml of water. Use the second shelf position.
www.aeg.com Baking results Possible cause Remedy The cake sinks and becomes soggy, lumpy or streaky. The oven temperature is too high. The next time you bake, set a slightly lower oven temperature. The baking time is too short. Set a longer baking time. You cannot decrease baking times by setting higher temperatures. There is too much liquid in the mixture. Use less liquid. Be careful with mixing times, especially if you use a mixing machine. The oven temperature is too low.
ENGLISH 19 Cakes / pastries / breads on baking trays Food Function Plaited bread / Bread crown Christmas stollen Temperature (°C) Time (min) Shelf position Top / Bottom Heat 170 - 190 30 - 40 3 Top / Bottom Heat 160 - 1801) 50 - 70 2 Bread (rye bread): Top / Bottom Heat 1. 1. First part of baking proce2. dure. 2. Second part of baking procedure. 1. 2301) 160 - 180 2.
www.aeg.com Food Function Temperature (°C) Time (min) Shelf position Macaroons True Fan Cooking 100 - 120 30 - 50 3 Biscuits made with yeast dough True Fan Cooking 150 - 160 20 - 40 3 Puff pastries True Fan Cooking 170 - 1801) 20 - 30 3 Rolls True Fan Cooking 1601) 10 - 25 3 Rolls Top / Bottom Heat 190 - 2101) 10 - 25 3 1) Preheat the oven. 10.
ENGLISH 21 Food Temperature (°C) Time (min) Shelf position Pasta gratin 200 - 220 45 - 55 3 Potato gratin 180 - 200 70 - 85 3 Moussaka 170 - 190 70 - 95 3 Lasagne 180 - 200 75 - 90 3 Cannelloni 180 - 200 70 - 85 3 Bread pudding 190 - 200 55 - 70 3 Rice pudding 170 - 190 45 - 60 3 Apple cake, made with sponge mix- 160 - 170 ture (round cake tin) 70 - 80 3 White bread 55 - 70 3 190 - 200 10.9 Multilevel Baking Use the function:True Fan Cooking.
www.aeg.com Food Temperature (°C) Time (min) Biscuits made with yeast dough 160 - 170 Puff pastries Rolls Shelf position 2 positions 3 positions 30 - 60 1/4 - 170 - 1801) 30 - 50 1/4 - 180 20 - 30 1/4 - 1) Preheat the oven. 10.
ENGLISH To keep meat more succulent: • roast lean meat in the roasting tin with the lid or use roasting bag. • roast meat and fish in large pieces (1 kg or more). • baste large roasts and poultry with their juices several times during roasting. 10.12 Roasting tables Beef Food Quantity Function Temperature (°C) Time (min) Shelf position Pot roast 1 - 1.
www.aeg.com Lamb Food Quantity (kg) Function Temperature Time (min) (°C) Shelf position Leg of lamb / 1 - 1.5 Roast lamb Turbo Grilling 150 - 170 100 - 120 1 Saddle of lamb 1 - 1.5 Turbo Grilling 160 - 180 40 - 60 1 Food Quantity (kg) Function Temperature Time (min) (°C) Saddle / Leg of hare up to 1 Top / Bottom 2301) Heat 30 - 40 1 Saddle of venison 1.5 - 2 Top / Bottom 210 - 220 Heat 35 - 40 1 Haunch of venison 1.
ENGLISH 10.13 Grilling • Always grill with the maximum temperature setting. • Set the shelf into the shelf position as recommended in the grilling table. • Always set the pan to collect the fat into the first shelf position. • Grill only flat pieces of meat or fish. • Always preheat the empty oven with the grill functions for 5 minutes. CAUTION! Always grill with the oven door closed.
www.aeg.com Food Temperature (°C) Time (min) Shelf position Chicken Wings 190 - 210 20 - 30 2 10.15 Defrost • Remove the food packaging and put the food on a plate. • Use the first shelf position from the bottom. • Do not cover the food with a bowl or a plate, as this can extend the defrost time. • For large portions of food place an upturned empty plate on the bottom of the oven cavity. Put the food in a deep plate or dish and set it on top of the plate inside the oven.
ENGLISH 27 Soft fruit Food Temperature (°C) Strawberries / Blue- 160 - 170 berries / Raspberries / Ripe gooseberries Cooking time until simmering (min) Continue to cook at 100 °C (min) 35 - 45 - Stone fruit Food Temperature (°C) Cooking time until simmering (min) Continue to cook at 100 °C (min) Pears / Quinces / Plums 160 - 170 35 - 45 10 - 15 Food Temperature (°C) Cooking time until simmering (min) Continue to cook at 100 °C (min) Carrots1) 160 - 170 50 - 60 5 - 10 Cucumbers 160
www.aeg.com Fruit Food Temperature (°C) Time (h) Plums 60 - 70 Apricots Shelf position 1 position 2 positions 8 - 10 3 1/4 60 - 70 8 - 10 3 1/4 Apple slices 60 - 70 6-8 3 1/4 Pears 60 - 70 6-9 3 1/4 10.
ENGLISH Mutton / lamb Food core temperature (°C) Less Medium More Leg of lamb, Roast lamb 65 70 75 Game Food core temperature (°C) Less Medium More Saddle of hare, Saddle of venison 65 70 75 Leg of hare, Whole hare, Leg of venison 70 75 80 Poultry Food core temperature (°C) Less Medium More Chicken (whole / half / breast) 80 83 86 Duck (whole / half), Turkey (whole / breast) 75 80 85 Duck (breast) 60 65 70 Fish (salmon, trout, zander) Fish (whole / large / steamed), Fis
www.aeg.com Casseroles - Sweet Food core temperature (°C) White bread casserole with / without fruits, Rice porridge casserole with / without fruits, Sweet noodle casserole Less Medium More 80 85 90 10.19 Information for test institutes Tests according to EN 60350-1:2013 and IEC 60350-1:2011. Baking on one level.
ENGLISH Food Function Small cakes (20 per tray) True Fan Cooking 31 Temperature (°C) Time (min) Shelf position 1501) 23 - 40 1/4 2 po- 3 positions sitions - 1) Preheat the oven. Grilling Preheat the empty oven for 5 minutes. Grill with the maximum temperature setting. Food Function Time (min) Shelf position Toast Grilling 1-3 5 Beef Steak Grilling 24 - 301) 4 1) Turn halfway through. 11. CARE AND CLEANING WARNING! Refer to Safety chapters. 11.
www.aeg.com CAUTION! Be careful when you remove the shelf supports. 1. Pull the front of the shelf support away from the side wall. 2. Pull the rear end of the shelf support away from the side wall and remove it. 1 2 Install the removed accessories in the opposite sequence. The retaining pins on the telescopic runners must point to the front. 11.4 Oven ceiling WARNING! Deactivate the appliance before you remove the heating element. Make sure that the appliance is cold. There is a risk of burns.
ENGLISH 33 9. Clean the glass panel with water and soap. Dry the glass panel carefully. When the cleaning is completed, do the above steps in the opposite sequence. Install the smaller panel first, then the larger and the door. WARNING! Make sure that the glasses are inserted in the correct position otherwise the surface of the door may overheat. 45° 4. Hold the door with one hand on each side and pull it away from the oven at an upwards angle. 5.
www.aeg.com 12. TROUBLESHOOTING WARNING! Refer to Safety chapters. 12.1 What to do if... Problem Possible cause Remedy You cannot activate or oper- The oven is not connected Check if the oven is correctly ate the oven. to an electrical supply or it is connected to the electrical connected incorrectly. supply (refer to the connection diagram if available). The oven does not heat up. The oven is deactivated. Activate the oven. The oven does not heat up. The clock is not set. Set the clock.
ENGLISH 35 Problem Possible cause Remedy The display shows an error code that is not in this table. There is an electrical fault. • Deactivate the oven with the house fuse or the safety switch in the fuse box and activate it again. • If the display shows the error code again, contact the Customer Care Department. There is no good cooking performance using the function: True Fan Cooking PLUS.
www.aeg.com We recommend that you write the data here: Model (MOD.) ......................................... Product number (PNC) ......................................... Serial number (S.N.) ......................................... 13. INSTALLATION WARNING! Refer to Safety chapters. min. 3 mm 13.1 Building in The built-in unit must meet the stability requirements of DIN 68930.
ENGLISH min. 50 mm = = 546 70 60 520 33 min. 550 20 114 4 18 590 100 21 560 min. 560 589 471 594 200 595+-1 5 3 min. 1500 H05RR-F H05W-F 546 min. 550 21 560 80 60 520 33 20 600 114 4 18 589 471 594 min. 560 100 200 595+-1 5 3 min.
www.aeg.com max. R1200 mm 65 485 90° 2x3,5x25 14. ENERGY EFFICIENCY 14.1 Energy saving The oven contains features which help you save energy during everyday cooking. General hints Make sure that the oven door is closed properly when the oven operates. Do not open the door too often during cooking. Keep the door gasket clean and make sure it is well fixed in its position. Use metal dishes to improve energy saving. When possible, do not preheat the oven before you put the food inside.
ENGLISH deactivate earlier in some oven functions. The fan and lamp continue to operate. Keep food warm Choose the lowest possible temperature setting to use residual heat and keep a meal warm. The residual heat indicator or temperature appears on the display. 39 Moist Fan Baking Function designed to save energy during cooking. When you use this function the lamp automatically turns off after 30 seconds. You may turn on the lamp again but this action will reduce the expected energy savings.
867335362-C-162017 www.aeg.