BCM546350M BCR546350B BCR546350M BCR546350W USER MANUAL EN User Manual Oven
www.aeg.com CONTENTS 1. SAFETY INFORMATION............................................................................................. 2 2. SAFETY INSTRUCTIONS.............................................................................................4 3. PRODUCT DESCRIPTION...........................................................................................6 4. CONTROL PANEL....................................................................................................... 7 5.
ENGLISH 3 manufacturer is not responsible for any injuries or damages that are the result of incorrect installation or usage. Always keep the instructions in a safe and accessible location for future reference. 1.
www.aeg.com • • • • • • Ensure that the appliance is switched off before replacing the lamp to avoid the possibility of electric shock. Do not use a steam cleaner to clean the appliance. Do not use harsh abrasive cleaners or sharp metal scrapers to clean the glass door since they can scratch the surface, which may result in shattering of the glass.
ENGLISH • • • • • • such a way that it cannot be removed without tools. Connect the mains plug to the mains socket only at the end of the installation. Make sure that there is access to the mains plug after the installation. If the mains socket is loose, do not connect the mains plug. Do not pull the mains cable to disconnect the appliance. Always pull the mains plug.
www.aeg.com • Before maintenance, deactivate the appliance and disconnect the mains plug from the mains socket. • Make sure the appliance is cold. There is the risk that the glass panels can break. • Replace immediately the door glass panels when they are damaged. Contact the Authorised Service Centre. • Be careful when you remove the door from the appliance. The door is heavy! • Clean regularly the appliance to prevent the deterioration of the surface material.
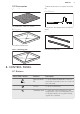
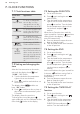
ENGLISH 3.2 Accessories 7 To bake and roast or as a pan to collect fat. Wire shelf Food Sensor For cookware, cake tins, roasts. Baking tray To measure the temperature inside the food. Telescopic runners For cakes and biscuits. Grill- / Roasting pan For shelves and trays. 4. CONTROL PANEL 4.1 Buttons Sensor field / Button Function Description MINUTE MINDER To set the MINUTE MINDER. Hold it for more than 3 seconds to turn on or turn off the oven lamp. CLOCK To set a clock function.
www.aeg.com 4.2 Display A G F E B D C A. Timer / Temperature B. Heat-up and residual heat indicator C. Core temperature sensor (selected models only) D. Door lock (selected models only) E. Hours / minutes F. Demo mode (selected models only) G. Clock functions 5. BEFORE FIRST USE WARNING! Refer to Safety chapters. To set the Time of day refer to "Clock functions" chapter. 5.1 Initial Cleaning Refer to "Care and cleaning" chapter. Clean the oven and the accessories before first use.
ENGLISH Oven function Application To bake and roast food on one shelf position. Conventional Cooking (Top / Bottom Heat) Bottom Heat Defrost To bake cakes with crispy bottom and to preserve food. This function can be used for defrosting frozen foods, such as vegetables and fruits. The defrosting time depends on the amount and size of the frozen food. This function is designed to save energy during Moist Fan Bak- cooking. For more information refer to "Hints ing and tips" chapter, Moist Fan Baking.
www.aeg.com 7. CLOCK FUNCTIONS 7.1 Clock functions table Clock function 1. Set an oven function. Application To show or change the TIME OF DAY time of day. You can change the time of day only when the oven is off. DURATION To set how long the oven works. Use only when a heating function is set. END To set when the oven turns off. Use only when a heating function is set. TIME DELAY MINUTE MINDER Combination of DURATION and END function. Use to set a countdown time.
ENGLISH temperature right or left to set the hours for DURATION time and press to confirm. The display shows flashing . 4. Turn the knob for the temperature right or left to set the hours for END to confirm. Turn time and press the knob for the temperature right or left to set the minutes for END time and press to confirm. Oven turns on automatically later on, works for the set DURATION time and stops at the set END time. At the set END time the signal sounds for 2 minutes.
www.aeg.com Food categories: meat, poultry and fish 1. Set the oven function and temperature. 2. Insert the tip of the core temperature sensor into the centre of meat or fish, in the thickest part if possible. Make sure that at least 3/4 of the core temperature sensor is inside of the dish. 3. Put the plug of the core temperature sensor into the socket located in the front frame of the appliance. The new default core temperature is displayed during the next use of the core temperature sensor.
ENGLISH 5. Put the plug of the core temperature sensor into the socket located in the front frame of the appliance. 13 changes every 10 seconds to the set oven temperature. • three times - the display shows the set oven temperature. 2. Use the knob for the temperature to change the temperature. 8.2 Inserting the accessories Wire shelf: Push the shelf between the guide bars of the shelf support and make sure that the feet point down. The display shows the core temperature sensor symbol.
www.aeg.com Small indentation at the top increase safety. The indentations are also anti-tip devices. The high rim around the shelf prevents cookware from slipping of the shelf. Deep pan: Put the deep pan on the telescopic runners. 8.3 Telescopic runners inserting the accessories With the telescopic runners you can put in and remove the shelves more easily. CAUTION! Do not clean the telescopic runners in the dishwasher. Do not lubricate the telescopic runners.
ENGLISH The signal sounds. SAFE appears on the display. To turn off the Child Lock, repeat step 2. 9.2 Using the Function Lock You can turn on the Function Lock function only when the oven operates. When the Function lock is on the temperature and time settings of a running oven function cannot be changed accidentally. 1. Select an oven function and set it according your preferences. and at the 2. Press and hold same time for 2 seconds. The signal sounds. Loc appears on the display for 5 seconds.
www.aeg.com 10.2 Inner side of the door On the inner side of the door you can find: • the numbers of the shelf positions. • information about the oven functions, recommended shelf positions and temperatures for dishes. 10.3 Baking • Use the lower temperature the first time. • You can extend baking times by 10 – 15 minutes if you bake cakes on more than one shelf position. • Cakes and pastries at different heights do not always brown equally.
ENGLISH 17 10.5 Baking on one level: Baking in tins Food Function Temperature (°C) Time (min) Shelf position Ring cake / Brio- True Fan Cookche ing 150 - 160 50 - 70 1 Madeira cake / Fruit cakes 140 - 160 70 - 90 1 Flan base - short True Fan Cookpastry ing 170 - 1801) 10 - 25 2 Flan base sponge mixture True Fan Cooking 150 - 170 20 - 25 2 Cheesecake Top / Bottom Heat 170 - 190 60 - 90 1 True Fan Cooking 1) Preheat the oven.
www.aeg.com Food Function Temperature (°C) Yeast cakes with delicate toppings (e.g. quark, cream, custard) Top / Bottom Heat 160 - 1801) Time (min) Shelf position 40 - 80 3 1) Preheat the oven. 2) Use a deep pan.
ENGLISH Food Function Temperature (°C) Time (min) Shelf position Vegetables au Turbo Grilling 160 - 170 15 - 30 1 Baguettes top- True Fan Cookped with melted ing cheese 160 - 170 15 - 30 1 Sweet bakes Top / Bottom Heat 180 - 200 40 - 60 1 Fish bakes Top / Bottom Heat 180 - 200 30 - 60 1 Stuffed vegetables True Fan Cooking 160 - 170 30 - 60 1 19 gratin1) 1) Preheat the oven. 10.7 Moist Fan Baking For best results follow the baking times listed in the table below.
www.aeg.com Cakes / pastries / breads on baking trays Food Temperature (°C) Time (min) Cream puffs / Eclairs 160 - 1801) Dry streusel cake 150 - 160 Shelf position 2 positions 3 positions 25 - 45 1/4 - 30 - 45 1/4 - 1) Preheat the oven.
ENGLISH Food Temperature (°C) Time (min) Shelf position Cheesecake 140 - 160 60 - 90 1 Apple cake, covered 150 - 170 50 - 60 1 Vegetable pie 160 - 180 50 - 60 1 Unleavened bread 230 - 2501) 10 - 20 2 Puff pastry flan 160 - 1801) 45 - 55 2 Flammekuchen (Pizza-like dish from Alsace) 230 - 2501) 12 - 20 2 Piroggen (Russian version of calzone) 180 - 2001) 15 - 25 2 21 1) Preheat the oven. 2) Use a deep pan. 10.10 Roasting Use heat-resistant ovenware.
www.aeg.com Pork Food Quantity (kg) Function Temperature (°C) Time (min) Shelf position Shoulder / Neck / Ham joint 1 - 1.5 Turbo Grilling 160 - 180 90 - 120 1 Chop / Spare rib 1 - 1.5 Turbo Grilling 170 - 180 60 - 90 1 Meatloaf 0.75 - 1 Turbo Grilling 160 - 170 50 - 60 1 Pork knuckle (precooked) 0.
ENGLISH 23 Poultry Food Quantity (kg) Function Temperature Time (min) (°C) Shelf position Poultry portions 0.2 - 0.25 each Turbo Grilling 200 - 220 30 - 50 1 Half chicken 0.4 - 0.5 each Turbo Grilling 190 - 210 35 - 50 1 Chicken, poulard 1 - 1.5 Turbo Grilling 190 - 210 50 - 70 1 Duck 1.5 - 2 Turbo Grilling 180 - 200 80 - 100 1 Goose 3.5 - 5 Turbo Grilling 160 - 180 120 - 180 1 Turkey 2.5 - 3.
www.aeg.com Food Whole Fish, 500 - 1000 g Temperature (°C) Time (min) Shelf position 1st side 2nd side 210 - 230 15 - 30 15 - 30 3/4 10.13 Frozen Foods Use the function True Fan Cooking.
ENGLISH 25 Food Quantity (kg) Defrosting time (min) Further deComments frosting time (min) Chicken 1 100 - 140 20 - 30 Put the chicken on an upturned saucer in a big plate. Turn halfway through. Meat 1 100 - 140 20 - 30 Turn halfway through. Trout 0.15 25 - 35 10 - 15 - Strawber- 0.3 ries 30 - 40 10 - 20 - Butter 0.25 30 - 40 10 - 15 - Cream 2 x 0.2 80 - 100 10 - 15 Whip the cream when still slightly frozen in places. Gateau 1.4 60 60 - 10.
www.aeg.com Vegetables Food Temperature (°C) Cooking time until simmering (min) Continue to cook at 100 °C (min) Carrots1) 160 - 170 50 - 60 5 - 10 Cucumbers 160 - 170 50 - 60 - Mixed pickles 160 - 170 50 - 60 5 - 10 Kohlrabi / Peas / Asparagus 160 - 170 50 - 60 15 - 20 1) Leave standing in the oven after it is deactivated. 10.16 Drying - True Fan Cooking • Cover trays with grease proof paper or baking parchment.
ENGLISH Beef Food core temperature (°C) Rare Medium Well done Sirloin 45 60 70 Beef Food core temperature (°C) Less Medium More Meat loaf 80 83 86 Pork Food core temperature (°C) Less Medium More Ham, Roast 80 84 88 Chop (saddle), Smoked pork loin, Smoked loin poached 75 78 82 Veal Food core temperature (°C) Less Medium More Roast veal 75 80 85 Knuckle of veal 85 88 90 Mutton / lamb Food core temperature (°C) Less Medium More Leg of mutton 80 85 88 Saddle of
www.aeg.
ENGLISH 29 Baking on one level. Baking in tins Food Function Temperature (°C) Time (min) Shelf position Fatless sponge cake True Fan Cooking 140 - 150 35 - 50 2 Fatless sponge cake Top / Bottom Heat 160 35 - 50 2 160 60 - 90 2 Apple pie (2 tins Ø20 Top / Bottom Heat 180 cm, diagonally off set) 70 - 90 1 Apple pie (2 tins Ø20 True Fan Cooking cm, diagonally off set) Baking on one level. Biscuits Use the third shelf position.
www.aeg.com 11. CARE AND CLEANING WARNING! Refer to Safety chapters. 11.1 Notes on cleaning Clean the front of the oven with a soft cloth with warm water and a mild cleaning agent. 2. Pull the rear end of the shelf support away from the side wall and remove it. 1 2 To clean metal surfaces, use a dedicated cleaning agent. Clean the oven interior after each use. Fat accumulation or other food remains may result in a fire. The risk is higher for the grill pan.
ENGLISH for 10 seconds after each activation and deactivation of the oven. 31 and push inwards to release the clip seal. The cleaning reminder goes out: • after the end of the Catalysis function. • if you press same time. and at the 11.5 Removing and installing the door You can remove the door and the internal glass panels to clean it. The number of glass panels is different for different models. WARNING! The door is heavy. 1. Open the door fully. 2.
www.aeg.com The top lamp 1. Turn the lamp glass cover to remove it. 2. Clean the glass cover. 3. Replace the lamp with a suitable 300 °C heat-resistant lamp. 4. Install the glass cover. 12. TROUBLESHOOTING WARNING! Refer to Safety chapters. 12.1 What to do if... Problem Possible cause Remedy You cannot activate or oper- The oven is not connected Check if the oven is correctly ate the oven. to an electrical supply or it is connected to the electrical connected incorrectly.
ENGLISH 33 Problem Possible cause Remedy It takes too long to cook the dishes or they cook too quickly. The temperature is too low or too high. Adjust the temperature if necessary. Follow the advice in the user manual. Steam and condensation You left the dish in the oven settle on the food and in the for too long. cavity of the oven. Do not leave the dishes in the oven for longer than 15 20 minutes after the cooking process ends. The display shows "C2".
www.aeg.com 14. ENERGY EFFICIENCY 14.1 Energy saving The oven contains features which help you save energy during everyday cooking. General hints Make sure that the oven door is closed properly when the oven operates. Do not open the door too often during cooking. Keep the door gasket clean and make sure it is well fixed in its position. Use metal dishes to improve energy saving. When possible, do not preheat the oven before you put the food inside.
ENGLISH 35
867344447-A-072018 www.aeg.