EN User Manual Oven BE2003021
www.aeg.com CONTENTS 1. SAFETY INFORMATION.................................................................................................3 2. SAFETY INSTRUCTIONS................................................................................................ 4 3. PRODUCT DESCRIPTION.............................................................................................. 6 4. BEFORE FIRST USE.........................................................................................................
ENGLISH 1. 3 SAFETY INFORMATION Before the installation and use of the appliance, carefully read the supplied instructions. The manufacturer is not responsible if an incorrect installation and use causes injuries and damages. Always keep the instructions with the appliance for future reference. 1.
www.aeg.com • • • • • • Ensure that the appliance is switched off before replacing the lamp to avoid the possibility of electric shock. Do not use a steam cleaner to clean the appliance. Do not use harsh abrasive cleaners or sharp metal scrapers to clean the glass door since they can scratch the surface, which may result in shattering of the glass.
ENGLISH • Connect the mains plug to the mains socket only at the end of the installation. Make sure that there is access to the mains plug after the installation. • If the mains socket is loose, do not connect the mains plug. • Do not pull the mains cable to disconnect the appliance. Always pull the mains plug. • Use only correct isolation devices: line protecting cut-outs, fuses (screw type fuses removed from the holder), earth leakage trips and contactors.
www.aeg.com • Make sure the appliance is cold. There is the risk that the glass panels can break. • Replace immediately the door glass panels when they are damaged. Contact the Authorised Service Centre. • Be careful when you remove the door from the appliance. The door is heavy! • Clean regularly the appliance to prevent the deterioration of the surface material. • Remaining fat or food in the appliance can cause fire. • Clean the appliance with a moist soft cloth. Only use neutral detergents.
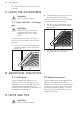
ENGLISH To bake and roast or as pan to collect fat. • Trivet For roasting and grilling. 7 Use the trivet only with the Grill- / roasting pan. 4. BEFORE FIRST USE WARNING! Refer to Safety chapters. 4.1 Initial Cleaning Remove all accessories and removable shelf supports from the appliance. Refer to "Care and cleaning" chapter. Clean the appliance before first use. Put the accessories and the removable shelf supports back to their initial position. 4.
www.aeg.com 5.1 Activating and deactivating the appliance It depends on the model if your appliance has knob symbols, indicators or lamps: • The indicator comes on when the oven heats up. • The lamp comes on when the appliance operates. • The symbol shows whether the knob controls the oven functions or the temperature. 1. Turn the knob for the oven functions to select an oven function. 2. Turn the knob for the temperature to select a temperature. 3.
ENGLISH 9 5.4 Buttons Button Function Description MINUS To set the time. CLOCK To set a clock function. PLUS To set the time. 6. CLOCK FUNCTIONS 6.1 Clock functions table Clock function Application Time of day To set, change or check the time of day. Minute Minder To set countdown time. This function has no effect on the operation of the appliance. Duration To set the cooking time of the oven. End To set the time of day when the oven should deactivate.
www.aeg.com The clock function goes out after some seconds. 7. USING THE ACCESSORIES WARNING! Refer to Safety chapters. 7.1 Trivet and Grill- / Roasting pan WARNING! Be careful when you remove the accessories from a hot appliance. There is a risk of burns. 2. Put the deep pan into the oven on the necessary shelf position. You can use the trivet to grill flat dishes in large quantities and to toast. 1. Put the trivet into the deep pan so that the supports of the wire shelf point down.
ENGLISH The temperature and baking times in the tables are guidelines only. They depend on the recipes and the quality and quantity of the ingredients used. 9.1 General information • The appliance has five shelf positions. Count the shelf positions from the bottom of the appliance floor. • The appliance has a special system which circulates the air and constantly recycles the steam. With this system you can cook in a steamy environment and keep the food soft inside and crusty outside.
www.aeg.
ENGLISH Food True Fan Cooking Time (min) Comments 13 Temperature (°C) Shelf position Rich fruit cake 150 2 110 - 120 In a 24 cm cake mould Victoria sandwich 160 2 (left and right) 50 - 60 In a 20 cm cake mould Time (min) Comments 1) Preheat the oven for 10 minutes.
www.aeg.
ENGLISH Food Quantity Temperature (°C) Time (min) 1st side 2nd side Shelf position Pieces (g) 4 800 max. 12 - 15 12 - 14 4 Beef steaks 4 600 max. 10 - 12 6-8 4 Sausages - max. 12 - 15 10 - 12 4 Pork chops 4 600 max. 12 - 16 12 - 14 4 Chicken (cut in 2) 2 1000 max. 30 - 35 25 - 30 4 Kebabs 4 - max. 10 - 15 10 - 12 4 Breast of chicken 4 400 max. 12 - 15 12 - 14 4 Hamburger 6 600 max. 20 - 30 - 4 Fish fillet 400 max.
www.aeg.com Food Quantity (kg) Temperature (°C) Time (min) Shelf position Meat loaf 0.75 - 1 160 - 170 50 - 60 1 or 2 Pork knuckle (precooked) 0.75 - 1 150 - 170 90 - 120 1 or 2 Food Quantity (kg) Temperature (°C) Time (min) Shelf position Roast veal 1 160 - 180 90 - 120 1 or 2 Knuckle of veal 1.5 - 2 160 - 180 120 - 150 1 or 2 Food Quantity (kg) Temperature (°C) Time (min) Shelf position Leg of lamb, roast lamb 1 - 1.
ENGLISH 17 9.8 Defrost Food Quantity (g) Defrosting time (min) Further defrosting time (min) Comments Chicken 1000 100 - 140 20 - 30 Place the chicken on an upturned saucer placed on a large plate. Turn halfway through. Meat 1000 100 - 140 20 - 30 Turn halfway through. Meat 500 90 - 120 20 - 30 Turn halfway through.
www.aeg.com Food Temperature (°C) Time (h) Apple slices 60 - 70 Pears 60 - 70 Shelf position 1 position 2 positions 6-8 3 1/4 6-9 3 1/4 10. CARE AND CLEANING WARNING! Refer to Safety chapters. 10.1 Notes on cleaning • Clean the front of the appliance with a soft cloth with warm water and a cleaning agent. • To clean metal surfaces, use a usual cleaning agent. • Clean the appliance interior after each use. Fat accumulation or other food remains may result in a fire.
ENGLISH 10.5 Oven ceiling WARNING! Deactivate the appliance before you remove the heating element. Make sure that the appliance is cold. There is a risk of burns. 19 CAUTION! Do not use the appliance without the glass panels. 1. Open the door fully and hold the two door hinges. Remove the shelf supports. You can remove the heating element to clean the oven ceiling more easily. 1. Remove the screw which holds the heating element. For the first time, use a screwdriver. 2.
www.aeg.com 7. First lift carefully and then remove the glass panels one by one. Start from the top panel. 1 4. Put the door on a soft cloth on a stable surface. 5. Release the locking system to remove the glass panels. 2 8. Clean the glass panels with water and soap. Dry the glass panels carefully. When the cleaning is completed, install the glass panels and the oven door. Do the above steps in the opposite sequence. Make sure that you put the glass panels (A and B) back in the correct sequence.
ENGLISH 21 CAUTION! Always hold the halogen lamp with a cloth to prevent grease residue from burning on the lamp. 1. Deactivate the appliance. 2. Remove the fuses from the fuse box or deactivate the circuit breaker. The back lamp 10.7 Replacing the lamp Put a cloth on the bottom of the interior of the appliance. It prevents damage to the lamp glass cover and the cavity. 1. Turn the lamp glass cover counterclockwise to remove it. 2. Clean the glass cover. 3.
www.aeg.com Problem Possible cause Remedy The display shows "12.00". There was a power cut. Reset the clock. 11.2 Service data If you cannot find a solution to the problem yourself, contact your dealer or an Authorised Service Centre. on the front frame of the appliance cavity. Do not remove the rating plate from the appliance cavity. The necessary data for the service centre is on the rating plate. The rating plate is We recommend that you write the data here: Model (MOD.) ...................
ENGLISH 12.2 Securing the appliance to the cabinet A B 23 12.3 Electrical installation The manufacturer is not responsible if you do not follow the safety precautions from the Safety chapters. This appliance is supplied without a main plug and a main cable. Applicable types of cables for Europe: • Minimum size Cable / flex: 1,5 mm² • Cable / flex type: H07 RN-F, H05 RNF, H05 RRF, H05 VV-F, H05 V2V2-F (T90), H05 BB-F Applicable types of cables for UK only Connection via Min.
www.aeg.com • General hints – Make sure that the oven door is closed properly when the appliance operates and keep it closed as much as possible during the cooking. – Use metal dishes to improve the energy saving. – When possible, put the food inside the oven without heating it up. – When the cooking duration is longer than 30 minutes, reduce the oven temperature to minimum, 3 - 10 minutes before the end of the cooking time, depending on the duration of the cooking.
ENGLISH 25
www.aeg.
ENGLISH 27
867323248-B-212015 www.aeg.