ES Manual de instrucciones Horno BE2013221
www.aeg.com CONTENIDO 1. INFORMACIÓN SOBRE SEGURIDAD...........................................................................3 2. INSTRUCCIONES DE SEGURIDAD............................................................................... 4 3. DESCRIPCIÓN DEL PRODUCTO...................................................................................7 4. ANTES DEL PRIMER USO...............................................................................................7 5. USO DIARIO.......................
ESPAÑOL 1. 3 INFORMACIÓN SOBRE SEGURIDAD Antes de instalar y utilizar el aparato, lea atentamente las instrucciones facilitadas. El fabricante no se hace responsable de los daños y lesiones causados por una instalación y uso incorrectos. Guarde siempre las instrucciones junto con el aparato para futuras consultas. 1.
www.aeg.com • • • • • • Antes de realizar tareas de mantenimiento, corte la corriente eléctrica. Asegúrese de que el aparato está desconectado antes de reemplazar la lámpara con el fin de impedir que se produzca una descarga eléctrica. No utilice un limpiador a vapor para limpiar el aparato. No utilice limpiadores abrasivos ásperos ni rascadores de metal afilado para limpiar la puerta de cristal si no quiere arañar su superficie, lo que podría hacer que el cristal se hiciese añicos.
ESPAÑOL • Evite que el cable de red toque o entre en contacto con la puerta del aparato, especialmente si la puerta está caliente. • Los mecanismos de protección contra descargas eléctricas de componentes con corriente y aislados deben fijarse de forma que no puedan aflojarse sin utilizar herramientas. • Conecte el enchufe a la toma de corriente únicamente cuando haya terminado la instalación. Asegúrese de tener acceso al enchufe del suministro de red una vez instalado el aparato.
www.aeg.com 2.4 Mantenimiento y limpieza ADVERTENCIA! Existe riesgo de lesiones, incendios o daños al aparato. • Antes de proceder con el mantenimiento, apague el aparato y desconecte el enchufe de la red. • Asegúrese de que el aparato esté frío. Los paneles de cristal pueden romperse. • Cambie inmediatamente los paneles de cristal de la puerta que estén dañados. Póngase en contacto con el servicio técnico. • Tenga cuidado al desmontar la puerta del aparato.
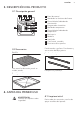
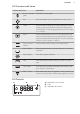
ESPAÑOL 7 3. DESCRIPCIÓN DEL PRODUCTO 3.1 Descripción general 1 11 2 3 4 5 4 3 2 1 5 6 7 8 9 10 3.2 Accesorios Parrilla 1 Panel de control 2 Mando de las funciones del horno 3 Piloto/símbolo/indicador de alimentación 4 Programador electrónico 5 Mando de temperatura 6 Piloto/símbolo/indicador de temperatura 7 Resistencia 8 Bombilla 9 Ventilador 10 Carril lateral, extraíble 11 Posiciones de las parrillas Para bizcochos y galletas. Para hornear y asar o como bandeja grasera.
www.aeg.com Consulte el capítulo "Mantenimiento y limpieza". Limpie el horno antes de utilizarlo por primera vez. Coloque los accesorios y carriles laterales extraíbles en su posición inicial. 4.2 Ajuste de la hora Debe ajustar la hora antes de usar el horno. El indicador de Hora actual parpadea cuando se conecta el aparato al suministro de red, después de un corte del mismo o si no se ha ajustado la obra. Pulse la tecla apropiada.
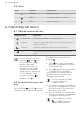
ESPAÑOL 5.2 Funciones del horno Función del horno Aplicación Posición de apagado El aparato está apagado. Luz Para encender la luz sin ninguna función de cocción. Turbo Para hornear en hasta 3 posiciones de parrilla al mismo tiempo y para secar alimentos.Ajuste la temperatura entre 20 y 40 °C menos que para la función Calor superior + inferior. Pizza Para hornear alimentos en 1 posición de parrilla y obtener un dorado más intenso y una base más crujiente.
www.aeg.com 5.4 Teclas Tecla Función Descripción MENOS Ajustar el tiempo. RELOJ Para ajustar una función de reloj. MÁS Ajustar el tiempo. 6. FUNCIONES DEL RELOJ 6.1 Tabla de funciones de reloj Función de reloj Aplicación Hora del día Para ajustar, modificar o comprobar la hora. Avisador Ajustar el temporizador. Esta función no influye en el funcionamiento del horno. Duración Permite programar el tiempo de cocción del horno.
ESPAÑOL 6.3 Cancelación de las funciones del reloj La función de reloj se apaga en unos segundos. 1. Pulse la tecla varias veces hasta que comience a parpadear el indicador de la función apropiada. 2. Mantenga pulsada . 7. USO DE LOS ACCESORIOS ADVERTENCIA! Consulte los capítulos sobre seguridad. 7.1 Inserción de los accesorios Parrilla: Inserte la parrilla entre las guías del carril y asegúrese de que las hendiduras apuntan hacia abajo.
www.aeg.com El marco exterior realzado de la parrilla es un dispositivo especial contra el deslizamiento de los recipientes. Parrilla y bandeja honda juntas: Coloque la parrilla sobre la bandeja honda. Coloque la parrilla y la bandeja honda sobre los carriles telescópicos. Bandeja o bandeja honda: Coloque la bandeja o bandeja honda en los carriles telescópicos. 8. FUNCIONES ADICIONALES 8.
ESPAÑOL • El tiempo de cocción puede ampliarse unos 10-15 minutos cuando se hornea repostería en más de una posición. • Los pasteles y los hojaldres que se hornean a niveles diferentes no se doran de manera uniforme al principio. Si ocurre esto, no cambie el ajuste de temperatura. Las diferencias se compensarán durante el horneado. • En caso de tiempos de cocción más largos puede apagar el horno aprox. 13 10 minutos antes de finalizar el tiempo para aprovechar el calor residual.
www.aeg.com 9.
ESPAÑOL Alimento Función Pan (pan de centeno): 1. Primera parte del proceso de horneado. 2. Segunda parte del proceso de horneado. Calor superior + 1. inferior 2.
www.aeg.
ESPAÑOL Alimento Función Lasaña Gratinado de Temperatura (°C) Tiempo (min) Posición de la parrilla Calor superior + 180 - 200 inferior 25 - 40 1 Grill + Turbo 160 - 170 15 - 30 1 160 - 170 15 - 30 1 Dulces horneados Calor superior + 180 - 200 inferior 40 - 60 1 Pescado al horno Calor superior + 180 - 200 inferior 30 - 60 1 Verduras rellenas Turbo 30 - 60 1 verduras1) Barras de pan Turbo cortadas a lo largo y cubiertas de queso fundido 160 - 170 1) Precaliente el horno. 9.
www.aeg.
ESPAÑOL Alimento Temperatura (°C) Tiempo (min) Posición de la parrilla Empanada de masa de hojaldre 160 - 1801) 45 - 55 2 Flammekuchen (plato típico de Alsacia) 230 - 2501) 12 - 20 2 Piroggen (versión ru- 180 - 2001) sa de la pizza calzone) 15 - 25 2 19 1) Precaliente el horno. 2) Utilice una bandeja honda. 9.7 Asado • Utilice recipientes resistentes al calor (consulte las instrucciones del fabricante).
www.aeg.com Alimento Cantidad Función Rosbif o solomillo entero: muy hecho por cm de grosor Temperatura (°C) Tiempo (min) Posición de la parrilla Grill + Turbo 170 - 1801) 8 - 10 1 Función Tiempo (min) Posición de la parrilla 1) Precaliente el horno.
ESPAÑOL Lomo de caza Alimento Cantidad Función Temperatura Tiempo (°C) (min) Posición de la parrilla Lomo / Muslo de liebre hasta 1 kg Calor superior + inferior 2301) 30 - 40 1 Lomo de cor- 1,5 - 2 kg zo/ciervo Calor superior + inferior 210 - 220 35 - 40 1 Corzo, ciervo 1,5 - 2 kg (pierna) Calor superior + inferior 180 - 200 60 - 90 1 1) Precaliente el horno.
www.aeg.com Grill Alimento Temperatura (°C) Tiempo (min) 1ª cara 2ª cara 210 - 230 30 - 40 30 - 40 2 Solomillo de ter- 230 nera 20 - 30 20 - 30 3 Lomo de cerdo 210 - 230 30 - 40 30 - 40 2 Lomo de ternera 210 - 230 30 - 40 30 - 40 2 Lomo de cordero 210 - 230 25 - 35 20 - 25 3 Pescado entero 500-1.
ESPAÑOL Alimento Temperatura (°C) Tiempo (min) Posición de la parrilla Patatas fritas, finas 200 - 220 20 - 30 3 Patatas fritas, gruesas 200 - 220 25 - 35 3 Porciones/Croquetas 220 - 230 20 - 35 3 Patatas asadas con cebolla 210 - 230 20 - 30 3 Lasaña / Canelones frescos 170 - 190 35 - 45 2 Lasaña / Canelones congelados 160 - 180 40 - 60 2 Queso gratinado al horno 170 - 190 20 - 30 3 Alitas de pollo 190 - 210 20 - 30 2 Platos preparados congelados Alimento Función Temper
www.aeg.com Alimento Cantidad Tiempo de Tiempo de Sugerencias descongela- descongelación (min) ción posterior (minutos) Pollo 1 kg 100 - 140 20 - 30 Coloque el pollo sobre un plato puesto del revés sobre otro mayor. Déle la vuelta a media cocción. Carne 1 kg 100 - 140 20 - 30 Déle la vuelta a media cocción. Carne 500 g 90 - 120 20 - 30 Déle la vuelta a media cocción.
ESPAÑOL 25 Frutas con hueso Alimento Temperatura (°C) Tiempo de cocción Continuar la cochasta que empiecen ción a 100 °C (min) a subir burbujas (min) Peras/Membrillos/ Ciruelas 160 - 170 35 - 45 Alimento Temperatura (°C) Tiempo de cocción Continuar la cochasta que empiecen ción a 100 °C (min) a subir burbujas (min) Zanahorias 1) 160 - 170 50 - 60 5 - 10 Pepinos 160 - 170 50 - 60 - Encurtidos variados 160 - 170 50 - 60 5 - 10 Colinabos/ Guisantes/Espárragos 160 - 170 50 - 60 15 - 20
www.aeg.com Fruta Alimento Temperatura (°C) Tiempo (h) Ciruelas 60 - 70 Albaricoques Posición de la parrilla 1 posición 2 posiciones 8 - 10 3 1/4 60 - 70 8 - 10 3 1/4 Manzana en rodajas 60 - 70 6-8 3 1/4 Peras 60 - 70 6-9 3 1/4 10. MANTENIMIENTO Y LIMPIEZA ADVERTENCIA! Consulte los capítulos sobre seguridad. 10.1 Notas sobre la limpieza • Limpie la parte delantera del horno con un paño suave humedecido en agua templada y jabón neutro.
ESPAÑOL 10.3 Techo del horno ADVERTENCIA! Apague el aparato antes de extraer la resistencia. Asegúrese de que el aparato está totalmente frío. Corre el riesgo de quemarse. Retire los carriles telescópicos. La resistencia del techo es abatible para facilitar su limpieza y la del techo del horno. ADVERTENCIA! Tenga cuidado al desmontar la puerta del aparato. Tenga en cuenta que la puerta pesa mucho. 1. Abra la puerta completamente. 2.
www.aeg.com La bombilla superior 1. Gire la tapa de cristal hacia la izquierda para extraerla. 9. Limpie los paneles de cristal con agua y jabón. Seque el panel de cristal con cuidado. Una vez finalizada la limpieza, coloque los paneles de cristal y la puerta del horno. Lleve a cabo los pasos anteriores en orden inverso. Introduzca primero el panel más pequeño y luego el de mayor tamaño. 2. Limpie la tapa de vidrio. 3. Cambie la bombilla por otra apropiada termorresistente hasta 300 °C. 4.
ESPAÑOL 29 Problema Posible causa Solución El horno no calienta. Ha saltado el fusible. Compruebe si el fusible es la causa del fallo de funcionamiento. Si el fusible se funde repetidamente, consulte a un electricista cualificado. La bombilla no funciona. La bombilla es defectuosa. Sustituya la bombilla. Se acumula vapor y condensación en los alimentos y en la cavidad del horno. El plato ha permanecido en No deje los platos en el horel horno demasiado tiempo.
www.aeg.com Fuente de calor Electricidad Volumen 71 l Tipo de horno Horno empotrado Masa 30,5 kg EN 60350-1 - Aparatos electrodomésticos para cocinas eléctricas. Parte 1: Cocinas, encimeras, encimeras de cocción y gratinadores Métodos de medición del rendimiento. 12.2 Ahorro de energía El aparato tiene características que le ayudan a ahorrar energía durante la cocina de cada día.
ESPAÑOL 31
867309027-A-272014 www.aeg.