BE3003001 BE3003021 EN User manual
www.aeg.com CONTENTS 1. 2. 3. 4. 5. 6. 7. 8. 9. 10. 11. 12. 13. 14. SAFETY INFORMATION . . . . . . . . . . . . . . . . . . . . . . . . . . . . . . . . . . . . . . . . . . . . . . . . . . . . . . 3 SAFETY INSTRUCTIONS . . . . . . . . . . . . . . . . . . . . . . . . . . . . . . . . . . . . . . . . . . . . . . . . . . . . . . 4 PRODUCT DESCRIPTION . . . . . . . . . . . . . . . . . . . . . . . . . . . . . . . . . . . . . . . . . . . . . . . . . . . . . 6 BEFORE FIRST USE . . . . . . . . . . . . . . . . . .
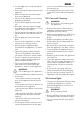
ENGLISH 3 1. SAFETY INFORMATION Before the installation and use of the appliance, carefully read the supplied instructions. The manufacturer is not responsible if an incorrect installation and use causes injuries and damages. Always keep the instructions with the appliance for future reference. 1.1 Children and vulnerable people safety WARNING! Risk of suffocation, injury or permanent disability.
www.aeg.com scratch the surface, which may result in shattering of the glass. • To remove the shelf supports first pull the front of the shelf support and then the rear end away from the side walls. Install the shelf supports in the opposite sequence. 2. SAFETY INSTRUCTIONS 2.1 Installation WARNING! Only a qualified person must install this appliance. • Remove all the packaging. • Do not install or use a damaged appliance. • Obey the installation instruction supplied with the appliance.
ENGLISH • Use this appliance in a household environment. • Do not change the specification of this appliance. • Make sure that the ventilation openings are not blocked. • Do not let the appliance stay unattended during operation. • Deactivate the appliance after each use. • Be careful, when you open the appliance door while the appliance is in operation. Hot air can release. • Do not operate the appliance with wet hands or when it has contact with water. • Do not apply pressure on the open door.
www.aeg.com 2.5 Disposal WARNING! Risk of injury or suffocation. • Cut off the mains cable and discard it. • Remove the door catch to prevent children and pets to get closed in the appliance. • Disconnect the appliance from the mains supply. 3.
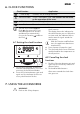
ENGLISH 7 Trivet • For roasting and grilling. Use the trivet only with the Grill- / roasting pan. 4. BEFORE FIRST USE WARNING! Refer to the Safety chapters. 4.1 Initial Cleaning • Remove all parts from the appliance. • Clean the appliance before first use. Refer to chapter "Care and Cleaning". 4.2 Setting the time When you connect the appliance to the electrical supply or after a power cut, the indicator for the Time function flashes. Press the + or - button to set the correct time.
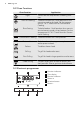
www.aeg.com 5.2 Oven Functions Oven function Application Light To activate the lamp without a cooking function. True Fan Cooking To bake maximum on 3 shelf positions at the same time and to dry food. Set the temperature 20 - 40 °C lower than for Conventional Cooking. Pizza Setting To bake food on 1 shelf position for a more intensive browning and a crispy bottom. Set the temperature 20 - 40 °C lower than for Conventional Cooking. Conventional Cooking To bake and roast on 1 shelf position.
ENGLISH 9 6. CLOCK FUNCTIONS Clock function Time of day Minute minder Duration End Application To show, set, or change the time. To set a countdown time. This function has no effect on the operation of the oven. To set the length of an oven operation. To set the switch-off time for an oven function. You can use Duration and End at the same time if you want the appliance to activate and deactivate automatically: and then first set the Duration . the End 6.1 Setting the clock functions hr min 3.
www.aeg.com 7.1 Inserting the oven accessories The deep pan and the wire shelf have side edges. These edges and the shape of the guide-bars are a special device to prevent the cookware from slipping. Installing the wire shelf and the deep pan together Put the wire shelf on the deep pan. Push the deep pan between the guide-bars of one of the oven levels. 7.2 Trivet and Grill- / Roasting pan WARNING! Be careful when you remove the accessories from a hot appliance. There is a risk of burns.
ENGLISH 11 You can use the trivet to grill flat dishes in large quantities and to toast: • Put the trivet into the deep pan so that the supports of the wire shelf point down. • Put the deep pan into the oven on the necessary shelf position. 8. ADDITIONAL FUNCTIONS 8.1 Cooling fan When the appliance operates, the cooling fan activates automatically to keep the surfaces of the appliance cool. If you deactivate the appliance, the cooling fan can continue to operate until the appliance cools down. 9.
www.aeg.com 9.3 Tips on baking Baking results Possible cause Remedy The bottom of the cake is not browned sufficiently. The shelf position is incorrect. Put the cake on a lower shelf. The cake sinks and becomes soggy, lumpy or streaky. The oven temperature is too high. The next time you bake, set a slightly lower oven temperature. The cake sinks and becomes soggy, lumpy or streaky. The baking time is too short. Set a longer baking time.
ENGLISH Type of baking Oven function Shelf position Temperature (°C) Time (min) Fatless sponge cake / Fatless sponge cake True Fan Cooking 2 140 - 150 35 - 50 Fatless sponge cake / Fatless sponge cake Conventional Cooking 2 160 35 - 50 Flan base short pastry True Fan Cooking 2 170 - 180 1) 10 - 25 Flan base sponge mixture True Fan Cooking 2 150 - 170 20 - 25 Apple pie / Apple pie (2 tins Ø20 cm, diagonally off set) True Fan Cooking 2 160 60 - 90 Apple pie / Apple pie (2 tins Ø2
www.aeg.com Type of baking Oven function Shelf position Bread (rye bread): 1. First part of baking procedure. 2. Second part of baking procedure.
ENGLISH Biscuits Type of baking Oven function Shelf position Temperature (°C) Time (min) Short pastry biscuits True Fan Cooking 3 150 - 160 10 - 20 Short bread / Short bread / Pastry stripes True Fan Cooking 3 140 20 - 35 Short bread / Short bread / Pastry stripes Conventional Cooking 3 160 1) 20 - 30 Biscuits made with sponge mixture True Fan Cooking 3 150 - 160 15 - 20 Pastries made with egg white / Merungues True Fan Cooking 3 80 - 100 120 - 150 Macaroons True Fan Cooking
www.aeg.com Oven function Shelf position Temperature (°C) Time (min) Vegetables au Turbo Grilling or True Fan gratin1) Cooking 1 160 - 170 15 - 30 Baguettes topped with melted cheese Turbo Grilling or True Fan Cooking 1 160 - 170 15 - 30 Sweet bakes Conventional Cooking 1 180 - 200 40 - 60 Fish bakes Conventional Cooking 1 180 - 200 30 - 60 Stuffed vegetables Turbo Grilling or True Fan Cooking 1 160 - 170 30 - 60 Temperature (°C) Time (min) Dish 1) Preheat the oven. 9.
ENGLISH True Fan Cooking Type of baking Shelf position Temperature (°C) Time (min) 2 shelf positions 3 shelf positions Biscuits made with egg white / Meringues 1/4 - 80 - 100 130 - 170 Macaroons 1/4 - 100 - 120 40 - 80 Biscuits made with yeast dough 1/4 - 160 - 170 30 - 60 Puff pastries 1/4 - 170 - 180 1) 30 - 50 Rolls 1/4 - 180 30 - 55 Small cakes / Small cakes (20 per tray) 1/4 - 1501) 25 - 40 Shelf position Temperature °C Time (min.
www.aeg.com 9.7 Roasting • Use heat-resistant ovenware to roast (refer to the instructions of the manufacturer). • You can roast large roasting joints directly in the deep pan (if present) or on the wire shelf above the deep pan. • Roast lean meats in the roasting tin with the lid. This keeps the meat more succulent. • All types of meat that can be browned or have crackling can be roasted in the roasting tin without the lid. • We recommend that you cook meat and fish weighing 1 kg and above in the oven.
ENGLISH 19 Veal Type of meat Quantity Oven func- Shelf position tion Temperature °C Time (min.) Roast veal 1 kg Turbo Grilling 1 160 - 180 90 - 120 Knuckle of veal 1.5 - 2 kg Turbo Grilling 1 160 - 180 120 - 150 Type of meat Quantity Oven func- Shelf position tion Temperature °C Time (min.) Leg of lamb / Roast lamb 1 - 1.5 kg Turbo Grilling 1 150 - 170 100 - 120 Saddle of lamb 1 - 1.
www.aeg.com Type of meat Quantity Oven func- Shelf position tion Temperature °C Time (min.) Turkey 2.5 - 3.5 kg Turbo Grilling 1 160 - 180 120 - 150 Turkey 4 - 6 kg Turbo Grilling 1 140 - 160 150 - 240 Temperature °C Time (min.) 210 - 220 40 - 60 Fish (steamed) Type of meat Quantity Whole fish 1 - 1.5 kg Oven func- Shelf position tion Conventional Cooking 1 Grill only flat pieces of meat or fish. Always preheat the empty oven with the grill functions for 5 minutes. 9.
ENGLISH 21 1) Preheat the oven. 9.10 Convenience food True Fan Cooking Convenience food Shelf position Temperature (°C) Time (min.
www.aeg.com Do not cover it with a bowl or a plate, as this can extend the defrost time. Use the first oven shelf position from the bottom. 9.11 Defrosting Remove the food packaging, and then put the food on a plate. Dish Defrosting time (min.) Further defrosting time (min.) Comment Chicken, 1000 g 100 - 140 20 - 30 Put the chicken on an upturned saucer placed on a large plate. Turn halfway through. Meat, 1000 g 100 - 140 20 - 30 Turn halfway through.
ENGLISH 23 Stone fruit Preserve Temperature in °C Pears / Quinces / Plums Cooking time unContinue to cook til simmering at 100°C (min.) (min.) 160 - 170 35 - 45 10 - 15 Vegetables Preserve Temperature in °C Cooking time unContinue to cook til simmering at 100°C (min.) (min.
www.aeg.com 10. CARE AND CLEANING WARNING! Refer to the Safety chapters. Notes on cleaning: • Clean the front of the appliance with a soft cloth with warm water and a cleaning agent. • To clean metal surfaces, use a usual cleaning agent. • Clean the appliance interior after each use. Then you can remove dirt more easily and it does not burn on. • Clean stubborn dirt with a special oven cleaner. • Clean all accessories after each use and let them dry.
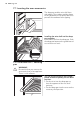
ENGLISH 25 CAUTION! Put a cloth on the bottom of the interior of the appliance. It prevents damage to the lamp glass cover and the cavity. Always use the same lamp type. Replacing the lamp at the cavity ceiling: 1. Turn the lamp glass cover counterclockwise to remove it. 2. Clean the glass cover. 3. Replace the lamp with a suitable 300 °C heat-resistant lamp. 4. Install the glass cover. 10.3 Oven ceiling You can fold down the heating element on the oven ceiling to clean the oven ceiling easily.
www.aeg.com 5. Put the door with the outer side down on a soft cloth on a stable surface. This is to prevent scratches. 6. Hold the door trim (B) on the top edge of the door at the two sides and push inwards to release the clip seal. Pull the door trim to the front to remove it. 2 7. B 1 8. 9. Installing the door and the glass panels Hold the door glass panels on their top edge one by one and pull them up out of the guide. Clean the glass panel with water and soap.
ENGLISH Problem Possible cause Remedy Steam and condensation You left the dish in the settle on the food and in appliance for too long. the appliance cavity. Do not leave the dishes in the oven for longer than 15 - 20 minutes after the cooking process ends. The display shows “12.00”. Reset the clock. A power cut. If you cannot find a solution to the problem yourself, contact your dealer or the service centre. The necessary data for the service centre is on the rating plate.
www.aeg.com The manufacturer declines any responsibility should these safety measures not be carried out. min. 3 mm min.
ENGLISH 560 min. 600 29 548 20 min. ! 546 114 530 min. 594 572 30 579 5 567 594 21 200 cm2 548 546 590 560 min. 20 530 min. 572 114 594 579 5 590 min.
www.aeg.com alternativ 100 max. R1200 mm 130 140 H05VV-F H05RR-F min.
ENGLISH 31 13. GB IE GREAT BRITAIN & IRELAND - GUARANTEE/ CUSTOMER SERVICE 13.
www.aeg.com 14. EUROPEAN GUARANTEE GB This appliance is guaranteed by Electrolux in each of the countries listed at the back of this user manual, for the period specified in the appliance guarantee or otherwise by law.
ENGLISH 33 Italia +39 (0) 434 558500 C.so Lino Zanussi, 26 - 33080 Porcia (PN) Latvija +371 67313626 Kr. Barona iela 130/2, LV-1012, Riga Lietuva +370 5 278 06 03 Ozo 10a, LT-08200 Vilnius Luxembourg +352 42 431 301 Rue de Bitbourg, 7, L-1273 Hamm Magyarország (06-1)467-3205 +361 252 1773 H-1142 Budapest XIV, Erzsébet királyné útja 87 Nederland +31 17 24 68 300 Vennootsweg 1, 2404 CG - Alphen aan den Rijn Norge +47 81 5 30 222 Risløkkvn.
www.aeg.com 16. ENVIRONMENT CONCERNS Recycle the materials with the symbol . Put the packaging in applicable containers to recycle it. Help protect the environment and human health and to recycle waste of electrical and electronic appliances. Do not dispose appliances marked with the symbol with the household waste. Return the product to your local recycling facility or contact your municipal office.
ENGLISH 35
892956806-A-412012 www.aeg.