BE3003001 BE3003021 BE3003031 BE3303071 NL Gebruiksaanwijzing
www.aeg.com INHOUD 1. 2. 3. 4. 5. 6. 7. 8. 9. 10. 11. VEILIGHEIDSINFORMATIE . . . . . . . . . . . . . . . . . . . . . . . . . . . . . . . . . . . . . . . . . . . . . . . . . . . . 3 VEILIGHEIDSVOORSCHRIFTEN . . . . . . . . . . . . . . . . . . . . . . . . . . . . . . . . . . . . . . . . . . . . . . . . 4 BESCHRIJVING VAN HET PRODUCT . . . . . . . . . . . . . . . . . . . . . . . . . . . . . . . . . . . . . . . . . . . 6 VOOR HET EERSTE GEBRUIK . . . . . . . . . . . . . . . . . . . . . . . . . . . . . . .
NEDERLANDS 3 1. VEILIGHEIDSINFORMATIE Lees zorgvuldig de meegeleverde instructies voor installatie en gebruik van het apparaat. De fabrikant is niet verantwoordelijk voor letsel en schade veroorzaakt door een foutieve installatie. Bewaar de instructies van het apparaat voor toekomstig gebruik. 1.1 Veiligheid van kinderen en kwetsbare mensen WAARSCHUWING! Gevaar voor verstikking, letsel of permanente invaliditeit.
www.aeg.com • Gebruik geen stoomreiniger om het apparaat schoon te maken. • Zet de stroomtoevoer uit alvorens onderhoud te plegen. • Gebruik nooit agressieve reinigingsmiddelen of scherpe metalen schrapers om de glazen deur schoon te maken, deze kunnen krassen veroorzaken op het oppervlak, waardoor het glas zou kunnen breken. • Om de inschuifrailen te verwijderen trekt u eerst de voorkant van de inschuifrail en dan de achterkant uit de zijwanden. Installeer de inschuifrail in de omgekeerde volgorde. 2.
NEDERLANDS • De schokbescherming van delen onder stroom en geïsoleerde delen moet op zo'n manier worden bevestigd dat het niet zonder gereedschap kan worden verplaatst. • Steek de stekker pas in het stopcontact als de installatie is voltooid. Zorg ervoor dat het netsnoer na installatie bereikbaar is. • Sluit de stroomstekker niet aan op een losse stroomaansluiting. • Trek niet aan het netsnoer om het apparaat los te koppelen. Trek altijd aan de stekker.
www.aeg.com • Vervang direct de glazen deurpanelen als deze beschadigd zijn. Neem contact op met de service-afdeling. • Wees voorzichtig bij het verwijderen van de deur uit het apparaat. De deur is zwaar! • Reinig het apparaat regelmatig om te voorkomen dat het materiaal van het oppervlak achteruitgaat. • Resterend vet of voedsel in het apparaat kan brand veroorzaken. • Maak het apparaat schoon met een vochtige, zachte doek. Gebruik alleen neutrale schoonmaakmiddelen.
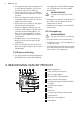
NEDERLANDS 7 3.1 Accessoires Bakrooster Voor kookgerei, cake bakblikken en braadvormen. Combi schaal Voor cake en koekjes. Voor braden en roosteren of als schaal om vet op te vangen. 4. VOOR HET EERSTE GEBRUIK WAARSCHUWING! Zie de veiligheidshoofdstukken . 4.1 Eerste reiniging • Verwijder alle onderdelen van het apparaat. • Reinig het apparaat voor het eerste gebruik. Als het apparaat wordt aangesloten op de stroomtoevoer of na een stroomonderbreking, gaat het symbool voor de tijd knipperen.
www.aeg.com en de knop voor de temperatuur in de uit-stand. Knopsymbool, indicatielampje of lampje (afhankelijk van het model - zie Beschrijving van het product): • Het indicatielampje gaat aan wanneer de oven opwarmt. • Het lampje gaat aan als het apparaat in werking is. • Het symbool geeft aan of de knop de kookzones, de ovenfuncties of de temperatuur bedient. 5.2 Ovenfuncties Ovenfunctie Binnenverlichting Applicatie Het lampje activeren zonder een bereidingsfunctie.
NEDERLANDS 9 5.3 Elektronische tijdschakelklok 1 2 3 1 Functie-indicatielampjes 2 Tijdindicatie 3 Functie-indicatie 4 Toets + hr min 5 Keuzetoets 6 Toets - 6 5 4 6. KLOKFUNCTIES Klokfunctie Tijdstip van de dag Kookwekker Toepassing De tijd weergeven, instellen of wijzigen. Voor het instellen van een afteltijd. Deze functie heeft geen invloed op de werking van de oven. Duur De duur van een ovenprogramma instellen. Einde Hier stelt u de tijd in waarna u wilt dat de oven uitschakelt.
www.aeg.com 5. Draai de knop voor de ovenfuncties en de temperatuurknop naar de uit stand. 6.2 De klokfuncties annuleren 1. 2. Druk op de toets - en houd de toets ingedrukt. Na een paar seconden gaat de klokfunctie uit. Druk meerdere malen op de keuzetoets tot het gewenste functielampje knippert. 7. GEBRUIK VAN DE ACCESSOIRES WAARSCHUWING! Zie de veiligheidshoofdstukken . 7.1 Ovenaccessoires plaatsen De diepe pan en het bakrooster hebben zijranden.
NEDERLANDS 11 9. NUTTIGE AANWIJZINGEN EN TIPS 9.1 Binnenzijde van de deur Bij bepaalde modellen vindt u het volgende aan de binnenkant van de deur: • De nummers van de ovenniveaus • Informatie over de verwarmingsfuncties, aanbevolen rekstanden en temperaturen voor karakteristieke gerechten De temperaturen en baktijden in de tabellen zijn slechts als richtlijn bedoeld. Deze zijn afhankelijk van de recepten en de kwaliteit en de hoeveelheid van de gebruikte ingrediënten. 9.
www.aeg.com Bakresultaat Mogelijke oorzaak Oplossing Te lange baktijd. De volgende keer dat u een cake bakt, gebruikt u een kortere baktijd. De cake wordt ongelijkmatig bruin. De oventemperatuur is te hoog en de baktijd te kort. De baktemperatuur lager instellen en de baktijd verlengen. De cake wordt ongelijkmatig bruin. Het deeg is niet gelijkmatig verdeeld. Verdeel het deeg gelijkmatig over de bakplaat. De cake wordt niet gaar binnen de aangegeven baktijd. De oventemperatuur is te laag.
NEDERLANDS Verwarmingssoort Kwarktaart Ovenfunctie Plaathoogte Temperatuur (°C) Tijd (min.) Boven + Onderwarmte 1 170 - 190 60 - 90 1) Oven voorverwarmen. Gebak op bakplaat Verwarmingssoort Ovenfunctie Plaathoogte Temperatuur (°C) Tijd (min.) Vlechtbrood/ broodkrans Boven + Onderwarmte 3 170 - 190 30 - 40 Kerststol Boven + Onderwarmte 2 160 - 180 1) 50 - 70 Brood (roggebrood): 1. Eerste deel van het bakproces. 2. Tweede deel van het bakproces.
www.aeg.com Verwarmingssoort Ovenfunctie Plaathoogte Temperatuur (°C) Tijd (min.) Gistcake met delicate garnering (bijvoorbeeld kwark, room, puddingvulling) Boven + Onderwarmte 3 160 - 180 1) 40 - 80 Ovenfunctie Plaathoogte Temperatuur (°C) Tijd (min.
NEDERLANDS Verwarmingssoort Ovenfunctie Plaathoogte Temperatuur (°C) Tijd (min.) Small cakes / Kleine cakes (20 stuks/bakplaat) Boven + Onderwarmte 3 1701) 20 - 30 1) Oven voorverwarmen.
www.aeg.com Koekjes / small cakes / cakejes / gebak / broodjes Multi hetelucht Verwarmingssoort Plaathoogte Temperatuur (°C) Tijd (min.
NEDERLANDS Verwarmingssoort Plaathoogte Temperatuur °C Tijd (min.) Ongedesemd brood 2 230 - 2501) 10 - 20 Bladerdeegtaart 2 160 - 180 1) 45 - 55 Flammekuchen (pizza-achtig gerecht uit de Elzas) 2 230 - 2501) 12 - 20 Piroggen (Russische variant op calzone) 2 180 - 200 1) 15 - 25 17 1) Oven voorverwarmen. 2) Gebruik de braadpan. 9.7 Braden • Gebruik hittebestendig servies om te braden (lees de instructies van de fabrikant).
www.aeg.com Varkensrug Soort vlees Hoeveelheid Ovenfunctie Plaathoogte Temperatuur °C Tijd (min.) Schouderstuk / nekstuk / hamlap 1 - 1,5 kg Circulatiegrill 1 160 - 180 90 - 120 Kotelet / ribbetje 1 - 1,5 kg Circulatiegrill 1 170 - 180 60 - 90 Gehaktbrood 750 g - 1 kg Circulatiegrill 1 160 - 170 50 - 60 Varkensschenkel (voorgekookt) 750 g - 1 kg Circulatiegrill 1 150 - 170 90 - 120 Kalfsvlees Soort vlees Hoeveelheid Ovenfunctie Plaathoogte Temperatuur °C Tijd (min.
NEDERLANDS 19 Gevogelte Soort vlees Hoeveelheid Ovenfunctie Plaathoogte Temperatuur °C Tijd (min.) Stukken gevogelte 200 – 250 g p.p. Circulatiegrill 1 200 - 220 30 - 50 Halve kip 400 – 500 g p.p.
www.aeg.com Grill intens Tijd (min.) Gerecht Plaathoogte Burgers / Burgers 4 8 - 10 6-8 Varkenshaas 4 10 - 12 6 - 10 Worstjes 4 10 - 12 6-8 Runderfilet / kalfsbiefstukken 4 7 - 10 6-8 Toast / Geroosterd brood 1) 5 1-3 1-3 Brood met iets erop 4 6-8 - Rekstand Temperatuur (°C) Tijd (min.
NEDERLANDS 21 Diepvries- en kant-en-klaargerechten Ovenfuncties Rekstand Temperatuur (°C) Tijd (min.
www.aeg.com • Vul de glazen potten gelijkmatig en sluit ze af met een klem. • De weckpotten mogen elkaar niet raken. • Vul ca. 1/2 liter water op de bakplaat, zodat er voldoende vocht in de oven ontstaat. • Zodra de vloeistof in de eerste weckpotten begint te borrelen (na ca. 35 60 minuten bij 1 liter-glazen), schakelt u de oven uit of verlaagt u de temperatuur tot 100 °C (zie tabel). Bessen Temperatuur in °C Inmaken/wecken tot het parelen begint (min.) Door blijven koken op 100 °C (min.
NEDERLANDS Voedsel om te drogen Plaathoogte 1 niveau 2 niveaus Temperatuur (°C) Tijd (u) Groente in het zuur 3 1/4 60 - 70 5-6 Paddenstoelen 3 1/4 50 - 60 6-8 Kruiden 3 1/4 40 - 50 2-3 23 Fruit Voedsel om te drogen Plaathoogte 1 niveau 2 niveaus Temperatuur (°C) Tijd (u) Pruimen 3 1/4 60 - 70 8 - 10 Abrikozen 3 1/4 60 - 70 8 - 10 Schijfjes appel 3 1/4 60 - 70 6-8 Peren 3 1/4 60 - 70 6-9 10. ONDERHOUD EN REINIGING WAARSCHUWING! Zie de veiligheidshoofdstukken .
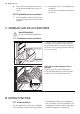
www.aeg.com 10.1 Inschuifrail Verwijderen van de inschuifrail U kunt de inschuifrail verwijderen om de zijwanden te reinigen. 1. Trek de inschuifrail bij de voorkant uit de zijwand. 2. Trek de inschuifrail bij de achterkant uit de zijwand en verwijder deze. 2 1 De inschuifrail installeren Installeer de inschuifrail in de omgekeerde volgorde. Geldig bij de telescopische geleiders: De pinnetjes op de telescopische geleiders moeten naar voren wijzen. 10.
NEDERLANDS WAARSCHUWING! Schakel het apparaat uit voordat u het verwarmingselement omlaag vouwt. Zorg ervoor dat het apparaat is afgekoeld. Gevaar voor brandwonden. Neerklappen van het verwarmingselement 1. De inschuifrail verwijderen. 25 2. Houd het verwarmingselement aan de voorzijde met beide handen vast. 3. Trek het naar voren tegen de drukveer aan, langs de steun aan beide zijden. 4. Het verwarmingselement klapt omlaag. Nu kunt u het plafond van de oven reinigen.
www.aeg.com 6. 2 7. B Deurafdekking (B) aan de bovenkant van de deur aan beide kanten vastpakken en naar binnen drukken om de klemsluiting te ontgrendelen. Trek de deur naar voor om deze te verwijderen. 1 8. 9. De deur en de glaspanelen installeren Als u de glaspanelen en de ovendeur heeft schoongemaakt, plaatst u ze terug. Houd de glasplaten aan de bovenkant vast en trek deze een voor een omhoog uit de geleiding. Reinig de glasplaat met een sopje. Droog de glasplaat voorzichtig af.
NEDERLANDS Storing Op het display verschijnt '12.00'. Mogelijke oorzaak Een stroomonderbreking. Als u niet zelf het probleem kunt verhelpen, neem dan contact op met uw verkoper of de klantenservice. De contactgegevens van het servicecentrum staan op het typeplaatje. Het type- Oplossing Stel de klok opnieuw in. plaatje bevindt zich aan de voorkant van de binnenkant van het apparaat. Wij adviseren u om de gegevens hier te noteren: Model (MOD.) .........................................
892956836-B-092013 www.aeg.