
Manual


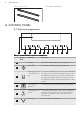
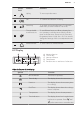

Table Of Contents
- CONTENTS
- 1. SAFETY INFORMATION
- 2. SAFETY INSTRUCTIONS
- 3. PRODUCT DESCRIPTION
- 4. CONTROL PANEL
- 5. BEFORE FIRST USE
- 6. DAILY USE
- 7. CLOCK FUNCTIONS
- 8. AUTOMATIC PROGRAMMES
- 9. USING THE ACCESSORIES
- 10. ADDITIONAL FUNCTIONS
- 11. HINTS AND TIPS
- 11.1 Inner side of the door
- 11.2 Advice for special heating functions of the oven
- 11.3 Baking
- 11.4 Tips on baking
- 11.5 Baking on one level:
- 11.6 Bakes and gratins
- 11.7 Moist Fan Baking
- 11.8 Multilevel Baking
- 11.9 Slow Cooking
- 11.10 Pizza Setting
- 11.11 Roasting
- 11.12 Roasting tables
- 11.13 Grilling
- 11.14 Frozen foods
- 11.15 Defrost
- 11.16 Preserving
- 11.17 Drying
- 11.18 Bread Baking
- 11.19 Core temperature sensor table
- 12. CARE AND CLEANING
- 13. TROUBLESHOOTING

Sensor
field
Function Comment
7
Up key To move up in the menu.
8
OK To confirm the selection or setting.
9
Home key To go back one level in the menu. To show the
main menu, touch the field for 3 seconds.
10
Time and addi-
tional functions
To set different functions. When a heating func-
tion operates, touch the sensor field to set the
timer or the functions: Function Lock, Favourite
Programme, Heat + Hold, Set + Go. You can also
change the settings of the core temperature sen-
sor.
11
Minute Minder To set the function: Minute Minder.
4.2 Display
A
DE
B C
A) Heating function
B) Time of day
C) Heat-up indicator
D) Temperature
E) Duration time or end time of a function
Other indicators of the display:
Symbol Function
Minute Minder The function operates.
Time of day The display shows the current time.
Duration The display shows the necessary time
for cooking.
End Time The display shows when the cooking
time is complete.
Temperature The display shows the temperature.
Time Indication The display shows how long the heat-
ing function operates. Press and
at the same time to reset the time.
ENGLISH
9