EN User Manual Oven BE300366K
www.aeg.com CONTENTS 1. SAFETY INFORMATION.................................................................................................3 2. SAFETY INSTRUCTIONS................................................................................................ 4 3. PRODUCT DESCRIPTION.............................................................................................. 6 4. BEFORE FIRST USE.........................................................................................................
ENGLISH 1. 3 SAFETY INFORMATION Before the installation and use of the appliance, carefully read the supplied instructions. The manufacturer is not responsible for any injuries or damages that are the result of incorrect installation or usage. Always keep the instructions in a safe and accessible location for future reference. 1.
www.aeg.com • • • • • • • Before maintenance cut the power supply. Ensure that the appliance is switched off before replacing the lamp to avoid the possibility of electric shock. Do not use a steam cleaner to clean the appliance. Do not use harsh abrasive cleaners or sharp metal scrapers to clean the glass door since they can scratch the surface, which may result in shattering of the glass.
ENGLISH • The shock protection of live and insulated parts must be fastened in such a way that it cannot be removed without tools. • Connect the mains plug to the mains socket only at the end of the installation. Make sure that there is access to the mains plug after the installation. • If the mains socket is loose, do not connect the mains plug. • Do not pull the mains cable to disconnect the appliance. Always pull the mains plug.
www.aeg.com • Make sure the appliance is cold. There is the risk that the glass panels can break. • Replace immediately the door glass panels when they are damaged. Contact the Authorised Service Centre. • Be careful when you remove the door from the appliance. The door is heavy! • Clean regularly the appliance to prevent the deterioration of the surface material. • Clean the appliance with a moist soft cloth. Only use neutral detergents.
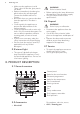
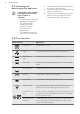
ENGLISH To bake and roast or as pan to collect fat. • Trivet For roasting and grilling. 7 Use the trivet only with the Grill- / roasting pan. 4. BEFORE FIRST USE WARNING! Refer to Safety chapters. 4.1 Initial Cleaning Remove all accessories and removable shelf supports from the appliance. Press again and again until the indicator for the Time of Day function flashes. To set a new time, refer to "Setting the time". 4.4 Preheating Preheat the empty appliance to burn off the remaining grease.
www.aeg.com 5.2 Activating and deactivating the appliance It depends on the model if your appliance has lamps, knob symbols or indicators: • The lamp comes on when the appliance operates. • The symbol shows whether the knob controls the oven functions or the temperature. • The indicator comes on when the oven heats up. 1. Turn the knob for the oven functions to select an oven function. 2. Turn the knob for the temperature to select a temperature. 3.
ENGLISH Oven function Application Pizza Setting To bake food on 1 shelf position for a more intensive browning and a crispy bottom. Set the temperature 20 - 40 °C lower than for Top / Bottom Heat. 5.4 Activating the True Fan Cooking PLUS function This function allows to have an improvement of humidity during the cooking. WARNING! Risk of burns and damage to the appliance. Released humidity can cause burns: • Open the appliance door with care after the True Fan Cooking PLUS operation.
www.aeg.com 5.6 Buttons Button Function Description MINUS To set the time. CLOCK To set a clock function. PLUS To set the time. Plus Steam To activate the True Fan Cooking PLUS function. 6. CLOCK FUNCTIONS 6.1 Clock functions table Clock function Application Time of day To set, change or check the time of day. Minute Minder To set countdown time. This function has no effect on the operation of the appliance. Duration To set the cooking time of the oven.
ENGLISH 6.3 Cancelling the clock functions 1. Press the again and again until the necessary function indicator flashes. 11 2. Press and hold . The clock function goes out after some seconds. 7. USING THE ACCESSORIES WARNING! Refer to Safety chapters. 7.1 Inserting the accessories Wire shelf: Push the shelf between the guide bars of the shelf support and make sure that the feet point down. All accessories have small indentations at the top of the right and left side to increase safety.
www.aeg.com 2. Put the deep pan into the oven on the necessary shelf position. You can use the trivet to grill flat dishes in large quantities and to toast. 2. Put the deep pan into the oven on the necessary shelf position. 1. Put the trivet into the deep pan so that the supports of the wire shelf point down. 8. ADDITIONAL FUNCTIONS 8.1 Cooling fan 8.2 Safety thermostat When the appliance operates, the cooling fan activates automatically to keep the surfaces of the appliance cool.
ENGLISH • Clean the moisture after each use of the appliance. • Do not put the objects directly on the appliance floor and do not put aluminium foil on the components when you cook. This can change the baking results and cause damage to the enamel. 9.3 Baking cakes • Do not open the oven door before 3/4 of the set cooking time is up. • If you use two baking trays at the same time, keep one empty level between them. 9.
www.aeg.com Food Water in the cavi- Temperature ty embossment (°C) (ml) Time (min) Shelf position Pizza frozen 150 200 - 210 10 - 20 21) Frozen lasagna 200 180 - 200 35 - 50 21) Frozen croissant 150 170 - 180 15 - 25 21) 1) Preheat in an empty oven for 10 minutes before cooking.
ENGLISH Food Top / Bottom Heat True Fan Cooking 15 Time (min) Comments Temperature (°C) Shelf posi- Temperation ture (°C) Shelf position Shortbread dough 170 2 160 3 (2 and 4) 20 - 30 In a cake mould Buttermilk cheesecake 170 1 165 2 60 - 80 In a 26 cm cake mould Apple cake (Ap- 170 2 160 2 (left and right) 80 - 100 In two 20 cm cake moulds on a wire shelf Strudel 175 3 150 2 60 - 80 In a baking tray Jam-tart 170 2 165 2 (left and right) 30 - 40 In a 26 cm cake mo
www.aeg.
ENGLISH Food Top / Bottom Heat True Fan Cooking 17 Time (min) Comments Temperature (°C) Shelf posi- Temperation ture (°C) Shelf position 190 2 180 2 (2 and 4) 25 - 40 6 - 8 rolls in a baking tray Pizza1) 230 - 250 1 230 - 250 1 10 - 20 In a baking tray or a deep pan Scones1) 200 3 190 3 10 - 20 In a baking tray Bread rolls 1) 1) Preheat the oven for 10 minutes.
www.aeg.
ENGLISH Food Quantity Temperature (°C) Time (min) 1st side 2nd side Shelf position Pieces (g) 4 800 max. 12 - 15 12 - 14 4 Beef steaks 4 600 max. 10 - 12 6-8 4 Sausages - max. 12 - 15 10 - 12 4 Pork chops 4 600 max. 12 - 16 12 - 14 4 Chicken (cut in 2) 2 1000 max. 30 - 35 25 - 30 4 Kebabs 4 - max. 10 - 15 10 - 12 4 Breast of chicken 4 400 max. 12 - 15 12 - 14 4 Hamburger 6 600 max. 20 - 30 - 4 Fish fillet 400 max.
www.aeg.com Food Quantity (kg) Temperature (°C) Time (min) Shelf position Meat loaf 0.75 - 1 160 - 170 50 - 60 1 or 2 Pork knuckle (precooked) 0.75 - 1 150 - 170 90 - 120 1 or 2 Food Quantity (kg) Temperature (°C) Time (min) Shelf position Roast veal 1 160 - 180 90 - 120 1 or 2 Knuckle of veal 1.5 - 2 160 - 180 120 - 150 1 or 2 Food Quantity (kg) Temperature (°C) Time (min) Shelf position Leg of lamb, roast lamb 1 - 1.
ENGLISH 21 Vegetables Food Temperature (°C) Time (h) Beans 60 - 70 Peppers Shelf position 1 position 2 positions 6-8 3 1/4 60 - 70 5-6 3 1/4 Vegetables for sour 60 - 70 5-6 3 1/4 Mushrooms 50 - 60 6-8 3 1/4 Herbs 40 - 50 2-3 3 1/4 Temperature (°C) Time (h) Shelf position Plums 60 - 70 Apricots Fruit Food 1 position 2 positions 8 - 10 3 1/4 60 - 70 8 - 10 3 1/4 Apple slices 60 - 70 6-8 3 1/4 Pears 60 - 70 6-9 3 1/4 10.
www.aeg.com 1. Put 250 ml of white vinegar into the cavity embossment at the bottom of the oven. Use maximum 6% vinegar without herbs. 2. Let the vinegar dissolve the residual limestone at the ambient temperature for 30 minutes. 3. Clean the cavity with warm water and a soft cloth. 10.4 Cleaning the door gasket • Regularly do a check of the door gasket. The door gasket is around the frame of the oven cavity. Do not use the appliance if the door gasket is damaged. Contact an Authorised Service Centre.
ENGLISH 2. Carefully pull the heating element down. 3. Clean the oven ceiling with a soft cloth with warm water and a cleaning agent, and let it dry. Install the heating element in the opposite sequence. 23 2. Lift and turn the levers on the two hinges. Install the shelf supports. WARNING! Make sure that the heating element is correctly installed and that it does not fall down. 10.8 Cleaning the oven door The oven door has three glass panels.
www.aeg.com When the cleaning is completed, install the glass panels and the oven door. Do the above steps in the opposite sequence. 5. Release the locking system to remove the glass panels. Make sure that you put the glass panels (A and B) back in the correct sequence. The first panel (A) has a decorative frame. The screen-printing zone must face the inner side of the door.
ENGLISH WARNING! Danger of electrocution! Disconnect the fuse before you replace the lamp. The lamp and the lamp glass cover can be hot. CAUTION! Always hold the halogen lamp with a cloth to prevent grease residue from burning on the lamp. 25 1. Deactivate the appliance. 2. Remove the fuses from the fuse box or deactivate the circuit breaker. The back lamp 1. Turn the lamp glass cover counterclockwise to remove it. 2. Clean the glass cover. 3. Replace the lamp with a suitable 300 °C heat-resistant lamp.
www.aeg.com Problem Possible cause There is no good cooking performance using the True Fan Cooking PLUS function. You did not activate correct- Refer to "Activating the True ly the True Fan Cooking Fan Cooking PLUS funcPLUS function with the Plus tion". Steam button. You want to activate the True Fan Cooking function, but the indicator of the Plus Steam button is on. The True Fan Cooking PLUS function operates. Push the Plus Steam button The water in the cavity embossment does not boil.
ENGLISH 12.1 Building In 27 12.2 Securing the appliance to the cabinet 548 21 114 16 20 600 A 558 min. 550 min. 560 B 589 594 573 594 5 3 12.3 Electrical installation The manufacturer is not responsible if you do not follow the safety precautions from the Safety chapters. 548 21 min. 550 558 16 20 590 114 min. 560 589 594 573 594 This appliance is supplied without a main plug and a main cable.
www.aeg.com Energy consumption with a standard load, fan-forced 0.85 kWh/cycle mode Number of cavities 1 Heat source Electricity Volume 72 l Type of oven Built-In Oven Mass 32.4 kg EN 60350-1 - Household electric cooking appliances - Part 1: Ranges, ovens, steam ovens and grills - Methods for measuring performance. 13.2 Energy saving The appliance contains features which help you save energy during everyday cooking.
ENGLISH 29
www.aeg.
ENGLISH 31
867323672-A-042016 www.aeg.