BE3013021 NL OVEN GEBRUIKSAANWIJZING
VOOR PERFECTE RESULTATEN Bedankt dat u voor dit AEG product heeft gekozen. Dit apparaat is ontworpen om vele jaren uitstekend te presteren, met innovatieve technologieën die het leven gemakkelijker helpen maken – functies die gewone apparaten wellicht niet hebben. Neem een paar minuten de tijd om het door te lezen zodat u er optimaal van kunt profiteren.
Inhoud 3 INHOUD 4 7 8 9 10 11 13 13 21 24 25 Veiligheidsinformatie Beschrijving van het product Voor het eerste gebruik Dagelijks gebruik Klokfuncties Gebruik van de accessoires Extra functies Nuttige aanwijzingen en tips Onderhoud en reiniging Problemen oplossen Milieubescherming In deze gebruiksaanwijzing worden de volgende symbolen gebruikt: Belangrijke informatie over uw persoonlijke veiligheid en informatie over het voorkomen van schade aan het apparaat.
Veiligheidsinformatie VEILIGHEIDSINFORMATIE Lees deze handleiding zorgvuldig alvorens het apparaat te installeren of te gebruiken: • Voor uw eigen veiligheid en de veiligheid van uw eigendommen • Uit respect voor het milieu • Voor de correcte werking van het apparaat. Bewaar deze instructies altijd bij het apparaat, ook wanneer u het verplaatst of verkoopt. De fabrikant is niet verantwoordelijk voor schade veroorzaakt door een foutieve installatie of foutief gebruik.
Veiligheidsinformatie 5 • De elektrische installatie moet een isolatieapparaat bevatten waardoor het apparaat volledig van het lichtnet afgesloten kan worden. Het isolatieapparaat moet een contactopening hebben met een minimale breedte van 3mm. • U dient te beschikken over de juiste isolatievoorzieningen: stroomonderbrekers, zekeringen (schroefzekeringen moeten uit de houder worden verwijderd), aardlekschakelaars en contactgevers.
Veiligheidsinformatie – plaats heet water niet direct in het apparaat; – haal vochtige schotels en eten uit het apparaat als u klaar bent met koken. • Verkleuring van het emaille heeft geen effect op de werking van het apparaat, het is dus geen defect in de zin van het recht op garantie. • Oefen geen kracht uit op een geopende deur. • De deur dient altijd gesloten te worden bij het koken, ook tijdens het grillen.
Beschrijving van het product 7 Service-afdeling • Alleen een bevoegd servicemonteur mag dit apparaat repareren. Neem contact op met de service-afdeling. • Gebruik alleen originele reserveonderdelen. Afvalverwerking van het apparaat • Om lichamelijk letsel of schade te voorkomen – Trek de stekker uit het stopcontact. – Snijd het netsnoer door en gooi het weg. – Verwijder de deurvergrendeling. Dit voorkomt dat kinderen of kleine huisdieren in het apparaat opgesloten raken.
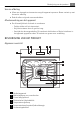
Voor het eerste gebruik 8 9 10 11 12 13 Ovenlampje Ventilator Verwarmingselement achterwand Onderwarmte Inschuifrails, verwijderbaar Rekstanden Ovenaccessoires • Bakrooster Voor servies, bak- en braadvormen. • Combischaal Voor gebak en koekjes. Voor braden en roosteren of als pan om vet op te vangen. • Telescopische geleiders Voor platen en rekken. VOOR HET EERSTE GEBRUIK WAARSCHUWING! Zie het hoofdstuk 'Veiligheidsinformatie'. Eerste reiniging • Verwijder alle onderdelen van het apparaat.
Dagelijks gebruik 9 Zie het hoofdstuk "Onderhoud en reiniging". Tijd instellen De oven functioneert alleen als u de tijd hebt ingesteld. Wanneer u het apparaat op de netvoeding aansluit, of na een stroomstoring gaat het symbool van de tijdfunctie automatisch knipperen. Gebruik de " + " of " - "-toets om de huidige tijd in te stellen. Na ongeveer 5 seconden stopt het knipperen en geeft de klok de ingestelde tijd van de dag weer.
Klokfuncties Ovenfunctie Toepassing Multi hetelucht Voor het maximaal bakken op drie ovenniveaus tegelijkertijd. Stel de temperatuur van de oven 20 tot 40 °C lager in dan bij Conventioneel (boven-/onderwarmte). En om voedsel te drogen. Pizza hetelucht Voor het bakken op één niveau van gerechten met een meer intensieve bruinering en een krokante korst. Stel de temperatuur van de oven 20 tot 40 °C lager in dan bij Conventioneel (boven-/onderwarmte).
Gebruik van de accessoires 11 2. Druk meerdere malen op de keuzetoets tot het gewenste functielampje knippert. 3. Om de tijd in te stellen voor de kookwekker , Bereidingsduur of Einde , gebruikt u de " + " of " - "-toets. Het controlelampje voor de betreffende functie gaat branden. Wanneer de tijd is verstreken, knippert het functielampje en klinkt er gedurende 2 minuten een geluidsignaal. Bij de functies Bereidingsduur en Einde schakelt de oven automatisch uit. 4.
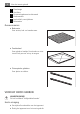
Gebruik van de accessoires Ovenaccessoires plaatsen De pan en het draadplateau hebben zijranden. Deze randen en de vorm van de geleidestangen bieden kantelbeveiliging voor de ovenaccessoires. Het draadplateau en de pan samen plaatsen Plaats het draadplateau op de pan. Duw de pan in de geleidestangen van een van de ovenniveaus. Telescopische geleiders - Ovenaccessoires plaatsen Plaats de bakplaat of de pan op de telescopische geleiders.
Extra functies 13 Het rooster en de pan samen plaatsen Plaats het rooster op de pan. Plaats het rooster en de pan op de telescopische geleiders. Bevestig de gaatjes in de randen op de bevestigingspennen van de telescopische geleiders. Maak alle oventoebehoren na elk gebruik schoon (met een zachte doek en een warm sopje en een reinigingsmiddel) en laat ze drogen.
Nuttige aanwijzingen en tips Type van bakken Ovenfunctie Ovenniveau Temperatuur °C Tijd uren:min. Taartbodem roerdeeg Multi hetelucht 2 150-170 0:20-0:25 Apple pie (2 vormen Ø20cm, diagonaal geplaatst) Multi hetelucht 2 160 1:10-1:30 Apple pie (2 vormen Ø20cm, diagonaal geplaatst) Boven + onderwarmte 2 180 1:10-1:30 Kwarktaart Boven + onderwarmte 1 170-190 1:00-1:30 1) Oven voorverwarmen Cakes/pastijen/gebak op bakblik Ovenfunctie Ovenniveau Temperatuur °C Tijd uren:min.
Nuttige aanwijzingen en tips 15 Type van bakken Ovenfunctie Ovenniveau Temperatuur °C Tijd uren:min. Plaatkoek met kwetsbare garnering (bijvoorbeeld kwark, room, puddingvulling) Boven + onderwarmte 3 160-180 1) 0:40-1:20 1) Oven voorverwarmen 2) Gebruik de lekbak of braadslede Koekjes Ovenfunctie Ovenniveau Temperatuur °C Tijd uren:min.
Nuttige aanwijzingen en tips Koekjes/small cakes/gebak/broodjes Multi hetelucht Type van bakken Multi hetelucht Inzetniveaus vanaf de bodem Temperatuur in °C Tijdsinstelling Uren:min.
Nuttige aanwijzingen en tips 17 Bakresultaat Mogelijke oorzaak Oplossing Gebak wordt niet gaar binnen de aangegeven baktijd Te lage temperatuur. Oveninstelling iets hoger instellen Ovenschotels en gegratineerde gerechten Schotel Ovenfunctie Plaathoogte Temperatuur °C Tijd uren:min.
Nuttige aanwijzingen en tips Hoeveelheid Ovenfunctie Plaathoogte Temperatuur °C Tijd in min. Tussenribstuk, casselerrib 1-1,5 kg Circulatiegrill 1 170-180 60-90 Gehaktbrood 750 g-1 kg Circulatiegrill 1 160-170 50-60 Varkensribstuk (voorgekookt) 750 g-1 kg Circulatiegrill 1 150-170 90-120 Soort vlees Kalfsvlees Soort vlees Hoeveelheid Ovenfunctie Plaathoogte Temperatuur °C Tijd in min.
Nuttige aanwijzingen en tips Soort vlees 19 Hoeveelheid Ovenfunctie Plaathoogte Temperatuur °C Tijd in min. 4-6 kg Circulatiegrill 1 140-160 150-240 Hoeveelheid Ovenfunctie Plaathoogte Temperatuur °C Tijd in min. 1-1,5 kg Boven + onderwarmte 1 210-220 40-60 Kalkoen Vis (stoven) Soort vlees Hele vis Grill Gerecht Grilltijd (min.
Nuttige aanwijzingen en tips Type van bakken Plaathoogte Temperatuur °C Tijd in min.
Onderhoud en reiniging Ovenniveau 21 Temperatuur in °C 1 niveau 2 niveaus Tijd in uren (richtwaarde) Groente in het zuur 60-70 3 1/4 5-6 Paddenstoelen 50-60 3 1/4 6-8 Zuurkool 40-50 3 1/4 2-3 Temperatuur in °C 1 niveau 2 niveaus Tijd in uren (richtwaarde) Pruimen 60-70 3 1/4 8-10 Abrikozen 60-70 3 1/4 8-10 Schijfjes appel 60-70 3 1/4 6-8 Peren 60-70 3 1/4 6-9 Gerecht Fruit Gerecht Ovenniveau Informatie over acrylamides Belangrijk! Volgens recente wetenschappel
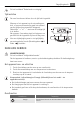
Onderhoud en reiniging Verwijderen van de inschuifrails 1. Trek de inschuifrails bij de voorkant uit de zijwand. 2. Trek de inschuifrails van de achterkant van de zijwand om ze te verwijderen. Om de inschuifrails te installeren volgt u de procedure in omgekeerde volgorde. Geldig bij de telescopische geleiders: De pinnetjes op de telescopische geleiders moeten naar voren wijzen! 2 1 Ovenlampje WAARSCHUWING! Er bestaat risico op elektrische schokken. De ovenlamp en het afdekglas kunnen heet zijn.
Onderhoud en reiniging Plafond oven Het verwarmingselement kan worden neergeklapt om het plafond van de oven gemakkelijker te reinigen. WAARSCHUWING! Schakel de oven uit voor het neerklappen van het verwarmingselement. Zorg ervoor dat het apparaat is afgekoeld. Gevaar voor brandwonden! Neerklappen van het verwarmingselement 1. De inschuifrails verwijderen. 2. Houd het verwarmingselement aan de voorzijde met beide handen vast. 3. Trek het naar voren tegen de drukveer aan langs de steun aan beide zijden.
Problemen oplossen LET OP! Plaats de ovendeur met de buitenkant omlaag op een zachte en egale ondergrond om krassen te voorkomen. Verwijderen en reinigen van de glasplaten 1. Verwijder de ovendeur. 2. Deurafdekking (B) aan de bovenkant van de deur aan beide kanten vastpakken en naar binnen drukken om de klemsluiting te ontgrendelen. 3. Trek de deurafdekking naar voren om deze te verwijderen. B 4. Houd de glasplaten aan de bovenkant vast en trek deze een voor een omhoog uit de geleiding 5.
Milieubescherming Probleem Op het display verschijnt "12.00" Mogelijke oorzaak Een stroomonderbreking 25 Oplossing Stel de klok opnieuw in Als u niet zelf het probleem kunt verhelpen, neem dan contact op met uw verkoper of de klantenservice. De benodigde gegevens voor de service-afdeling staan op het typeplaatje. Het typeplatje bevindt zich aan de voorkant van de binnenkant van de oven. Wij adviseren u om de gegevens hier te noteren: Model (MOD.) Productnummer (PNC) Serienummer (S.N.) .................
www.aeg-electrolux.