BE5003021 EN User manual
www.aeg.com CONTENTS 1. 2. 3. 4. 5. 6. 7. 8. 9. 10. 11. 12. 13. 14. SAFETY INFORMATION . . . . . . . . . . . . . . . . . . . . . . . . . . . . . . . . . . . . . . . . . . . . . . . . . . . . . . 3 SAFETY INSTRUCTIONS . . . . . . . . . . . . . . . . . . . . . . . . . . . . . . . . . . . . . . . . . . . . . . . . . . . . . . 4 PRODUCT DESCRIPTION . . . . . . . . . . . . . . . . . . . . . . . . . . . . . . . . . . . . . . . . . . . . . . . . . . . . . 6 BEFORE FIRST USE . . . . . . . . . . . . . . . . . .
ENGLISH 3 1. SAFETY INFORMATION Before the installation and use of the appliance, carefully read the supplied instructions. The manufacturer is not responsible if an incorrect installation and use causes injuries and damages. Always keep the instructions with the appliance for future reference. 1.1 Children and vulnerable people safety WARNING! Risk of suffocation, injury or permanent disability.
www.aeg.com scratch the surface, which may result in shattering of the glass. • To remove the shelf supports first pull the front of the shelf support and then the rear end away from the side walls. Install the shelf supports in the opposite sequence. 2. SAFETY INSTRUCTIONS 2.1 Installation WARNING! Only a qualified person must install this appliance. • Remove all the packaging. • Do not install or use a damaged appliance. • Obey the installation instruction supplied with the appliance.
ENGLISH • Use this appliance in a household environment. • Do not change the specification of this appliance. • Make sure that the ventilation openings are not blocked. • Do not let the appliance stay unattended during operation. • Deactivate the appliance after each use. • Be careful, when you open the appliance door while the appliance is in operation. Hot air can release. • Do not operate the appliance with wet hands or when it has contact with water. • Do not apply pressure on the open door.
www.aeg.com 2.5 Disposal WARNING! Risk of injury or suffocation. • Cut off the mains cable and discard it. • Remove the door catch to prevent children and pets to get closed in the appliance. • Disconnect the appliance from the mains supply. 3.
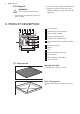
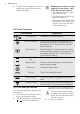
ENGLISH 7 Trivet • For roasting and grilling. Use the trivet only with the Grill- / roasting pan. 4. BEFORE FIRST USE WARNING! Refer to the Safety chapters. time will be saved automatically after 5 seconds). The display shows hour. "00" flashes. 4.1 Initial Cleaning • Remove all parts from the appliance. • Clean the appliance before first use. Refer to chapter "Care and Cleaning". 3. Press nutes. 4. Press to confirm (necessary only for the first setting.
www.aeg.com 3. To deactivate the appliance, turn the knob for the oven functions to the off position ("0") . Knob symbol, indicator or lamp (depends on the model - refer to the product description): • The indicator comes on when the oven heats up. • The lamp comes on when the appliance operates. • The symbol shows whether the knob controls one of the cooking zones, the oven functions or the temperature. 5.2 Oven Functions Oven function Fast Heat Up Application To decrease the heat-up time.
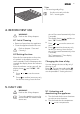
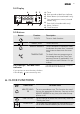
ENGLISH 9 5.4 Display A G F B E C D A) B) C) D) Timer Heat-up and residual heat indicator Water drawer (selected models only) Core temperature sensor (selected models only) E) Door lock (selected models only) F) Hours / minutes G) Clock functions 5.5 Buttons Button Function CLOCK , MINUS, PLUS Description To set a clock function. To set the time. MINUTE MINDER To set the MINUTE MINDER. Hold the button for more than 3 seconds to activate or deactivate the oven lamp.
www.aeg.com SYMBOL FUNCTION DESCRIPTION END To set when the appliance must be deactivated. First set an oven function before you set this function. You can use Duration and End at the same time (Time Delay) to set the time when the appliance must be activated and then deactivated. Press again and again to change the clock function. Press to confirm the settings of the clock functions, or wait 5 seconds for the setting to be confirmed automatically. 6.1 Setting the DURATION or END 1.
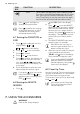
ENGLISH 11 7.1 Inserting the oven accessories The deep pan and the wire shelf have side edges. These edges and the shape of the guide-bars are a special device to prevent the cookware from slipping. Installing the wire shelf and the deep pan together Put the wire shelf on the deep pan. Push the deep pan between the guide-bars of one of the oven levels. 7.2 Trivet and Grill- / Roasting pan WARNING! Be careful when you remove the accessories from a hot appliance. There is a risk of burns.
www.aeg.com You can use the trivet to grill flat dishes in large quantities and to toast: • Put the trivet into the deep pan so that the supports of the wire shelf point down. • Put the deep pan into the oven on the necessary shelf position. 8. ADDITIONAL FUNCTIONS 8.1 Child Lock The Child Lock prevents an accidental operation of the appliance. Activating and deactivating the Child Lock function: 1. Do not set an oven function. 2. Press and hold and at the same time for 2 seconds. 3.
ENGLISH Oven temperature Switch-off time 30 - 115 °C 12.5 h 120 - 195 °C 8.5 h 200 - 245 °C 5.5 h 250 - maximum °C 3.0 h After an automatic switch-off, press a button to activate the appliance again. 13 The Automatic switch-off works with all oven functions except Duration, End and Time Delay. 9. HELPFUL HINTS AND TIPS 9.1 Inner side of the door In some models, on the inner side of the door you can find: • The numbers of the shelf positions.
www.aeg.com Baking results Possible cause Remedy The cake sinks and becomes soggy, lumpy or streaky. The baking time is too short. Set a longer baking time. You cannot decrease baking times by setting higher temperatures. The cake sinks and becomes soggy, lumpy or streaky. There is too much liquid in the mixture. Use less liquid. Be careful with mixing times, especially if you use a mixing machine. The cake is too dry. The oven temperature is too low.
ENGLISH Type of baking Oven function Shelf position Temperature (°C) Time (min) Flan base sponge mixture True Fan Cooking 2 150 - 170 20 - 25 Apple pie / Apple pie (2 tins Ø20 cm, diagonally off set) True Fan Cooking 2 160 60 - 90 Apple pie / Apple pie (2 tins Ø20 cm, diagonally off set) Conventional Cooking 1 180 70 - 90 Cheesecake Conventional Cooking 1 170 - 190 60 - 90 1) Preheat the oven.
www.aeg.
ENGLISH Type of baking Oven function Shelf position Temperature (°C) Time (min) Macaroons True Fan Cooking 3 100 - 120 30 - 50 Biscuits made with yeast dough True Fan Cooking 3 150 - 160 20 - 40 Puff pastries True Fan Cooking 3 170 - 1801) 20 - 30 Rolls True Fan Cooking 3 1601) 10 - 25 Rolls Conventional Cooking 3 190 - 2101) 10 - 25 Small cakes / Small cakes (20 per tray) True Fan Cooking 3 1501) 20 - 35 Small cakes / Small cakes (20 per tray) Conventional Cooking 3 1
www.aeg.com 9.5 Multileveled Baking Cakes / pastries / breads on baking trays True Fan Cooking Type of baking Shelf position Temperature (°C) Time (min) - 160 - 180 1) 25 - 45 - 150 - 160 30 - 45 2 shelf positions 3 shelf positions Cream puffs / Eclairs 1/4 Dry streusel cake 1/4 1) Preheat the oven.
ENGLISH 19 9.6 Pizza Setting Type of baking Shelf position Temperature °C Time (min.
www.aeg.com 9.8 Roasting with Turbo Grilling Beef Type of meat Quantity Oven function Shelf position Temperature °C Time (min.) Pot roast 1 - 1.5 kg Conventional Cooking 1 230 120 - 150 Roast beef or fillet: rare per cm of thickness Turbo Grilling 1 Roast beef or fillet: medium per cm of thickness Turbo Grilling 1 Roast beef or fillet: well done per cm of thickness Turbo Grilling 1 190 - 200 1) 180 - 190 1) 170 - 180 5-6 6-8 1) 8 - 10 1) Preheat the oven.
ENGLISH 21 Type of meat Quantity Oven func- Shelf position tion Temperature °C Time (min.) Saddle of lamb 1 - 1.5 kg Turbo Grilling 160 - 180 40 - 60 Type of meat Quantity Oven func- Shelf position tion Temperature °C Time (min.) Saddle / Leg of hare up to 1 kg Conventional Cooking 1 230 1) 30 - 40 Saddle of venison 1.5 - 2 kg Conventional Cooking 1 210 - 220 35 - 40 Haunch of venison 1.
www.aeg.com Grill only flat pieces of meat or fish. Always preheat the empty oven with the grill functions for 5 minutes. 9.9 Grilling Always grill with the maximum temperature setting. Set the shelf into the shelf position as recommended in the grilling table. Always set the pan to collect the fat into the first shelf position. CAUTION! Always grill with the oven door closed. Grilling Food to be grilled Shelf position Temperature Roast beef 2 Filet of beef Back of pork Time (min.
ENGLISH Convenience food Shelf position Temperature (°C) Time (min.
www.aeg.com Defrosting time (min.) Further defrosting time (min.) Trout, 150 g 25 - 35 10 - 15 - Strawberries, 300 g 30 - 40 10 - 20 - Butter, 250 g 30 - 40 10 - 15 - Cream, 2 x 200 g 80 - 100 10 - 15 Cream can also be whipped when still slightly frozen in places. Dish Gateau, 1400 g 60 9.12 Preserving - Bottom Heat Things to note: • Use only preserve jars of the same dimensions available on the market. • Do not use jars with twist-off and bayonet type lids or metal tins.
ENGLISH Preserve Temperature in °C Kohlrabi / Peas / Asparagus 25 Cooking time unContinue to cook til simmering at 100°C (min.) (min.) 160 - 170 50 - 60 15 - 20 1) Leave standing in the oven after it’s deactivated. 9.13 Drying - True Fan Cooking Use baking parchment as a cover for the oven shelves. For best results, deactivate the appliance halfway through the operation. Open the appliance door and let the appliance cool down. After that, complete the drying process.
www.aeg.com 10.1 Shelf supports Removing the shelf supports You can remove the shelf supports to clean the side walls. 1. Pull the front of the shelf support away from the side wall. 2. Pull the rear end of the shelf support away from the side wall and remove it. 2 1 Installing the shelf supports Install the shelf supports in the opposite sequence. Valid for telescopic runners: The retaining pins on the telescopic runners must point to the front. 10.
ENGLISH 27 3. Pull it forwards against the spring pressure and out along the supports on the two sides. 4. The heating element folds down. You can clean the oven ceiling. Installing the heating element Install the heating element in the opposite sequence. 1. 2. Hold the heating element with two hands at the front. Install the heating element correctly above the supports on the inner walls of the appliance. 2. Install the shelf supports. 10.
www.aeg.com 8. 9. Installing the door and the glass panels Hold the door glass panels on their top edge one by one and pull them up out of the guide. Clean the glass panel with water and soap. Dry the glass panel carefully. the above steps in the opposite sequence. Install the smaller panel first, then the larger. When the cleaning is completed, install the glass panels and the oven door. Do 11. WHAT TO DO IF… WARNING! Refer to the Safety chapters.
ENGLISH If you cannot find a solution to the problem yourself, contact your dealer or the service centre. The necessary data for the service centre is on the rating plate. The rating plate is 29 on the front frame of the appliance cavity. We recommend that you write the data here: Model (MOD.) ......................................... Product number (PNC) ......................................... Serial number (S.N.) ......................................... 12.
www.aeg.com min. 3 mm min.
ENGLISH 560 min. 600 31 548 20 min. ! 546 114 530 min. 594 572 30 579 5 567 594 21 200 cm2 548 546 590 560 min. 20 530 min. 572 114 594 579 5 590 min. 567 594 21 30 max. R1200 mm alternativ 100 130 140 H05VV-F H05RR-F min.
www.aeg.com 90° 2x3,5x25 13. GB IE GREAT BRITAIN & IRELAND - GUARANTEE/ CUSTOMER SERVICE 13.
ENGLISH Exclusions • Damage, calls resulting from transport, improper use, neglect, light bulbs, removable parts of glass, plastic. • Costs for calls to put right appliance which is improperly installed, calls to appliances outside United Kingdom. • Appliances found to be in use within a commercial environment, plus those which are subject to rental agreements. • Products of Electrolux manufacturer that are not marketed by Electrolux Service and Spare Parts.
www.aeg.com The provisions of this European Guarantee do not affect any of the rights granted to you by law. 15. WWW.ELECTROLUX.COM Albania +355 4 261 450 Rruga “Kavajës”, ish-parku autobuzëve, Tiranë Belgique/België/Belgien +32 2 7162444 Raketstraat 40, 1130 Brussel/ Bruxelles Česká Republika +420 261 302 261 Budějovická 3, Praha 4, 140 21 Danmark +45 70 11 74 00 Strevelinsvej 38-40, 7000 Fredericia Deutschland +49 180 32 26 622 Fürther Str.
ENGLISH 35 Polska +48 22 43 47 300 ul. Kolejowa 5/7, 01–217 Wars‐ zawa Portugal +35 12 14 40 39 39 Quinta da Fonte - Edifício Gonçalves Zarco - Q 35 -2774-518 Paço de Arcos Romania +40 21 451 20 30 Str. Garii Progresului 2, S4, 040671 RO Schweiz - Suisse Svizzera 0848 848 111 Industriestrasse 10, CH-5506 Mägenwil Slovenija +38 61 24 25 731 Gerbičeva ulica 110, 1000 Ljubl‐ jana Slovensko +421 2 32 14 13 34-5 Electrolux Slovakia s.r.o.
892960007-A-482012 www.aeg.