EN User Manual Oven BE501310AM
www.aeg.com CONTENTS 1. SAFETY INFORMATION............................................................................................. 2 2. CONDITIONS OF USE................................................................................................ 4 3. SAFETY INSTRUCTIONS.............................................................................................4 4. PRODUCT DESCRIPTION...........................................................................................6 5.
ENGLISH 3 damages that are the result of incorrect installation or usage. Always keep the instructions in a safe and accessible location for future reference. 1.
www.aeg.com • • • • • Do not use a steam cleaner to clean the appliance. Do not use harsh abrasive cleaners or sharp metal scrapers to clean the glass door since they can scratch the surface, which may result in shattering of the glass. If the mains power supply cable is damaged, it must be replaced by the manufacturer, its Authorised Service Centre or similarly qualified persons to avoid an electrical hazard.
ENGLISH • • • • • • • • cable. Should the mains cable need to be replaced, this must be carried out by our Authorised Service Centre. Do not let mains cables touch or come near the appliance door, especially when the door is hot. The shock protection of live and insulated parts must be fastened in such a way that it cannot be removed without tools. Connect the mains plug to the mains socket only at the end of the installation. Make sure that there is access to the mains plug after the installation.
www.aeg.com 3.4 Care and cleaning for household appliances. Do not use it for house lighting. WARNING! Risk of injury, fire, or damage to the appliance. • Before maintenance, deactivate the appliance and disconnect the mains plug from the mains socket. • Make sure the appliance is cold. There is the risk that the glass panels can break. • Replace immediately the door glass panels when they are damaged. Contact the Authorised Service Centre. • Be careful when you remove the door from the appliance.
ENGLISH 11 Shelf positions 4.2 Accessories Nonstick wire shelf To bake and roast or as a pan to collect fat. Nonstick trivet For cookware, cake tins, roasts. Nonstick baking tray For roasting and grilling. Use the trivet only with the Grill- / Roasting pan. Telescopic runners For cakes and biscuits. Nonstick grill- / Roasting pan For shelves and trays. 5. BEFORE FIRST USE WARNING! Refer to Safety chapters. To set the Time of day refer to "Clock functions" chapter. 5.
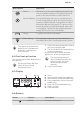
www.aeg.com 6. DAILY USE WARNING! Refer to Safety chapters. 6.1 Retractable knobs To use the appliance, press the control knob. The control knob comes out. 1. Turn the knob for the oven functions to select an oven function. 2. Turn the knob for the temperature to select a temperature. 3. To deactivate the appliance turn the knobs for the oven functions and temperature to the off position. 6.
ENGLISH Oven function 9 Application Defrost This function can be used for defrosting frozen foods, such as vegetables and fruits. The defrosting time depends on the amount and size of the frozen food. Moist Fan Baking To prepare baked goods in tin on one shelf position. To save energy during cooking. This function must be used in accordance with the cooking tables in order to achieve the desired cooking result. To get more information about the recommended settings, refer to the cooking tables.
www.aeg.com Button Function Description MINUS To set the time. MINUTE MINDER To set the MINUTE MINDER. Hold the button for more than 3 seconds to activate or deactivate the oven lamp. PLUS To set the time. TEMPERATURE To check the oven temperature or the temperature of the core temperature sensor (if applicable). Use only while an oven function is in operation. 6.7 Heat-up indicator When you activate an oven function, the bars in the display one.
ENGLISH 7.2 Setting and changing the time After the first connection to the mains, wait until the display shows "12:00". "12" flashes. 1. Press or and to set the hours. 2. Press to confirm and switch to set the minutes. The display shows hour. "00" flashes. 3. Press or minutes. and the set to set the current 4. Press to confirm or the set time of day will be saved automatically after 5 seconds. The display shows the new time.
www.aeg.com 7.7 COUNT UP TIMER To reset the Count Up Timer, press and hold and up again. . The timer starts to count 8. USING THE ACCESSORIES WARNING! Refer to Safety chapters. 8.1 Inserting the accessories Wire shelf: Push the shelf between the guide bars of the shelf support and make sure that the feet point down. Small indentation at the top increase safety. The indentations are also anti-tip devices. The high rim around the shelf prevents cookware from slipping of the shelf. 8.
ENGLISH 13 You can use the trivet to roast larger pieces of meat or poultry on one shelf position. 1. Put the trivet into the deep pan so that the supports of the wire shelf point up. Deep pan: Put the deep pan on the telescopic runners. 2. Put the deep pan into the oven on the necessary shelf position. You can use the trivet to grill flat dishes in large quantities and to toast. Wire shelf and deep pan together: 1. Put the trivet into the deep pan so that the supports of the wire shelf point down.
www.aeg.com 9. ADDITIONAL FUNCTIONS 9.1 Using the Child Lock 9.3 Residual heat indicator When the Child Lock is on, the appliance cannot be activated accidentally. When you deactivate the appliance, the display shows the residual heat indicator 1. Ensure the knob for the oven functions is in the off position. if the temperature in the oven is more than 40 °C. Turn the knob for the temperature left or right to show the oven temperature. 2. Press and hold and at the same time for 2 seconds.
ENGLISH The temperature and baking times in the tables are guidelines only. They depend on the recipes and the quality and quantity of the ingredients used. 10.1 Inner side of the door In some models, on the inner side of the door you can find: • the numbers of the shelf positions. • information about the oven functions, recommended shelf positions and temperatures for typical dishes. 10.2 Baking • Your oven may bake or roast differently to the appliance you had before.
www.aeg.com Baking results Possible cause Remedy The cake browns unevenly. The mixture is unevenly distributed. Spread the mixture evenly on the baking tray. The cake is not ready in the baking time given. The oven temperature is too The next time you bake, set low. a slightly higher oven temperature. 10.
ENGLISH Cakes / pastries / breads on baking trays Food Function Temperature (°C) Time (min) Shelf position Plaited bread / Bread crown Top / Bottom Heat 170 - 190 30 - 40 3 Christmas stollen Top / Bottom Heat 160 - 1801) 50 - 70 2 1. 2. 1 Bread (rye Top / Bottom bread): Heat 1. First part of baking procedure. 2. Second part of baking procedure. 1. 2.
www.aeg.
ENGLISH Food Function Temperature (°C) Time (min) Shelf position Lasagne Top / Bottom Heat 180 - 200 25 - 40 1 Vegetables au Turbo Grilling 160 - 170 15 - 30 1 Baguettes top- True Fan Cookped with melted ing cheese 160 - 170 15 - 30 1 Sweet bakes Top / Bottom Heat 180 - 200 40 - 60 1 Fish bakes Top / Bottom Heat 180 - 200 30 - 60 1 Stuffed vegetables True Fan Cooking 160 - 170 30 - 60 1 19 gratin1) 1) Preheat the oven. 10.
www.aeg.com Cakes / pastries / breads on baking trays Food Temperature (°C) Time (min) Cream puffs / Eclairs 160 - 1801) Dry streusel cake 150 - 160 Shelf position 2 positions 3 positions 25 - 45 1/4 - 30 - 45 1/4 - 1) Preheat the oven.
ENGLISH Food Temperature (°C) Time (min) Shelf position Tarts 180 - 200 40 - 55 1 Spinach flan 160 - 180 45 - 60 1 Quiche Lorraine 170 - 190 45 - 55 1 Swiss Flan 170 - 190 45 - 55 1 Cheesecake 140 - 160 60 - 90 1 Apple cake, covered 150 - 170 50 - 60 1 Vegetable pie 160 - 180 50 - 60 1 Unleavened bread 230 - 2501) 10 - 20 2 Puff pastry flan 160 - 1801) 45 - 55 2 Flammekuchen (Pizza-like dish from Alsace) 230 - 2501) 12 - 20 2 Piroggen (Russian version of calzone)
www.aeg.com Food Quantity Function Temperature (°C) Time (min) Shelf position Roast beef or fil- per cm of let: rare thickness Turbo Grilling 190 - 2001) 5-6 1 Roast beef or fil- per cm of let: medium thickness Turbo Grilling 180 - 1901) 6-8 1 Roast beef or fil- per cm of let: well done thickness Turbo Grilling 170 - 1801) 8 - 10 1 1) Preheat the oven. Pork Food Quantity (kg) Function Temperature (°C) Time (min) Shelf position Shoulder / Neck / Ham joint 1 - 1.
ENGLISH 23 Game Food Quantity (kg) Function Temperature Time (min) (°C) Shelf position Saddle / Leg of hare up to 1 Top / Bottom 2301) Heat 30 - 40 1 Saddle of venison 1.5 - 2 Top / Bottom 210 - 220 Heat 35 - 40 1 Haunch of venison 1.5 - 2 Top / Bottom 180 - 200 Heat 60 - 90 1 1) Preheat the oven. Poultry Food Quantity (kg) Function Temperature Time (min) (°C) Shelf position Poultry portions 0.2 - 0.25 each Turbo Grilling 200 - 220 30 - 50 1 Half chicken 0.4 - 0.
www.aeg.com Grilling Food Temperature (°C) Time (min) Shelf position 1st side 2nd side Roast beef 210 - 230 30 - 40 30 - 40 2 Filet of beef 230 20 - 30 20 - 30 3 Back of pork 210 - 230 30 - 40 30 - 40 2 Back of veal 210 - 230 30 - 40 30 - 40 2 Back of lamb 210 - 230 25 - 35 20 - 25 3 Whole Fish, 500 - 1000 g 210 - 230 15 - 30 15 - 30 3/4 10.12 Frozen foods Use the function True Fan Cooking.
ENGLISH 25 Frozen ready meals Food Function Temperature (°C) Time (min) Shelf position Frozen pizza Top / Bottom Heat as per manufacturer’s instructions as per manufacturer’s instructions 3 French fries1) (300 - 600 g) Top / Bottom Heat or Turbo Grilling 200 - 220 as per manufacturer’s instructions 3 Baguettes Top / Bottom Heat as per manufacturer’s instructions as per manufacturer’s instructions 3 Fruit flans Top / Bottom Heat as per manufacturer’s instructions as per manufacturer’
www.aeg.com 10.14 Preserving - Bottom Heat • Use only preserve jars of the same dimensions available on the market. • Do not use jars with twist-off and bayonet type lids or metal tins. • Use the first shelf from the bottom for this function. • Put no more than six one-litre preserve jars on the baking tray. • Fill the jars equally and close with a clamp. • The jars cannot touch each other. • Put approximately 1/2 litre of water into the baking tray to give sufficient moisture in the oven.
ENGLISH 27 Vegetables Food Temperature (°C) Time (h) Beans 60 - 70 Peppers Shelf position 1 position 2 positions 6-8 3 1/4 60 - 70 5-6 3 1/4 Vegetables for sour 60 - 70 5-6 3 1/4 Mushrooms 50 - 60 6-8 3 1/4 Herbs 40 - 50 2-3 3 1/4 Temperature (°C) Time (h) Shelf position Plums 60 - 70 Apricots Fruit Food 1 position 2 positions 8 - 10 3 1/4 60 - 70 8 - 10 3 1/4 Apple slices 60 - 70 6-8 3 1/4 Pears 60 - 70 6-9 3 1/4 11.
www.aeg.com 1 2 Install the heating element correctly above the supports on the inner walls of the appliance. 5. Install the shelf supports. 11.4 Removing and installing the door Install the shelf supports in the opposite sequence. The retaining pins on the telescopic runners must point to the front. You can remove the door and the internal glass panels to clean it. The number of glass panels is different for different models. WARNING! Be careful when you remove the door from the appliance.
ENGLISH 8. Hold the door glass panels on their top edge one by one and pull them up out of the guide. 29 WARNING! Danger of electrocution! Disconnect the fuse before you replace the lamp. The lamp and the lamp glass cover can be hot. 1. Deactivate the appliance. 2. Remove the fuses from the fuse box or deactivate the circuit breaker. 9. Clean the glass panel with water and soap. Dry the glass panel carefully. When the cleaning is completed, do the above steps in the opposite sequence.
www.aeg.com Problem Possible cause Remedy The oven does not heat up. The automatic switch-off is activated. Refer to "Automatic switchoff". The oven does not heat up. The Child Lock is on. Refer to "Using the Child Lock". The oven does not heat up. The fuse is blown. Make sure that the fuse is the cause of the malfunction. If the fuse is blown again and again, contact a qualified electrician. The lamp does not operate. The lamp is defective. Replace the lamp.
ENGLISH 12.2 Service data If you cannot find a solution to the problem yourself, contact your dealer or an Authorised Service Centre. on the front frame of the appliance cavity. Do not remove the rating plate from the appliance cavity. The necessary data for the service centre is on the rating plate. The rating plate is We recommend that you write the data here: Model (MOD.) ......................................... Product number (PNC) ......................................... Serial number (S.N.
www.aeg.com min. 50 mm = = 546 21 min. 550 20 600 548 15 546 21 114 589 594 min. 560 579 min. 550 590 20 548 15 114 min. 560 589 594 579 594 594 5 5 3 3 alternativ 100 max. R1200 mm 130 140 H05VV-F H05RR-F min.
ENGLISH 33 90° 2x3,5x25 14. ENERGY EFFICIENCY 14.1 Product Fiche and information according to EU 65-66/2014 Supplier's name AEG Model identification BE501310AM Energy Efficiency Index 81.2 Energy efficiency class A+ Energy consumption with a standard load, conventional mode 1.
www.aeg.com Energy consumption with a standard load, fan-forced 0.69 kWh/cycle mode Number of cavities 1 Heat source Electricity Volume 71 l Type of oven Built-In Oven Mass 41.5 kg EN 60350-1 - Household electric cooking appliances - Part 1: Ranges, ovens, steam ovens and grills - Methods for measuring performance. 14.2 Energy saving The appliance contains features which help you save energy during everyday cooking.
ENGLISH proof of purchase documents in a safe place for future reference should you require service for your Appliance. 1.
www.aeg.com – incomplete or improper installation – incorrect, improper or inappropriate operation – insect or vermin infestation – failure to comply with any additional instructions supplied with the Appliance; b) the Appliance is modified without authority from Electrolux in writing; c) the Appliance’s serial number or warranty seal has been removed or defaced; d) the Appliance was serviced or repaired by anyone other than Electrolux, an authorised repairer or ASC. 8.
ENGLISH 37 FOR SERVICE or to find the address of your nearest state service centre in Australia PLEASE CALL 1300 363 664 OR EMAIL customercare@aegaustralia.com.au For the cost of a local call (Australia only) FOR SPARE PARTS or to find the address of your nearest state spare parts centre in Australia PLEASE CALL 13 13 50 OR EMAIL customercare@aegaustralia.com.au For the cost of a local call (Australia only) AEG SERVICE NEW ZEALAND www.aeg.co.
www.aeg.
ENGLISH 39
867316801-D-402016 www.aeg.