BE5013421 BE501342R CS TROUBA NÁVOD K POUŽITÍ
PRO DOKONALÉ VÝSLEDKY Děkujeme vám, že jste si zvolili výrobek značky AEG. Aby vám bezchybně sloužil mnoho let, vyrobili jsme jej s pomocí inovativních technologií, které usnadňují život, a vybavili jsme jej funkcemi, které u obyčejných spotřebičů nenajdete. Stačí věnovat pár minut čtení a zjistíte, jak z něho získat co nejvíce. PŘÍSLUŠENSTVÍ A SPOTŘEBNÍ MATERIÁL V e-shopu společnosti AEG naleznete vše, co potřebujte k udržování všech vašich spotřebičů AEG v perfektním stavu.
Obsah 3 OBSAH 4 5 8 9 10 12 14 15 17 27 30 31 31 Bezpečnostní informace Bezpečnostní pokyny Popis spotřebiče Před prvním použitím Denní používání Funkce hodin Použití příslušenství Doplňkové funkce Užitečné rady a tipy Čištění a údržba Co dělat, když... Technické údaje Poznámky k ochraně životního prostředí V tomto návodu pro uživatele se používají následující symboly: Důležité informace týkající se Vaší bezpečnosti a informace o ochraně spotřebiče před poškozením.
Bezpečnostní informace BEZPEČNOSTNÍ INFORMACE Tento návod si pečlivě přečtěte ještě před instalací spotřebiče a jeho prvním použitím. Výrobce nezodpovídá za škody a zranění způsobená nesprávnou instalací či chybným používáním. Návod k použití vždy uchovávejte spolu se spotřebičem pro jeho budoucí použití. Bezpečnost dětí a postižených osob UPOZORNĚNÍ Hrozí nebezpečí udušení, úrazu nebo jiných trvalých následků.
Bezpečnostní pokyny 5 • K odstranění drážek na rošty nejprve odtáhněte přední a poté zadní konec drážek na rošty od stěny trouby. Drážky na rošty instalujte stejným postupem v opačném pořadí. BEZPEČNOSTNÍ POKYNY Instalace UPOZORNĚNÍ Tento spotřebič smí instalovat jen kvalifikovaná osoba. • • • • • • • • Odstraňte veškerý obalový materiál. Poškozený spotřebič neinstalujte ani nepoužívejte. Řiďte se pokyny k instalaci dodanými spolu s tímto spotřebičem.
Bezpečnostní pokyny • Používejte pouze správná izolační zařízení: ochranné vypínače vedení, pojistky (pojistky šroubového typu se musí odstranit z držáku), ochranné zemnicí jističe a stykače. • Je nutné instalovat vhodný vypínač nebo izolační zařízení k řádnému odpojení všech na‐ pájecích vodičů spotřebiče. Toto izolační zařízení musí mít mezeru mezi kontakty ale‐ spoň 3 mm širokou. Použití spotřebiče UPOZORNĚNÍ Hrozí nebezpečí zranění, popálení, úrazu elektrickým proudem či výbuchu.
Bezpečnostní pokyny 7 Čištění a údržba UPOZORNĚNÍ Hrozí nebezpečí poranění, požáru nebo poškození spotřebiče. • Před čištěním nebo údržbou spotřebič vždy vypněte a vytáhněte síťovou zástrčku ze zá‐ suvky. • Přesvědčte se, že spotřebič už vychladl. Mohlo by dojít k prasknutí skleněných panelů. • Poškozené skleněné panely okamžitě vyměňte. Kontaktujte autorizované servisní středi‐ sko. • Při vyjímání dvířek spotřebiče buďte opatrní.
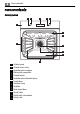
Popis spotřebiče POPIS SPOTŘEBIČE Celkový pohled 2 3 4 5 6 1 7 8 5 4 13 3 9 2 1 10 11 12 1 2 3 4 5 6 7 8 9 10 11 12 13 Ovládací panel Ovladač funkcí trouby Kontrolka/symbol napájení Elektronický programátor Ovladač teploty Kontrolka/symbol/ukazatel teploty Topné těleso Osvětlení trouby Ventilátor Zadní topné těleso Spodní ohřev Drážky roštů, odnímatelné Polohy roštů
Před prvním použitím Příslušenství trouby • Drátěný rošt Pro nádoby na pečení, dortové a koláčové formy, pečeně. • Plech na pečení Na koláče a sušenky. • Hluboký plech na pečení / grilování Pro pečení moučných jídel a masa, nebo k zachycování tuku. • Vysunovací kolejničky Pro rošty a plechy na pečení. PŘED PRVNÍM POUŽITÍM UPOZORNĚNÍ Viz kapitola „Bezpečnostní informace“.
Denní používání První čištění • Vyjměte ze spotřebiče všechno příslušenství. • Před prvním použitím spotřebič vyčistěte. Řiďte se částí „Čištění a údržba“. První připojení k elektrické síti Po prvním připojení spotřebiče k elektrické síti se na displeji na několik sekund rozsvítí vše‐ chny symboly. Následujících několik sekund se na displeji zobrazuje verze software. Nastavení denního času Když zhasne verze softwaru, zobrazí se na displeji a „12:00“. „12“ bliká. 1.
Denní používání 11 Funkce trouby Funkce trouby Rychlé zahřátí Použití Zkracuje dobu rozehřátí. Pravý horký vzduch K pečení masa a moučných jídel na maximálně třech úrovních současně. Snižte teplotu trouby (o 20–40 °C) v porovnání s Konvenčním ohřevem. Vhodné také pro su‐ šení potravin. Příprava pizzy K pečení jídel, která vyžadují propečenější a křupavější spodek, na jedné úrovni. Snižte teplotu trouby (o 20–40 °C) v porovnání s Konvenčním ohřevem.
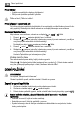
Funkce hodin Displej 1 Časovač 2 Ukazatel Ohřevu / Zbytkového tepla 3 Zásobník vody (pouze u vybraných modelů) 4 Pečicí sonda (pouze u vybraných mo‐ delů) 5 Blokování dvířek (pouze u vybraných modelů) 6 hod / min 7 Funkce hodin 7 1 7 2 6 5 3 4 Tlačítka Tlačítko Funkce , Popis HODINY Nastavení funkce hodin. MÍNUS, PLUS Nastavení hodnoty času MINUTKA Nastavení funkce minutky. Pokud chcete za‐ pnout/vypnout osvětlení vnitřku trouby, pod‐ ržte tlačítko alespoň 3 sekundy.
Funkce hodin SYMBOL 13 FUNKCE POPIS KONEC Používá se jen v případě, že je nastavená funkce trouby, a to k nastavení, kdy se má trouba vypnout. Funkce Trvání a Ko‐ nec lze použít současně (Časové odložení) pro naprogramo‐ vání automatického zapnutí a pozdějšího vypnutí trouby. Mezi funkcemi hodin se přepíná opakovaným zmáčknutím Pokud chcete nastavení funkce hodin potvrdit, použijte matické potvrzení. . nebo počkejte 5 sekund na auto‐ Nastavení funkce TRVÁNÍ nebo UKONČENÍ 1. 2. 3. 4. 5. 6.
Použití příslušenství Měřič času Měřič času můžete použít ke zjištění, jak dlouho je trouba v provozu. Zapne se ihned, jak začne trouba hřát. Vynulování měřiče času: stiskněte a podržte a měřič začne počítat znovu. Měřič času nelze použít, pokud nastavena funkce Trvání nebo Konec. POUŽITÍ PŘÍSLUŠENSTVÍ UPOZORNĚNÍ Viz kapitola „Bezpečnostní informace“. Instalace příslušenství trouby Hluboký plech a tvarovaný rošt mají po stranách přesahující okraje.
Doplňkové funkce 15 Vysunovací drážky - vložení příslušenství trouby Vložte mělký nebo hluboký plech na pečení do vy‐ sunovacích drážek. Zasuňte drátěný rošt do vysunovacích drážek tak, aby nožičky směřovaly dolů. Zvýšený okraj drátěného roštu je dalším zajiště‐ ním proti sklouznutí nádoby na pečení. Společné vložení drátěného roštu a hlubokého plechu Drátěný rošt položte na hluboký plech. Drátěný rošt a hluboký plech na pečení umístěte na vysu‐ novací drážky.
Doplňkové funkce Blokování tlačítek Týká se pouze modelů s pyrolytickým čištěním Funkce blokování tlačítek brání náhodné změně funkce trouby. Funkci blokování tlačítek můžete zapnout pouze, když je spotřebič v provozu. Zapnutí či vypnutí funkce blokování tlačítek: 1. Zapněte spotřebič. 2. Zapněte funkci trouby nebo zvolte nastavení. 3. Na dvě sekundy stiskněte a podržte současně a . 4. Zazní zvukový signál.
Užitečné rady a tipy 17 Ukazatel zbytkového tepla Na displeji je zobrazen ukazatel zbytkového tepla po skončení každého pečení, když je teplota uvnitř trouby vyšší než 40 °C. Pomocí otočného ovladače Teplota zobrazíte teplotu trouby na displeji. Chladicí ventilátor Když je spotřebič v provozu, chladicí ventilátor se automaticky zapne, aby udržoval povrch spotřebiče chladný. Jestliže spotřebič vypnete, bude chladicí ventilátor pokračovat v chlaze‐ ní až do úplného ochlazení spotřebiče.
Užitečné rady a tipy Při pečení zmrazeného jídla se mohou plechy v troubě během pečení zkroutit. Po ochlazení se opět vyrovnají. Jak používat tabulky pro pečení • Doporučujeme vždy nejprve použít nižší teplotu. • Jestliže nemůžete najít nastavení pro určitý recept, snažte se vybrat podobné jídlo. • Při pečení moučníků na několika úrovních drážek může být doba pečení o 10-15 minut delší. • Různě vysoké moučníky a pečivo mohou nejprve nerovnoměrně zhnědnout. V takovém případě ale hned neměňte teplotu.
Užitečné rady a tipy 19 Koláče / sladké pečivo / chléb na plechu na pečení Druh pečení Funkce trouby Poloha roštu Teplota °C Čas v minutách Kynutá pletýnka/ věnec Konvenční ohřev 3 170 - 190 30 - 40 Vánoční štola Konvenční ohřev 2 160 - 180 1) 50 - 70 Chléb (žitný chléb): 1. První část procesu pe‐ čení. 2. Druhá část procesu pe‐ čení.
Užitečné rady a tipy Druh pečení Funkce trouby Poloha roštu Teplota °C Čas v minutách Short bread / Má‐ slové sušenky / Proužky těsta Konvenční ohřev 3 160 1) 20 - 30 Sušenky z piško‐ tového těsta Pravý horký vzduch 3 150 - 160 15 - 20 Sněhové pusinky Pravý horký vzduch 3 80 - 100 120 - 150 Makronky Pravý horký vzduch 3 100 - 120 30 - 50 Sušenky z kynu‐ tého těsta Pravý horký vzduch 3 150 - 160 20 - 40 Drobné pečivo z listového těsta Pravý horký vzduch 3 170 - 1801) 20
Užitečné rady a tipy 21 Sušenky / small cakes / malé koláčky / sladké pečivo / slané pečivo Pravý horký vzduch Druh pečení Poloha roštu Teplota ve °C Čas v minutách 2 úrovně 3 úrovně Sušenky z křehkého těsta 1/4 1/3/5 150 - 160 20 - 40 Short bread / Má‐ slové sušenky / Proužky těsta 1/4 1/3/5 140 25 - 50 Sušenky z piško‐ tového těsta 1/4 - 160 - 170 25 - 40 Čajové pečivo z vaječného bílku, sněhové pusinky 1/4 - 80 - 100 130 - 170 Makronky 1/4 - 100 - 120 40 - 80 Sušenky z ky
Užitečné rady a tipy Výsledek pečení Možná příčina Řešení Koláč hnědne nerovnoměrně. Teplota trouby je příliš vysoká a doba pečení je příliš krátká. Nastavte nižší teplotu pečení a prodlužte dobu pečení. Koláč hnědne nerovnoměrně. Směs je nerovnoměrně rozlo‐ žena. Směs rovnoměrně rozložte na plech na pečení. Koláč není při dané délce peče‐ ní hotový. Teplota trouby je příliš nízká. Při příštím pečení nastavte tro‐ chu vyšší teplotu trouby.
Užitečné rady a tipy 23 Druh masa Množství Funkce trou‐ by Poloha roštu Teplota °C Čas v minu‐ tách Hovězí pečeně nebo filet: nepro‐ pečené na cm tloušť‐ ky Turbo gril 1 190 - 200 1) 5-6 Hovězí pečeně nebo filet: středně propečené na cm tloušť‐ ky Turbo gril 1 180 - 190 1) 6-8 Hovězí pečeně nebo filet: dobře propečené na cm tloušť‐ ky Turbo gril 1 170 - 180 1) 8 - 10 Druh masa Množství Funkce trou‐ by Poloha roštu Teplota °C Čas v minu‐ tách Plec, krkovice, kýta v celku 1 -
Užitečné rady a tipy Druh masa Množství Funkce trouby Poloha roštu Teplota °C Čas v minu‐ tách Kýta z vysoké zvěře 1,5 - 2 kg Konvenční ohřev 1 180 - 200 60 - 90 Druh masa Množství Funkce trouby Poloha roštu Teplota °C Čas v minu‐ tách Kusy drůbeže 200 - 250 g každý Turbo gril 1 200 - 220 30 - 50 Půlka kuřete 400 - 500 g každý Turbo gril 1 190 - 210 35 - 50 Kuře, brojler 1 - 1,5 kg Turbo gril 1 190 - 210 50 - 70 Kachna 1,5 - 2 kg Turbo gril 1 180 - 200 80 - 100
Užitečné rady a tipy Jídlo ke grilování Celé ryby, 500– 1000 g Poloha roštu Teplota 3/4 210 - 230 25 Čas v minutách 1. strana 2. strana 15 - 30 15 - 30 Velkoplošný gril Jídlo ke grilování Poloha roštu Čas v minutách 1. strana 2.
Užitečné rady a tipy Nezakrývejte je talířem ani miskou. Mohlo by tak dojít k prodloužení doby rozmrazování. Použijte první polohu roštu trouby. Jedná se o spodní úroveň. Doba rozmrazo‐ vání v minutách Následující doba roz‐ mrazování v minutách Poznámka Kuře, 1000 g 100 - 140 20 - 30 Kuře položte na obrácený podšálek ve velkém talíři a v polovině doby obraťte.
Čištění a údržba 27 Zelenina Teplota ve °C Zavařování do začátku perlení v minutách Další vaření při 100 °C v minutách Karotka/mrkev 1) 160 - 170 50 - 60 5 - 10 Okurky 160 - 170 50 - 60 - Nakládaná zelenina 160 - 170 50 - 60 5 - 10 Kedlubny, hrášek, chřest 160 - 170 50 - 60 15 - 20 Zavařování 1) Nechte dojít ve vypnuté troubě Sušení - Pravý horký vzduch Na rošty trouby položte papír na pečení. Pro dosažení nejlepších výsledků: vypněte spotřebič v polovině potřebné doby.
Čištění a údržba Poznámky k čištění: • Přední stranu spotřebiče otřete měkkým hadříkem namočeným v roztoku teplé vody a či‐ sticího prostředku. • K čištění kovových ploch používejte běžný čisticí prostředek. • Vnitřek spotřebiče čistěte po každém použití. Nečistoty se pak snadněji odstraňují a nepřipékají se. • Odolné nečistoty odstraňte pomocí speciálního prostředku k čištění trouby.
Čištění a údržba 29 POZOR Na dno vnitřku spotřebiče položte měkkou látku. Zabráníte tak poškození krytu žárovky a vnitřku trouby. Výměna žárovky trouby: 1. Skleněný kryt žárovky se nachází na stropě vnitřku trouby. Skleněným krytem otočte proti směru hodinových ručiček a sejměte jej. 2. Skleněný kryt vyčistěte. 3. V případě potřeby vyměňte žárovku trouby za novou, odolnou do teploty 300 °C. Použijte žárovku stejného typu. 4. Nasaďte skleněný kryt.
Co dělat, když... 2. 3. 4. Stiskněte upínací páčky (A) na obou dveřních závěsech až na doraz. Dvířka přivřete až k první zarážce (úhel přibl. 70°). Oběma rukama podržte dvířka a vytáh‐ něte je směrem šikmo vzhůru od trouby. A A Při instalaci dvířek proveďte stejný postup v opačném pořadí. Počet skleněných panelů se liší dle modelu. POZOR Dvířka položte vnější stranou dolů na měkkou a rovnou podložku, aby se nepoškrábala. Vytažení a vyčištění skleněných panelů dvířek 1. Odstraňte dvířka. 2.
Technické údaje Problém Možná příčina 31 Řešení Trouba nehřeje Hodiny nejsou nastavené Nastavte hodiny. Viz „Nastave‐ ní hodin“ Trouba nehřeje Nejsou provedena nutná nasta‐ Zkontrolujte, zda jsou nastave‐ vení ní správná Trouba nehřeje Je zapnutá funkce automatic‐ kého vypnutí Viz „Automatické vypnutí“ Trouba nehřeje Je uvolněná pojistka Zkontrolujte, zda příčinou záva‐ dy není pojistka. Pokud se po‐ jistka uvolňuje opakovaně, ob‐ raťte se na autorizovaného elektrikáře.
důsledkům pro životní prostředí a lidské zdraví, které by jinak byly způsobeny nevhodnou likvidací tohoto výrobku. Podrobnější informace o recyklaci tohoto výrobku zjistíte u příslušného místního úřadu, služby pro likvidaci domovního odpadu nebo v obchodě, kde jste výrobek zakoupili. Obalové materiály Obalový materiál neškodí životnímu prostředí a je recyklovatelný. Plastové díly jsou označe‐ ny mezinárodními zkratkami jako PE, PS apod.
www.aeg.