BE7304151 NL OVEN GEBRUIKSAANWIJZING
VOOR PERFECTE RESULTATEN Bedankt dat u voor dit AEG product heeft gekozen. Dit apparaat is ontworpen om vele jaren uitstekend te presteren, met innovatieve technologieën die het leven gemakkelijker helpen maken – functies die gewone apparaten wellicht niet hebben. Neem een paar minuten de tijd om het door te lezen zodat u er optimaal van kunt profiteren.
Inhoud 3 INHOUD 4 7 9 10 12 14 16 18 20 22 26 27 Veiligheidsinformatie Beschrijving van het product Voor het eerste gebruik Bedieningspaneel Dagelijks gebruik Klokfuncties Automatische programma's Gebruik van de accessoires Extra functies Onderhoud en reiniging Problemen oplossen Milieubescherming In deze gebruiksaanwijzing worden de volgende symbolen gebruikt: Belangrijke informatie over uw persoonlijke veiligheid en informatie over het voorkomen van schade aan het apparaat.
Veiligheidsinformatie VEILIGHEIDSINFORMATIE Lees deze handleiding zorgvuldig alvorens het apparaat te installeren of te gebruiken: • Voor uw eigen veiligheid en de veiligheid van uw eigendommen • Uit respect voor het milieu • Voor de correcte werking van het apparaat. Bewaar deze instructies altijd bij het apparaat, ook wanneer u het verplaatst of verkoopt. De fabrikant is niet verantwoordelijk voor schade veroorzaakt door een foutieve installatie of foutief gebruik.
Veiligheidsinformatie 5 • De elektrische installatie moet een isolatieapparaat bevatten waardoor het apparaat volledig van het lichtnet afgesloten kan worden. Het isolatieapparaat moet een contactopening hebben met een minimale breedte van 3mm. • U dient te beschikken over de juiste isolatievoorzieningen: stroomonderbrekers, zekeringen (schroefzekeringen moeten uit de houder worden verwijderd), aardlekschakelaars en contactgevers.
Veiligheidsinformatie – plaats heet water niet direct in het apparaat; – haal vochtige schotels en eten uit het apparaat als u klaar bent met koken. • Verkleuring van het emaille heeft geen effect op de werking van het apparaat, het is dus geen defect in de zin van het recht op garantie. • Oefen geen kracht uit op een geopende deur. • De deur dient altijd gesloten te worden bij het koken, ook tijdens het grillen.
Beschrijving van het product 7 • Als de lamp moet worden vervangen, moet u een lamp gebruiken die hetzelfde vermogen heeft en uitsluitend is bedoeld voor gebruik in huishoudelijke apparaten. • Haal de stekker van het apparaat uit het stopcontact voordat u de ovenlamp vervangt. Er bestaat risico op een elektrische schok. Service-afdeling • Alleen een bevoegd servicemonteur mag dit apparaat repareren. Neem contact op met de service-afdeling. • Gebruik alleen originele reserveonderdelen.
Beschrijving van het product 4 5 6 7 8 9 10 Verwarmingselement Ovenlampje Ventilator Verwarmingselement achterwand Onderwarmte Reksteunen, verwijderbaar Rekstanden Ovenaccessoires • Bakrooster Voor servies, bak- en braadvormen. • Bakplaat Voor gebak en koekjes. • Combischaal Voor gebak en koekjes. Voor braden en roosteren of als pan om vet op te vangen.
Voor het eerste gebruik 9 • Kerntemperatuursensor Voor het vaststellen van het gaarpunt van het gerecht. VOOR HET EERSTE GEBRUIK WAARSCHUWING! Zie het hoofdstuk 'Veiligheidsinformatie'. Eerste reiniging • Verwijder alle onderdelen van het apparaat. • Reinig het apparaat voor het eerste gebruik. Zie het hoofdstuk "Onderhoud en reiniging". Eerste aansluiting op het elektriciteitsnet Na de eerste aansluiting op het elektriciteitsnet, blijven alle symbolen op het display enkele seconden branden.
Bedieningspaneel BEDIENINGSPANEEL Elektronische tijdschakelklok 1 2 3 4 5 6 7 8 9 10 Gebruik de sensorvelden om het apparaat te bedienen. Sensorveld Functie - DISPLAY Toont de huidige instellingen van het apparaat. 2 AAN/UIT Het apparaat in- en uitschakelen. 3 OPTIES Een ovenfunctie of programma instellen. Rechtstreekse toegang tot de ovenfunctie wanneer het apparaat is uitgeschakeld. 4 MIJN FAVORIETE PROGRAMMA U kunt uw favoriete programma opslaan.
Bedieningspaneel Sensorveld Functie Beschrijving KOOKWEKKER 10 De timer met aftelfunctie instellen. Display 1 2 7 1 2 3 4 5 6 7 3 6 5 4 Ovenfunctiesymbool Display Temperatuur/tijd Display van de klok/restwarmte (ook de kookwekker en dagtijd) Restwarmte-indicatie Indicatie voor de klokfuncties (zie de tabel "Klokfuncties") Voorverwarmindicatie Nummer van de ovenfunctie/het programma Andere indicators op het display Symbolen / / Naam Beschrijving Opties U kunt een ovenfunctie kiezen.
Dagelijks gebruik Voorverwarmindicatie Als u een ovenfunctie instelt, lichten de balkjes in het display één voor één op. De balkjes geven aan dat de temperatuur in het apparaat toe- of afneemt. Wanneer het apparaat de ingestelde temperatuur heeft bereikt, verdwijnt de voorverwarmindicatie van het display. DAGELIJKS GEBRUIK WAARSCHUWING! Zie het hoofdstuk 'Veiligheidsinformatie'. U kunt het apparaat gebruiken in: • handmatige modus -u stelt de ovenfunctie, de temperatuur en de kooktijd handmatig in.
Dagelijks gebruik Ovenfunctie 13 Toepassing 6 Circulatiegrill 7 Snel grillen 8 Grill 9 Warmhouden 10 Ontdooien 11 Onderwarmte Voor het bakken van taarten met een knapperige bodem en het bewaren van voedsel. 12 ECO Braden Dankzij ECO-functies kunt u het energieverbruik tijdens het koken optimaliseren. Het is daarom nodig om de kooktijd eerst in te stellen. Voor meer informatie over de aanbevolen instellingen raadpleegt u de kooktabellen met de equivalente normale ovenfunctie.
Klokfuncties De snelwarmfunctie is niet bij elke ovenfunctie beschikbaar. Er is een geluidssignaal te horen als de snelwarmfunctie niet voor de ingestelde functie beschikbaar is. Energie besparen Het apparaat beschikt over enkele functies waarmee u tijdens het dagelijks koken energie kunt besparen: • Restwarmte: – De ovenfunctie of het programma is in werking: de verwarmingselementen worden 10% eerder uitgeschakeld (de lamp en ventilator blijven wel in werking).
Klokfuncties 15 U kunt de timer met optelfunctie niet gebruiken als Duur of Einde is ingesteld. De duur instellen 1. Activeer het apparaat en stel een ovenfunctie en de temperatuur in. 2. Raak herhaaldelijk aan totdat het display weergeeft. knippert op het display. of aan om de minuten van 3. Raak de DUUR in te stellen. aan om te bevestigen 4. Raak of aan om de uren van de DUUR in te stellen. 5.
Automatische programma's Het display geeft en met een punt weer. Deze punt wordt weergegeven wanneer de klokfunctie wordt geactiveerd. 5. Raak een sensorveld aan (behalve AAN/UIT) om de functie SET+GO te starten. U kunt de functie SET+GO alleen gebruiken als de DUUR is ingesteld. Resultaat controleren (alleen geselecteerde modellen) Als u de functie EINDE of DUUR instelt, weerklinkt er 2 minuten voor het einde van de kooktijd een geluidssignaal en gaat de lamp aan.
Automatische programma's 17 Er zijn drie soorten automatische programma's: • Automatische recepten • Automatische programma's met gewichtinvoer • Automatische programma's met kerntemperatuursensor; Automatische recepten Een automatisch recept instellen: 1. Raak twee keer aan totdat het display weergeeft. Het display geeft het symbool en nummer van het automatische programma weer. of aan om de automatische recepten te kiezen. 2. Raak aan. Anders start het automatische recept na vijf seconden automatisch.
Gebruik van de accessoires 5. Wanneer de ingestelde tijd is verlopen, weerklinkt er gedurende twee minuten een geluidssignaal. knippert. Het apparaat wordt uitgeschakeld. 6. Raak een sensorveld aan, of open de ovendeur om het geluidssignaal te stoppen. Functie mijn favoriete programma Gebruik deze functie om uw favoriete temperatuur- en tijdinstellingen voor een ovenfunctie of programma op te slaan. 1. Stel de temperatuur en tijd voor een ovenfunctie of programma in. 2.
Gebruik van de accessoires 19 2. Steek de punt van de kerntemperatuurop de hensensor (met het symbool del) in het midden van het vlees. 3. Steek de stekker van de kerntemperatuursensor in de aansluiting op de voorkant van het apparaat. Het display geeft een knipperend symbool en de standaardinstelling voor de kerntemperatuur weer. De temperatuur bedraagt 60° C bij het eerste gebruik, en de laatst ingestelde waarde bij elk volgend gebruik. of aan om de kerntempera4. Raak tuur in te stellen. aan.
Extra functies Wanneer u kookt met de kerntemperatuursensor, kunt u de temperatuur in het display temperatuur/tijd wijzigen. Nadat u de kerntemperatuursensor in de aansluiting hebt geplaatst en een ovenfunctie en -temperatuur hebt ingesteld, geeft het display de huidige kerntemperatuur weer. Raak telkens opnieuw aan om drie andere temperaturen te zien: • De huidige kerntemperatuur • De ingestelde oventemperatuur • De huidige oventemperatuur.
Extra functies 21 2. Raak en tegelijkertijd aan en houd beide opties minimaal 2 seconden ingedrukt. 3. Er klinkt een geluidssignaal. SAFE gaat aan in het display wanneer u een willekeurige toets aanraakt. Als de oven beschikt over de functie voor pyrolytisch reinigen, wordt de deur vergrendeld. Toetsblokkering De toetsblokkering voorkomt dat u de ovenfuncties per ongeluk verandert. U kunt de toetsblokkering alleen inschakelen als het apparaat in werking is. De toetsblokkering inschakelen: 1.
Onderhoud en reiniging 2. Raak gedurende drie seconden aan. Het display geeft "SET1" weer en "1" knippert. / aan om de instelling te bevestigen. 3. Raak aan. 4. Raak / aan om de waarde van de instelling te wijzigen. 5. Raak aan. 6. Raak Automatische uitschakeling Om veiligheidsredenen wordt het apparaat na een tijdje automatisch uitgeschakeld: • Als een ovenfunctie in werking is. • Als u de oventemperatuur niet verandert. Oventemperatuur Uitschakeltijd 30 °C -120 °C 12,5 u. 120 °C - 200 °C 8,5 u.
Onderhoud en reiniging 23 Opmerkingen over schoonmaken: • Maak de voorkant van het apparaat schoon met een zachte doek en een warm sopje. • Gebruik voor de metalen oppervlakken een universeel reinigingsmiddel. • Reinig de binnenkant van de oven na elk gebruik. Verontreiningen laten zich dan het makkelijkst verwijderen en kunnen dan niet aanbranden. • Verwijder hardnekkig vuil met een speciale ovenreiniger.
Onderhoud en reiniging LET OP! Leg een doek op de bodem van de binnenkant van het apparaat. Dit voorkomt schade aan het afdekglas en de ovenruimte. Het ovenlampje vervangen: 1. Het afdekglas van het lampje bevindt zich in de bovenkant. Draai het afdekglas naar links om het te verwijderen. 2. Reinig het afdekglas. 3. Vervang indien nodig de ovenlamp met een 300 °C hittebestendige ovenlamp. Gebruik hetzelfde ovenlamptype. 4. Plaats het afdekglas terug. Het ovenlampje vervangen: 1.
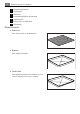
Onderhoud en reiniging Neerklappen van het verwarmingselement 1. De inschuifrails verwijderen. 2. Houd het verwarmingselement aan de voorzijde met beide handen vast. 3. Trek het naar voren tegen de drukveer aan langs de steun aan beide zijden. 4. Het verwarmingselement klapt omlaag. Het plafond in de oven kan nu worden schoongemaakt. Verwarmingselement installeren 1. Installeer het verwarmingselement in omgekeerde volgorde.
Problemen oplossen 2. Deurafdekking (B) aan de bovenkant van de deur aan beide kanten vastpakken en naar binnen drukken om de klemsluiting te ontgrendelen. 3. Trek de deurafdekking naar voren om deze te verwijderen. B 4. Houd de glasplaten aan de bovenkant vast en trek deze een voor een omhoog uit de geleiding 5. Reinigen van de glasplaten. Om de platen te installeren volgt u de procedure in omgekeerde volgorde. Plaats de kleinste glasplaat eerst, daarna de grotere glasplaten.
Milieubescherming Probleem 27 Mogelijke oorzaak Oplossing Op de display verschijnt F102. De deurvergrendeling is defect • Sluit de deur correct • Schakel het apparaat uit via de huiszekering of de veiligheidsschakelaar in de zekeringkast en schakel deze weer in • Neem contact op met de klantenservice als F102 opnieuw wordt weergegeven.
www.aeg-electrolux.