ES Manual de instrucciones Horno BE7004101M BE730410WM BE730417IM
www.aeg.com CONTENIDO 1. INFORMACIÓN SOBRE SEGURIDAD....................................................................... 3 2. INSTRUCCIONES DE SEGURIDAD............................................................................4 3. DESCRIPCIÓN DEL PRODUCTO............................................................................... 7 4. PANEL DE MANDOS.................................................................................................. 8 5. ANTES DEL PRIMER USO........................
ESPAÑOL 1. 3 INFORMACIÓN SOBRE SEGURIDAD Antes de instalar y utilizar el aparato, lea atentamente las instrucciones facilitadas. El fabricante no se hace responsable de lesiones o daños producidos como resultado de una instalación o un uso incorrectos: Conserve siempre estas instrucciones en lugar seguro y accesible para futuras consultas. 1.
www.aeg.com • • • • • • • • necesario mantener alejados a los niños de menos de 8 años salvo que estén bajo supervisión continua. Utilice siempre guantes de horno cuando introduzca o retire accesorios o utensilios refractarios. Antes de realizar tareas de mantenimiento, desenchufe el aparato de la red eléctrica. Asegúrese de que el aparato está desconectado antes de reemplazar la lámpara con el fin de impedir que se produzca una descarga eléctrica.
ESPAÑOL 2.2 Conexión eléctrica ADVERTENCIA! Riesgo de incendios y descargas eléctricas. • Todas las conexiones eléctricas deben realizarlas electricistas cualificados. • El aparato debe conectarse a tierra. • Asegúrese de que los parámetros de la placa de características son compatibles con los valores eléctricos del suministro eléctrico. • Utilice siempre una toma con aislamiento de conexión a tierra correctamente instalada. • No utilice adaptadores de enchufes múltiples ni cables prolongadores.
www.aeg.com • • • • • – No ponga agua directamente en el aparato caliente. – No deje platos húmedos ni comida en el aparato una vez finalizada la cocción. – Preste especial atención al desmontar o instalar los accesorios. La pérdida de color del esmalte o el acero inoxidable no afecta al rendimiento del aparato. Utilice una bandeja honda para pasteles húmedos. Los jugos de las frutas podrían ocasionar manchas permanentes. Este aparato está diseñado exclusivamente para cocinar.
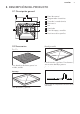
ESPAÑOL 7 3. DESCRIPCIÓN DEL PRODUCTO 3.1 Descripción general 1 2 3 4 5 5 4 8 3 6 2 1 1 2 3 4 5 6 7 8 Panel de control Programador electrónico Toma de la sonda térmica Resistencia Luz Ventilador Carril de apoyo, extraíble Posiciones de las parrillas 7 3.2 Accesorios Bandeja combi Parrilla Para bandejas de horno, pastel en molde, asados. Para bizcochos y galletas. Para hornear y asar o como bandeja grasera. Sonda térmica Bandeja Para bizcochos y galletas.
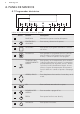
www.aeg.com 4. PANEL DE MANDOS 4.1 Programador electrónico 1 2 3 4 5 6 7 8 9 10 Utilice los sensores para accionar el aparato. Sensor 1 2 3 - Función Descripción PANTALLA Muestra los ajustes actuales del aparato. ENCENDIDO / APAGADO Para activar y desactivar el aparato. OPCIONES Para ajustar un programa automático o función del horno. FAVORITOS Para guardar sus programas favoritos. Utilícelo para acceder a su programa favorito directamente, o cuando el aparato esté apagado.
ESPAÑOL 9 4.2 Pantalla A B G C F E D A. Símbolo de la función del horno B. Visualización de la temperatura / hora actual C. Visualización de Reloj/Calor residual/ Avisador D. Indicador de calor residual E. Indicadores de las funciones de reloj F. Indicador de calentamiento / Indicador de calentamiento rápido G. Número de función del horno/ programa Otros indicadores de la pantalla: Símbolo / / Nombre Descripción Funciones Puede elegir una función del horno.
www.aeg.com 5. ANTES DEL PRIMER USO ADVERTENCIA! Consulte los capítulos sobre seguridad. Para ajustar la hora actual, consulte el capítulo "Funciones del reloj". Consulte el capítulo "Mantenimiento y limpieza". Limpie el horno y los accesorios antes del primer uso. Coloque los accesorios y soportes telescópicos extraíbles en su posición inicial. 5.1 Limpieza inicial Retire todos los accesorios y carriles de apoyo extraíbles del horno. 6.
ESPAÑOL Función del horno 11 Aplicación Grill Rápido Para asar al grill grandes cantidades de alimentos de poco espesor y tostar pan. Grill Para asar al grill alimentos de poco espesor y tostar pan. Turbo Plus Para hornear panes, tartas y pasteles. Para ahorrar energía durante la cocción. Esta función se debe usar de conformidad con la tabla de cocción Turbo plus para lograr los resultados de cocción deseados.
www.aeg.com 6.5 Consulta de la temperatura Puede ver la temperatura del aparato cuando esté en uso la función o el programa. 1. Toque . La pantalla de Temperatura / Hora muestra la temperatura del aparato. para volver a la 2. Toque temperatura ajustada o bien la pantalla la mostrará automáticamente después de cinco segundos. 6.6 Función de calentamiento rápido No coloque alimentos en el horno cuando esté en uso la función de calentamiento rápido.
ESPAÑOL 7.2 Programar y cambiar la hora Después de la primera conexión, espere hasta que en la pantalla aparezca y parpadee un 12:00. "12" flashes. 1. Toque horas. o 2. Toque o 3. Toque minutos. o para programar las . para programar los 4. Toque o . La pantalla muestra la hora nueva. Para cambiar la hora del día toque una y otra vez hasta que parpadear. empiece a 7.3 Programar la DURACIÓN 3. Use o 13 para programar el FIN y o para confirmar.
www.aeg.com Cuando el retraso del tiempo está activado, se muestra en la pantalla un símbolo estático de la función del horno, con un punto y . El punto muestra qué función del reloj está activada en el reloj / pantalla de calor residual. 7.6 Programar SET+GO Puede usar la función SET+GO solo cuando se programa la DURACIÓN 1. Programe una función del horno (o un programa) y la temperatura. 2. Programe la DURACIÓN. 3. Toque una y otra vez hasta que parpadee en la pantalla. 4.
ESPAÑOL Número del programa Nombre del programa 3 TERNERA ASADA 4 CORDERO ASADO 5 CAZA 6 POLLO ENTERO 7 FILETE DE PESCADO 8 PIZZA 9 QUICHE LORRAINE 10 BIZCOCHO AL LIMÓN 11 TARTA DE QUESO 12 ROLLITOS 13 PAN RÚSTICO 14 LEVANTAR MASA 15 PATATAS GRATINADAS 16 LASAÑA 17 CANELONES 18 PASTEL PRECOCINADO 19 PIZZA PRECOCINADA 20 PATATAS FRITAS PRECOCINADAS 8.2 Recetas online Encontrará las recetas para los programas automáticos propias de este aparato en nuestra página web.
www.aeg.com 2. Toque . 3. Toque o para ajustar el programa de peso. La pantalla muestra: el tiempo de cocción, el símbolo de duración , un peso por defecto y una unidad de medida (kg, g). o bien los ajustes se 4. Toque guardarán automáticamente después de cinco segundos. El aparato se enciende. 5. Puede cambiar el valor del peso por defecto con o . Toque . 6. Cuando termina el tiempo programado, se emite una señal acústica durante dos minutos. parpadea. 7.
ESPAÑOL 17 Cuando se cocina con el sensor de temperatura interna, puede cambiar la temperatura mostrada en la pantalla. Después de conectar el sensor a la toma y de ajustar una función y la temperatura del horno, la pantalla muestra la temperatura interna actual. Toque repetidamente para ver otras tres temperaturas: • la temperatura interior ajustada • la temperatura actual del horno • la temperatura interior actual. La pantalla muestra intermitente y la temperatura interior programada predeterminada.
www.aeg.com Parrilla y bandeja / bandeja honda juntas: Posicione la bandeja / bandeja honda entre las guías del carril de apoyo y la parrilla en las guías de encima. Bandeja / Bandeja honda: Posicione la bandeja / bandeja honda entre las guías del carril de apoyo. Las pequeñas hendiduras en la parte superior incrementan la seguridad. Las hendiduras también son dispositivos anti-vuelco. El borde elevado que rodea la bandeja evita que los utensilios de cocina resbalen de la parrilla. 10.
ESPAÑOL 19 1. Para activar la función, encienda el aparato. 2. Active una función o ajuste del horno. 10.4 Uso del menú de ajustes 3. Mantenga pulsado y al mismo tiempo durante 2 segundos. Sonará una señal acústica. Loc aparece en la pantalla. Para desactivar la Tecla de Bloqueo, repita el paso 3. El menú de ajustes sirve para activar o desactivar funciones del menú principal. La pantalla muestra SET y el número del ajuste. Puede configurar el menú de ajustes cuando el horno está apagado.
www.aeg.com 10.6 Brillo de la pantalla – si el aparato está apagado y se ajusta el Avisador. Cuando termina la función Avisador, la pantalla vuelve al brillo nocturno. Existen dos modos para el brillo de la pantalla: • Brillo nocturno: cuando el aparato está apagado, el brillo de la pantalla es inferior entre las 22:00 h y las 06:00 h. • Brillo diurno: – con el aparato encendido.
ESPAÑOL Resultado Posible causa 21 Solución La tarta se hunde y se queda La temperatura del horno es pegajosa o muestra estrías demasiado alta. de agua. La próxima vez, seleccione una temperatura ligeramente más baja para el horno. La tarta se hunde y se queda El tiempo de horneado es pegajosa o muestra estrías insuficiente. de agua. Seleccione un tiempo de horneado mayor. Los tiempos de horneado no se pueden reducir aumentando las temperaturas.
www.aeg.com Alimento Función Temperatura (°C) Tiempo (min) Posición de la parrilla Tarta de queso Bóveda/Calor Inferior 170 - 190 60 - 90 1 1) Precaliente el horno. Pasteles / hojaldres / pan en bandejas Alimento Función Pan de trenza / Roscones Pan de Navidad Temperatura (°C) Tiempo (min) Posición de la parrilla Bóveda/Calor Infe- 170 - 190 rior 30 - 40 3 Bóveda/Calor Infe- 160 - 1801) rior 50 - 70 2 Pan (pan de centeno): Bóveda/Calor Infe- 1. 1.
ESPAÑOL Galletas Alimento Función Temperatura (°C) Tiempo (min) Posición de la parrilla Galletas de masa quebrada Turbo 150 - 160 10 - 20 3 Galletas de ma- Turbo sa batida de bizcocho 150 - 160 15 - 20 3 Hojaldres con clara de huevo / Merengues Turbo 80 - 100 120 - 150 3 Mostachones De Almendra Turbo 100 - 120 30 - 50 3 Galletas de masa de levadura Turbo 150 - 160 20 - 40 3 Pastas de hojaldre Turbo 170 - 1801) 20 - 30 3 Rollitos Turbo 1601) 10 - 25 3 Rollitos Bóveda/
www.aeg.com Alimento Función Temperatura (°C) Tiempo (min) Posición de la parrilla Verduras rellenas Turbo 160 - 170 30 - 60 1 1) Precaliente el horno. 11.6 Turbo Plus Para obtener el mejor resultado, siga los tiempos de horneado indicados en la tabla siguiente.
ESPAÑOL 25 Galletas / small cakes / pastelillos / hojaldres / rollitos Alimento Temperatura (°C) Tiempo (min) 150 - 160 Posición de la parrilla 2 posiciones 3 posiciones 20 - 40 1/4 1/3/5 Galletas de ma- 160 - 170 sa batida de bizcocho 25 - 40 1/4 - Galletas de clara 80 - 100 de huevo, merengues 130 - 170 1/4 - Mostachones De Almendra 100 - 120 40 - 80 1/4 - Galletas de masa de levadura 160 - 170 30 - 60 1/4 - Pastas de hojaldre 170 - 1801) 30 - 50 1/4 - Rollitos 180 20 -
www.aeg.com Alimento Cantidad Temperatura (°C) Tiempo (min) Posición de la parrilla Ternera asada 1000 - 1500 g 120 120 - 150 1 Filetes 200 - 300 g 120 20 - 40 3 11.
ESPAÑOL • Para mantener la carne más jugosa: – prepare las carnes magras en una fuente de asado tapada o use una bolsa para asar. – utilice trozos de carne y pescado con un peso mínimo de 1 kg. 27 – durante la cocción, los asados grandes y las aves se deberían regar repetidamente con el jugo de asado. 11.
www.aeg.com Cordero Alimento Cantidad (kg) Función Temperatura Tiempo (°C) (min) Posición de la parrilla Pata de cordero / Cordero asado 1 - 1.5 Grill + Turbo 150 - 170 100 - 120 1 Espalda de cordero 1 - 1.5 Grill + Turbo 160 - 180 40 - 60 1 Alimento Cantidad (kg) Función Temperatura Tiempo (°C) (min) Lomo / Muslo de liebre hasta 1 Bóveda/ 2301) Calor inferior 30 - 40 1 Lomo de cor- 1.
ESPAÑOL 11.12 Grill 29 • Precaliente siempre el horno en vacío con la función de grill durante 5 minutos. • Hornee al grill con el ajuste máximo de temperatura. • Coloque la rejilla en el nivel recomendado en la tabla de uso. • La grasera debe ir siempre en el primer nivel inferior. • Cocine al grill solo trozos de carne o pescado poco gruesos. PRECAUCIÓN! Hornee al grill con la puerta del horno siempre cerrada.
www.aeg.
ESPAÑOL Alimento Cantidad (kg) Tiempo de Tiempo de descongela- descongelación (min) ción posterior (minutos) Comentarios Fresas 0.3 30 - 40 10 - 20 - Mantequilla 0.25 30 - 40 10 - 15 - Nata 2 x 0,2 80 - 100 10 - 15 Monte la nata aunque queden puntos ligeramente congelados. Pasteles 1.4 60 60 - 11.15 Conservar - Calor inferior • Utilice únicamente botes de conserva del mismo tamaño disponibles en el mercado.
www.aeg.com Verduras Alimento Temperatura (°C) Tiempo de cocción Continuar la cochasta que empiecen ción a 100 °C (min) a subir burbujas (min) Zanahorias1) 160 - 170 50 - 60 5 - 10 Pepinos 160 - 170 50 - 60 - Encurtidos variados 160 - 170 50 - 60 5 - 10 Colinabos/Guisantes/Espárragos 160 - 170 50 - 60 15 - 20 1) Deje reposar en el horno después de apagarlo. 11.16 Secar - Turbo • Cubra las bandejas con papel vegetal o de hornear.
ESPAÑOL 11.
www.aeg.com 11.18 Información para los institutos de pruebas Pruebas según EN 60350-1:2013 y IEC 60350-1:2011. Horneado en un solo nivel.
ESPAÑOL 35 Horneado en varios niveles. Galletas / small cakes / pastelillos / hojaldres / rollitos Alimento Función Temperatura (°C) Tiempo (min) Posición de la parrilla 2 posiciones 3 posiciones Short bread / Mante- Turbo. cados / Masa quebrada 140 25 - 45 1/4 1/3/ 5 Small cakes / Pastelillos (20 unidades por bandeja) 1501) 23 - 40 1/4 - Turbo. 1) Precaliente el horno.
www.aeg.com 4. Cuando se enfríe el horno, límpielo con una esponja suave humedecida. Los puntos o la decoloración de la superficie catalítica no afectan a las propiedades catalíticas. 12.4 Techo del horno 2. Tire del extremo trasero del carril de apoyo para despegarlo de la pared y extráigalo. 1 2 ADVERTENCIA! Apague el aparato antes de extraer la resistencia. Asegúrese de que el aparato está totalmente frío. Corre el riesgo de quemarse. Retire los carriles telescópicos.
ESPAÑOL 12.5 Extracción e instalación de la puerta Retire la puerta y los paneles internos de cristal para limpiarlos. El número de paneles de cristal es diferente según el modelo. ADVERTENCIA! Tenga cuidado al desmontar la puerta del aparato. Tenga en cuenta que la puerta pesa mucho. 1. Abra la puerta completamente. 2. Presione al máximo las palancas de bloqueo (A) de ambas bisagras de la puerta. A A 3.
www.aeg.com 2. Limpie la tapa de cristal. 3. Cambie la bombilla por otra apropiada termorresistente hasta 300 °C . 4. Coloque la tapa de cristal. La bombilla lateral 1. Retire el carril izquierdo para acceder a la bombilla. 2. Utilice un objeto estrecho y sin punta (por ejemplo, una cucharilla) para retirar la tapa de cristal. 3. Limpie la tapa de vidrio. 4. Cambie la bombilla por otra apropiada termorresistente hasta 300 °C. 5. Coloque la tapa de cristal. 6. Coloque el carril lateral izquierdo. 13.
ESPAÑOL 39 Problema Posible causa Solución El horno no calienta. Ha saltado el fusible. Compruebe si el fusible es la causa del fallo de funcionamiento. Si el fusible se funde repetidamente, consulte a un electricista cualificado. La bombilla no funciona. La bombilla es defectuosa. Sustituya la bombilla. La pantalla no muestra la ho- La pantalla está apagada. ra si está apagada. Toque y al mismo tiempo para volver a activar la pantalla. La sonda térmica no funciona.
www.aeg.com Es conveniente que anote los datos aquí: Modelo (MOD.) ......................................... Número de producto (PNC) ......................................... Número de serie (S.N.) ......................................... 14. DATOS TÉCNICOS 14.1 Datos técnicos Voltaje 220 - 240 V Frecuencia 50 Hz 15. EFICACIA ENERGÉTICA 15.
ESPAÑOL 15.2 Ahorro de energía 41 tiempo (Duración o Fin) y el tiempo de cocción es superior a 30 minutos, las resistencias se desactivan antes automáticamente. El horno tiene características que le ayudan a ahorrar energía durante la cocina de cada día. La bombilla y el ventilador siguen funcionando. Consejos generales Asegúrese de que la puerta del horno está cerrada correctamente cuando el aparato funcione. No abra la puerta del aparato muchas veces durante la cocción.
www.aeg.
ESPAÑOL 43
867303686-H-272017 www.aeg.