BE7314401M BE7314421M BE731442PM BE731440CM BE731442CM BE731440NM BE731442NM CS Návod k použití
www.aeg.com OBSAH 1. 2. 3. 4. 5. 6. 7. 8. 9. 10. 11. 12. 13. 14. BEZPEČNOSTNÍ INFORMACE . . . . . . . . . . . . . . . . . . . . . . . . . . . . . . . . . . . . . . . . . . . . . 3 BEZPEČNOSTNÍ POKYNY . . . . . . . . . . . . . . . . . . . . . . . . . . . . . . . . . . . . . . . . . . . . . . . . 4 POPIS SPOTŘEBIČE . . . . . . . . . . . . . . . . . . . . . . . . . . . . . . . . . . . . . . . . . . . . . . . . . . . . 6 PŘED PRVNÍM POUŽITÍM . . . . . . . . . . . . . . . . . . . . . . . . . . . . . . . . .
ČESKY 3 1. BEZPEČNOSTNÍ INFORMACE Tento návod si pečlivě přečtěte ještě před instalací spotřebiče a jeho prvním použitím. Výrobce nezodpoví‐ dá za škody a zranění způsobená nesprávnou instalací či chybným používáním. Návod k použití vždy uchová‐ vejte spolu se spotřebičem pro jeho budoucí použití. 1.1 Bezpečnost dětí a postižených osob UPOZORNĚNÍ Hrozí nebezpečí udušení, úrazu nebo jiných trva‐ lých následků.
www.aeg.com • Před údržbou odpojte spotřebič od napájení. • Nepoužívejte drsné čisticí prostředky nebo ostré ko‐ vové škrabky k čistění skleněných dvířek, mohly by poškrábat povrch, což by mohlo následně vést k roz‐ bití skla. • Používejte pouze pečicí sondu doporučenou k tomuto spotřebiči. • K odstranění drážek na rošty nejprve odtáhněte přední a poté zadní konec drážek na rošty od stěny trouby. Drážky na rošty instalujte stejným postupem v opačném pořadí.
ČESKY • • • • • musí být připevněna tak, aby nešla odstranit bez použití nástrojů. Síťovou zástrčku zapojte do síťové zá‐ suvky až na konci instalace spotřebi‐ če. Po instalaci musí zůstat síťová zá‐ strčka nadále dostupná. Pokud je síťová zásuvka uvolněná, nezapojujte do ni síťovou zástrčku. Neodpojujte spotřebič ze zásuvky ta‐ hem za kabel. Vždy tahejte za zá‐ strčku.
www.aeg.com • Zbytky tuků či jídel ve spotřebiči mo‐ hou způsobit požár. • Vyčistěte spotřebič vlhkým měkkým hadrem. Používejte pouze neutrální mycí prostředky. Nepoužívejte prostředky s drsnými částicemi, drá‐ těnky, rozpouštědla nebo kovové předměty. • Použijete-li sprej do trouby, řiďte se bezpečnostními pokyny uvedenými na jeho balení. • Katalytický smalt (je-li součástí výba‐ vy) nečistěte žádným druhem čisticího prostředku. 2.
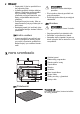
ČESKY 7 Plech na pečení Na koláče a sušenky. Hluboký pekáč / plech K pečení moučných jídel a masa, nebo k zachycování tuku. Pečicí sonda Používá se k měření stupně propečení masa. Teleskopické výsuvy Pro rošty a plechy na pečení. 4. PŘED PRVNÍM POUŽITÍM UPOZORNĚNÍ Viz kapitoly o bezpečnosti. 4.1 První čištění • Vyjměte ze spotřebiče všechno příslu‐ šenství. • Před prvním použitím spotřebič vyči‐ stěte. Řiďte se částí „Čištění a údržba“. 4.
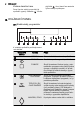
www.aeg.com Změna denního času . Nový denní čas nastavíte pleji bliká výše uvedeným postupem. Denní čas lze změnit, pouze když je spotřebič vypnutý. Stiskněte . Na dis‐ 5. OVLÁDACÍ PANEL 5.1 Elektronický programátor 1 2 3 4 5 6 7 8 9 10 K ovládání spotřebiče používejte senzo‐ rová tlačítka. Senzorové tlačítko Popis DISPLEJ Zobrazí aktuální nastavení spotřebiče. 2 ZAP/VYP Slouží k zapnutí a vypnutí spotřebiče.
ČESKY Senzorové tlačítko Funkce 7 OK 8 OSVĚTLENÍ TROUBY 9 HODINY 10 MINUTKA 9 Popis Slouží k potvrzení výběru nebo nasta‐ vení. Slouží k posunu v nabídce smě‐ rem dolů. Vypnutí a zapnutí osvětlení. Slouží k nastavení funkcí hodin. Slouží k nastavení funkce Minutka. 5.
www.aeg.com 6. DENNÍ POUŽÍVÁNÍ UPOZORNĚNÍ Viz kapitoly o bezpečnosti. Pro provoz spotřebiče můžete použít: • Manuální režim - slouží k manuálnímu nastavení pečicí funkce, teploty a do‐ by pečení. Funkce trouby 1 • Automatické programy - k přípravě po‐ krmů, když neznáte jejich přípravu ne‐ bo nemáte dostatečné zkušenosti s vařením. Použití Pravý horký vzduch K pečení jídla na maximálně 3 úrovních součas‐ ně a k sušení potravin.
ČESKY 6.1 Nastavení funkce trouby 1. Pomocí nebo zapněte spotřebič. Na displeji se zobrazí na‐ stavená teplota, symbol a číslo funk‐ ce trouby. 2. Pomocí trouby. 3. Stiskněte nebo se po pěti sekun‐ dách spotřebič spustí automaticky. nebo nastavte funkci Pokud spotřebič spustíte a nena‐ stavíte žádnou funkci nebo pro‐ gram trouby, spotřebič se po 20 sekundách automaticky vypne. 6.2 Změna teploty Stisknutím / změníte teplotu v krocích po 5 °C.
www.aeg.com 7. FUNKCE HODIN SYM‐ BOL FUNKCE POPIS MĚŘIČ ČASU Nastaví měření času. Ukazuje, jak dlouho je spotřebič v provozu. Tato funkce nemá žádný vliv na provoz spotřebiče. DENNÍ ČAS Ke kontrole denního času. Pro změnu denního času viz „Nastavení denního času“. TRVÁNÍ K nastavení délky provozu spotřebiče. KONEC K nastavení doby vypnutí spotřebiče. Funkci Trvání a Ukončení lze použít současně pro na‐ programování automatického zapnutí a pozdější‐ ho vypnutí spotřebiče (Odloženého startu).
ČESKY 7.4 Zkontroluj výsledek (pouze u vybraných modelů) Pokud nastavíte funkce UKONČENÍ a TRVÁNÍ, dvě minuty před koncem peče‐ ní zazní zvukový signál a rozsvítí se osvětlení trouby. Spotřebič přejde na na‐ stavení funkce UKONČENÍ nebo TRVÁ‐ NÍ. Během těchto dvou minut můžete zkontrolovat výsledek pečení a, pokud je to zapotřebí, přidat čas funkci UKONČE‐ NÍ nebo TRVÁNÍ. 7.5 Nastavení funkce NASTAVIT A SPUSTIT 1. 2.
www.aeg.com K dispozici je 20 automatických programů a receptů. Automatický program použijte, když neznáte recept nebo nemáte zkušenosti s přípravou daného pokrmu. Se‐ znam receptů pro automatické programy naleznete v části „Re‐ cepty“. • Automatické programy se zadáním vá‐ hy • Automatické programy s pečící son‐ dou 8.1 RECEPTY Na displeji se zobrazí poloha ro‐ štu a výchozí doba přípravy u všech automatických receptů. K dispozici jsou tři typy automatických programů: • Automatické recepty 8.
ČESKY 3. K nastavení receptu použijte bo . 4. Stiskněte nebo se automatický recept po pěti sekundách spustí au‐ tomaticky. Po uplynutí nastaveného času zazní na dvě minuty zvukový signál. bli‐ ká. Spotřebič se vypne. Zvukovou signalizaci vypnete stis‐ knutím jakéhokoliv senzorového tla‐ čítka nebo otevřením dvířek spotřebiče. 5. 6. ne‐ 8.4 Automatické programy se zadáním váhy Spotřebič vypočítá čas pečení podle za‐ dané hmotnosti masa. 1. Zapněte spotřebič. 2. Stiskněte 3.
www.aeg.com 7. Zapojte zástrčku pečicí sondy do zá‐ suvky na přední straně spotřebiče. a předna‐ Na displeji se zobrazí stavená teplota sondy. Při prvním použitím je použita teplota 60 °C a při dalším použití je použita poslední nastavená hodnota. 8. 4. Použijte nebo teploty sondy. 9. 5. Stiskněte nebo se nastavení au‐ tomaticky uloží po pěti sekundách. Užitečné informace: Teplotu sondy můžete nastavit po‐ uze, když bliká symbol .
ČESKY 17 9.2 Vložení příslušenství trouby Hluboký pekáč / plech a tvarovaný rošt mají po stranách přesahující okraje. Tyto okraje a tvar vodicích lišt slouží jako spe‐ ciální zařízení bránící vyklouznutí nád‐ obí. Společné vložení tvarovaného roštu a hlubokého pekáče / plechu Tvarovaný rošt položte na hluboký pe‐ káč / plech. Zasuňte hluboký pekáč / plech do drážek na jedné z úrovní trou‐ by. 9.
www.aeg.com 9.4 Společné vložení tvarovaného roštu a hlubokého pekáče / plechu Tvarovaný rošt položte na hluboký pe‐ káč / plech. Tvarovaný rošt a hluboký pekáč / plech umístěte na teleskopické výsuvy. 10. DOPLŇKOVÉ FUNKCE 10.1 Funkce Můj oblíbený program Pomocí této funkce můžete uložit vaše oblíbené nastavení teploty a doby přípravy určité funkce či programu trou‐ by. 1. Nastavte teplotu a čas pro určitou funkci či program. 2. Stiskněte a na déle než tři sekundy . Zazní zvukový signál. podržte 3.
ČESKY 19 Nabídka nastavení Číslo nabídky nastavení Popis Hodnota SET1 NASTAVIT A SPUSTIT ON / OFF SET2 UKAZATEL ZBYTKOVÉ‐ HO TEPLA ON / OFF SET31) TÓNY TLAČÍTEK CLICK / BEEP / OFF SET4 TÓN ZÁVADY ON / OFF SET5 SERVISNÍ NABÍDKA ON / OFF SET6 OBNOVIT TOVÁRNÍ NASTAVENÍ YES / NO 1) Není možné vypnout tón senzorového tlačítka Zap / Vyp. Nabídku nastavení můžete upra‐ vit pouze u vypnutého spotřebi‐ če. 4. Stiskněte 5. Pomocí / nastavení. Zapnutí nabídky nastavení: 1.
www.aeg.com ntilátor pokračovat v chlazení až do úplného ochlazení spotřebiče. 10.8 Mechanický zámek dvířek Při zakoupení spotřebiče není zámek dvířek aktivován. Aktivace zámku dvířek: Vytáhněte zá‐ mek dvířek dopředu, dokud se nezablo‐ kuje. Deaktivace zámku dvířek: Zatlačte zá‐ mek dvířek zpět do panelu. 1 2 Zámek dvířek použijete následujícím způsobem: Vytáhněte zámek dvířek do aktivované polohy. Když jsou dvířka bezpečně zavřená (me‐ chanický zámek dvířek je aktivován): 1.
ČESKY 21 11. UŽITEČNÉ RADY A TIPY 11.1 Vnitřní strana dvířek U některých modelů můžete na vnitřní straně dvířek najít: • Čísla poloh roštů. • Informace o pečicích funkcích, dopo‐ ručené poloze roštů a teplotách pro ty‐ pická jídla. Teploty a časy pečení v tabul‐ kách jsou pouze orientační. Závi‐ sí na receptu, kvalitě a množství použitých přísad. 11.2 Pečení moučných jídel Všeobecné pokyny • Nová trouba může péct jinak, než jak jste byli zvyklí u starého spotřebiče.
www.aeg.com Možná příčina Řešení Koláč hnědne nerovno‐ měrně. Výsledek pečení Směs je nerovnoměrně rozložena. Směs rovnoměrně roz‐ ložte na plech na pečení. Koláč není při dané dél‐ ce pečení hotový. Teplota trouby je příliš nízká. Při příštím pečení na‐ stavte trochu vyšší teplo‐ tu trouby. 11.
ČESKY Koláče / sladké pečivo / chléb na plechu na pečení Druh pečení Funkce trouby Poloha roštu Teplota (°C) Čas (min) Kynutá pletýn‐ ka / Věnec Konvenční ohřev 3 170 - 190 30 - 40 Vánoční štola Konvenční ohřev 2 160 - 180 1) 50 - 70 Chléb (žitný chléb): 1. První část procesu pečení. 2. Druhá část pro‐ cesu pe‐ čení.
www.aeg.com 2) Použijte hluboký pekáč / plech.
ČESKY Jídlo Funkce trouby Poloha roštu Teplota (°C) Čas (min) Konvenční ohřev 1 180 - 200 25 - 40 Zapékaná ze‐ lenina1) Turbo gril ne‐ bo Pravý hor‐ ký vzduch 1 160 - 170 15 - 30 Bagety zape‐ čené s rozta‐ veným sýrem Turbo gril ne‐ bo Pravý hor‐ ký vzduch 1 160 - 170 15 - 30 Sladké náky‐ py Konvenční ohřev 1 180 - 200 40 - 60 Rybí nákypy Konvenční ohřev 1 180 - 200 30 - 60 Turbo gril ne‐ bo Pravý hor‐ ký vzduch 1 160 - 170 30 - 60 Lasagne Plněná zeleni‐ na 25 1) Předehř
www.aeg.com 1) Předehřejte troubu.
ČESKY 4. 27 Zvolte funkci Nízkoteplotní pečení a nastavte správnou koncovou teplotu sondy. Jídlo k přípra‐ vě Hmotnost (g) Poloha roštu Teplota °C Čas v minu‐ tách Hovězí peče‐ ně 1000 - 1500 1 120 120 - 150 Hovězí plátek 1000 - 1500 3 120 90 - 150 Telecí pečeně 1000 - 1500 1 120 120 - 150 200 - 300 3 120 20 - 40 Steaky 11.
www.aeg.com • Abyste zabránili připékání šťávy nebo tuků z masa na plechu, nalijte do hlu‐ bokého pekáče / plechu trochu tekuti‐ ny. • Podle potřeby otočte pečeni (za 1/2 2/3 doby pečení). • Velké kusy pečeně nebo drůbeže ně‐ kolikrát v průběhu pečení potřete vlastní šťávou. Lépe se tak upečou. • Spotřebič můžete vypnout přibližně 10 minut před koncem doby pečení a vy‐ užít zbytkového tepla. 11.
ČESKY 29 Jehněčí Druh masa Množství Funkce trouby Poloha ro‐ štu Teplota °C Čas (min) Jehněčí ký‐ ta / Jehněčí pečeně 1–1,5 kg Turbo gril 1 150 - 170 100 - 120 Jehněčí hřbet 1–1,5 kg Turbo gril 1 160 - 180 40 - 60 Množství Funkce trouby Poloha ro‐ štu Teplota °C Čas (min) Zaječí hřbet / stehno až 1 kg Konvenční ohřev 1 230 1) 30 - 40 Hřbet z vy‐ soké zvěře 1,5–2 kg Konvenční ohřev 1 210 - 220 35 - 40 Kýta z vy‐ soké zvěře 1,5–2 kg Konvenční ohřev 1 180 - 200 60 - 90
www.aeg.com Grilujte pouze ploché kousky masa nebo ryb. Prázdnou troubu předehřejte po dobu pěti minut pomocí grilovací funkce. POZOR Vždy grilujte se zavřenými dvířky trouby. Gril Jídlo ke grilo‐ vání Poloha roštu Teplota Hovězí peče‐ ně 2 Hovězí filety Čas (min) 1. strana 2.
ČESKY Poloha roštu Teplota (°C) Čas (min) Hranolky, silné Polotovary 3 200 - 220 25 - 35 Amer.
www.aeg.com Jídlo Máslo, 250 g Smetana, 2 x 200 g Dort, 1400 g Doba roz‐ mrazování (min) Další čas rozmra‐ zování (min) 30 - 40 10 - 15 - 80 - 100 10 - 15 Smetanu lze snadno ušlehat, i když jsou v ní ne zcela rozmražené kousky. 60 60 11.13 Zavařování Upozornění: • Pro zavařování používejte pouze za‐ vařovací sklenice, které jsou na trhu dostupné ve stejné velikosti. • Sklenice se šroubovacím uzávěrem nebo bajonetovým uzávěrem nejsou vhodné.
ČESKY Zavařování Teplota ve °C Doba zavařování do začátku perlení (min) Další vaření při 100 °C (min) 160 - 170 50 - 60 15 - 20 Kedlubny / Hrá‐ šek / Chřest 33 1) Po vypnutí spotřebiče nechte stát v troubě. 11.14 Sušení - Pravý horký vzduch Nejlepších výsledků dosáhnete, když v polovině doby sušení spotřebič vypnete. Otevřete dvířka spotřebiče a nechte jej vychladnout. Poté dokončete sušení. Rošty trouby zakryjte papírem na peče‐ ní.
www.aeg.
ČESKY • Vyčistěte všechno příslušenství po každém použití a nechte jej vysušit. Použijte měkký hadr a vlažnou vodu s mycím prostředkem. • Máte-li nepřilnavé příslušenství, neči‐ stěte je agresivními čisticími 35 prostředky, ostrými předměty, ani je nemyjte v myčce nádobí. Mohlo by do‐ jít k poškození nepřilnavého povrchu. 12.1 Drážky roštů Vyjmutí drážek na rošty Při čištění bočních stěn můžete drážky roštů vyjmout. 1. Odtáhněte přední část drážek od stěny trouby. 2.
www.aeg.com 2. Pomocí úzkého, tupého předmětu (např. čajové lžičky) odstraňte skle‐ něný kryt. Skleněný kryt vyčistěte. Sklopení topného tělesa 1. Odstraňte drážky na rošty. 2. 3. 3. 4. 5. Žárovku vyměňte za vhodnou žárov‐ ku odolnou proti teplotě 300 °C. Nasaďte skleněný kryt. Namontujte levé drážky roštů. 12.3 Strop trouby Topný článek na stropě trouby můžete sklopit a strop pak snadno umýt. UPOZORNĚNÍ Před sklopením topného článku spotřebič vypněte. Přesvědčte se, že spotřebič už vychladl.
ČESKY 1. 2. A 3. 4. A Otevřete plně dvířka. Stiskněte upínací páčky (A) na obou dveřních závěsech až na doraz. Přivřete dvířka trouby do první polo‐ hy otevření (přibližně do úhlu 70°). Oběma rukama podržte dvířka a vy‐ táhněte je směrem šikmo vzhůru od spotřebiče. 5. Dvířka položte vnější stranou dolů na měkkou látku na rovné podložce. Zabráníte tak poškrábání. 6. Uchopte okrajovou lištu na horní straně dvířek (B) na obou stranách a zatlačením směrem dovnitř uvol‐ něte svorku těsnění.
www.aeg.com Možná příčina Řešení Spotřebič nehřeje. Problém Je zapnutá funkce auto‐ matického vypnutí. Viz „Automatické vypnu‐ tí“. Spotřebič nehřeje. Je uvolněná pojistka. Zkontrolujte, zda příči‐ nou závady není pojist‐ ka. Pokud se pojistka uvolňuje opakovaně, ob‐ raťte se na autorizované‐ ho elektrikáře. Osvětlení nefunguje. Vadná žárovka. Vyměňte žárovku. Na displeji se zobrazuje chybový kód, který není v seznamu. Jedná se závadu na elektroinstalaci.
ČESKY 15. POZNÁMKY K OCHRANĚ ŽIVOTNÍHO PROSTŘEDÍ Recyklujte materiály označené symbolem . Obaly vyhoďte do příslušných odpadních kontejnerů k recyklaci. Pomáhejte chránit životní prostředí a lidské zdraví a recyklovat elektrické a elektronické spotřebiče určené k likvidaci. Spotřebiče označené příslušným symbolem nelikvidujte spolu s domovním odpadem. Spotřebič odevzdejte v místním sběrném dvoře nebo kontaktujte místní úřad.
892956165-C-132013 www.aeg.