RU Инструкция по эксплуатации Духовой шкаф BE931417IM
www.aeg.com СОДЕРЖАНИЕ 1. СВЕДЕНИЯ ПО ТЕХНИКЕ БЕЗОПАСНОСТИ...................................................3 2. УКАЗАНИЯ ПО БЕЗОПАСНОСТИ..................................................................... 5 3. ОПИСАНИЕ ИЗДЕЛИЯ....................................................................................... 8 4. ПАНЕЛЬ УПРАВЛЕНИЯ..................................................................................... 9 5. ПЕРЕД ПЕРВЫМ ИСПОЛЬЗОВАНИЕМ...................................................
РУССКИЙ 1. СВЕДЕНИЯ ПО ТЕХНИКЕ БЕЗОПАСНОСТИ Перед установкой и эксплуатацией прибора внимательно ознакомьтесь с приложенным руководством. Производитель не несет ответственности за какие-либо травмы или ущерб, возникший вследствие неправильной установки или эксплуатации. Всегда храните данное руководство под рукой в надежном месте для последующего использования. 1.
www.aeg.com • Детям младше 3 лет категорически запрещается находиться рядом с прибором во время его работы. 1.2 Общие правила техники безопасности • • • • • • • • • Установка прибора и замена кабеля должна осуществляться только квалифицированным персоналом! ВНИМАНИЕ: Прибор и его доступные для контакта части сильно нагреваются во время эксплуатации. Будьте осторожны и не прикасайтесь к нагревательным элементам.
РУССКИЙ • 5 часть направляющей для противня из боковой стенки движением, направленным от стенки. Установка направляющих производится в обратном порядке. Используйте только термощуп (датчик температуры внутри продукта), рекомендованный для данного прибора. 2. УКАЗАНИЯ ПО БЕЗОПАСНОСТИ 2.1 Установка ВНИМАНИЕ! Установка прибора должна осуществляться только квалифицированным персоналом! • • • • • • • • • Удалите всю упаковку. Не устанавливайте и не подключайте прибор, имеющий повреждения.
www.aeg.com • • • • • электропитания имеется свободный доступ. Не подключайте прибор к розетке электропитания, если она плохо закреплена или если вилка неплотно входит в розетку. Для отключения прибора от электросети не тяните за кабель электропитания. Всегда беритесь за саму вилку.
РУССКИЙ • • Всегда готовьте при закрытой дверце духового шкафа. В случае установки прибора за мебельной панелью (например, за дверцей) позаботьтесь о том, чтобы во время работы прибора дверца ни в коем случае не оказывалась закрытой. Нагрев и влажность, образующиеся за закрытой дверцей или мебельной панелью, могут привести к последующему повреждению прибора, места его установки или пола. Не закрывайте дверцу мебели до окончательного остывания прибора после использования.
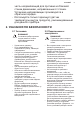
www.aeg.com 3. ОПИСАНИЕ ИЗДЕЛИЯ 3.1 Общий обзор 1 2 3 4 5 5 4 8 3 6 2 1 Панель управления Электронный программатор Гнездо для термощупа Нагревательный элемент Лампа освещения Вентилятор Съемная направляющая для противня 8 Положение противней 1 2 3 4 5 6 7 7 3.2 Аксессуары Решетка Для выпекания и жарки или в качестве поддона для сбора жира. Термощуп Для кухонной посуды, форм для выпечки, жаркого. Для определения готовности блюда.
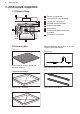
РУССКИЙ 4. ПАНЕЛЬ УПРАВЛЕНИЯ 4.1 Электронный программатор 1 2 3 4 5 6 7 8 9 Управление прибором осуществляется с помощью сенсорных полей. Сен‐ сор‐ ное поле 1 2 3 4 - Режим Комментарий Дисплей На дисплее отображаются текущие настройки прибора. ВКЛ/ВЫКЛ Включение и выключение прибора. Регулятор и кноп‐ ка OK Подтверждение выбора или параметра настрой‐ ки. Вращение регулятора позволяет переходить между режимами и настройками. Кнопка «Возврат» Для отображения основного меню.
www.aeg.com Сен‐ сор‐ ное поле 8 9 Режим Комментарий Таймер Установка функции Таймер. Любимая про‐ грамма Просмотр Ваших любимых программ. 4.2 Дисплей A B C E D A. B. C. D. E. Режим нагрева Время суток Индикация нагрева Темп. Отображение продолжительности или времени окончания работы функции Другие индикаторы дисплея: Символ Описание Таймер Работает указанная функция. Время суток На дисплее отображается текущее время суток. Продолж.
РУССКИЙ Символ 11 Описание Вес, автоматич. На дисплее отображается информа‐ ция о том, что система автоматиче‐ ского взвешивания включена или что вес может быть изменен. Сохранение Тепла Режим включен. 5. ПЕРЕД ПЕРВЫМ ИСПОЛЬЗОВАНИЕМ Установите принадлежности и съемные направляющие для полок обратно на место. ВНИМАНИЕ! См. Главы, содержащие Сведения по технике безопасности. 5.2 Первое подключение 5.
www.aeg.com Сим‐ вол Элемент меню Применение Помощь в приготовлении Содержит перечень автоматических программ. Основные Установки Используется для задания конфигурации при‐ бора. Любимая программа Содержит список избранных программ приго‐ товления, созданных пользователем. Подменю для меню: Основные Установки Сим‐ вол Подменю Описание Установка Времени Суток Установка текущего времени.
РУССКИЙ Сим‐ вол Подменю Описание Заводские Установки Сброс всех настроек к заводским установкам. 13 6.3 Режимы Нагрева Режимы нагрева Применение Горячий воздух Одновременное выпекание, жарка и высуши‐ вание продуктов максимум на трех уровнях.Ус‐ тановите температуру на 20°C – 40°C ниже, чем для режима Верхний + нижний нагрев.. Пицца Выпекание на одном уровне духового шкафа, когда требуется более интенсивное подрумя‐ нивание и хрустящая нижняя корочка.
www.aeg.com Режимы нагрева Применение Влажный горячий воз‐ дух Выпекание в формах на одном уровне духово‐ го шкафа. Экономия электроэнергии в ходе приготовления. Для достижения желаемого ре‐ зультата приготовления данную функцию не‐ обходимо использовать согласно Таблицам для приготовления пищи. Более подробные сведения о рекомендованных настройках нахо‐ дятся в Таблицах для приготовления пищи. Данная функция использовалась при опреде‐ лении класса энергоэффективности в соответ‐ ствии с EN 60350-1.
РУССКИЙ 6.4 Включение режима нагрева полоска начинает мигать и затем исчезает. 1. Включите прибор. 2. Выберите меню Режимы Нагрева. 3. Чтобы подтвердить выбор, 6.6 Индикация быстрого нагрева . нажмите на 4. Выберите режим нагрева духового шкафа. 5. Чтобы подтвердить выбор, нажмите на . 6. Установите температуру. 7. Чтобы подтвердить выбор, нажмите на . 6.5 Индикация нагрева При включении режима нагрева на дисплее отображается полоска. Полоска показывает, что температура духового шкафа повышается.
www.aeg.com При использовании функций часов Продолж. и Окончание выключение нагревательных элементов прибора происходит по истечении 90% заданного времени работы. В конце приготовления (в течение от 3 до 20 минут) прибор использует остаточное тепло для продолжения приготовления. 7.2 Установка функций часов Перед использованием функций Продолж. и Окончание сначала следует задать режим нагрева и температуру. Прибор отключится автоматически. При одновременном использовании функций Продолж.
РУССКИЙ 3. Задайте продолжительность работы функции. 4. Нажмите на 17 . 8. АВТОМАТИЧЕСКИЕ ПРОГРАММЫ ВНИМАНИЕ! См. Главы, содержащие Сведения по технике безопасности. 8.1 Рецепты в Интернете Рецепты для автоматических программ данного конкретного прибора можно найти на нашем веб-сайте. Для выбора подходящей книги рецептов проверьте PNC (код изделия) на табличке с техническими данными на передней рамке внутренней камеры прибора. 8.2 Помощь в приготовлении с Запрограммир.
www.aeg.com 9. ИСПОЛЬЗОВАНИЕ ДОПОЛНИТЕЛЬНЫХ ПРИНАДЛЕЖНОСТЕЙ ВНИМАНИЕ! См. Главы, содержащие Сведения по технике безопасности. 9.1 Термощуп Необходимо задать два значения температуры: температуру духового шкафа и температуру внутри продукта. Термощуп предназначен для измерения температуры внутри мяса. Когда температура мяса достигает заданного значения, прибор выключается. ПРЕДУПРЕЖДЕНИЕ Используйте только термощуп, идущий в комплекте с прибором, или фирменные запасные части.
РУССКИЙ 19 Небольшой выступ наверху повышает безопасность. Выступы также служат защитой от опрокидывания. Высокий ободок по периметру решетки служит для предотвращения соскальзывания посуды с решетки. Противень для жарки: Вставьте противень для жарки между направляющими планками духового шкафа. 9.3 Телескопические направляющие – установка принадлежностей Телескопические направляющие облегчают установку и снятие полок. ПРЕДУПРЕЖДЕНИЕ Не мойте телескопические направляющие в посудомоечной машине.
www.aeg.com Противень для жарки: Установите противень для жарки на телескопические направляющие. Установите решетку и противень для жарки на телескопические направляющие. Одновременная установка решетки и противня для жарки: 10. ДОПОЛНИТЕЛЬНЫЕ ФУНКЦИИ 10.1 Любимая программа Вы можете сохранить в памяти прибора избранные настройки, например, продолжительность, температуру или режим нагрева. Их можно выбирать в меню Любимая программа. Можно сохранить до 20 программ.
РУССКИЙ 10.2 Использование функции «Защита от детей». 21 5. Многократным нажатием на кнопку добейтесь появления на дисплее ВКЛЮЧИЛ и ИДИ. 6. Чтобы подтвердить выбор, Когда установлена функция «Защита от детей», случайное включение прибора становится невозможным. нажмите на . Для включения функции ВКЛЮЧИЛ и ИДИ коснитесь любого символа (кроме для включения 1. Коснитесь дисплея. 2. Нажмите и удерживайте ). Будет включен установленный режим нагрева.
www.aeg.com • • Ночная яркость – когда прибор выключен, яркость дисплея в период с 22:00 до 06:00 снижается. Яркость в светлое время суток: – когда прибор включен. – если в режиме яркости ночного времени суток нажать на любой символ (за исключением ВКЛ/ ВЫКЛ), дисплей на следующие 10 секунд переходит в режим яркости светлого времени суток. – если при выключенном приборе Вы устанавливаете функцию Таймер. По завершении работы функции дисплей возвращается в режим ночной яркости. 10.
РУССКИЙ 11.3 Выпечка • • • • Ваш духовой шкаф может отличаться характером приготовления выпечки и жаркого от предыдущего. Адаптируйте свои обычные настройки, такие как температура, время приготовления и положения противней к значениям, приведенным в таблице. В первый раз используйте низкую температуру. Если найти установки для конкретного рецепта не удается, поищите похожий рецепт. • • 23 При выпекании пирогов более чем на одном положении противня время выпекания можно увеличить на 10–15 минут.
www.aeg.com Результат выпекания/ жарки Возможная причина Решение Торт подрумянивается не‐ равномерно. Температура духового шкафа слишком высока, а время выпекания слишком мало. Понизьте температуру ду‐ хового шкафа и увеличьте время выпекания. Торт подрумянивается не‐ равномерно. Тесто распределено не‐ равномерно. Равномерно распределите тесто по глубокому против‐ ню. Торт не готов по истечении Слишком низкая темпера‐ установленного времени. тура духового шкафа.
РУССКИЙ Продукты Описание Температура (°C) Время (мин) Положение противня Apple pie / Верхний + ниж‐ 180 Яблочный пи‐ ний нагрев рог (2 формы Ø 20 см, устано‐ вленные по диагонали) 70 - 90 1 Чизкейк 60 - 90 1 Верхний + ниж‐ 170 - 190 ний нагрев 1) Предварительно разогрейте духовой шкаф.
www.aeg.
РУССКИЙ Продукты Описание Выпечка с яич‐ ным белком / безе Минд.
www.aeg.com Продукты Описание Запеканки с рыбой Фарширован‐ ные овощи Температура (°C) Время (мин) Положение противня Верхний + ниж‐ 180 - 200 ний нагрев 30 - 60 1 Горячий воздух 160 - 170 30 - 60 1 1) Предварительно разогрейте духовой шкаф. 11.
РУССКИЙ Бисквиты / small cakes / маленькие торты / выпечка / рулеты Продукты Температура (°C) Время (мин) 150 - 160 Положение противня 2 положения 3 положения 20 - 40 1/4 1/3/5 Short bread / 140 Песочное пече‐ нье / полоски из теста 25 - 45 1/4 1/3/5 Печенье из сдобного теста 160 - 170 25 - 40 1/4 - Выпечка с яич‐ ным белком, безе 80 - 100 130 - 170 1/4 - Миндальное печенье 100 - 120 40 - 80 1/4 - Печенье из 160 - 170 дрожжевого те‐ ста 30 - 60 1/4 - Печенье из слоеного тест
www.aeg.com Продукты Температура (°C) Время (мин) Положение про‐ тивня Швейцарский флан 170 - 190 45 - 55 1 Закрытый яблоч‐ ный пирог 150 - 170 50 - 60 1 Овощной пирог 160 - 180 50 - 60 1 Пресный хлеб 230 - 2501) 10 - 20 2 Флан из слоеного теста 160 - 1801) 45 - 55 2 «Фламмкухен» (по‐ хожее на пиццу блюдо из Эльзаса) 230 - 2501) 12 - 20 2 Пироги 180 - 2001) 15 - 25 2 1) Предварительно разогрейте духовой шкаф. 2) Используйте противень для жарки. 11.
РУССКИЙ Продукты Количе‐ ство Описание Температу‐ Время ра (°C) (мин) 31 Положение противня Ростбиф или на см тол‐ филе: с кровью щины Турбо-гриль 190 - 2001) 5-6 1 Ростбиф или на см тол‐ филе: средней щины прожаренности Турбо-гриль 180 - 1901) 6-8 1 Ростбиф или на см тол‐ филе: хорошей щины прожаренности Турбо-гриль 170 - 1801) 8 - 10 1 Время (мин) Положение противня 1) Предварительно разогрейте духовой шкаф.
www.aeg.com Дичь Продукты Количество Описание Температу‐ ра (°C) Время (мин) Положение противня Седло за‐ йца / заячьи окорочка до 1 кг Верхний + нижний на‐ грев 2301) 30 - 40 1 Седло оле‐ ня/косули 1,5 кг - 2 кг Верхний + нижний на‐ грев 210 - 220 35 - 40 1 Окорок оле‐ ня/косули 1,5 кг - 2 кг Верхний + нижний на‐ грев 180 - 200 60 - 90 1 Температу‐ ра (°C) Время (мин) Положение противня 1) Предварительно разогрейте духовой шкаф.
РУССКИЙ 33 ПРЕДУПРЕЖДЕНИЕ При приготовлении на гриле дверца духового шкафа всегда должна быть закрытой.
www.aeg.
РУССКИЙ горшочке или жарка жирной свинины. Чтобы удостовериться, что температура внутри мяса соответствует требуемому значению температуры внутри продукта, можно воспользоваться термощупом (см. Таблицу приготовления с использованием термощупа). В первые 10 минут можно установить температуру духового шкафа в пределах от 80°C до 150°C. Значение по умолчанию 90°C. После установки температуры духовой шкаф продолжает приготовления при 80°C. Не используйте данную функцию для приготовления птицы. 35 1.
www.aeg.com Продук‐ ты Количе‐ ство Время раз‐ моражива‐ ния (мин) Время оста‐ Комментарии точного разморажи‐ вания (мин) Мясо 500 г 90 - 120 20 - 30 Перевернуть по истечении поло‐ вины времени. Форель 150 г 25 - 35 10 - 15 - Клубника 300 г 30 - 40 10 - 20 - Сливоч‐ ное мас‐ ло 250 г 30 - 40 10 - 15 - Сливки 2 x 200 г 80 - 100 10 - 15 Взбейте сливки, немного их охладив. Пирож‐ ные 1,4 кг 60 60 - 11.
РУССКИЙ 37 Фрукты с косточками Продукты Температура (°C) Время до начала медленного кипе‐ ния (мин) Продолжение ки‐ пячения при 100 °C (мин) Груша / айва / сли‐ ва 160 - 170 35 - 45 10 - 15 Продукты Температура (°C) Время до начала медленного кипе‐ ния (мин) Продолжение ки‐ пячения при 100 °C (мин) Морковь1) 160 - 170 50 - 60 5 - 10 Огурцы 160 - 170 50 - 60 - Овощное ассорти 160 - 170 50 - 60 5 - 10 Кольраби / горох / спаржа 160 - 170 50 - 60 15 - 20 Овощи 1) Оставьте стоять в
www.aeg.com Продукты Температура (°C) Время (час) Яблоки, дол‐ ьками 60 - 70 Груши 60 - 70 Положение противня 1 положение 2 положения 6-8 3 1/4 6-9 3 1/4 11.18 Хлеб Не рекомендуется производить предварительный разогрев.
РУССКИЙ 39 Телятина Продукты Температура внутри продукта (°C) Жареная телятина 75 - 80 Телячья рулька 85 - 90 Баранина/ягненок Продукты Температура внутри продукта (°C) Баранья нога 80 - 85 Седло барашка 80 - 85 Жареный ягненок / ножка ягненка 70 - 75 Дичь Продукты Температура внутри продукта (°C) Седло зайца 70 - 75 Заячьи лапки 70 - 75 Заяц целиком 70 - 75 Седло оленя/косули 70 - 75 Окорок оленя/косули 70 - 75 Рыба Продукты Температура внутри продукта (°C) Лосось 65 - 70 Фо
www.aeg.com • предметы с острыми краями или посудомоечную машину. Это может привести к повреждению антипригарного покрытия. Если после использования камера духового шкафа оказалась влажной, вытрите ее. 12.2 Снятие направляющих для противней, а также снятие Для очистки камеры духового шкафа извлеките направляющие для противней, а также извлеките . 1. Потяните переднюю часть направляющей для противня в сторону, противоположную боковой стенке. 12.
РУССКИЙ 12.4 Снятие и установка дверцы 41 их по одной по направлению вверх. Как дверца, так и внутренние стеклянные панели снимаются для чистки. Количество стеклянных панелей зависит от конкретной модели. ВНИМАНИЕ! Будьте осторожны при снятии дверцы с прибора. Дверца имеет большой вес. 1. Полностью откройте дверцу. 2. Нажмите до упора стопорные рычаги (A) на двух петлях дверцы. A A 3. Прикройте дверцу до первого фиксируемого положения (приблизительно на угол 70°). 4.
www.aeg.com 2. Очистите стеклянный плафон от грязи. 3. Замените лампу освещения духового шкафа на аналогичную, с жаростойкостью 300°C. 4. Установите плафон. Боковая лампа 1. Снимите левую направляющую для противня, чтобы получить доступ к лампе освещения. 2. Снимите стеклянный плафон, воспользовавшись для этого узким тупым предметом (например, чайной ложкой). 3. Очистите стеклянный плафон от грязи. 4. Замените лампу освещения духового шкафа на аналогичную, с жаростойкостью 300°C. 5.
РУССКИЙ 43 Неисправность Возможная причина Решение Духовой шкаф не нагре‐ вается. Включена функция «Защи‐ та от детей». См. «Отключение функции «Защита от детей». Духовой шкаф не нагре‐ вается. Дверца не закрыта как сле‐ Полностью закройте двер‐ дует. цу. Духовой шкаф не нагре‐ вается. Сработал предохранитель. Проверьте, не является ли предохранитель причиной неисправности. Если пред‐ охранитель срабатывает снова и снова, обратитесь к квалифицированному электрику. Лампа не горит.
www.aeg.com Рекомендуем записать их здесь: Модель (MOD.) ......................................... Код изделия (PNC) ......................................... Серийный номер (S.N.) ......................................... 14. ТЕХНИЧЕСКИЕ ДАННЫЕ 14.1 Технические данные Напряжение 220 - 240 В Частота 50 Гц 15. ОХРАНА ОКРУЖАЮЩЕЙ СРЕДЫ Материалы с символом следует сдавать на переработку. Положите упаковку в соответствующие контейнеры для сбора вторичного сырья.
РУССКИЙ 45
www.aeg.
РУССКИЙ 47
867316315-C-472016 www.aeg.