BEK230011M BES230011M USER MANUAL EN DE User Manual Oven Benutzerinformation Backofen 2 24
www.aeg.com CONTENTS 1. SAFETY INFORMATION............................................................................................. 3 2. SAFETY INSTRUCTIONS.............................................................................................4 3. PRODUCT DESCRIPTION...........................................................................................7 4. BEFORE FIRST USE..................................................................................................... 7 5. DAILY USE...
ENGLISH 1. 3 SAFETY INFORMATION Before the installation and use of the appliance, carefully read the supplied instructions. The manufacturer is not responsible for any injuries or damages that are the result of incorrect installation or usage. Always keep the instructions in a safe and accessible location for future reference. 1.
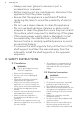
www.aeg.com • • • • • • • Always use oven gloves to remove or put in accessories or ovenware. Before carrying out any maintenance, disconnect the appliance from the power supply. Ensure that the appliance is switched off before replacing the lamp to avoid the possibility of electric shock. Do not use a steam cleaner to clean the appliance.
ENGLISH • • • • • • • • to be replaced, this must be carried out by our Authorised Service Centre. Do not let mains cables touch or come near the appliance door, especially when the door is hot. The shock protection of live and insulated parts must be fastened in such a way that it cannot be removed without tools. Connect the mains plug to the mains socket only at the end of the installation. Make sure that there is access to the mains plug after the installation.
www.aeg.com 2.4 Care and cleaning WARNING! Risk of injury, fire, or damage to the appliance. • Before maintenance, deactivate the appliance and disconnect the mains plug from the mains socket. • Make sure the appliance is cold. There is the risk that the glass panels can break. • Replace immediately the door glass panels when they are damaged. Contact the Authorised Service Centre. • Be careful when you remove the door from the appliance.
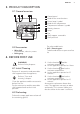
ENGLISH 7 3. PRODUCT DESCRIPTION 3.1 General overview 1 2 3 4 5 6 10 5 4 3 2 1 7 8 1 2 3 4 5 6 7 8 9 10 Control panel Knob for the oven functions Power lamp / symbol Knob for the temperature Temperature indicator / symbol Heating element Lamp Fan Shelf support, removable Shelf positions 9 3.2 Accessories • Wire shelf For cookware, cake tins, roasts. • Baking tray For cakes and biscuits. • Grill- / Roasting pan To bake and roast or as pan to collect fat. 4.
www.aeg.com 5. DAILY USE WARNING! Refer to Safety chapters. 5.1 Activating and deactivating the appliance It depends on the model if your appliance has lamps, knob symbols or indicators: • The lamp turns on when the appliance operates. • The symbol shows whether the knob controls the oven functions or the temperature. • The indicator turns on when the oven heats up. 1. Turn the knob for the oven functions to select an oven function. 2. Turn the knob for the temperature to select a temperature. 3.
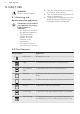
ENGLISH Oven function 9 Application True Fan Cooking To bake on up to three shelf positions at the same time and to dry food. Set the temperature 20 - 40 °C lower than for Top / Bottom Heat. Pizza Setting To bake food on one shelf position for a more intensive browning and a crispy bottom. Set the temperature 20 - 40 °C lower than for Top / Bottom Heat. 6. USING THE ACCESSORIES WARNING! Refer to Safety chapters. 6.
www.aeg.com 7. ADDITIONAL FUNCTIONS 7.1 Cooling fan 7.2 Safety thermostat When the appliance operates, the cooling fan activates automatically to keep the surfaces of the appliance cool. If you deactivate the appliance, the cooling fan can continue to operate until the appliance cools down. Incorrect operation of the appliance or defective components can cause dangerous overheating. To prevent this, the oven has a safety thermostat which interrupts the power supply.
ENGLISH 11 8.
www.aeg.
ENGLISH 13 Bread and pizza Food Top / Bottom Heat True Fan Cooking Time (min) Comments Temperature (°C) Shelf posi- Temperation ture (°C) Shelf position 190 1 190 1 60 - 70 1-2 pieces, 500 gr per piece Rye bread 190 1 180 1 30 - 45 In a bread tin Bread 190 2 180 2 (2 and 4) 25 - 40 6 - 8 rolls in a baking tray Pizza1) 230 - 250 1 230 - 250 1 10 - 20 In a baking tray or a deep pan Scones1) 200 3 190 3 10 - 20 In a baking tray White bread1) rolls 1) 1) Preheat the
www.aeg.
ENGLISH 15 8.6 Grilling Preheat the empty oven for 3 minutes before cooking. Food Quantity Temperature (°C) Time (min) 1st side 2nd side Shelf position Pieces (g) 4 800 max. 12 - 15 12 - 14 4 Beef steaks 4 600 max. 10 - 12 6-8 4 Sausages - max. 12 - 15 10 - 12 4 Pork chops 4 600 max. 12 - 16 12 - 14 4 Chicken (cut in 2) 2 1000 max. 30 - 35 25 - 30 4 Kebabs 4 - max. 10 - 15 10 - 12 4 Breast of chicken 4 400 max. 12 - 15 12 - 14 4 Hamburger 6 600 max.
www.aeg.com Pork Food Quantity (kg) Temperature (°C) Time (min) Shelf position Shoulder, neck, ham joint 1 - 1.5 160 - 180 90 - 120 1 or 2 Chop, spare rib 1 - 1.5 170 - 180 60 - 90 1 or 2 Meat loaf 0.75 - 1 160 - 170 50 - 60 1 or 2 Pork knuckle (precooked) 0.75 - 1 150 - 170 90 - 120 1 or 2 Food Quantity (kg) Temperature (°C) Time (min) Shelf position Roast veal 1 160 - 180 90 - 120 1 or 2 Knuckle of veal 1.
ENGLISH 8.8 Drying - True Fan Cooking • Cover trays with grease proof paper or baking parchment. • For a better result, stop the oven halfway through the drying time, open the door and let it cool down for one night to complete the drying.
www.aeg.com 9.3 Cleaning the door gasket • Regularly do a check of the door gasket. The door gasket is around the frame of the oven cavity. Do not use the appliance if the door gasket is damaged. Contact an Authorised Service Centre. • To clean the door gasket, refer to the general information about cleaning. 1. Remove the screw which holds the heating element. For the first time, use a screwdriver. 9.4 Removing the shelf supports To clean the oven, remove the shelf supports. 1.
ENGLISH 19 5. Hold the door trim (B) on the top edge of the door at the two sides and push inwards to release the clip seal. 2 B 1 2. Lift and turn the levers on the two hinges. 3. Close the oven door halfway to the first opening position. Then pull forward and remove the door from its seat. 4. Put the door on a soft cloth on a stable surface. 6. Pull the door trim to the front to remove it. 7. Hold the door glass panels by their top edge and carefully pull them out one by one.
www.aeg.com A WARNING! Danger of electrocution! Disconnect the fuse before you replace the lamp. The lamp and the lamp glass cover can be hot. B CAUTION! Always hold the halogen lamp with a cloth to prevent grease residue from burning on the lamp. Make sure that you install the middle panel of glass in the seats correctly. A B 1. Deactivate the appliance. 2. Remove the fuses from the fuse box or deactivate the circuit breaker. The back lamp 1.
ENGLISH 10.2 Service data If you cannot find a solution to the problem yourself, contact your dealer or an Authorised Service Centre. 21 on the front frame of the appliance cavity. Do not remove the rating plate from the appliance cavity. The necessary data for the service centre is on the rating plate. The rating plate is We recommend that you write the data here: Model (MOD.) ......................................... Product number (PNC) ......................................... Serial number (S.
www.aeg.com Total power (W) Section of the cable (mm²) Total power (W) Section of the cable (mm²) maximum 1380 3 x 0.75 maximum 3680 3 x 1.5 maximum 2300 3x1 The earth cord (green / yellow cable) must be 2 cm longer than phase and neutral cables (blue and brown cables). 12. ENERGY EFFICIENCY 12.1 Product Fiche and information according to EU 65-66/2014 Supplier's name AEG Model identification BEK230011M BES230011M Energy Efficiency Index 100.
ENGLISH Cooking with fan When possible, use the cooking functions with fan to save energy. 23 Keep food warm Choose the lowest possible temperature setting to use residual heat and keep a meal warm. 13. ENVIRONMENTAL CONCERNS Recycle the materials with the symbol . Put the packaging in applicable containers to recycle it. Help protect the environment and human health and to recycle waste of electrical and electronic appliances. Do not dispose appliances marked with the symbol with the household waste.
www.aeg.com INHALTSVERZEICHNIS 1. SICHERHEITSHINWEISE........................................................................................... 25 2. SICHERHEITSANWEISUNGEN.................................................................................27 3. GERÄTEBESCHREIBUNG......................................................................................... 29 4. VOR DER ERSTEN INBETRIEBNAHME................................................................... 30 5. TÄGLICHER GEBRAUCH............
DEUTSCH 1. 25 SICHERHEITSHINWEISE Lesen Sie vor der Montage und dem Gebrauch des Geräts zuerst die Gebrauchsanleitung. Bei Verletzungen oder Schäden infolge nicht ordnungsgemäßer Montage oder Verwendung des Geräts übernimmt der Hersteller keine Haftung. Bewahren Sie die Anleitung immer an einem sicheren und zugänglichen Ort zum späteren Nachschlagen auf. 1.
www.aeg.com 1.2 Allgemeine Sicherheit • • • • • • • • • Die Montage des Geräts und der Austausch des Kabels muss von einer Fachkraft vorgenommen werden. WARNUNG: Das Gerät und die zugänglichen Geräteteile werden während des Betriebs heiß. Seien Sie vorsichtig und berühren Sie niemals die Heizelemente. Halten Sie Kinder unter 8 Jahren vom Gerät fern, wenn sie nicht ständig beaufsichtigt werden. Verwenden Sie zum Anfassen des Zubehörs und der Töpfe wärmeisolierende Handschuhe.
DEUTSCH 27 2. SICHERHEITSANWEISUNGEN 2.1 Montage WARNUNG! Nur eine qualifizierte Fachkraft darf den elektrischen Anschluss des Geräts vornehmen. • Entfernen Sie das gesamte Verpackungsmaterial. • Montieren Sie ein beschädigtes Gerät nicht und benutzen Sie es nicht. • Halten Sie sich an die mitgelieferte Montageanleitung. • Seien Sie beim Umsetzen des Gerätes vorsichtig, da es sehr schwer ist. Tragen Sie stets Sicherheitshandschuhe und festes Schuhwerk. • Ziehen Sie das Gerät nicht am Griff.
www.aeg.com • Nehmen Sie keine technischen Änderungen am Gerät vor. • Die Lüftungsöffnungen dürfen nicht abgedeckt werden. • Lassen Sie das Gerät bei Betrieb nicht unbeaufsichtigt. • Schalten Sie das Gerät nach jedem Gebrauch aus. • Gehen Sie beim Öffnen der Tür vorsichtig vor, wenn das Gerät in Betrieb ist. Es kann heiße Luft austreten. • Bedienen Sie das Gerät nicht mit feuchten oder nassen Händen oder wenn es mit Wasser in Kontakt gekommen ist.
DEUTSCH Lösungsmittel oder Metallgegenstände. • Falls Sie ein Backofenspray verwenden, befolgen Sie die Anweisungen auf der Verpackung. • Reinigen Sie die katalytische Emailbeschichtung (falls vorhanden) nicht mit Reinigungsmitteln. 2.5 Backofenbeleuchtung • Die Leuchtmittel in diesem Gerät sind nur für Haushaltsgeräte geeignet. Benutzen Sie diese nicht für die Raumbeleuchtung. WARNUNG! Stromschlaggefahr. • Trennen Sie das Gerät von der Stromversorgung, bevor Sie die Lampe austauschen.
www.aeg.com 4. VOR DER ERSTEN INBETRIEBNAHME WARNUNG! Siehe Kapitel Sicherheitshinweise. 4.1 Erste Reinigung Nehmen Sie die Zubehörteile und die herausnehmbaren Einhängegitter aus dem Gerät. Siehe Kapitel „Reinigung und Pflege“. Reinigen Sie das Gerät und die Zubehörteile vor der ersten Inbetriebnahme. Setzen Sie das Zubehör und die herausnehmbaren Einhängegitter wieder in ihrer ursprünglichen Position ein. 1. Stellen Sie die Funktion und die Höchsttemperatur ein. 2.
DEUTSCH 31 5.2 Ofenfunktionen Ofenfunktion Anwendung Stellung Aus Das Gerät ist ausgeschaltet. Backofenbeleuchtung Einschalten der Backofenlampe, ohne dass eine Garfunktion eingeschaltet ist. Ober-/Unterhitze Zum Backen und Braten auf einer Ebene. Oberhitze Zum Bräunen von Brot, Kuchen und Gebäck. Zum Bräunen bereits gegarter Gerichte. Unterhitze Zum Backen von Kuchen mit knusprigen Böden und zum Einkochen von Lebensmitteln.
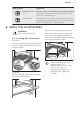
www.aeg.com Tiefes Blech: Schieben Sie das tiefe Blech zwischen die Führungsschienen der Einhängegitter. Die kleine Einkerbung auf der Oberseite erhöht die Sicherheit. Diese Einkerbungen dienen auch als Kippsicherung. Durch den umlaufend erhöhten Rand des Rosts ist das Kochgeschirr gegen Abrutschen vom Rost gesichert. Kombirost und tiefes Blech zusammen: Schieben Sie das tiefe Blech zwischen die Führungsschienen der Einhängegitter und den Kombirost in die Führungsschienen darüber.
DEUTSCH 33 8. TIPPS UND HINWEISE Garergebnis beeinträchtigen und die Emailbeschichtung beschädigen. WARNUNG! Siehe Kapitel Sicherheitshinweise. 8.2 Backen von Kuchen Die Temperaturen und Backzeiten in den Tabellen sind nur Richtwerte. Sie sind abhängig von den Rezepten, der Qualität und der Menge der verwendeten Zutaten. • Die Backofentür nicht öffnen, bevor 3/4 der Backzeit abgelaufen ist. • Wenn Sie zwei Backbleche gleichzeitig nutzen, lassen Sie eine Ebene dazwischen frei. 8.
www.aeg.com Gargut Ober-/Unterhitze Heißluft mit Ringheizkörper Dauer (Min.
DEUTSCH Gargut Ober-/Unterhitze Heißluft mit Ringheizkörper Temperatur (°C) Ebene Temperatur (°C) Ebene Plätzchen/ Feingebäck - zwei Ebenen - 140 - 150 Plätzchen/ Feingebäck - drei Ebenen - - Baisers – eine Ebene 120 Baisers – zwei Ebe- 35 Dauer (Min.
www.aeg.com Brot und Pizza Gargut Ober-/Unterhitze Heißluft mit Ringheizkörper Dauer (Min.) Bemerkungen Temperatur (°C) Ebene Temperatur (°C) Ebene Weißbrot1) 190 1 190 1 60 - 70 1 - 2 Stück, 500 g pro Stück Roggenbrot 190 1 180 1 30 - 45 In einer Brotform Brötchen 1) 190 2 180 2 (2 und 4) 25 - 40 6 - 8 Brötchen auf einem Backblech Pizza1) 230 - 250 1 230 - 250 1 10 - 20 Backblech oder tiefes Blech Scones1) 200 3 190 3 10 - 20 Auf dem Backblech Dauer (Min.
DEUTSCH 37 Fleisch Gargut Ober-/Unterhitze Heißluft mit Ringheizkörper Dauer (Min.
www.aeg.com 8.6 Grillstufe 1 Leeren Backofen 3 Minuten vorheizen. Gargut Menge Temperatur (°C) Dauer (Min.) Ebene Stück (g) Filetsteaks 4 800 max. 12 - 15 12 - 14 4 Beefsteaks 4 600 max. 10 - 12 6-8 4 Grillwürste 8 - max. 12 - 15 10 - 12 4 Schweinskotelett 4 600 max. 12 - 16 12 - 14 4 Hähnchen, 2 halbe 2 1000 max. 30 - 35 25 - 30 4 Spieße 4 - max. 10 - 15 10 - 12 4 Hähnchen- 4 brustfilet 400 max. 12 - 15 12 - 14 4 Hamburger 6 600 max.
DEUTSCH Schweinefleisch Gargut Menge (kg) Temperatur (°C) Dauer (Min.) Ebene Schulter, Nacken, Schinkenstück 1 - 1.5 160 - 180 90 - 120 1 oder 2 Kotelett, Rippchen 1 - 1.5 170 - 180 60 - 90 1 oder 2 Hackbraten 0.75 - 1 160 - 170 50 - 60 1 oder 2 Schweinshaxe (vorgekocht) 0.75 - 1 150 - 170 90 - 120 1 oder 2 Kalb Gargut Menge (kg) Temperatur (°C) Dauer (Min.) Ebene Kalbsbraten 1 160 - 180 90 - 120 1 oder 2 Kalbshaxe 1.
www.aeg.com 8.8 Dörren - Heißluft mit Ringheizkörper • Verwenden Sie mit Butterbrot- oder Backpapier belegte Bleche. • Sie erzielen ein besseres Ergebnis, wenn Sie nach halber Dörrzeit den Backofen ausschalten, öffnen und am besten über Nacht auskühlen lassen. Gemüse Gargut Temperatur (°C) Dauer (Std.
DEUTSCH 9.2 Geräte mit Edelstahl- oder Aluminiumfront: Reinigen Sie die Backofentür nur mit einem feuchten Tuch oder Schwamm und trocknen Sie sie mit einem weichen Tuch ab. Verwenden Sie keine Stahlwolle, Säuren oder Scheuermittel, da diese die Oberflächen beschädigen können. Reinigen Sie das Bedienfeld auf gleiche Weise. 9.3 Reinigen der Türdichtung • Die Türdichtung muss regelmäßig überprüft werden. Die Türdichtung ist im Rahmen des Garraums angebracht.
www.aeg.com Setzen Sie die Einhängegitter wieder ein. WARNUNG! Vergewissern Sie sich, dass das Heizelement ordnungsgemäß eingesetzt ist und nicht herunterfallen kann. 9.6 Reinigen der Backofentür Die Backofentür hat drei Glasscheiben.Die Backofentür und die inneren Glasscheiben können zur Reinigung ausgebaut werden. Versuchen Sie nicht, die Glasscheiben herauszunehmen, solange die Backofentür noch am Gerät montiert ist: Die Tür kann zuklappen. 3.
DEUTSCH 7. Halten Sie die Oberkante der Türglasscheiben fest und ziehen Sie vorsichtig nacheinander heraus. Beginnen Sie mit der obersten Glasscheibe. Achten Sie darauf, dass die Glasscheiben vollständig aus den Halterungen gezogen werden. 43 Achten Sie darauf, die mittlere Glasscheibe richtig in die Aufnahmen einzusetzen A B . 9.7 Austauschen der Lampe 8. Reinigen Sie die Glasscheiben mit Wasser und Spülmittel. Trocknen Sie die Glasscheiben sorgfältig ab.
www.aeg.com 10. FEHLERSUCHE WARNUNG! Siehe Kapitel Sicherheitshinweise. 10.1 Was tun, wenn ... Störung Mögliche Ursache Abhilfe Der Backofen heizt nicht auf. Der Backofen ist ausgeschal- Schalten Sie den Backofen tet. ein. Der Backofen heizt nicht auf. Die Sicherung ist durchgebrannt. Vergewissern Sie sich, dass die Sicherung der Grund für die Störung ist. Brennt die Sicherung wiederholt durch, wenden Sie sich an eine zugelassene Elektrofachkraft. Die Lampe funktioniert nicht.
DEUTSCH 11.1 Montage 11.3 Elektrischer Anschluss 548 21 558 min. 550 114 16 20 600 45 min. 560 589 594 573 595 +/-1 Der Hersteller haftet nicht für Schäden, die aufgrund der Nichtbeachtung der in den Sicherheitshinweisen beschriebenen Sicherheitsvorkehrungen entstehen. Das Gerät wird mit einem Netzstecker und Netzkabel geliefert. 11.4 Kabel 5 3 Einsetzbare Kabeltypen für Montage oder Austausch: H07 RN-F, H05 RN-F, H05 RRF, H05 VV-F, H05 V2V2-F (T90), H05 BB-F 548 21 min.
www.aeg.com 12. ENERGIEEFFIZIENZ 12.1 Produktdatenblatt und Informationen gemäß EU 65-66/2014 Herstellername AEG Modellidentifikation BEK230011M BES230011M Energieeffizienzindex 100.0 Energieeffizienzklasse A Energieverbrauch bei Standardbeladung, Ober-/ Unterhitze 0.93 kWh/Programm Energieverbrauch bei Standardbeladung, Umluft 0.
DEUTSCH 47 13. UMWELTTIPPS Recyceln Sie Materialien mit dem Symbol . Entsorgen Sie die Verpackung in den entsprechenden Recyclingbehältern. Recyceln Sie zum Umwelt- und Gesundheitsschutz elektrische und elektronische Geräte. Entsorgen Sie * Geräte mit diesem Symbol nicht mit dem Hausmüll. Bringen Sie das Gerät zu Ihrer örtlichen Sammelstelle oder wenden Sie sich an Ihr Gemeindeamt.
867340789-B-152017 www.aeg.