BEK431111M USER MANUAL EN User Manual Oven
www.aeg.com CONTENTS 1. SAFETY INFORMATION............................................................................................. 2 2. SAFETY INSTRUCTIONS.............................................................................................4 3. PRODUCT DESCRIPTION...........................................................................................6 4. CONTROL PANEL....................................................................................................... 7 5.
ENGLISH 3 manufacturer is not responsible for any injuries or damages that are the result of incorrect installation or usage. Always keep the instructions in a safe and accessible location for future reference. 1.
www.aeg.com • • • • • Ensure that the appliance is switched off before replacing the lamp to avoid the possibility of electric shock. Do not use a steam cleaner to clean the appliance. Do not use harsh abrasive cleaners or sharp metal scrapers to clean the glass door since they can scratch the surface, which may result in shattering of the glass.
ENGLISH • • • • • installation. Make sure that there is access to the mains plug after the installation. If the mains socket is loose, do not connect the mains plug. Do not pull the mains cable to disconnect the appliance. Always pull the mains plug. Use only correct isolation devices: line protecting cut-outs, fuses (screw type fuses removed from the holder), earth leakage trips and contactors.
www.aeg.com • Replace immediately the door glass panels when they are damaged. Contact the Authorised Service Centre. • Be careful when you remove the door from the appliance. The door is heavy! • Clean regularly the appliance to prevent the deterioration of the surface material. • Clean the appliance with a moist soft cloth. Only use neutral detergents. Do not use any abrasive products, abrasive cleaning pads, solvents or metal objects.
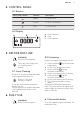
ENGLISH 7 4. CONTROL PANEL 4.1 Buttons Sensor field / Button Function Description MINUS To set the time. CLOCK To set a clock function. PLUS To set the time. 4.2 Display A B C A. Clock functions B. Timer C. Clock function 5. BEFORE FIRST USE 5.2 Preheating WARNING! Refer to Safety chapters. Preheat the empty oven before first use. To set the Time of day refer to "Clock functions" chapter. 1. Set the function .Set the maximum temperature. 2. Let the oven operate for 1 hour. 5.
www.aeg.com 6.2 Setting a heating function 1. Turn the knob for the heating functions to select a heating function. 2. Turn the control knob to select the temperature. The lamp turns on when the oven operates. 3. To turn off the oven, turn the knob for the heating functions to the off position. 6.3 Heating functions Oven function Application The oven is off. Off position To turn on the lamp without a cooking function.
ENGLISH 9 Oven function Application To bake and roast food on one shelf position. Conventional For more information about Aqua Clean, refer Cooking (Top / Bottom to "Care and cleaning" Heat) / Aqua chapter. Clean 7. CLOCK FUNCTIONS 7.1 Clock functions table Clock function Application TIME OF DAY To set, change or check the time of day. DURATION To set how long the appliance operates. END To set when the appliance deactivates. TIME DELAY To combine DURATION and END function.
www.aeg.com 4. When the time ends, flashes and an acoustic signal sounds. The appliance deactivates automatically. 5. Press any button to stop the signal. 6. Turn the knob for the oven functions and the knob for the temperature to the off position. 7.5 Setting the TIME DELAY 1. Set an oven function and temperature. 2. Press again and again until starts to flash. or 3. Press DURATION. 4. Press . 5. Press END. or to set the time for to set the time for 6. Press to confirm.
ENGLISH Wire shelf and baking tray / deep pan together: Push the baking tray / deep pan between the guide bars of the shelf support and the wire shelf on the guide bars above. 11 Small indentation at the top increase safety. The indentations are also anti-tip devices. The high rim around the shelf prevents cookware from slipping of the shelf. 9. ADDITIONAL FUNCTIONS 9.1 Cooling fan When the oven operates, the cooling fan turns on automatically to keep the surfaces of the oven cool.
www.aeg.com If you use two baking trays at the same time, keep one empty level between them. Cooking meat and fish Use a deep pan for very fatty food to prevent the oven from stains that can be permanent. Leave the meat for approximately 15 minutes before carving so that the juice does not seep out. To prevent too much smoke in the oven during roasting, add some water into the deep pan. To prevent the smoke condensation, add water each time after it dries up.
ENGLISH Food Top / Bottom Heat Temperature (°C) True Fan Cooking 13 Time (min) Comments Shelf posi- Temperation ture (°C) Shelf position 2 150 2 90 - 120 In a 20 cm cake mould 175 1 160 2 50 - 60 In a bread tin 170 3 140 - 150 3 20 - 30 In a baking tray Small cakes - two levels - 140 - 150 2 and 4 25 - 35 In a baking tray Small cakes three levels - - 140 - 150 1, 3 and 5 30 - 45 In a baking tray Biscuits / pastry stripes one level 140 3 140 - 150 3 30 - 35 In a b
www.aeg.com Food Top / Bottom Heat True Fan Cooking Time (min) Comments Temperature (°C) Shelf posi- Temperation ture (°C) Shelf position Eclairs two levels - - 170 2 and 4 35 - 45 In a baking tray Plate tarts 180 2 170 2 45 - 70 In a 20 cm cake mould Rich fruit cake 160 1 150 2 110 - 120 In a 24 cm cake mould Victoria sandwich 170 1 160 2 (left and right) 50 - 60 In a 20 cm cake mould 1) Preheat the oven for 10 minutes.
ENGLISH Food Top / Bottom Heat True Fan Cooking 15 Time (min) Comments Temperature (°C) Shelf posi- Temperation ture (°C) Shelf position Quiches1) 180 1 180 1 50 - 60 In a mould Lasagne1) 180 - 190 2 180 - 190 2 25 - 40 In a mould Cannello- 180 - 190 2 180 - 190 2 25 - 40 In a mould ni1) 1) Preheat the oven for 10 minutes.
www.aeg.
ENGLISH 10.5 Turbo Grilling Lamb Use the first or the second shelf position. Beef Preheat the oven. To calculate the roasting time multiple the time given in the table below by the centimetres of thickness of the fillet. Food Temperature (°C) Time (min) Roast beef or 190 - 200 fillet, rare 5-6 Roast beef or 180 - 190 fillet, medium 6-8 Roast beef or 170 - 180 fillet, well done 8 - 10 Pork Food Temperature (°C) Time (min) Shoulder, neck, ham joint, 1 - 1.
www.aeg.com Food Accessories Temperature (°C) Shelf position Time (min) Sweet rolls, 12 pieces baking tray or dripping pan 175 3 40 - 50 Rolls, 9 pieces baking tray or dripping pan 180 2 35 - 45 Pizza, frozen, 0.
ENGLISH Food Accessories Temperature (°C) Shelf position Time (min) Poached vegetables, 0.4 kg baking tray or dripping pan 180 2 35 - 45 Vegetarian omelette pizza pan on wire shelf 180 3 35 - 45 Vegetables, mediterrean 0.7 kg baking tray or dripping pan 180 4 35 - 45 10.7 Drying - True Fan Cooking Cover trays with grease proof paper or baking parchment.
www.aeg.com Food Function Small cake Accessories Shelf position Temperature (°C) Time (min) Comments Convention- Baking al Cooking tray 3 170 20 - 30 Put 20 small cakes per one baking tray. Small cake True Fan Baking Cooking / tray Fan Cooking 3 150 160 20 - 35 Put 20 small cakes per one baking tray. Small cake True Fan Baking Cooking / tray Fan Cooking 2 and 4 150 160 20 - 35 Put 20 small cakes per one baking tray.
ENGLISH Food Function Accessories Toast 4-6 pieces Grilling Beef burger 6 pieces, 0.6 kg Grilling Shelf position 21 Temperature (°C) Time (min) Comments Wire shelf 4 max. 2 - 3 minutes first side; 2 - 3 minutes second side Preheat the oven for 3 minutes. Wire shelf 4 and dripping pan max. 20 - 30 Put the wire shelf on the fourth level and the dripping pan on the third level of the oven. Turn the food halfway through the cooking time. Preheat the oven for 3 minutes. 11.
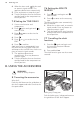
www.aeg.com CAUTION! Be careful when you remove the shelf supports. 1. Pull the front of the shelf support away from the side wall. 11.6 Removing and installing door The oven door has two glass panels. You can remove the oven door and the internal glass panel to clean it. Read the whole "Removing and installing door" instruction before you remove the glass panels. The oven door may close if you try to remove the internal glass panel before you remove the oven door. 2.
ENGLISH pull forward and remove the door from its seat. 23 8. Clean the glass panels with water and soap. Dry the glass panels carefully. Do not clean the glass panels in the dishwasher. When the cleaning is completed, install the glass panel and the oven door. The screen-printing zone must face the inner side of the door. Make sure that after the installation the surface of the glass panel frame on the screen-printing zones is not rough when you touch it. When installed correctly the door trim clicks.
www.aeg.com 12.1 What to do if... Problem Possible cause Remedy The oven does not heat up. The oven is deactivated. Activate the oven. The oven does not heat up. The clock is not set. Set the clock. The oven does not heat up. The necessary settings are not set. Make sure that the settings are correct. The oven does not heat up. The fuse is blown. Make sure that the fuse is the cause of the malfunction. If the fuse is blown again and again, contact a qualified electrician.
ENGLISH 25 13.1 Building In 548 21 min. 550 80 60 520 600 114 18 20 589 594 min. 560 595+-1 198 60 5 3 523 20 548 70 60 21 min. 550 20 520 18 590 114 min. 560 589 594 198 60 595+-1 5 3 523 20 13.2 Securing the appliance to the cabinet A B 13.3 Electrical installation The manufacturer is not responsible if you do not follow the safety precautions from the Safety chapters. This appliance is supplied with a main plug and a main cable. 13.
www.aeg.com For the section of the cable refer to the total power on the rating plate. You can also refer to the table: Total power (W) Section of the cable (mm²) maximum 1380 3 x 0.75 maximum 2300 3x1 Total power (W) Section of the cable (mm²) maximum 3680 3 x 1.5 The earth cord (green / yellow cable) must be 2 cm longer than phase and neutral cables (blue and brown cables). 14. ENERGY EFFICIENCY 14.
ENGLISH Cooking with fan When possible, use the cooking functions with fan to save energy. 27 Moist Fan Baking Function designed to save energy during cooking. Keep food warm Choose the lowest possible temperature setting to use residual heat and keep a meal warm. 15. ENVIRONMENTAL CONCERNS Recycle materials with the symbol . Put the packaging in relevant containers to recycle it. Help protect the environment and human health by recycling waste of electrical and electronic appliances.
X Fan motor & cooling system * X X Wiring Accessories (meat probe, shelves, baking tray + cleaning tools like sponges)* Hg Cd Cr6+ Hazardous substances PBBs PBDEs Notes: 1. This table is compiled according to SJ/T 11364-2014. 2. means that this kind of hazardous substance content in all of the homogenous materials of this part is under the limitations regulated in GB/ T26572-2011. 3.
ENGLISH 29
www.aeg.
ENGLISH 31
867347972-A-242018 www.aeg.