BHG 500 W BHG 750 W BHG 750 C BHG 1000 W Badheizkörper Bedienung und Installation__________________________________ 2 Bathroom Radiator Operation and installation_________________________________ 10 Radiateurs pour salle de bains Utilisation et installation___________________________________ 16 Badkamerradiatoren Bediening en installatie___________________________________ 22 Koupelnové topné těleso Obsluha a instalace______________________________________ 28 Радиатор для ванной Эксплуатация и установка
Inhalt - Besondere Hinweise BESONDERE HINWEISE BEDIENUNG 1. Allgemeine Hinweise ��������������������������������������������������� 2 2. Sicherheit ��������������������������������������������������������������������� 3 3. Gerätebeschreibung ��������������������������������������������������� 3 4. Bedienung �������������������������������������������������������������������� 4 5. Reinigung, Pflege und Wartung ��������������������������������� 5 6.
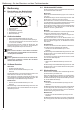
Bedienung - für den Benutzer und den Fachhandwerker 1.1.3 Signalworte SIGNALWORT Bedeutung GEFAHR Hinweise, deren Nichtbeachtung schwere Verletzungen oder Tod zur Folge haben. WARNUNG Hinweise, deren Nichtbeachtung schwere Verletzungen oder Tod zur Folge haben kann. VORSICHT Hinweise, deren Nichtbeachtung zu mittelschweren oder leichten Verletzungen führen kann. 1.2 Andere Markierungen in dieser Dokumentation Hinweis Allgemeine Hinweise werden mit dem nebenstehenden Symbol gekennzeichnet.
Bedienung - für den Benutzer und den Fachhandwerker 4. Bedienung Die 24h Automatik-Funktion wiederholt die 2h Boost-Funktion automatisch alle 24 Stunden. Beschreibung des Bedienfeldes Sie bedienen das Gerät über das Bedienfeld. 1 2 1 2 3 4 5 5 4 Betriebsanzeige Heizanzeige Temperatureinstellknopf Einstellbereich „24h auto“ Betriebswahlknopf 3 Aktivieren 26_07_80_0050 4.1 4.4 24h Automatik-Funktion 4.2 Gerät einschalten »» Stellen Sie den Betriebswahlknopf auf „ON“.
Bedienung - Installation INSTALLATION 4.6 Außerbetriebnahme »» Schalten Sie das Gerät aus, indem Sie den Betriebswahlknopf in die Stellung „OFF“ drehen. Die Betriebsanzeige erlischt. »» Ziehen Sie den Netzstecker aus der Wandsteckdose. 5. Reinigung, Pflege und Wartung Reinigen Sie die Oberflächen im kalten Zustand mit einem weichen Tuch mit gebräuchlichen Pflegemitteln. 7. 7.1 Allgemeine Sicherheitshinweise 7.
Installation - für den Fachhandwerker 9.3 Montage der Bademantelhalter Schraube der Halterung Wandhülse Konterschraube Halterung Abdeckkappe 1 2 3 26_07_80_0055 26_07_80_0054 1 2 3 4 5 Hinweis Beachten Sie die korrekte Ausrichtung der Wandhülsen. »» Schrauben Sie die Wandhülsen an. »» Befestigen Sie die Halterungen auf der Leiter. Ziehen Sie die Halterungen noch nicht fest. 1 2 3 »» Bademantelknopf Unterlegscheibe Bademantelknopfplatine Montieren Sie die Bademantelhalter wie abgebildet. 10.
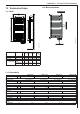
Installation - für den Fachhandwerker 13. Technische Daten 13.2 Mindestabstände ≥150 13.1 Maße a20 i13 a30 D0000026162 ≥200 D0000026163 i13 a10 ≥150 BHG BHG 500 W 750 W a10 a20 a30 i13 Gerät Gerät Gerät Wandaufhängung Höhe Breite Tiefe Lochabstand vertikal Lochabstand horizontal BHG 750 C mm mm mm mm 998 480 100 779 1453 480 115 1230 1658 600 110 1435 BHG 1000 W 1781 550 115 1599 mm 350 350 450 400 13.
Kundendienst und Garantie Erreichbarkeit Sollte einmal eine Störung an einem unserer Produkte auftreten, stehen wir Ihnen natürlich mit Rat und Tat zur Seite. EHT Haustechnik GmbH Kundendienst Fürstenberger Straße 77 37603 Holzminden Tel. 05531 702-111 Fax 05531 702-95890 info@eht-haustechnik.de Weitere Anschriften sind auf der letzten Seite aufgeführt. Unseren Kundendienst erreichen Sie telefonisch rund um die Uhr, auch an Samstagen und Sonntagen sowie an Feiertagen.
Umwelt und Recycling Entsorgung von Transport- und Verkaufsverpackungsmaterial Damit Ihr Gerät unbeschädigt bei Ihnen ankommt, haben wir es sorgfältig verpackt. Bitte helfen Sie, die Umwelt zu schützen, und entsorgen Sie das Verpackungsmaterial des Gerätes sachgerecht. Wir beteiligen uns gemeinsam mit dem Großhandel und dem Fachhandwerk / Fachhandel in Deutschland an einem wirksamen Rücknahme- und Entsorgungskonzept für die umweltschonende Aufarbeitung der Verpackungen.
Contents - Special information SPECIAL INFORMATION OPERATION 1. General information �������������������������������������������������� 11 2. Safety �������������������������������������������������������������������������� 11 3. Appliance description ����������������������������������������������� 12 4. Operation �������������������������������������������������������������������� 12 5. Cleaning, care and maintenance ����������������������������� 13 6.
Operation - for users and contractors OPERATION 1. General information The chapter "Operation" is intended for appliance users and qualified contractors. The chapter "Installation" is intended for qualified contractors. 1.3 Note All measurements are given in mm unless stated otherwise. 2. Safety 2.1 Note Read these instructions carefully before using the appliance and retain them for future reference. Pass on the instructions to a new user if required. 1.1 Safety instructions 1.1.
Operation - for users and contractors 3. Appliance description Disable This appliance has been designed as a booster heater and is particularly suitable for bathrooms, as well as drying and warming bathrobes and towels. You can place your towels at various heights. The appliance heats the room through natural convection and radiated warmth. The integral room thermostat keeps the room at the set temperature. For this, it is important that the appliance's heating output matches the room's heat demand.
Operation - Installation INSTALLATION 4.6 Shutting down the system »» Stop the appliance by turning the rotary selector to "OFF". The ON indicator goes off. »» Pull the mains plug out of the wall socket. 5. Cleaning, care and maintenance Clean the surfaces when cold with a soft cloth and ordinary cleaning products. Note Avoid abrasive or corrosive cleaning products. 6. Troubleshooting 7.1 General safety instructions 7.
Installation - for contractors 9.3 Fitting the bathrobe hooks 26_07_80_0054 1 2 26_07_80_0055 Note Note the alignment of the wall sleeves. 3 »» Use screws to secure the wall sleeves. »» Secure the retainers to the rungs. Do not yet tighten the retainers. 1 2 3 »» Bathrobe hook Washer Bathrobe hook backplate Fit the bathrobe hooks as shown. 10. Power supply WARNING Electrocution In wet rooms such as shower rooms and kitchens, install the flush box at least 25 cm above the floor.
Installation - for contractors 13. Specification 13.3 Data table BHG 500 BHG 750 BHG 750 W W C 13.
Table des matières - remarques particulières REMARQUES PARTICULIÈRES UTILISATION 1. Remarques générales ����������������������������������������������� 16 2. Sécurité ����������������������������������������������������������������������� 17 3. Description de l’appareil ������������������������������������������� 17 4. Utilisation ������������������������������������������������������������������� 18 5. Nettoyage, entretien et maintenance ���������������������� 19 6.
Utilisation - pour l’utilisateur et l’installateur 1.1.3 Mentions d’avertissement MENTION Signification D’AVERTISSEMENT DANGER Caractérise des remarques dont le non-respect entraîne de graves lésions, voire la mort. AVERTISSE- Caractérise des remarques dont le non-respect enMENT traîne de graves lésions, voire la mort. ATTENTION Caractérise des remarques dont le non-respect peut entraîner des lésions légères à moyennement graves. 1.
Utilisation - pour l’utilisateur et l’installateur 4. Utilisation La fonction automatique 24h relance la fonction boost 2h automatiquement toutes les 24 heures. Description du tableau de commande Vous commandez l’appareil par le biais de la console. 1 2 1 2 3 4 5 5 3 4 Voyant de fonctionnement Voyant de chauffe Bouton de réglage de la température Plage de réglage « 24h auto » Sélecteur de mode de fonctionnement Activation 26_07_80_0050 4.1 4.4 Fonction automatique 24h 4.
Utilisation - Installation INSTALLATION 4.6 Mise hors service 5. Nettoyage, entretien et maintenance Nettoyez la surface de l’appareil, lorsqu’elle est froide, à l’aide d’un chiffon doux et de produits de nettoyage usuels. Remarque Évitez les produits d’entretien abrasifs et corrosifs. 6. Aide au dépannage 6.1 7. 7.1 Consignes de sécurité générales 7.2 Prescriptions, normes et directives Il y a une panne de réseau. La fonction automatique 24h n’a pas démarré. Il y a eu une panne de courant.
Installation - pour l’installateur 26_07_80_0054 9.3 Montage du porte-peignoir 1 2 26_07_80_0055 Remarque Veillez à l’alignement des douilles murales. 3 »» Vissez les douilles au mur. »» Montez les supports sur les barres sans les serrer encore à ce stade. 1 2 3 »» Champignon Rondelle Plaque Posez le porte-peignoir comme indiqué sur l’illustration. 10.
Installation - pour l’installateur 13. Données techniques 13.3 Tableau de données 13.
Inhoud - Bijzondere info BIJZONDERE INFO BEDIENING 1. Algemene aanwijzingen �������������������������������������������� 23 2. Veiligheid �������������������������������������������������������������������� 23 3. Toestelbeschrijving ��������������������������������������������������� 24 4. Bediening ������������������������������������������������������������������� 24 5. Reiniging, verzorging en onderhoud ���������������������� 25 6.
Bediening - voor de gebruiker en de installateur BEDIENING 1. Algemene aanwijzingen Het hoofdstuk "Bediening" is bedoeld voor de gebruiker van het toestel en voor de installateur. Het hoofdstuk "Installatie" is bestemd voor de installateur. 1.3 Info Tenzij anders wordt vermeld, worden alle maten in millimeter aangegeven. 2. Veiligheid 2.1 Info Lees deze handleiding voor gebruik zorgvuldig door en bewaar deze op een veilige plaats.
Bediening - voor de gebruiker en de installateur 3. Toestelbeschrijving Het toestel is als aanvullende verwarming vooral geschikt in de badkamer en voor het drogen van badjassen en badhanddoeken. U kunt uw badhanddoeken op verschillende niveaus uitspreiden. Het toestel verwarmt de ruimte via natuurlijke convectie en stralingswarmte. De ingebouwde kamerthermostaat houdt de kamertemperatuur constant op de ingestelde waarde.
Bediening - installatie INSTALLATIE Uitschakelen 4.6 Buitendienststelling »» Schakel het toestel uit door de bedrijfskeuzeknop naar de stand "OFF" te draaien. Het bedrijfslampje dooft. »» Trek de stekker uit het stopcontact. 5. Reiniging, verzorging en onderhoud Reinig de oppervlakken met een zachte doek met de klassieke onderhoudsproducten, wanneer het toestel is afgekoeld. Info Vermijd schurende en bijtende onderhoudsproducten. 6. Problemen verhelpen 6.1 7. 7.
Installatie - voor de installateur 9.3 Montage badjashouders 26_07_80_0054 1 2 26_07_80_0055 Info Zorg voor een juiste uitlijning van de wandhulzen. 3 »» Schroef de wandhulzen op de wand. »» Monteer de houders op de geleider. Zet de houders nog niet vast. 1 2 3 »» Badjasknop Onderlegschijf Schroef voor de badjasknop Monteer de badjashouder, zoals is afgebeeld. 10.
Installatie - voor de installateur 13. Technische gegevens 13.3 Gegevenstabel BHG BHG 750 500 W W 13.
Obsah - zvláštní pokyny ZVLÁŠTNÍ POKYNY OBSLUHA 1. Obecné pokyny ���������������������������������������������������������� 29 2. Bezpečnost ���������������������������������������������������������������� 29 3. Popis přístroje ����������������������������������������������������������� 30 4. Obsluha ����������������������������������������������������������������������� 30 5. Čištění, péče a údržba ���������������������������������������������� 31 6.
Obsluha - pro uživatele a instalačního technika OBSLUHA 1. Obecné pokyny Kapitola „Obsluha“ je určena uživatelům přístroje a instalačním technikům. Kapitola „Instalace“ je určena instalačním technikům. 1.3 Upozornění Pokud není uvedeno jinak, jsou všechny rozměry uvedeny v milimetrech. 2. Bezpečnost 2.1 Upozornění Dříve, než zahájíte provoz, si pozorně přečtěte tento návod a pečlivě jej uschovejte. Případně předejte návod dalšímu uživateli. 1.1 Bezpečnostní pokyny 1.1.
Obsluha - pro uživatele a instalačního technika 3. Popis přístroje Deaktivovat Přístroj je vhodný především k podpůrnému vytápění koupelen a k vysoušení a nahřívání koupacích plášťů a ručníků. Můžete pověsit několik ručníků do více úrovní. Přístroj vyhřívá místnost přirozenou konvekcí a sálavým teplem. Instalovaný prostorový termostat udržuje teplotu v místnosti na konstantní úrovni podle nastavené hodnoty. Předpokladem k tomu je, aby topný výkon přístroje odpovídal spotřebě tepla v místnosti.
Obsluha a instalace INSTALACE Deaktivovat 4.6 Uvedení mimo provoz »» Vypněte přístroj otočením přepínače provozních režimů do polohy „OFF“. Provozní kontrolka zhasne. »» Vytáhněte zástrčku ze zásuvky. 5. Čištění, péče a údržba Povrch čistěte po vychladnutí měkkou utěrkou a běžnými čisticími prostředky. 7. 7.1 Všeobecné bezpečnostní pokyny 7.2 Předpisy, normy a ustanovení 6.1 Tabulka poruch Závada Příčina Zahřátý vzduch ne- Důvodem může být příjemně zapáchá. při prvním uvedení do provozu prach.
Instalace - pro instalačního technika 9.3 Montáž držáku koupacích plášťů 26_07_80_0054 1 2 26_07_80_0055 Upozornění Pozor na správné vyrovnání nátrubků ve stěně. 3 »» Přišroubujte nástěnné distanční objímky. »» Upevněte držáky na žebřík. Držáky zatím pevně neutahujte. 1 2 3 »» Knoflík na koupací plášť Podložka Destička knoflíku na koupací plášť Namontujte držák koupacího pláště dle obrázku. 10.
Instalace - pro instalačního technika 13. Technické údaje 13.3 Tabulka údajů BHG 500 W 13.
Содержание | Специальные указания СПЕЦИАЛЬНЫЕ УКАЗАНИЯ ЭКСПЛУАТАЦИЯ 1. Общие указания �������������������������������������������������������������34 2. Техника безопасности ���������������������������������������������������35 3. Описание устройства ����������������������������������������������������35 4. Эксплуатация ������������������������������������������������������������������36 5. Чистка, уход и техническое обслуживание ��������������37 6.
Управление – для пользователя и технического специалиста 1.1.2 Символы, вид опасности Символ ! Вид опасности Травма ! Поражение электрическим током Ожог (ожог, обваривание) 1.1.3 Сигнальные слова СИГНАЛЬНОЕ СЛОВО ОПАСНОСТЬ Значение Указания, несоблюдение которых приводит к серьезным травмам или к смертельному исходу. ПРЕДУПРЕЖДЕ- Указания, несоблюдение которых может привести к НИЕ серьезным травмам или к смертельному исходу.
Управление – для пользователя и технического специалиста 4. Эксплуатация 4.1 Активация Описание панели управления 1 2 3 4 5 5 3 4 Индикатор режима работы Индикатор нагрева Ручка регулятора температуры Диапазон настройки «24h auto» Переключатель режимов 26_07_80_0050 Управление прибором осуществляется с помощью интерфейса пользователя. 1 2 4.2 Включение прибора »» Установить переключатель режимов в положение «ВКЛ». »» При помощи ручки регулятора температуры выбрать необходимую температуру помещения.
Эксплуатация – Монтаж МОНТАЖ 4.5 Вывод из эксплуатации »» Выключить прибор, повернув переключатель режимов в положение OFF (ВЫКЛ.). Индикатор режима работы погаснет. »» Извлечь штепсельную вилку из стенной розетки. 5. Чистка, уход и техническое обслуживание После остывания прибора очистить поверхности мягкой тканью с использованием обычных чистящих средств. 7. Монтаж, ввод в эксплуатацию, а также техобслуживание и ремонт устройства должны производиться только квалифицированным специалистом. 7.
Монтаж – для технического специалиста 9.2 Крепление на стене Указание При этом учитывать габаритные размеры и соблюдать минимальные расстояния до других предметов, приведенные в главе «Технические характеристики». »» Просверлить отверстия для крепежа и установить в них дюбели. 1 2 3 4 5 3 4 Винт крепления Муфта крепления Стопорный винт Крепление Заглушка D0000040882 5 2 26_07_80_0058 1 »» Прибор соединить с настенной монтажной планкой. »» Для фиксации прибора затянуть винты. 9.
Монтаж – для технического специалиста 13.2 Минимальные расстояния ≥150 Указание Выполнять любые работы по электроподключению и электромонтажу нужно в соответствии с национальными и региональными правилами. Указание Важно, чтобы розетка с защитным контактом или разъем для стационарного подключения находились сбоку от прибора на расстоянии не менее 10 см. 11.
Гарантия – защита окружающей среды и утилизация Гарантия Приборы, приобретенные за пределами Германии, не подпадают под условия гарантии немецких компаний. К тому же в странах, где продажу нашей продукции осуществляет одна из наших дочерних компаний, гарантия предоставляется исключительно этой дочерней компанией. Такая гарантия предоставляется только в случае, если дочерней компанией изданы собственные условия гарантии. За пределами этих условий никакая гарантия не предоставляется.
Spis treści – wskazówki specjalne WSKAZÓWKI SPECJALNE OBSŁUGA 1. Wskazówki ogólne ����������������������������������������������������� 42 2. Bezpieczeństwo ��������������������������������������������������������� 42 3. Opis urządzenia ���������������������������������������������������������43 4. Obsługa ����������������������������������������������������������������������43 5. Czyszczenie, pielęgnacja i konserwacja ����������������44 6.
Obsługa – przeznaczone dla użytkownika i specjalisty OBSŁUGA 1. Wskazówki ogólne Rozdział „Obsługa” przeznaczony jest dla użytkownika urządzenia i specjalisty. Rozdział „Instalacja” przeznaczony jest dla specjalisty. Wskazówka Przed przystąpieniem do obsługi urządzenia należy dokładnie zapoznać się z niniejszą instrukcją i zachować ją do późniejszego wykorzystania. W przypadku przekazania produktu osobom trzecim niniejszą instrukcję należy również dołączyć. 1.
Obsługa – przeznaczone dla użytkownika i specjalisty 3. Opis urządzenia Urządzenie rzeznaczone jest do użytkowania jako ogrzewanie uzupełniające przede wszystkim w łazienkach, a także do suszenia i ogrzewania szlafroków i ręczników. Ręczniki można wieszać na kilku poziomach. Urządzenie ogrzewa pomieszczenie poprzez konwekcję naturalną i ciepło promieniowania. Wbudowany regulator temperatury utrzymuje temperaturę pomieszczenia na stałym poziomie według nastawionej wartości.
Obsługa – instalacja Z funkcji „2h boost” można korzystać w normalny sposób także przy aktywnym zabezpieczeniu przed dziećmi. Tabliczka znamionowa znajduje się w prawym dolnym rogu urządzenia. Deaktywacja »» Nacisnąć i przytrzymać pokrętło wyboru trybu dłużej niż przez trzy sekundy. Wskaźnik pracy zaświeci się na krótko pięć razy co oznacza włączenie zabezpieczenia przed dziećmi. INSTALACJA 4.6 Wyłączenie z eksploatacji »» Wyłączyć urządzenie, przestawiając pokrętło wyboru trybu w położenie „OFF”.
Obsługa – instalacja 5 3 4 D0000040882 Śruba mocowania Tulejka ścienna Śruba kontrująca Uchwyt Zaślepka 26_07_80_0054 1 2 3 4 5 2 26_07_80_0058 1 Hinweis Należy zapewnić prawidłowe ustawienie tulejek ściennych. »» Połączyć urządzenie z uchwytem ściennym. »» Dokręcić śruby, aby zamocować urządzenie. 9.3 Montaż uchwytów na szlafrok 1 2 3 26_07_80_0055 »» Przykręcić tulejki ścienne. »» Przykręcić mocowania do drabinki. Jeszcze nie dokręcać mocowań.
Instalacja – przeznaczone dla specjalisty Szkody materialne Zwrócić uwagę na treść tabliczki znamionowej. Podane napięcie musi być zgodne z napięciem sieciowym. 13.2 Odstępy minimalne ≥150 ! Wskazówka Wszystkie elektryczne prace przyłączeniowe i instalacyjne wykonywać zgodnie z przepisami krajowymi i lokalnymi.
Gwarancja, ochrona środowiska naturalnego i recycling Gwarancja Urządzeń zakupionych poza granicami Niemiec nie obejmują warunki gwarancji naszych niemieckich spółek. Ponadto w krajach, w których jedna z naszych spółek córek jest dystrybutorem naszych produktów, gwarancji może udzielić wyłącznie ta spółka. Taka gwarancja obowiązuje tylko wówczas, gdy spółka-córka sformułowała własne warunki gwarancji. W innych przypadkach gwarancja nie jest udzielana.
Adressen und Kontakte Vertriebszentrale International EHT Haustechnik GmbH Australia Markenvertrieb AEG Gutenstetter Straße 10 90449 Nürnberg info@eht-haustechnik.de www.aeg-haustechnik.de Tel. 0911 9656-250 Fax 0911 9656-444 Kundendienstzentrale Holzminden Fürstenberger Str. 77 37603 Holzminden Briefanschrift 37601 Holzminden STIEBEL ELTRON Australia Pty. Ltd. 6 Prohasky Street Port Melbourne VIC 3207 Tel. 03 9645-1833 Fax 03 9645-4366 Austria STIEBEL ELTRON Ges.m.b.H.