BOA EN User manual
www.aeg.com CONTENTS 1. 2. 3. 4. 5. 6. 7. 8. 9. 10. 11. 12. SAFETY INFORMATION . . . . . . . . . . . . . . . . . . . . . . . . . . . . . . . . . . . . . . . . . . . . . . . . . . . . . . 3 SAFETY INSTRUCTIONS . . . . . . . . . . . . . . . . . . . . . . . . . . . . . . . . . . . . . . . . . . . . . . . . . . . . . . 4 PRODUCT DESCRIPTION . . . . . . . . . . . . . . . . . . . . . . . . . . . . . . . . . . . . . . . . . . . . . . . . . . . . . 6 BEFORE FIRST USE . . . . . . . . . . . . . . . . . . . . . .
ENGLISH 3 1. SAFETY INFORMATION Before the installation and use of the appliance, carefully read the supplied instructions. The manufacturer is not responsible if an incorrect installation and use causes injuries and damages. Always keep the instructions with the appliance for future reference. 1.1 Children and vulnerable people safety WARNING! Risk of suffocation, injury or permanent disability.
www.aeg.com • Before maintenance cut the power supply. • Do not use harsh abrasive cleaners or sharp metal scrapers to clean the glass door since they can scratch the surface, which may result in shattering of the glass. • To remove the shelf supports first pull the front of the shelf support and then the rear end away from the side walls. Install the shelf supports in the opposite sequence.
ENGLISH • • • • • • • Contact the Service or an electrician to change a damaged mains cable. Do not let mains cables to come in touch with the appliance door, specially when the door is hot. The shock protection of live and insulated parts must be fastened in such a way that it cannot be removed without tools. Connect the mains plug to the mains socket only at the end of the installation. Make sure that there is access to the mains plug after the installation.
www.aeg.com • Be careful when you remove the door from the appliance. The door is heavy! • Clean regularly the appliance to prevent the deterioration of the surface material. • Remaining fat or food in the appliance can cause fire. • Clean the appliance with a moist soft cloth. Only use neutral detergents. Do not use abrasive products, abrasive cleaning pads, solvents or metal objects. • If you use an oven spray, obey the safety instructions on the packaging.
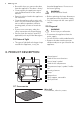
ENGLISH 7 Baking tray For cakes and biscuits. 4. BEFORE FIRST USE WARNING! Refer to the Safety chapters. 4.1 Initial Cleaning • Clean the appliance before first use. Refer to chapter "Care and Cleaning". • Remove all parts from the appliance. 5. DAILY USE WARNING! Refer to the Safety chapters. 5.1 Activating and deactivating the appliance 1. Turn the control knob for the oven functions to select an oven function. 2. Turn the control knob for the temperature to select a temperature. 3.
www.aeg.com Oven function Grilling Fast Grilling Application To grill flat food and to toast bread. To grill flat food in large quantities. To toast bread. 6. USING THE ACCESSORIES WARNING! Refer to the Safety chapters. 6.1 Inserting the accessories Baking tray: Push the baking tray between the guide bars of the shelf support. Wire shelf: Push the shelf between the guide bars of the shelf support and make sure that the feet point down.
ENGLISH 9 7. ADDITIONAL FUNCTIONS 7.1 Cooling fan When the appliance operates, the cooling fan activates automatically to keep the surfaces of the appliance cool. If you deactivate the appliance, the cooling fan can continue to operate until the appliance cools down. 8. HELPFUL HINTS AND TIPS The temperature and baking times in the tables are guidelines only. They depend on the recipes, quality and quantity of the ingredients used. 8.
www.aeg.com Baking results Possible cause Remedy The cake is too dry. The oven temperature is too low. The next time you bake, set a higher oven temperature. The cake is too dry. The baking time is too long. The next time you bake, set a shorter baking time. The cake browns unevenly. The oven temperature is Set a lower oven tempertoo high and the baking ature and a longer baktime is too short. ing time. The cake browns unevenly. The mixture is unevenly distributed.
ENGLISH 11 Cakes / pastries / breads on baking trays Oven function Shelf position Plaited bread / bread crown Conventional Cooking 2 170 - 190 40 - 50 Christmas stollen Conventional Cooking 2 160 - 180 1) 50 - 70 Bread (rye bread): 1. First part of baking process. 2. Second part of baking process. Conventional Cooking 1 1. 230 1) 2. 160 - 180 1. 25 2.
www.aeg.
ENGLISH Dish Oven function Shelf position Temperature (°C) Time (min) Stuffed vegetables Conventional Cooking 1 180 - 200 40 - 60 13 1) Preheat the oven 8.4 Roasting Roasting dishes • Use heat-resistant ovenware to roast (refer to the instructions of the manufacturer). • You can roast large roasting joints directly in the deep pan (if present) or on the wire shelf above the deep pan. • Roast lean meats in the roasting tin with the lid. This keeps the meat more succulent.
www.aeg.com Type of meat Quantity Oven function Shelf position Temperature (°C) Time (min) Meat loaf 750 g - 1 kg Conventional Cooking 1 170 - 190 50 - 60 Porkknuckle (precooked) 750 g - 1 kg Conventional Cooking 1 200 - 220 90 - 120 Quantity Oven function Shelf position Temperature (°C) Time (min) 1 kg Conventional Cooking 1 210 - 220 90 - 120 1.
ENGLISH Type of meat Quantity Oven function Shelf position Temperature (°C) Time (min) 1.5 - 2 kg Conventional Cooking 1 210 - 220 80 - 100 3.5 - 5 kg Conventional Cooking 1 200 - 210 150 - 180 2.5 - 3.5 kg Conventional Cooking 1 200 - 210 120 - 180 4 - 6 kg Conventional Cooking 1 180 - 200 180 - 240 Quantity Oven function Shelf position Temperature (°C) Time (min) 1 - 1.
www.aeg.com Time (min) Shelf position 1st side 2nd side Fillet steaks, veal steaks 4 7 - 10 6-8 Toast / Toast 1) 5 1-3 1-3 Toast with topping 4 6-8 --- Food to be grilled 1) Preheat the oven 8.7 Preserving - Bottom Heat Things to note: • Use only preserve jars of the same dimensions available on the market. • Do not use jars with twist-off and bayonet type lids, or metal tins. • Use the first shelf from the bottom for this function.
ENGLISH 17 9. CARE AND CLEANING WARNING! Refer to the Safety chapters. Notes on cleaning: • Clean the front of the appliance with a soft cloth with warm water and a cleaning agent. • To clean metal surfaces, use a usual cleaning agent. • Clean the oven interior after each use. Then you can remove dirt more easily and it does not burn on. • Clean all oven accessories after each use and let them dry.
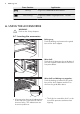
www.aeg.com Install the heating element correctly above the supports on the inner walls of the appliance. 2. Install the shelf supports. 9.3 Removing / inserting the door WARNING! Be careful when you remove the door from the appliance. The door is heavy. 2. Hold the heating element with two hands at the front. 3. Pull it forwards against the spring pressure and out along the supports on the two sides. 4. The heating element folds down. You can clean the oven ceiling.
ENGLISH 8. 9. Inserting the door and the glass panels When the cleaning is completed, install the glass panels and the door. Do the above steps in the opposite sequence. Install the smaller panel first, then the larger. 19 Hold the door glass panels on their top edge one by one and pull them up out of the guide. Clean the glass panel with water and soap. Dry the glass panel carefully. Replacing the top lamp: 1. Turn the lamp glass cover counterclockwise to remove it. 9.
www.aeg.com Problem Possible cause Remedy The lamp does not oper- The lamp is defective. ate. Replace the lamp. Steam and condensation You left the dish in the collect on the food and appliance for too long. in the appliance. Do not keep the dishes in the appliance for longer than 15 - 20 minutes after the cooking ends. If you cannot find a solution to the problem yourself, contact your dealer or the service centre. The necessary data for the service centre is on the rating plate.
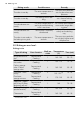
ENGLISH 21 11.1 Installing the oven A = appliance N = recess B A A 180 A WARNING! Installation into flammable material must agree with NIN SEV 1000 (Swiss Association of the Cantonal Fire Insurance Companies) fire protection guidelines and regulations. ca.50 A 595 N 585-592 442 1. 115 CAUTION! Make sure the cable is free when you slide the appliance. N min. 550 20 Use the side handles to hold the appliance and slide it flush into the recess. A 567 N 560-568 A 592 A 11.
www.aeg.com A = appliance N = recess B 180 A ca.50 A N 600 WARNING! Installation into flammable material must agree with NIN SEV 1000 (Association of Cantonal Fire Insurers) fire protection guidelines and regulations. A 595 442 115 CAUTION! Make sure the cable is free when you move the appliance. N min. 550 A 567 20 N 560-568 1. Push the cooker into the recess so that it is flush with the surrounding units. 2. Use at least 2 screws to fix the appliance on both sides (Detail A).
ENGLISH 23 2 3 4 1 1 = 45 mm 2 = 45 mm 3 = 60 mm 4 = 60 mm = 70 mm 1 2 3 4 12. CH GARANTIE, GARANZIA, GUARANTEE 12.1 Kundendienst, service-clientèle, Servizio clienti, Customer Service Centres Servicestellen Points de Service Servizio dopo vendita 5506 Mägenwil/Zürich In- 3018 Bern Mordustriestrasse 10 genstrasse 131 9000 St. Gallen Zürcherstrasse 204e 4052 Basel St.
www.aeg.com Servicestellen Points de Service Servizio dopo vendita Point of Service 6020 Emmenbrücke Seetalstrasse 11 7000 Chur Comercialstrasse 19 Ersatzteilverkauf/Points de vente de rechange/Vendita pezzi di ricambio/ spare parts service: 5506 Mägenwil, Industriestrasse 10, Tel. 0848 848 111 Fachberatung/Verkauf/Demonstration/Vente/Consulente (cucina)/Vendita 8048 Zürich, Badenerstrasse 587, Tel. 044 405 81 11 Garantie Für jedes Produkt gewähren wir ab Verkauf bzw.
ENGLISH 25
www.aeg.
ENGLISH 27
892961716-A-492013 www.aeg.