BP3003001 BP3003021 EN User manual
www.aeg.com CONTENTS 1. 2. 3. 4. 5. 6. 7. 8. 9. 10. 11. 12. SAFETY INFORMATION . . . . . . . . . . . . . . . . . . . . . . . . . . . . . . . . . . . . . . . . . . . . . . . . . . . . . . 3 SAFETY INSTRUCTIONS . . . . . . . . . . . . . . . . . . . . . . . . . . . . . . . . . . . . . . . . . . . . . . . . . . . . . . 4 PRODUCT DESCRIPTION . . . . . . . . . . . . . . . . . . . . . . . . . . . . . . . . . . . . . . . . . . . . . . . . . . . . . 7 BEFORE FIRST USE . . . . . . . . . . . . . . . . . . . . . .
ENGLISH 3 1. SAFETY INFORMATION Before the installation and use of the appliance, carefully read the supplied instructions. The manufacturer is not responsible if an incorrect installation and use causes injuries and damages. Always keep the instructions with the appliance for future reference. 1.1 Children and vulnerable people safety WARNING! Risk of suffocation, injury or permanent disability.
www.aeg.com • Before maintenance cut the power supply. • Do not use harsh abrasive cleaners or sharp metal scrapers to clean the glass door since they can scratch the surface, which may result in shattering of the glass. • Excess spillage must be removed before the pyrolytic cleaning. Remove all parts from the oven. • To remove the shelf supports first pull the front of the shelf support and then the rear end away from the side walls. Install the shelf supports in the opposite sequence.
ENGLISH • Always use a correctly installed shockproof socket. • Do not use multi-plug adapters and extension cables. • Make sure not to cause damage to the mains plug and to the mains cable. Contact the Service or an electrician to change a damaged mains cable. • Do not let mains cables to come in touch with the appliance door, specially when the door is hot. • The shock protection of live and insulated parts must be fastened in such a way that it cannot be removed without tools.
www.aeg.com • Before maintenance, deactivate the appliance and disconnect the mains plug from the mains socket. • Make sure the appliance is cold. There is the risk that the glass panels can break. • Replace immediately the door glass panels when they are damaged. Contact the Service. • Be careful when you remove the door from the appliance. The door is heavy! • Clean regularly the appliance to prevent the deterioration of the surface material. • Remaining fat or food in the appliance can cause fire.
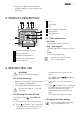
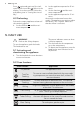
ENGLISH 7 • Remove the door catch to prevent children and pets to get closed in the appliance. 3. PRODUCT DESCRIPTION 1 2 3 3 6 Grill 4 5 7 Oven lamp 8 Fan 9 Shelf support, removable 5 4 11 3 6 10 Rating plate 7 11 Shelf positions 8 2 1 10 9 1 Knob for the oven functions 2 Power indicator 3 Electronic programmer 3.1 Oven accessories • Wire shelf For cookware, cake tins, roasts. • Grill- / Roasting pan To bake and roast or as pan to collect fat. • Trivet For roasting and grilling.
www.aeg.com Press again and again until the indicator for the time of day flashes in the display. To set the new time, follow the procedure given in "Setting the time of day". 4.3 Preheating Preheat the empty appliance to burn off the remaining grease. 1. 2. Let the appliance operate for 45 minutes. 3. Set the function and the maximum temperature. 4. Let the appliance operate for 15 minutes. Accessories can become hotter than usually. The appliance can emit an odour and smoke. This is normal.
ENGLISH Oven function 9 Application Meat To prepare very tender and juicy roasts. Keep Warm To keep the food warm. Defrost To thaw frozen food. Pyrolysis To clean the oven. The high temperature burns off the residual dirt. You can then remove it with a cloth when the appliance is cold. 5.
www.aeg.com Symbol Function Description Duration To set how long the appliance must operate. First set an oven function before you set this function. End To set when the appliance must be deactivated. First set an oven function before you set this function. You can use Duration and End at the same time (Time Delay) to set the time when the appliance must be activated and then deactivated. Press again and again to change the clock function. Minute Minder at any time, also if the appliance is off.
ENGLISH 11 7.1 Trivet and Grill- / Roasting pan To roast larger pieces of meat or poultry on one level, put the trivet in the grill- / roasting pan so that the supports point up. To grill flat food items in large quantities and to make toast, put the trivet in the grill- / roasting pan so that the supports point down. Put the grill- / roasting pan in the oven at the necessary level. WARNING! Be careful when you remove the accessories from a hot appliance. There is a risk of burns. 8.
www.aeg.com Oven temperature Switch-off time 120 - 195 °C 8.5 h 200 - 245 °C 5.5 h 250 - maximum °C 3.0 h After an automatic switch-off, press a button to activate the appliance again. The automatic switch-off works with all oven functions, except Light, Duration, End and Time Delay. the surfaces of the appliance cool. If you deactivate the appliance, the cooling fan continues to operate and the power indicator stays on until the appliance cools down. 8.
ENGLISH smoke condensation, add water each time after it dries up. 13 Initially, monitor the performance when you cook. Find the best settings (heat setting, cooking time, etc.) for your cookware, recipes and quantities when you use this appliance. 9.4 Cooking times Cooking times depend on the type of food, its consistency, and volume. 9.
www.aeg.
ENGLISH TYPE OF DISH Conventional Cooking Shelf position True Fan Cooking Cooking time Temp Shelf po- Temp [min] [°C] sition [°C] 15 Notes Bread rolls 2 190 2 (2 and 4) 180 25 - 40 6 - 8 rolls in a baking tray1) Pizza 1 230 250 1 230 250 10 - 20 In a baking tray or a deep pan1) Scones 3 200 3 190 10 - 20 In a baking tray1) 1) Preheat for 10 minutes.
www.aeg.
ENGLISH Quantity Grilling 17 Cooking time [min] TYPE OF DISH Pieces [g] Shelf position Temp [°C] 1st side 2nd side Chicken (cut in 2) 2 1000 4 max. 30 - 35 25 - 30 Kebabs 4 - 4 max. 10 - 15 10 - 12 Breast of chicken 4 400 4 max. 12 - 15 12 - 14 Hamburger 6 600 4 max. 20 - 30 - Fish fillet 4 400 4 max. 12 - 14 10 - 12 Toasted sandwiches 4-6 - 4 max. 5-7 - Toast 4-6 - 4 max. 2-4 2-3 9.
www.aeg.com Lamb TYPE OF DISH Quantity Shelf position Temperature [°C] Time [min] Leg of lamb, roast lamb 1 - 1.5 kg 1 or 2 150 - 170 100 - 120 Saddle of lamb 1 - 1.5 kg 1 or 2 160 - 180 40 - 60 Quantity Shelf position Temperature [°C] Time [min] Poultry portions 200 - 250 g each 1 or 2 200 - 220 30 - 50 Chicken , half 400 - 500 g each 1 or 2 190 - 210 35 - 50 Chicken, poulard 1 - 1.5 kg 1 or 2 190 - 210 50 - 70 Duck 1.5 - 2 kg 1 or 2 180 - 200 80 - 100 Goose 3.
ENGLISH TYPE OF DISH Defrosting time [min] [g] Further defrosting time [min] Notes 19 Cream 2 x 200 80 - 100 10 - 15 Cream can also be whipped when still slightly frozen in places. Gateau 1400 60 60 - 9.9 Drying - True Fan Cooking Cover the oven shelves with baking parchment.
www.aeg.com Stainless steel or aluminium appliances: Clean the oven door with a wet sponge only. Dry it with a soft cloth. Do not use steel wool, acids or abrasive materials, as they can cause damage to the oven surface. Clean the oven control panel with the same precautions. 10.1 Shelf supports You can remove the shelf supports to clean the side walls. Removing the shelf supports 1. Pull the front of the shelf support away from the side wall. 2.
ENGLISH – P1 - if the oven is not very dirty. The procedure is 1 h long. – P2 - if the oven is more dirty. The procedure is 1 h 30 min long. 6. Before you change the oven lamp: • Deactivate the oven. • Remove the fuses in the fuse box or deactivate the circuit breaker. Press to start the procedure. You can use the End function to delay the start of the cleaning. When the oven is at the set temperature, the door locks. The display and the bars of shows the symbol the heat indicator.
www.aeg.com Removing the oven door and the glass panel 1. Open the door fully and hold the two door hinges. 2. Lift and turn the levers on the two hinges. 3. Close the oven door to the first opening position (halfway). Then pull forward and remove the door from its seat.
ENGLISH 23 4. Put the door on a soft cloth on a stable surface. 5. Release the locking system to remove the glass panels. 6. Turn the two fasteners by 90° and remove them from their seats. 7. Carefully lift (step 1) and remove (step 2) the glass panels one by one. Start from the top panel. Clean the glass panels with water and soap. Dry the glass panels carefully. 90° 8.
www.aeg.com Installing the door and the glass panels A B When the cleaning is completed, install the glass panels and the oven door. Do the above steps in the opposite sequence. Make sure that you put the glass panels (A, B and C) back in the correct sequence. The middle panel (B) has a decorative frame. The screen-printing zone must face the inner side of the door.
ENGLISH Problem 25 Possible cause Remedy The oven does not heat up. The fuse in the fuse box is released. Do a check of the fuse. If the fuse is released more than one time, contact a qualified electrician. The oven lamp does not operate. The oven lamp is defective. Replace the oven lamp. The Pyrolysis does not start. The display shows C3. The door is not fully Fully close the door. closed or the door lock is defective. The display shows F102. 1.
www.aeg.com Problem Possible cause The display shows an error code. Remedy 1. There is an electronic fault. 2. Steam and condensation You left the dish in the collect on the food and oven for too long. in the oven. If you cannot find a solution to the problem yourself, contact your dealer or the service centre. The necessary data for the service centre is on the rating plate.
ENGLISH 27 12.2 Electrical installation Only a qualified person must do the electrical installation. 600 min. 550 20 The manufacturer is not responsible if you do not follow the safety precautions from the chapter "Safety information". min. 560 A B This appliance is supplied without a main plug and a main cable.
397325001-A-362013 www.aeg.