EN FR User Manual Oven Notice d'utilisation Four 2 29 BP3203121
www.aeg.com CONTENTS 1. SAFETY INFORMATION...........................................................................................3 2. SAFETY INSTRUCTIONS.......................................................................................... 4 3. PRODUCT DESCRIPTION........................................................................................ 7 4. BEFORE FIRST USE...................................................................................................7 5. DAILY USE.............
ENGLISH 1. 3 SAFETY INFORMATION Before the installation and use of the appliance, carefully read the supplied instructions. The manufacturer is not responsible if an incorrect installation and use causes injuries and damages. Always keep the instructions with the appliance for future reference. 1.
www.aeg.com • • • • • • Ensure that the appliance is switched off before replacing the lamp to avoid the possibility of electric shock. Do not use a steam cleaner to clean the appliance. Do not use harsh abrasive cleaners or sharp metal scrapers to clean the glass door since they can scratch the surface, which may result in shattering of the glass.
ENGLISH • Connect the mains plug to the mains socket only at the end of the installation. Make sure that there is access to the mains plug after the installation. • If the mains socket is loose, do not connect the mains plug. • Do not pull the mains cable to disconnect the appliance. Always pull the mains plug. • Use only correct isolation devices: line protecting cut-outs, fuses (screw type fuses removed from the holder), earth leakage trips and contactors.
www.aeg.com • Clean regularly the appliance to prevent the deterioration of the surface material. • Remaining fat or food in the appliance can cause fire. • Clean the appliance with a moist soft cloth. Only use neutral detergents. Do not use abrasive products, abrasive cleaning pads, solvents or metal objects. • If you use an oven spray, obey the safety instructions on the packaging. • Do not clean the catalytic enamel (if applicable) with any kind of detergent. 2.
ENGLISH 7 3. PRODUCT DESCRIPTION 3.1 General overview 1 2 3 4 5 6 7 5 8 4 11 3 1 2 3 4 5 6 9 2 1 10 3.2 Accessories • Wire shelf For cookware, cake tins, roasts. 7 8 9 10 11 Control panel Knob for the oven functions Power lamp / symbol / indicator Electronic programmer Knob for the temperature Temperature lamp / symbol / indicator Heating element Lamp Fan Shelf support, removable Shelf positions • Combi pan For cakes and biscuits. To bake and roast or as a pan to collect fat. 4.
www.aeg.com 4.3 Changing the time 2. Let the appliance operate for 1 hour. You can change the time of day only if the oven is off. 3. Set the function and the maximum temperature. 4. Let the appliance operate for 15 minutes. Accessories can become hotter than usual. The appliance can emit an odour and smoke. This is normal. Make sure that the airflow in the room is sufficient. Press . The set time and symbol flash in the display. To set a new time, refer to "Setting the time". 4.
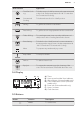
ENGLISH Oven function 9 Application True Fan Cooking To bake on up to 3 shelf positions at the same time and to dry food. Set the temperature 20 - 40 °C lower than for Conventional Cooking. Conventional Cooking To bake and roast food on 1 shelf position. Grilling To grill flat food and to toast bread. Fast Grilling To grill flat food in large quantities and to toast bread. Turbo Grilling To roast larger meat joints or poultry with bones on 1 shelf position. Also to make gratins and to brown.
www.aeg.com Button Function Description CLOCK To set a clock function. PLUS To set the time. 5.6 Heat-up indicator When you activate an oven function, the bars in the display one. The bars show that the oven temperature increases or decreases. come on one by 6. CLOCK FUNCTIONS 6.1 Clock functions table Clock function Application TIME OF DAY To set, change or check the time of day. Refer to "Setting the time". MINUTE MINDER Use to set a countdown time (maximum 23 h 59 min).
ENGLISH 6.3 Setting the MINUTE MINDER 1. Press again and again until "00" flash in the display. Press any button or open the oven door to stop the acoustic signal. and or to set the MINUTE 2. Press MINDER. First you set the seconds, then the minutes and then the hours. At first, the time is calculated in minutes and seconds. When the time you set is longer than 60 minutes, the comes on in the display. symbol The appliance now calculates the time in hours and minutes. 3.
www.aeg.com If you deactivate the appliance, the cooling fan can continue to operate until the appliance cools down. 7.5 Safety thermostat dangerous overheating. To prevent this, the oven has a safety thermostat which interrupts the power supply. The oven activates again automatically when the temperature drops. Incorrect operation of the appliance or defective components can cause 8. HINTS AND TIPS WARNING! Refer to Safety chapters.
ENGLISH 13 8.
www.aeg.
ENGLISH 15 Bread and pizza Food Conventional Cooking True Fan Cooking Time (min) Comments Temperature (°C) Shelf posi- Temperation ture (°C) Shelf position 190 1 190 1 60 - 70 1-2 pieces, 500 gr per piece Rye bread 190 1 180 1 30 - 45 In a bread tin Bread 190 2 180 2 (2 and 4) 25 - 40 6 - 8 rolls in a baking tray Pizza1) 230 - 250 1 230 - 250 1 10 - 20 In a baking tray or a deep pan Scones1) 200 3 190 3 10 - 20 In a baking tray White bread1) rolls1) 1) Preheat th
www.aeg.
ENGLISH 17 8.7 Grilling Preheat the empty oven for 3 minutes before cooking. Food Quantity Temperature (°C) Time (min) 1st side 2nd side Shelf position Pieces (g) 4 800 max. 12 - 15 12 - 14 4 Beef steaks 4 600 max. 10 - 12 6-8 4 Sausages - max. 12 - 15 10 - 12 4 Pork chops 4 600 max. 12 - 16 12 - 14 4 Chicken (cut in 2) 2 1000 max. 30 - 35 25 - 30 4 Kebabs 4 - max. 10 - 15 10 - 12 4 Breast of chicken 4 400 max. 12 - 15 12 - 14 4 Hamburger 6 600 max.
www.aeg.com Pork Food Quantity (kg) Temperature (°C) Time (min) Shelf position Shoulder, neck, ham joint 1 - 1.5 160 - 180 90 - 120 1 or 2 Chop, spare rib 1 - 1.5 170 - 180 60 - 90 1 or 2 Meat loaf 0.75 - 1 160 - 170 50 - 60 1 or 2 Pork knuckle (precooked) 0.75 - 1 150 - 170 90 - 120 1 or 2 Food Quantity (kg) Temperature (°C) Time (min) Shelf position Roast veal 1 160 - 180 90 - 120 1 or 2 Knuckle of veal 1.
ENGLISH 19 8.9 Defrost Food Quantity (g) Defrosting time (min) Further defrosting time (min) Comments Chicken 1000 100 - 140 20 - 30 Place the chicken on an upturned saucer placed on a large plate. Turn halfway through. Meat 1000 100 - 140 20 - 30 Turn halfway through. Meat 500 90 - 120 20 - 30 Turn halfway through.
www.aeg.com Food Temperature (°C) Time (h) Apple slices 60 - 70 Pears 60 - 70 Shelf position 1 position 2 positions 6-8 3 1/4 6-9 3 1/4 9. CARE AND CLEANING WARNING! Refer to Safety chapters. 1. Pull the front of the shelf support away from the side wall. 9.1 Notes on cleaning • Clean the front of the appliance with a soft cloth with warm water and a cleaning agent. • To clean metal surfaces, use a usual cleaning agent. • Clean the appliance interior after each use.
ENGLISH 7. When the appliance is cool again, an acoustic signal sounds and the door unlocks. WARNING! The appliance becomes very hot. There is a risk of burns. 9.5 Cleaning reminder CAUTION! If there are other appliances installed in the same cabinet, do not use them at the same time as the Pyrolysis function. It can cause damage to the appliance. To remind you that the Pyrolysis is necessary, PYR flashes in the display for 10 seconds after each activation and deactivation of the appliance. 1.
www.aeg.com other hand to lift and turn the right side hinge lever. 4. Identify the hinge to the left side of the door. forward and remove the door from its seat. 7. Put the door on a soft cloth on a stable surface. 8. Release the locking system to remove the glass panels. 5. Lift and turn the lever on the left hinge. 9. Turn the two fasteners by 90° and remove them from their seats. 6. Close the oven door halfway to the first opening position.
ENGLISH A B 23 C 90° 10. First lift carefully and then remove the glass panels one by one. Start from the top panel. Make sure that you install the middle panel of glass in the seats correctly. 1 2 11. Clean the glass panels with water and soap. Dry the glass panels carefully. When the cleaning is completed, install the glass panels and the oven door. Do the above steps in the opposite sequence. Make sure that you put the glass panels (A, B and C) back in the correct sequence.
www.aeg.com The back lamp 1. Turn the lamp glass cover counterclockwise to remove it. 2. Clean the glass cover. 3. Replace the lamp with a suitable 300 °C heat-resistant lamp. 4. Install the glass cover. 10. TROUBLESHOOTING WARNING! Refer to Safety chapters. 10.1 What to do if... Problem Possible cause Remedy The oven does not heat up. The oven is deactivated. Activate the oven. The oven does not heat up. The clock is not set. Set the clock. The oven does not heat up.
ENGLISH 25 Problem Possible cause Remedy The display shows "F102". • You did not fully close the door. • The door lock is defective. • Fully close the door. • Deactivate the oven with the house fuse or the safety switch in the fuse box and activate it again. • If the display shows "F102" again, contact the Customer Care Department. The display shows an error code that is not in this table. There is an electrical fault.
www.aeg.com We recommend that you write the data here: Model (MOD.) ......................................... Product number (PNC) ......................................... Serial number (S.N.) ......................................... 11. INSTALLATION 11.2 Securing the appliance to the cabinet WARNING! Refer to Safety chapters. 11.1 Building In A B 548 21 558 min. 550 114 16 20 600 min. 560 589 594 573 594 11.
ENGLISH Total power (W) Section of the cable (mm²) maximum 3680 3 x 1.5 27 The earth cord (green / yellow cable) must be 2 cm longer than phase and neutral cables (blue and brown cables). 12. ENERGY EFFICIENCY 12.1 Product Fiche and information according to EU 65-66/2014 Supplier's name AEG Model identification BP3203121M Energy Efficiency Index 100.0 Energy efficiency class A Energy consumption with a standard load, conventional mode 0.
www.aeg.com temperature setting. The display shows the residual heat temperature. 13. ENVIRONMENT CONCERNS Recycle the materials with the symbol . Put the packaging in applicable containers to recycle it. Help protect the environment and human health and to recycle waste of electrical and electronic appliances. Do not dispose appliances marked with the symbol with the household waste. Return the product to your local recycling facility or contact your municipal office.
FRANÇAIS 29 TABLE DES MATIÈRES 1. CONSIGNES DE SÉCURITÉ................................................................................... 30 2. INSTRUCTIONS DE SÉCURITÉ.............................................................................. 31 3. DESCRIPTION DE L'APPAREIL.............................................................................. 35 4. AVANT LA PREMIÈRE UTILISATION..................................................................... 35 5. UTILISATION QUOTIDIENNE..................
1. www.aeg.com CONSIGNES DE SÉCURITÉ Avant d'installer et d'utiliser cet appareil, lisez soigneusement les instructions fournies. Le fabricant ne peut être tenu pour responsable des dommages et blessures liés à une mauvaise installation ou utilisation. Conservez toujours cette notice avec votre appareil pour vous y référer ultérieurement. 1.
FRANÇAIS • • • • • • • 31 des gants de cuisine pour retirer ou enfourner des accessoires ou des plats allant au four. Avant toute opération de maintenance, déconnectez l'alimentation électrique. Assurez-vous que l'appareil est éteint et débranché avant de remplacer l'éclairage afin d'éviter tout risque de choc électrique. N'utilisez pas de nettoyeur vapeur pour nettoyer l'appareil.
www.aeg.com • Vérifiez que les données électriques figurant sur la plaque signalétique correspondent à celles de votre réseau. Si ce n'est pas le cas, contactez un électricien. • Utilisez toujours une prise de courant de sécurité correctement installée. • N'utilisez pas d'adaptateurs multiprises ni de rallonges. • Veillez à ne pas endommager la fiche secteur ni le câble d'alimentation. Le remplacement du cordon d'alimentation de l'appareil doit être effectué par notre service aprèsvente.
FRANÇAIS • • • • – ne placez jamais de feuilles d'aluminium directement sur le fond de l'appareil. – ne versez jamais d'eau directement dans l'appareil lorsqu'il est chaud. – une fois la cuisson terminée, ne laissez jamais d'aliments ou de plats humides à l'intérieur de l'appareil. – faites attention lorsque vous retirez ou remettez en place les accessoires. La décoloration de l'émail est sans effet sur les performances de l'appareil. Il ne s'agit pas d'un défaut dans le cadre de la garantie.
www.aeg.com • • • • et après la première utilisation à température maximale. Certains oiseaux et reptiles sont extrêmement sensibles (plus que les êtes humains) aux fumées pouvant se dégager lors du processus de nettoyage des fours à pyrolyse. – Ne laissez aucun animal, en particulier aucun oiseau, à proximité de l'appareil pendant et après un nettoyage par pyrolyse ; la première fois, utilisez la température de fonctionnement maximale dans une pièce bien ventilée.
FRANÇAIS 35 3. DESCRIPTION DE L'APPAREIL 3.1 Vue d'ensemble 1 2 3 4 5 6 7 5 8 4 11 3 9 2 1 10 3.2 Accessoires • Grille métallique Permet de poser des plats (rôtis, gratins) et des moules à gâteau/ pâtisserie.
www.aeg.com L'affichage indique réglée. "« 00 » clignote. et l'heure 4.4 Préchauffage 3. Appuyez sur minutes. pour régler les Préchauffez le four à vide afin de faire brûler les résidus de graisse. ou 4. Appuyez sur la touche pour confirmer. Cette action n'est nécessaire que pour le premier réglage de l'heure. Par la suite, la nouvelle heure sera automatiquement sauvegardée au bout de 5 secondes. L'affichage indique la nouvelle heure. 4.
FRANÇAIS 37 5.3 Fonctions du four Fonction du four Utilisation L'appareil est éteint L'appareil est éteint. Chaleur tournante Pour faire cuire sur 3 niveaux en même temps et pour déshydrater des aliments.Diminuez les températures de 20 à 40 °C par rapport à la Convection naturelle. Convection naturelle Pour cuire et rôtir des aliments sur 1 seul niveau. Gril Pour faire griller des aliments peu épais et du pain.
www.aeg.com G) Fonctions de l'horloge 5.5 Touches Touche Fonction Description MOINS Pour régler l'heure. HORLOGE Pour régler une fonction de l'horloge. PLUS Pour régler l'heure. 5.6 Indicateur de chauffe Les barres indiquent l'augmentation ou la diminution de la température du four. Lorsque vous activez une fonction du four, les segments s'affichent un à un . 6. FONCTIONS DE L'HORLOGE 6.
FRANÇAIS Pour la Durée réglez d'abord les minutes puis les heures ; pour la Fin réglez d'abord les heures puis les minutes. Un signal sonore retentit pendant 2 minutes une fois la durée définie écoulée. Le symbole ou et le réglage de l'heure clignotent sur l'affichage. Le four s'arrête. 3. Tournez la manette de sélection des fonctions du four sur la position Arrêt. 4. Appuyez sur n'importe quelle touche ou ouvrez la porte du four pour arrêter le signal sonore.
www.aeg.com 2. Appuyez simultanément sur les touches et et maintenez-les enfoncées pendant au moins 2 secondes. Un signal sonore retentit. SAFE s'affiche. Pour désactiver la Sécurité enfants, répétez l'étape 2. 7.2 Voyant de chaleur résiduelle Lorsque que vous éteignez l'appareil, le voyant de chaleur résiduelle s'allume si la température à l'intérieur du four est supérieure à 40 °C. Tournez la manette du thermostat vers la gauche ou la droite pour que la température du four s'affiche. 7.
FRANÇAIS • L'appareil est doté d'un système spécial qui permet à l'air de circuler et qui recycle perpétuellement la vapeur. Dans cet environnement, ce système permet de cuisiner des plats tout en maintenant ceux-ci tendres à l'intérieur et croquants à l'extérieur. Le temps de cuisson et la consommation énergétique sont donc réduits au minimum. • De l'humidité peut se déposer dans l'enceinte du four ou sur les vitres de la porte. C'est normal.
www.aeg.
FRANÇAIS Mets Cuisson traditionnelle Véritable multichaleur tournante Température (°C) Niveau Température (°C) Niveau - - 140 - 150 Biscuits/ 140 Tresses feuilletées - sur un seul niveau 3 Biscuits/ Tresses feuilletées - sur deux niveaux - Biscuits/ Tresses feuilletées - sur trois niveaux - 43 Durée (min) Commentaires 1, 3 et 5 30 - 45 Sur un plateau de cuisson 140 - 150 3 25 - 45 Sur un plateau de cuisson - 140 - 150 2 et 4 35 - 40 Sur un plateau de cuisson - 140 - 150 1,
www.aeg.
FRANÇAIS 45 Préparations à base d'œufs Mets Cuisson traditionnelle Véritable multichaleur tournante Durée (min) Commentaires Température (°C) Niveau Température (°C) Niveau Gratin de pâtes 200 2 180 2 40 - 50 Dans un moule Gratin aux légumes 200 2 175 2 45 - 60 Dans un moule Quiches1) 180 1 180 1 50 - 60 Dans un moule Lasagnes1) 180 - 190 2 180 - 190 2 25 - 40 Dans un moule Cannello- 2 180 - 190 2 25 - 40 Dans un moule Durée (min) Commentaires 180 - 190 ni1) 1)
www.aeg.
FRANÇAIS Mets Quantité Température (°C) Durée (min) Niveau 1er côté 2ème face Morceaux (g) Steaks de bœuf 4 600 max. 10 - 12 6-8 4 Saucisses 8 - max. 12 - 15 10 - 12 4 Côtelettes de porc 4 600 max. 12 - 16 12 - 14 4 Poulet (coupé en deux) 2 1000 max. 30 - 35 25 - 30 4 Brochettes 4 - max. 10 - 15 10 - 12 4 Escalope de poulet 4 400 max. 12 - 15 12 - 14 4 Steak haché 6 600 max. 20 - 30 - 4 Filet de poisson 4 400 max.
www.aeg.com Mets Quantité (kg) Température (°C) Durée (min) Niveau Côtelette, côte lev- 1 - 1.5 ée 170 - 180 60 - 90 1 ou 2 Pâté à la viande 0.75 - 1 160 - 170 50 - 60 1 ou 2 Jarret de porc (pré- 0.75 - 1 cuit) 150 - 170 90 - 120 1 ou 2 Veau Mets Quantité (kg) Température (°C) Durée (min) Niveau Rôti de veau 1 160 - 180 90 - 120 1 ou 2 Jarret 1.5 - 2 160 - 180 120 - 150 1 ou 2 Quantité (kg) Température (°C) Durée (min) Niveau Gigot d'agneau, 1 - 1.
FRANÇAIS 49 8.9 Décongélation Mets Quantité (g) Durée de décongélation (min) Décongélation complémentaire (min) Commentaires Poulet 1000 100 - 140 20 - 30 Placez le poulet sur une sous-tasse retournée, posée sur une grande assiette Retournez à la moitié du temps. Viande 1000 100 - 140 20 - 30 Retournez à la moitié du temps. Viande 500 90 - 120 20 - 30 Retournez à la moitié du temps.
www.aeg.com Fruits Mets Température (°C) Durée (h) Prunes 60 - 70 Abricots Niveau 1 position 2 positions 8 - 10 3 1/4 60 - 70 8 - 10 3 1/4 Pommes, lamelles 60 - 70 6-8 3 1/4 Poires 60 - 70 6-9 3 1/4 9. ENTRETIEN ET NETTOYAGE AVERTISSEMENT! Reportez-vous aux chapitres concernant la sécurité. 9.1 Remarques concernant l'entretien • Nettoyez la façade du four à l'aide d'une éponge humide additionnée d'eau savonneuse tiède.
FRANÇAIS Options Description du P1 Si le four n'est pas très sale. Durée de la procédure : 1 h. P2 Si vous ne pouvez pas retirer les salissures facilement. Durée de la procédure : 1 h 30 min. 2 1 Réinstallez les supports de grille en répétant cette procédure dans l'ordre inverse. 9.4 Pyrolyse ATTENTION! Retirez tous les accessoires et les supports de grille amovibles. Ne lancez pas la Pyrolyse si vous n'avez pas correctement fermé la porte du four.
www.aeg.com Le symbole « Nettoyage conseillé » s'éteint : • après la fin de la fonction de nettoyage par pyrolyse. • si vous appuyez simultanément sur « » et « » tandis que PYR clignote sur l'affichage. 9.6 Nettoyage de la porte du four La porte du four est dotée de quatre panneaux de verre.Vous pouvez retirer la porte du four et les panneaux de verre intérieurs pour les nettoyer. 4. Identifiez la charnière à gauche de la porte.
FRANÇAIS 53 90° 10. Soulevez doucement puis sortez les panneaux de verre un par un. Commencez par le panneau supérieur. 7. Déposez la porte sur une surface stable recouverte d'un tissu doux. 1 8. Désengagez le système de verrouillage pour retirer les panneaux de verre intérieurs. 9. Faites pivoter les deux fixations de 90° et retirez-les de leurs logements. 2 11. Nettoyez les panneaux de verre à l'eau savonneuse. Séchez soigneusement les panneaux de verre.
www.aeg.com A B AVERTISSEMENT! Risque d'électrocution ! Déconnectez le fusible avant de remplacer l'ampoule. L'éclairage et le diffuseur en verre peuvent être très chauds. C ATTENTION! Tenez toujours l'ampoule halogène avec un chiffon afin d'éviter que des résidus de graisse ne brûlent sur l'ampoule. Veillez à installer correctement le panneau de verre du milieu dans son logement. 1. Éteignez l'appareil 2. Retirez les fusibles de la boîte à fusibles ou coupez le disjoncteur. Éclairage arrière 1.
FRANÇAIS 55 Problème Cause probable Solution Le four ne chauffe pas. Les réglages nécessaires n'ont pas été effectués. Vérifiez que les réglages sont corrects. Le four ne chauffe pas. La fonction d'arrêt automatique est activée. Reportez-vous à « Arrêt automatique ». Le four ne chauffe pas. La sécurité enfants est activée. Reportez-vous à la section « Utilisation de la sécurité enfants ». Le four ne chauffe pas. Le fusible a disjoncté. Vérifiez que le fusible est bien la cause de l'anomalie.
www.aeg.com Problème Cause probable Solution Un code d'erreur ne figurant Une anomalie électrique est pas dans ce tableau s'affisurvenue. che. • Éteignez le four à l'aide du fusible de l'habitation ou du disjoncteur situé dans la boîte à fusibles, puis allumez-le de nouveau. • Si l'affichage indique de nouveau un code d'erreur, contactez le service après-vente. L'appareil est allumé mais il ne chauffe pas. Le ventilateur ne fonctionne pas. L'affichage indique "Demo". 1. 2.
FRANÇAIS 57 11. INSTALLATION AVERTISSEMENT! Reportez-vous aux chapitres concernant la sécurité. 11.1 Encastrement 548 21 558 min. 550 114 16 20 600 min. 560 589 594 573 11.3 Installation électrique Le fabricant ne pourra être tenu pour responsable si vous ne respectez pas les précautions de sécurité du chapitre « Consignes de sécurité ». Cet appareil est fourni avec une fiche d'alimentation et un câble d'alimentation. 11.
www.aeg.com 12. RENDEMENT ÉNERGÉTIQUE 12.1 Fiche produit et informations selon la norme UE 65-66/2014 Nom du fournisseur AEG Identification du modèle BP3203121M Index d'efficacité énergétique 100.0 Classe d'efficacité énergétique A Consommation d'énergie avec charge standard, mode conventionnel 0.93 kWh/cycle Consommation d'énergie avec charge standard, mode avec ventilateur 0.
FRANÇAIS 59 13. EN MATIÈRE DE PROTECTION DE L'ENVIRONNEMENT Recyclez les matériaux portant le électroniques. Ne jetez pas les appareils symbole . Déposez les emballages dans les conteneurs prévus à cet effet. Contribuez à la protection de l'environnement et à votre sécurité, recyclez vos produits électriques et portant le symbole avec les ordures ménagères. Emmenez un tel produit dans votre centre local de recyclage ou contactez vos services municipaux.
867310396-B-442014 www.aeg.