BP5304001 DE Benutzerinformation
www.aeg.com INHALT 1. 2. 3. 4. 5. 6. 7. 8. 9. 10. 11. SICHERHEITSINFORMATIONEN . . . . . . . . . . . . . . . . . . . . . . . . . . . . . . . . . . . . . . . . . . . . . . . 3 SICHERHEITSHINWEISE . . . . . . . . . . . . . . . . . . . . . . . . . . . . . . . . . . . . . . . . . . . . . . . . . . . . . . 4 GERÄTEBESCHREIBUNG . . . . . . . . . . . . . . . . . . . . . . . . . . . . . . . . . . . . . . . . . . . . . . . . . . . . . 8 VOR DER ERSTEN INBETRIEBNAHME . . . . . . . . . . . . . . . . . . . . . . .
DEUTSCH 3 1. SICHERHEITSINFORMATIONEN Lesen Sie vor der Montage und Verwendung des Geräts sorgfältig die mitgelieferte Anleitung. Der Hersteller haftet nicht für Verletzungen oder Schäden, die durch eine fehlerhafte Montage entstehen. Bewahren Sie die Anleitung zum Nachschlagen auf. 1.1 Sicherheit von Kindern und schutzbedürftigen Personen WARNUNG! Es besteht Erstickungsgefahr, das Risiko von Verletzungen oder permanenten Behinderungen.
www.aeg.com • Der Geräteinnenraum wird während des Betriebs heiß. Berühren Sie nicht die Heizelemente im Geräteinnern. Verwenden Sie zum Anfassen des Zubehörs und der Töpfe wärmeisolierende Handschuhe. • Benutzen Sie zum Reinigen des Geräts keinen Dampfreiniger. • Trennen Sie vor Wartungsarbeiten das Gerät von der Stromversorgung. • Benutzen Sie keine Scheuermittel oder Metallschwämmchen zum Reinigen der Ofenglastür; sie können die Glasfläche verkratzen und zum Zersplittern der Scheibe führen.
DEUTSCH 2.1 Montage WARNUNG! Nur eine qualifizierte Fachkraft darf den Elektroanschluss des Geräts vornehmen. • Entfernen Sie das Verpackungsmaterial. • Stellen Sie ein beschädigtes Gerät nicht auf und benutzen Sie es nicht. • Halten Sie sich an die mitgelieferte Montageanleitung. • Seien Sie beim Umsetzen des Geräts vorsichtig, denn es ist schwer. Tragen Sie stets Sicherheitshandschuhe. • Ziehen Sie das Gerät nicht am Türgriff. • Die Mindestabstände zu anderen Geräten und Küchenmöbeln sind einzuhalten.
www.aeg.com • Üben Sie keinen Druck auf die geöffnete Gerätetür aus. • Benutzen Sie das Gerät nicht als Arbeits- oder Abstellfläche. • Halten Sie die Tür immer geschlossen, wenn das Gerät in Betrieb ist. • Öffnen Sie die Gerätetür vorsichtig. Bei der Verwendung von Zutaten, die Alkohol enthalten, kann ein AlkoholLuftgemisch entstehen. • Achten Sie beim Öffnen der Tür darauf, dass keine Funken oder offenen Flammen in das Geräts gelangen.
DEUTSCH • • • • sehr heiß und aus den vorderen Kühlungsöffnungen tritt heiße Luft aus. Die pyrolytische Reinigung erfolgt bei sehr hoher Temperatur und kann Dämpfe von Lebensmittelrückständen und Gerätematerialen freisetzen. Beachten Sie unbedingt Folgendes: – Sorgen Sie während des ersten Gebrauchs bei Verwendung der Höchsttemperatur für eine gute Belüftung. – Sorgen Sie während und nach der Pyrolyse für eine gute Belüftung.
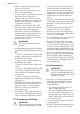
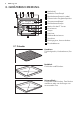
www.aeg.com 3. GERÄTEBESCHREIBUNG 1 2 3 4 1 Bedienfeld 5 6 2 Backofen-Einstellknopf 3 Betriebskontrolllampe/-symbol 5 4 14 3 7 4 Elektronischer Programmspeicher 8 5 Temperaturwahlknopf 9 6 Betriebskontrolllampe 10 11 2 1 12 13 7 Buchse für den KT Sensor 8 Heizelement 9 Lampe 10 Ventilator 11 Rückwandheizelement 12 Unterhitze 13 Einhängegitter, herausnehmbar 14 Einschubebenen 3.1 Zubehör Kombirost Für Kochgeschirr, Kuchenformen, Braten. Backblech Für Kuchen und Plätzchen.
DEUTSCH 9 KT Sensor Zum Messen des Garzustands. 4. VOR DER ERSTEN INBETRIEBNAHME WARNUNG! Siehe Sicherheitshinweise. 4.1 Erste Reinigung • Entfernen Sie alle Teile aus dem Gerät. • Reinigen Sie das Gerät vor der ersten Inbetriebnahme. Zeit wird später nach 5 Sekunden automatisch gespeichert). und die einIm Display wird gestellte Stunde angezeigt. "00“ blinkt. 3. Drücken Sie zur Einstellung der Minuten oder . 4. Siehe Kapitel „Reinigung und Pflege“. 4.
www.aeg.com 3. Zum Ausschalten des Geräts drehen Sie den Backofen-Einstellknopf auf die Position („0“) . Knopfsymbol, -anzeige oder kontrolllampe (je nach Modell, siehe Gerätebeschreibung): • Die Kontrolllampe leuchtet während der Aufheizphase auf. • Die Lampe leuchtet während das Gerät in Betrieb ist. • Das Symbol zeigt an, ob der Knopf eine der Kochzonen, die Ofenfunktionen oder die Temperatur regelt. 5.2 Ofenfunktionen Ofenfunktion Anwendung Schnellaufheizung Zum Verkürzen der Aufheizzeit.
DEUTSCH 2. Um die Temperatur einzustellen, drehen Sie den Temperaturwahlknopf / auf die gewünschte Temperatur. 3. Sobald das Gerät die eingestellte Temperatur erreicht hat, ertönt ein akustisches Signal. 11 Die Schnellaufheizung wird nach dem Signalton nicht ausgeschaltet. Sie müssen die Funktion von Hand ausschalten. 4. Stellen Sie eine Backofenfunktion ein. 5.
www.aeg.com 6. UHRFUNKTIONEN SYMBOL FUNKTION BESCHREIBUNG KURZZEIT-WECKER Zum Einstellen einer Countdownzeit. Diese Funktion hat keine Auswirkung auf den Backofenbetrieb. Sie können den KURZZEIT-WECKER jederzeit einstellen, auch wenn das Gerät ausgeschaltet ist. UHRZEIT Zum Einstellen, Ändern oder Abfragen der Uhrzeit. Siehe „Einstellen der Uhrzeit“. DAUER Einstellen der Betriebsdauer. Stellen Sie zunächst die gewünschte Ofenfunktion ein, bevor Sie Einstellungen für diese Funktion vornehmen.
DEUTSCH Nach Ablauf von 90 % der eingestellten Zeit ertönt ein Signalton. Drücken Sie eine beliebige Taste, um den Signalton abzustellen. 4. Nach Ablauf der Zeit ertönt zwei Minuten lang ein Signalton. "00:00“ und blinken im Display. Drücken Sie eine beliebige Taste, um den Signalton abzustellen. 13 werden. Der Garzeitmesser wird gleichzeitig mit dem Backofen eingeschaltet. und gleichHalten Sie die Tasten zeitig gedrückt, um den Garzeitmesser zurückzusetzen.
www.aeg.com 6. 7. 8. 9. Die neue Standardkerntemperatur wird bei der nächsten Verwendung des KT Sensors angezeigt. Der KT Sensor muss während des Garvorgangs im Fleisch und der Stecker in der Buchse bleiben. Sobald das Fleischstück die eingestellte Kerntemperatur erreicht hat, blinken die Symbole für die Kerntemperatur und den KT Sensor. Es ertönt für zwei Minuten ein Signal. Drücken Sie eine beliebige Taste, um den Signalton abzustellen. Ziehen Sie den Stecker des KT Sensors aus der Buchse.
DEUTSCH 15 Kombirost: Schieben Sie den Kombirost zwischen die Führungsstäbe der Einhängegitter, mit den Füßen nach unten zeigend. • Alle Zubehörteile besitzen kleine Kerben oben auf der rechten und linken Kante, um die Sicherheit zu erhöhen. Diese Einkerbungen dienen auch als Kippsicherung. • Durch den umlaufend erhöhten Rahmen des Rostes ist das Kochgeschirr zusätzlich gegen Abrutschen gesichert. 8. ZUSATZFUNKTIONEN 8.
www.aeg.com als 40 °C ist. Drehen Sie den Temperaturwahlschalter, um die Backofentemperatur anzuzeigen. 8.3 Kühlgebläse Wenn das Gerät in Betrieb ist, wird automatisch das Kühlgebläse eingeschaltet, um die Geräteflächen zu kühlen. Nach dem Abschalten des Geräts läuft das Kühlgebläse weiter, bis das Gerät abgekühlt ist. 8.4 Automatische Abschaltung Aus Sicherheitsgründen wird das Gerät nach einiger Zeit automatisch ausgeschaltet, wenn: • Eine Ofenfunktion eingestellt ist.
DEUTSCH dern Sie in diesem Fall nicht die Temperatureinstellung. Die Bräunungsun- 17 terschiede gleichen sich während des Backvorgangs aus. 9.3 Tipps zum Backen Backergebnis Die Unterseite des Kuchens ist zu hell. Mögliche Ursache Abhilfe Die Einschubebene ist nicht richtig. Stellen Sie den Kuchen auf eine niedrigere Einschubebene. Der Kuchen fällt zusammen (wird feucht, klumpig, streifig). Stellen Sie beim nächsten Kuchen eine etwas Die Backofentemperatur niedrigere Backofentemist zu hoch.
www.aeg.com 9.4 Backen auf einer Einschubebene: Backen in Formen Backware Ofenfunktion Einschubebene Temperatur (°C) Dauer (Min.
DEUTSCH 19 Backware Ofenfunktion Einschubebene Brot (Roggenbrot): 1. Erster Teil des Backvorgangs. 2. Zweiter Teil des Backvorgangs.
www.aeg.com Backware Ofenfunktion Einschubebene Temperatur (°C) Dauer (Min.
DEUTSCH 21 Ofenfunktion Einschubebene Temperatur (°C) Dauer (Min.
www.aeg.com Heißluft mit Ringheizkörper Backware Einschubebene Temperatur (°C) Dauer (Min.) 2 Ebenen 3 Ebenen Rührteigplätzchen 1/4 - 160 - 170 25 - 40 Eiweißgebäck/Baiser 1/4 - 80 - 100 130 - 170 Makronen 1/4 - 100 - 120 40 - 80 Hefekleingebäck 1/4 - 160 - 170 30 - 60 Blätterteiggebäck 1/4 - 170 - 180 1) 30 - 50 Brötchen 1/4 - 180 30 - 55 Small cakes/ Törtchen (20 Stück pro Blech) 1/4 - 1501) 25 - 40 1) Backofen vorheizen. 9.
DEUTSCH Backware Einschubebene Temperatur in °C Zeit (Min.) 2 180 - 200 1) 15 - 25 Piroggen (Russische Version der Calzone) 23 1) Backofen vorheizen. 2) Tiefes Blech benutzen. 9.7 Braten • Benutzen Sie zum Braten hitzebeständiges Geschirr (beachten Sie die Angaben des Herstellers). • Große Bratenstücke können direkt in der Brat- und Fettpfanne (falls vorhanden) oder auf dem Kombirost über der Brat- und Fettpfanne gebraten werden. • Braten Sie magere Fleischsorten in einem Bräter mit Deckel.
www.aeg.com Fleischart Menge Backofenfunktion Einschubebene Temperatur in °C Zeit (Min.) Kotelett/Spare Ribs 1 - 1,5 kg Heißluftgrillen 1 170 - 180 60 - 90 Hackbraten 750 g - 1 kg Heißluftgrillen 1 160 - 170 50 - 60 Schweinshaxe (vorgegart) 750 g - 1 kg Heißluftgrillen 1 150 - 170 90 - 120 Kalbfleisch Fleischart Menge Backofenfunktion Einschubebene Temperatur in °C Zeit (Min.
DEUTSCH 25 Fleischart Menge Backofenfunktion Einschubebene Temperatur in °C Zeit (Min.
www.aeg.com Grillstufe 2 Grillgut Einschubebene Burgers/Frikadellen Zeit (Min.) Erste Seite Zweite Seite 4 8 - 10 6-8 Schweinefilet 4 10 - 12 6 - 10 Würstchen 4 10 - 12 6-8 Filet/Kalbssteaks 4 7 - 10 6-8 Toast /Toast 1) 5 1-3 1-3 Überbackener Toast 4 6-8 - 1) Backofen vorheizen. 9.10 Convenience-Lebensmittel (Fertiggerichte) Heißluft mit Ringheizkörper Convenience-Lebensmittel (Fertiggerichte) Einschubebene Temperatur (°C) Zeit (Min.
DEUTSCH 27 Gefrorene Fertiggerichte Backofenfunktionen Einschubebene Temperatur (°C) Zeit (Min.
www.aeg.com 9.12 Einkochen Hinweise: • Verwenden Sie nur handelsübliche Einweckgläser gleicher Größe. • Verwenden Sie keine Gläser mit Schraub- oder Bajonettdeckeln oder Metalldosen. • Verwenden Sie für diese Funktion die erste Einschubebene von unten. • Stellen Sie nicht mehr als sechs 1-Liter fassende Einweckgläser auf das Backblech. • Füllen Sie alle Gläser gleich hoch und verschließen Sie sie mit dem Verschluss. • Die Gläser dürfen sich nicht berühren.
DEUTSCH 29 Gemüse Einschubebene 1 Ebene 2 Ebenen Temperatur (°C) Bohnen 3 1/4 60 - 70 6- 8 Paprika 3 1/4 60 - 70 5-6 Suppengemüse 3 1/4 60 - 70 5-6 Pilze 3 1/4 50 - 60 6-8 Kräuter 3 1/4 40 - 50 2-3 Dörrgut Dauer (Std.) Obst Einschubebene 1 Ebene 2 Ebenen Temperatur (°C) Dauer (Std.) Pflaumen 3 1/4 60 - 70 8 - 10 Aprikosen 3 1/4 60 - 70 8 - 10 Apfelscheiben 3 1/4 60 - 70 6-8 Birnen 3 1/4 60 - 70 6-9 Dörrgut 9.
www.aeg.com Speise Speisekerntemperatur °C Hammelrücken 80 - 85 Lammbraten / Lammkeule 70 - 75 Wild Speise Speisekerntemperatur °C Hasenrücken 70 - 75 Hasenkeule 70 - 75 Ganzer Hase 70 - 75 Reh-/Hirschrücken 70 - 75 Reh-/Hirschkeule 70 - 75 Fisch Speise Speisekerntemperatur °C Lachs 65 - 70 Forellen 65 - 70 10. REINIGUNG UND PFLEGE WARNUNG! Siehe Sicherheitshinweise.
DEUTSCH – P1 – bei geringfügig verschmutztem Backofen. Die Pyrolysereinigung dauert 1:30 Stunden. – P2 – wenn sich die Verschmutzungen nicht einfach entfernen lassen. Die Pyrolysereinigung dauert 2:30 Stunden. Der Vorgang startet nach 2 Sekunden. Drücken Sie zur Änderung der Programmdauer (P1 oder P2) die Taste , um auszuwählen und drücken Sie dann die Taste oder , um die Dauer der pyrolytischen Reinigung einzustellen. Sie können den Start des Reinigungsvorgangs mit der Endefunktion verzögern.
www.aeg.com 10.3 Lampe WARNUNG! Es besteht die Gefahr eines elektrischen Schlags. Die Lampe und die Glasabdeckung der Lampe können heiß werden. Bevor Sie die Lampe austauschen: • Schalten Sie das Gerät aus. • Entfernen Sie die Sicherungen aus dem Sicherungskasten, oder schalten Sie den Schutzschalter aus. Austauschen der Backofenbeleuchtung (links im Garraum) 1. Entfernen Sie das linke Einhängegitter. 2. Benutzen Sie einen schmalen, stumpfen Gegenstand (z. B.
DEUTSCH 33 1. 2. A A Öffnen Sie die Tür vollständig. Drücken Sie die Klemmhebel (A) an beiden Türscharnieren. 3. Schließen Sie die Backofentür bis zur ersten Öffnungsstellung (Winkel ca. 70°). 4. Fassen Sie die Tür mit beiden Händen seitlich an und ziehen Sie sie schräg nach oben vom Gerät weg. 5. Legen Sie die Ofentür mit der Außenseite nach unten auf ein weiches Tuch und eine stabile Unterlage. Dies verhindert Kratzer. 6.
www.aeg.com Problem Mögliche Ursache Abhilfe Das Gerät heizt nicht. Die erforderlichen Einstellungen wurden nicht vorgenommen. Vergewissern Sie sich, dass die Einstellungen richtig sind. Das Gerät heizt nicht. Die Abschaltautomatik ist eingeschaltet. Siehe „Abschaltautomatik“. Das Gerät heizt nicht. Die Sicherung hat ausge- Vergewissern Sie sich, löst. dass die Sicherung der Grund für die Störung ist. Löst die Sicherung wiederholt aus, wenden Sie sich an eine zugelassene Elektrofachkraft.
DEUTSCH Wenn Sie das Problem nicht selbst lösen können, wenden Sie sich an Ihren Fachhändler oder Kundendienst. Die vom Kundendienst benötigten Daten finden Sie auf dem Typenschild. Das Typenschild befindet sich am Frontrahmen des Garraums. Wir empfehlen, dass Sie folgende Daten hier notieren: Modell (MOD.) ......................................... Produktnummer (PNC) ......................................... Seriennummer (S.N.) ......................................... 12.
892961775-B-362013 www.aeg.