BP5304001 User manual
Contents Thank you for choosing one of our high-quality products. To ensure optimal and regular performance of your appliance please read this instruction manual carefully. It will enable you to navigate all processes perfectly and most efficiently. To refer to this manual any time you need to, we recommend you to keep it in a safe place. And please pass it to any future owner of the appliance. We wish you much joy with your new appliance.
Safety information 3 • For your personal safety and the safety of your property • For the respect of the environment • For the correct operation of the appliance. Always keep these instructions with the appliance also if you move or sell it. The manufacturer is not responsible if incorrect installation or use results in damage.
Safety information Electrical connection • The appliance must be earthed. • Make sure that the electrical data on the rating plate agree with your domestic power supply. • Information on the voltage is on the rating plate. • Always use a correctly installed shockproof socket. • Do not use multi-way plugs, connectors and extension cables. There is the risk of fire. • Do not replace or change the mains cable. Contact the service centre.
Safety information 5 • Do not clean the appliance with steam cleaners, high-pressure cleaners, sharp objects, abrasive cleaning agents, abrasive sponges and stain removers • If you use an oven spray, follow the instructions from the manufacturer. • Do not clean the glass door with abrasive cleaning agents or metal scraper. Heat resistant surface of the inner glass can break and shatter. • When the door glass panels are damaged they become weak and can break. You must replace them.
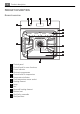
Product description PRODUCT DESCRIPTION General overview 2 3 4 5 6 1 7 8 9 5 4 14 3 10 2 1 11 12 13 1 2 3 4 5 6 7 8 9 10 11 12 13 14 Control panel Control knob for oven functions Power indicator Electronic programmer Control knob for temperature Temperature indicator Core temperature sensor socket Heating element Lamp Fan Rear wall heating element Bottom heat Shelf rails, removable Shelf positions
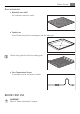
Before first use Oven accessories • Nonstick oven shelf For cookware, cake tins, roasts. • Combi tray Set of Combi tray has the roasting pan and the inlay grid. Use the inlay grid only with the roasting pan. • Core Temperature Sensor To measure how far the meat is cooked. BEFORE FIRST USE WARNING! Refer to "Safety information" chapter.
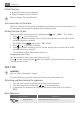
Daily use Initial Cleaning • Remove all parts from the appliance. • Clean the appliance before first use. Refer to chapter "Care and Cleaning". First connection to the mains After first connection to the mains all symbols in the display are on for some seconds. For the subsequent few seconds the display shows software version. Setting the time of day After the software version goes off, the display shows and " 12:00 ". " 12 " flashes. 1. Press or to set current hour. 2.
Daily use Oven function Application True Fan Cooking To bake maximum on three oven levels at the same time. Decrease the oven temperatures (20-40 °C) compared with Conventional. And to dry food. Pizza Setting To bake on one oven level food with a more intensive browning and a crispy base. Decrease the oven temperatures (20-40 °C) compared with Conventional Conventional Cooking Bottom Heat Defrosting Grilling Fast Grilling To bake and roast on one oven level.
Clock Functions Buttons Button Function CLOCK MINUS, PLUS , Description To set the clock function. To set a value for temperature or time MINUTE MINDER To set the minute minder. To switch ON/OFF light in oven cavity, hold button more than 3 seconds TEMPERATURE To check temperature inside the oven cavity. To check the Food Sensor temperature, when is connected (if applicable). Use only when the oven function is set.
Using the Accessories A sound operates after the time ends for 2 minutes. or flash in the display. The oven stops. 6. Press any button or open the oven door to stop the sound. If you press of the END button during setting hours for DURATION function. 11 symbol and time setting , the appliance goes to setting When END function is activated the Timer/Residual heat indicator shows relation between Time of day and END time set.
Using the Accessories Core temperature sensor Core temperature sensor measures the core temperature of the meat. When the meat is at the set temperature, the appliance deactivates. There are two temperatures to be set: • the oven temperature: refer to the table for roasting; • the core temperature: refer to the table for core temperature sensor; Only use the food sensor supplied or genuine replacement parts. 1. Activate the appliance. 2.
Using the Accessories 13 Every time you put the core temperature sensor in the socket, you need to set the duration and end time again. When you put the core temperature sensor plug in the socket, the display shows current to set the temperature that the Temperature/Time display core temperature.
Additional Functions You can use the combi tray to roast larger pieces of meat or poultry on one level: • Put the inlay grid inside the roasting pan so that the supports of the oven shelf point up. • Put the roasting pan in the oven at the necessary level. You can use the combi tray to grill flat dishes in large quantities and to toast: • Put the inlay grid inside the roasting pan so that the supports of the oven shelf point downwards. • Put the roasting pan in the oven at the necessary level.
Helpful hints and tips 15 • if an oven function is running. • if you do not change the oven temperature. Oven temperature Switch-off time 30 °C -120 °C 12.5 h. 120 °C - 200 °C 8.5 h. 200 °C -250 °C 5.5 h. 250 °C -maximum °C 3.0 h. After an automatic switch-off, press a any button to operate the appliance again. The Automatic switch-off works with all oven functions, except Light, Low temperature cooking, Food sensor, Duration, End, Time delay.
Helpful hints and tips Type of baking Oven function Oven level Temperature °C Time Hours:Mins. Apple pie (2tins Ø20cm, diagonally off set) Conventional Cooking 1 180 1:10-1:30 Savoury flan (e. g, True Fan Cooking quiche lorraine) 1 160-180 0:30-1:10 Cheesecake Conventional Cooking 1 170-190 1:00-1:30 Quark flan, round Conventional Cooking 1 140 - 160 0:50-1:10 Oven function Oven level Temperature °C Time Hours:Mins.
Helpful hints and tips Type of baking 17 Oven function Oven level Temperature °C Time Hours:Mins. Unleavened bread True Fan Cooking 1 200-220 0:08-0:15 Tarts (CH) True Fan Cooking 1 180-200 0:35-0:50 1) Pre-heat the oven 2) Use the drip tray or roasting tray Biscuits Type of baking Oven function Oven level Temperature °C Time Hours:Mins.
Helpful hints and tips Biscuits/small cakes/pastries/rolls True Fan Cooking Type of baking True Fan Cooking Shelf positions from bottom Temperature in °C Time Hours:Mins.
Helpful hints and tips Baking results Cake browns unevenly 19 Possible cause Remedy Mixture is unevenly distributed Spread the mixture evenly on the baking tray Temperature too low Use a slightly higher oven setting Cake does not cook in the baking time given Bakes and gratins Dish Oven function Shelf position Temperature °C Time Hours:Mins.
Helpful hints and tips Type of meat Chop, spare rib Quantity Oven function Shelf position Temperature °C Time mins. 1-1.5 kg Turbo Grill 1 170-180 60-90 Meat loaf 750 g-1 kg Turbo Grill 1 160-170 50-60 Porkknuckle (precooked) 750 g-1 kg Turbo Grill 1 150-170 90-120 Veal Type of meat Quantity Oven function Shelf position Temperature °C Time mins. Roast veal 1 kg Turbo Grill 1 160-180 90-120 Knuckle of veal 1.
Helpful hints and tips Type of meat Quantity Oven function Shelf position 21 Temperature °C Time mins. Goose 3.5-5 kg Turbo Grill 1 160-180 120-180 Turkey 2.5-3.5 kg Turbo Grill 1 160-180 120-150 Turkey 4-6 kg Turbo Grill 1 140-160 150-240 Temperature °C Time mins. 210-220 40-60 Fish (steamed) Type of meat Quantity Oven function Shelf position Whole fish 1-1.5 kg Conventional Cooking 1 Slow Grill Food to be grilled Oven level Grilling time (mins.
Helpful hints and tips Type of baking Shelf position Temperature °C Time Mins.
Helpful hints and tips 23 Preserving Soft fruit Preserve Temperature in °C Cooking time until simmering in mins. Continue to cook at 100°C in mins. Strawberries, blueberries, raspberries, ripe gooseberries 160-170 35-45 - Preserve Temperature in °C Cooking time until simmering in mins. Continue to cook at 100°C in mins. Pears, guinces, plums 160-170 35-45 10-15 Temperature in °C Cooking time until simmering in mins. Continue to cook at 100°C in mins.
Helpful hints and tips Core temperature sensor table Beef Food Meat Core Temperature Rib steak or fillet steak: rare 45 - 50 °C Rib steak or fillet steak: medium 60 - 65 °C Rib steak or fillet steak: well done 70 - 75 °C Pork Food Meat Core Temperature Shoulder of pork, ham joint, neck 80 - 82 °C Chop (saddle), smoked pork loin 75 - 80 °C Meat loaf 75 - 80 °C Veal Food Meat Core Temperature Roast veal 75 - 80 °C Knuckle of veal 85 - 90 °C Mutton / lamb Food Meat Core Temperature
Care and cleaning 25 CARE AND CLEANING WARNING! Refer to "Safety information" chapter. Notes on cleaning: • Clean the front of the appliance with a soft cloth with warm water and cleaning agent. • To clean metal surfaces use a usual cleaning agent • Clean the oven interior after each use. Thus you can remove dirt more easily and it does not burn on. • Clean stubborn dirt with a special oven cleaner.
Care and cleaning Shelf rails You can remove the shelf rails to clean the side walls. Removing the shelf rail 1. Pull the front of the shelf rail away from the side wall. 2. Pull the shelf rail from the back of the side wall to remove it. To install the shelf rail follow the procedure in reverse. Valid with telescopic runners: The retaining pins on the telescopic shelf runners must point to the front! 2 1 Oven lamp WARNING! There is a risk of electrical shock.
Care and cleaning Replacing the oven lamp: 1. You can find the lamp glass cover at the left side of the cavity. Remove the left shelf rail. 2. Use a narrow, blunt object (for example a teaspoon) to remove the glass cover. Clean the glass cover. 3. If necessary, replace the oven lamp with applicable 300°C heat-resistant oven lamp. Use the same oven lamp type. 4. Install the glass cover. 5. Install the left shelf rail. Oven door and glass panels To clean the oven door, remove it.
What to do if… 2. Hold the door t (B) on the top edge of the door at the two sides and push inwards to release the clip seal. 3. Pull the door t to the front to remove it. B 4. Hold the door glass panels on their top edge one by one and pull them up out of the guide 5. Clean the door glass panels. To install panels follow the procedure in reverse. Install the smaller panel first, then the larger. WHAT TO DO IF… WARNING! Refer to "Safety information" chapter.
Installation Problem Possible cause 29 Solution The display shows C2 You want to start the pyrolytic Remove the food sensor plug cleaning or defrost function from the socket but you did not remove food sensor plug from the socket.
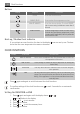
Installation 200 cm2 547 546 114 590 560 min. 20 572 530 min. 594 579 5 590 min. 567 594 21 30 max. R1200 mm 130 140 alternativ 100 H05VV-F H05RR-F min.
Disposal 31 90º 2x3,5x25 DISPOSAL The symbol on the product or on its packaging indicates that this product may not be treated as household waste. Instead it should be taken to the appropriate collection point for the recycling of electrical and electronic equipment. By ensuring this product is disposed of correctly, you will help prevent potential negative consequences for the environment and human health, which could otherwise be caused by inappropriate waste handling of this product.
GREAT BRITAIN & IRELAND - Guarantee/Customer Service GREAT BRITAIN & IRELAND - GUARANTEE/CUSTOMER SERVICE GB IE Standard guarantee conditions We, Electrolux, undertake that if within 12 months of the date of the purchase this Electrolux appliance or any part thereof is proved to be defective by reason only of faulty workmanship or materials, we will, at our option repair or replace the same FREE OF CHARGE for labour, materials or carriage on condition that: • Appliance has been correctly installed an
For Customer Service in The Republic of Ireland please contact us at the address below: Electrolux Group (Irl) Ltd, Long Mile Road, Dublin 12, Republic of Ireland Tel: +353 (0)1 4090751, Email: service.eid@electrolux.ie GB European Guarantee: This appliance is guaranteed by Electrolux in each of the countries listed at the back of this user manual, for the period specified in the appliance guarantee or otherwise by law.
Ireland +353 1 40 90 753 Long Mile Road Dublin 12 Italia +39 (0) 434 558500 C.so Lino Zanussi, 26 - 33080 Porcia (PN) Latvija +371 67313626 Kr. Barona iela 130/2, LV-1012, Ri‐ ga Lietuva +370 5 278 06 03 Ozo 10a, LT-08200 Vilnius Luxembourg +352 42 431 301 Rue de Bitbourg, 7, L-1273 Hamm Magyarország +36 1 252 1773 H-1142 Budapest XIV, Erzsébet királyné útja 87 Nederland +31 17 24 68 300 Vennootsweg 1, 2404 CG - Alphen aan den Rijn Norge +47 81 5 30 222 Risløkkvn.
892944993-A-042010 www.aeg-electrolux.