BP7314001 BP7314021 BP7314071 NL Gebruiksaanwijzing
www.aeg.com INHOUD 1. 2. 3. 4. 5. 6. 7. 8. 9. 10. 11. 12. 13. 14. VEILIGHEIDSINFORMATIE . . . . . . . . . . . . . . . . . . . . . . . . . . . . . . . . . . . . . . . . . . . . . . . . . . . . 3 VEILIGHEIDSVOORSCHRIFTEN . . . . . . . . . . . . . . . . . . . . . . . . . . . . . . . . . . . . . . . . . . . . . . . . 4 BESCHRIJVING VAN HET PRODUCT . . . . . . . . . . . . . . . . . . . . . . . . . . . . . . . . . . . . . . . . . . . 7 VOOR HET EERSTE GEBRUIK . . . . . . . . . . . . . . . . . . . . . . . . .
NEDERLANDS 3 1. VEILIGHEIDSINFORMATIE Lees zorgvuldig de meegeleverde instructies voor installatie en gebruik van het apparaat. De fabrikant is niet verantwoordelijk voor letsel en schade veroorzaakt door een foutieve installatie. Bewaar de instructies van het apparaat voor toekomstig gebruik. 1.1 Veiligheid van kinderen en kwetsbare mensen WAARSCHUWING! Gevaar voor verstikking, letsel of permanente invaliditeit.
www.aeg.com • Zet de stroomtoevoer uit alvorens onderhoud te plegen. • Gebruik nooit agressieve reinigingsmiddelen of scherpe metalen schrapers om de glazen deur schoon te maken, deze kunnen krassen veroorzaken op het oppervlak, waardoor het glas zou kunnen breken. • Overtollige voedselresten moeten verwijderd worden alvorens de pyrolytische reiniging te starten. Verwijder alle onderdelen van de oven. • Gebruik uitsluitend de vleesthermometer die aanbevolen is voor dit apparaat.
NEDERLANDS • Zorg dat u de hoofdstekker en kabel niet beschadigt. Neem contact op met de service-afdeling of een elektromonteur om een beschadigde hoofdkabel te vervangen. • Laat de stroomkabel niet in aanraking komen met de deur van het apparaat, met name niet als deze heet is. • De schokbescherming van delen onder stroom en geïsoleerde delen moet op zo'n manier worden bevestigd dat het niet zonder gereedschap kan worden verplaatst. • Steek de stekker pas in het stopcontact als de installatie is voltooid.
www.aeg.com • Schakel het apparaat uit en trek de stekker uit het stopcontact voordat u onderhoudshandelingen verricht. • Zorg ervoor dat het apparaat is afgekoeld. Er bestaat een risico dat de glasplaten kunnen breken. • Vervang direct de glazen deurpanelen als deze beschadigd zijn. Neem contact op met de service-afdeling. • Wees voorzichtig bij het verwijderen van de deur uit het apparaat.
NEDERLANDS • Voordat u het lampje vervangt, dient u de stekker van het apparaat uit het stopcontact te halen. • Gebruik alleen lampjes met dezelfde specificaties. • Haal de stekker uit het stopcontact. • Snijd het netsnoer van het apparaat af en gooi dit weg. • Verwijder de deurgreep om te voorkomen dat kinderen en huisdieren opgesloten raken in het apparaat. 2.5 Verwijdering WAARSCHUWING! Gevaar voor letsel of verstikking. 3.
www.aeg.com Combi schaal Voor cake en koekjes. Voor braden en roosteren of als schaal om vet op te vangen. Vleesthermometer Voor het vaststellen van het gaarpunt van het gerecht. Telescopische geleiders Voor roosters en bakplaten. 4. VOOR HET EERSTE GEBRUIK WAARSCHUWING! Zie de veiligheidshoofdstukken . De dagtijd instellen: 1. aan om het uur in te 4.1 Eerste reiniging Raak of stellen. 2. Raak aan. • Verwijder alle onderdelen van het apparaat. • Reinig het apparaat voor het eerste gebruik.
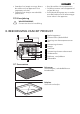
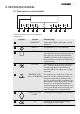
NEDERLANDS 9 5. BEDIENINGSPANEEL 5.1 Elektronische tijdschakelklok 1 2 3 4 5 6 7 8 9 10 Gebruik de tiptoetsen om het apparaat te bedienen. 1 Tiptoets -functie - WEERGAVE Omschrijving Toont de huidige instellingen van het apparaat. 2 AAN/UIT 3 OPTIES Voor het instellen van een ovenfunctie, een automatisch programma of een reinigingsfunctie (alleen geselecteerde modellen). Rechtstreekse toegang tot de ovenfunctie wanneer het apparaat is uitgeschakeld.
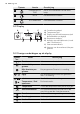
www.aeg.com Tiptoets -functie Omschrijving 8 OVENVERLICHTING 9 KLOK De klokfuncties instellen. 10 KOOKWEKKER De Kookwekker instellen. Het in- of uitschakelen van de ovenlamp. 5.2 Display A B C A) Ovenfunctiesymbool B) Temperatuur/tijd C) Display van de klok/restwarmte (ook de kookwekker en dagtijd) G F E D D) Restwarmte-indicatie E) Indicatie voor de klokfuncties (zie de tabel "Klokfuncties") F) Voorverwarmindicatie G) Nummer van de ovenfunctie/het pro- gramma 5.
NEDERLANDS 5.4 Voorverwarmindicatie Als u een ovenfunctie inschakelt, gaan de balkjes op het display branden. De balkjes geven aan dat de temperatuur in het apparaat toe- of afneemt. 11 Wanneer het apparaat de ingestelde temperatuur heeft bereikt, verdwijnen de balkjes van het display. 6. DAGELIJKS GEBRUIK WAARSCHUWING! Zie de veiligheidshoofdstukken . U kunt het apparaat gebruiken in: • de handmatige modus - u stelt de verwarmingsfunctie, de temperatuur en de kooktijd handmatig in.
www.aeg.com Ovenfunctie 11 Applicatie Ontdooien Om bevroren gerechten te ontdooien. 12 Onderwarmte Voor het bakken van taarten met een knapperige bodem en om voedsel in te maken. 13 ECO Braden Dankzij ECO-functies kunt u het energieverbruik tijdens het koken optimaliseren. Het is daarom nodig om de kooktijd eerst in te stellen. Zie voor meer informatie over de aanbevolen instellingen de kooktabellen voor een ovenfunctie die vrijwel hetzelfde is.
NEDERLANDS • Restwarmte: – Wanneer de verwarmingsfunctie of een programma in werking is, worden de verwarmingselementen 10% eerder uitgeschakeld (de lamp en ventilator blijven werken). Deze functie werkt alleen als de kooktijd langer dan 30 minuten is. Anders moet u de klokfuncties (duur, eindtijd, tijdvertraging) gebruiken. Deze toepassing werkt niet met de grillfuncties. – Wanneer het apparaat uit is, kunt u de warmte gebruiken om het eten warm te houden.
www.aeg.com 7.2 De DUUR instellen 1. Activeer het apparaat en stel een ovenfunctie en de temperatuur in. 2. Druk herhaaldelijk op totdat op het display wordt weergegeven. knippert op het display. 3. Raak of aan om de minuten van de DUUR in te stellen. 4. Raak 5. Gebruik of om de uren van de DUUR in te stellen. aan om te bevestigen. Als u tijdens het instellen van de of aanraakt, schaDUUR kelt het apparaat over naar de instelling van de functie EINDE. 6.
NEDERLANDS 3. 15 neer de oven op een later tijdstip automatisch wordt in- en uitgeschakeld. In eerst ingedit geval wordt de DUUR steld, en dan EINDE (zie "De DUUR instellen" en "Het EINDE instellen"). Wanneer de tijdvertragingsfunctie wordt ingeschakeld, geeft het display het statische symbool van de ovenfunctie weer, met een punt en . De punt geeft aan welke klokfunctie zich op het display voor de klok-/restwarmte bevindt. Raak aan. Anders start de KOOKWEKKER na vijf seconden automatisch. 4.
www.aeg.com Programmanummer Programmanaam 10 CITROENCAKE 11 KWARKTAART 12 BROODJES 13 VOLKORENBROOD 14 DEEG LATEN RIJZEN 15 AARDAPPELGRATIN 16 LASAGNE 17 CANNELLONI 18 KANT-EN-KLARE TAART 19 AFBAKPIZZA 20 KANT-EN-KLARE AARDAPPELGERECHTEN Op onze website vindt u de recepten voor de automatische programma's van dit apparaat. Om het juiste Receptenboek te vinden, controleer het productnummer op het classificatieplatje op de voorzijde van het frame van de binnenkant van het apparaat.
NEDERLANDS Wanneer er een programma met kerntemperatuursensor wordt ingesteld, geeft het display de kooktijd en weer. en 8.5 Automatische programma's met vleesthermometer De kerntemperatuur van het gerecht is standaard en kan in programma's met de vleesthermometer niet worden veranderd. Het programma eindigt wanneer het apparaat de ingestelde kerntemperatuur heeft bereikt. 1. Schakel het apparaat in. 2. Raak herhaaldelijk aan totdat het display weergeeft. 3.
www.aeg.com Nuttige informatie: U kunt de kerntemperatuur alleen instellen wanneer het symbool knippert. Als op het display voor de kerntemperatuur wordt weergegeven, gebruikt u en of om een nieuwe waarde in te stellen. 6. Selecteer de ovenfunctie en, indien nodig, de oventemperatuur. Het display geeft de huidige kerntemperatuur en de temperatuurbalk aan die de relatie toont tussen de ingestelde oventemperatuur en de huidige oventemperatuur.
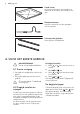
NEDERLANDS 19 Het rooster en de diepe pan samen plaatsen Plaats het rooster op de diepe pan. Plaats de diepe pan tussen de geleidestangen van een van de ovenniveaus. 9.3 Telescopische geleiders - de ovenaccessoires plaatsen Plaats de bakplaat of braadpan op de telescopische geleiders. Plaats het bakrooster op de telescopische geleiders zodat de pootjes naar beneden zijn gericht. Door de verhoogde lijst die om het rooster loopt is het kookgerei bovendien beveiligd tegen wegglijden. 9.
www.aeg.com 10. EXTRA FUNCTIES 10.1 Functie Favoriet 10.3 Toetsblokkering Gebruik deze functie voor het opslaan van uw favoriete temperatuur- en tijdinstellingen van een ovenfunctie of programma. 1. Stel de temperatuur en tijd voor een ovenfunctie of programma in. U kunt de functie alleen inschakelen als het apparaat in werking is. Toetsblokkering voorkomt dat een ovenfunctie per ongeluk wordt ingeschakeld. 2. Raak gedurende langer dan drie seconden aan. Er klinkt een geluidssignaal. 3.
NEDERLANDS Indicatie van het instelmenu Beschrijving In te stellen waarde SET2 RESTWARMTE-INDICATIE ON / OFF SET3 REINIGINGSHERINNERING ON / OFF SET41) TOETSVOLUME CLICK / BEEP / OFF SET5 FOUTTOON ON / OFF SET6 ONDERHOUDSMENU --- SET7 INSTELLINGEN RESETTEN YES / NO SET82) TIJD VERLENGEN ON / OFF 21 1) Het geluid van de tiptoets aan/uit kan niet worden uitgeschakeld. 2) Alleen geselecteerde modellen U kunt het instellingenmenu alleen instellen wanneer het apparaat is uitgeschakeld.
www.aeg.com – Als u tijdens helderheid 's nachts een tiptoets aanraakt (behalve AAN/UIT), keert het display gedurende 10 seconden terug naar helderheid voor overdag. – Als het apparaat uit staat en u de kookwekker hebt ingesteld. Wanneer de kookwekker eindigt, keert het display terug naar helderheid voor 's nachts. 10.7 Koelventilator Als het apparaat in werking is, wordt de koelventilator automatisch ingeschakeld om de oppervlakken van het apparaat koel te houden.
NEDERLANDS Bakresultaat 23 Mogelijke oorzaak Oplossing De cake zakt in en wordt klef, klonterig, streperig. Te korte baktijd. Baktijd verlengen. U kunt de baktijd niet verlagen door een hogere temperatuur in te stellen. De cake zakt in en wordt klef, klonterig, streperig. Er zit te veel vloeistof in het mengsel. Minder vocht gebruiken. Let op de kneedtijden, vooral bij het gebruik van keukenmachines. De cake is te droog. De oventemperatuur is te laag.
www.aeg.com Verwarmingssoort Ovenfunctie Plaathoogte Temperatuur (°C) Tijd (min.) Taartbodem van zandtaartdeeg Multi hetelucht 2 170 - 180 1) 10 - 25 Taartbodem roerdeeg Multi hetelucht 2 150 - 170 20 - 25 Apple pie / Appeltaart (2 vormen Ø 20 cm, diagonaal geplaatst) Multi hetelucht 2 160 60 - 90 Apple pie / Appeltaart (2 vormen Ø 20 cm, diagonaal geplaatst) Boven + Onderwarmte 1 180 70 - 90 Kwarktaart Boven + Onderwarmte 1 170 - 190 60 - 90 1) Oven voorverwarmen.
NEDERLANDS Verwarmingssoort Ovenfunctie Plaathoogte Temperatuur (°C) Tijd (min.
www.aeg.com Verwarmingssoort Ovenfunctie Plaathoogte Temperatuur (°C) Tijd (min.
NEDERLANDS 27 Multi hetelucht (vochtig) Soort gerecht Roosterhoogte Temperatuur (°C) Tijd (min.) Pastaschotel 2 180 - 200 45 - 60 Lasagne 2 180 - 200 45 - 60 Aardappelgratin 2 190 - 210 55 - 80 Zoet gerecht 2 180 - 200 45 - 60 Tulband of brioche 1 160 - 170 50 - 70 Vlechtbrood/broodkrans 2 170 - 190 40 - 50 Kruimeltaart (droog) 3 160 - 170 20 - 40 Koekjes gemaakt van gistdeeg 2 160 - 170 20 - 40 11.
www.aeg.com Multi hetelucht Verwarmingssoort Plaathoogte Temperatuur (°C) Tijd (min.) 2 rekposities 3 rekposities Klein gerezen gebak 1/4 - 160 - 170 30 - 60 Klein bladerdeeggebak 1/4 - 170 - 180 1) 30 - 50 Broodjes 1/4 - 180 30 - 55 Small cakes / Kleine cakes (20 stuks/bakplaat) 1/4 - 1501) 25 - 40 1) Oven voorverwarmen. Bereid de gerechten als u deze functie gebruikt altijd zonder deksel. 11.
NEDERLANDS Verwarmingssoort Plaathoogte Temperatuur °C Tijd (min.
www.aeg.com 11.9 Braden met circulatiegrill Rundvlees Hoeveelheid Ovenfunctie Plaathoogte Temperatuur °C Tijd (min.) 1 - 1,5 kg Boven + Onderwarmte 1 230 120 - 150 Biefstuk of ossehaas: rood per cm dikte Circulatiegrill 1 Biefstuk of ossehaas: medium per cm dikte Circulatiegrill 1 Biefstuk of ossehaas: gaar per cm dikte Circulatiegrill 1 Soort vlees Stoofvlees 190 - 200 1) 180 - 190 1) 170 - 180 5-6 6-8 1) 8 - 10 1) Oven voorverwarmen.
NEDERLANDS 31 Lamsvlees Soort vlees Hoeveelheid Ovenfunctie Plaathoogte Temperatuur °C Tijd (min.) Lamsbout / geroosterd lamsvlees 1 - 1,5 kg Circulatiegrill 1 150 - 170 100 - 120 Lamsrug 1 - 1,5 kg Circulatiegrill 1 160 - 180 40 - 60 Hoeveelheid Ovenfunctie Plaathoogte Temperatuur °C Tijd (min.
www.aeg.com Vis (gestoomd) Soort vlees Hoeveelheid Ovenfunctie Plaathoogte Temperatuur °C Tijd (min.) 1 - 1,5 kg Boven + Onderwarmte 1 210 - 220 40 - 60 Hele vis Alleen platte stukken vlees of vis grillen. Lege oven met grillfuncties altijd 5 minuten voorverwarmen. 11.10 Grill Grill altijd met de maximale temperatuurinstelling. Rooster in de rekstand plaatsen, zoals aangeraden in de grilleertabel. Altijd de pan plaatsen om vet op te vangen op de eerste rekstand.
NEDERLANDS Schotel Ontdooitijd (min.) Verdere ontdooitijd (min.) Opmerking 33 Kip 1000 g 100 - 140 20 - 30 Leg de kip op een omgekeerde onderschotel in een groot bord. Halverwege de bereidingstijd omdraaien. Vlees, 1000 g 100 - 140 20 - 30 Halverwege de bereidingstijd omdraaien. Vlees, 500 g 90 - 120 20 - 30 Halverwege de bereidingstijd omdraaien.
www.aeg.com Diepvries- en kant-en-klaargerechten Ovenfuncties Rekstand Temperatuur (°C) Tijd (min.
NEDERLANDS 11.14 Inmaken Let op: • Gebruik alleen weckpotten van dezelfde afmetingen. • Gebruik geen weckpotten met een draai- of bajonetsluiting en metalen bakken. • Gebruik het eerste rooster van de bodem van deze functie. • Zet niet meer dan zes weckpotten van één liter op de bakplaat. 35 • Vul de glazen potten gelijkmatig en sluit ze af met een klem. • De weckpotten mogen elkaar niet raken. • Vul ca. 1/2 liter water op de bakplaat, zodat er voldoende vocht in de oven ontstaat.
www.aeg.
NEDERLANDS Opmerkingen over schoonmaken: • Maak de voorkant van het apparaat schoon met een zachte doek en een warm sopje. • Gebruik voor metalen oppervlakken een universeel reinigingsmiddel. • Reinig de binnenkant van het apparaat na elk gebruik. Vuil laat zich dan het makkelijkst verwijderen en kan niet aanbranden. • Verwijder hardnekkig vuil met een speciale ovenreiniger. • Reinig alle accessoires na elk gebruik en laat ze drogen. Gebruik een zachte doek met warm water en een schoonmaakmiddel.
www.aeg.com 12.2 Inschuifrail Verwijderen van de inschuifrail U kunt de inschuifrail verwijderen om de zijwanden te reinigen. 1. Trek de inschuifrail bij de voorkant uit de zijwand. 2. Trek de inschuifrail bij de achterkant uit de zijwand en verwijder deze. 2 1 De inschuifrail installeren Installeer de inschuifrail in de omgekeerde volgorde. Geldig bij de telescopische geleiders: De pinnetjes op de telescopische geleiders moeten naar voren wijzen. 12.
NEDERLANDS 39 3. Vervang de lamp door een geschikte 300°C hittebestendige lamp. 4. Plaats het afdekglas terug. 5. De linker inschuifrails installeren. 12.4 De ovendeur reinigen De deur en de glaspanelen verwijderen U kunt de ovendeur en de interne glazen panelen verwijderen om schoon te maken. Het aantal glasplaten verschilt per model. WAARSCHUWING! Wees voorzichtig bij het verwijderen van de deur uit het apparaat. De deur is zwaar. 1. 2. A A Open de deur helemaal.
www.aeg.com 8. 9. De deur en de glaspanelen installeren Als u de glaspanelen en de ovendeur heeft schoongemaakt, plaatst u ze terug. Houd de glasplaten aan de bovenkant vast en trek deze een voor een omhoog uit de geleiding. Reinig de glasplaat met een sopje. Droog de glasplaat voorzichtig af. Voer bovenstaande stappen uit in de omgekeerde volgorde. Plaats de kleinste glasplaat eerst, daarna de grotere glasplaten. 13. PROBLEMEN OPLOSSEN WAARSCHUWING! Zie de veiligheidshoofdstukken .
NEDERLANDS Probleem Mogelijke oorzaak 41 Oplossing Op het display verschijnt C2. U wilt de pyrolitische rei- Haal de stekker van de niging starten, warmvleesthermometersensor houd- of ontdooifunctie uit het contact. starten maar u verwijderde de vleesthermometersensorstekker niet uit het contact. Op het display verschijnt C3. U wilt de pyrolytische rei- Sluit de deur volledig. niging starten maar u heeft de ovendeur niet goed gesloten. Op het display verschijnt F102. Het deurslot is defect.
www.aeg.com Serienummer (S.N.) ......................................... 14. TECHNISCHE INFORMATIE Spanning 220 - 240 V Frequentie 50 Hz 15. MILIEUBESCHERMING Recycle de materialen met het symbool . Gooi de verpakking in een geschikte verzamelcontainer om het te recyclen. Help om het milieu en de volksgezondheid te beschermen en recycle het afval van elektrische en elektronische apparaten. Gooi apparaten gemarkeerd met het symbool niet weg met het huishoudelijk afval.
NEDERLANDS 43
892956185-C-032013 www.aeg.