BP7314001 BP7314021 BP7314071 ES Manual de instrucciones
www.aeg.com ÍNDICE DE MATERIAS 1. 2. 3. 4. 5. 6. 7. 8. 9. 10. 11. 12. 13. 14. INFORMACIÓN SOBRE SEGURIDAD . . . . . . . . . . . . . . . . . . . . . . . . . . . . . . . . . . . . . . . . . . . 3 INSTRUCCIONES DE SEGURIDAD . . . . . . . . . . . . . . . . . . . . . . . . . . . . . . . . . . . . . . . . . . . . . 4 DESCRIPCIÓN DEL PRODUCTO . . . . . . . . . . . . . . . . . . . . . . . . . . . . . . . . . . . . . . . . . . . . . . . 7 ANTES DEL PRIMER USO . . . . . . . . . . . . . . . . . . . . . . . . . .
ESPAÑOL 3 1. INFORMACIÓN SOBRE SEGURIDAD Antes de instalar y utilizar el aparato, lea atentamente las instrucciones facilitadas. El fabricante no se hace responsable de los daños y lesiones causados por una instalación y uso incorrectos. Guarde siempre las instrucciones junto con el aparato para futuras consultas. 1.1 Seguridad de niños y personas vulnerables ADVERTENCIA Existe riesgo de sufrir asfixia, lesiones o incapacidad permanente.
www.aeg.com • El aparato se calienta cuando está en funcionamiento. No toque las resistencias del aparato. Utilice siempre guantes de horno cuando introduzca o retire accesorios o utensilios refractarios. • No utilice un limpiador a vapor para limpiar el aparato. • Antes de realizar tareas de mantenimiento, corte la corriente eléctrica.
ESPAÑOL • Respete siempre la distancia mínima entre el aparato y los demás electrodomésticos y mobiliario. • Asegúrese de que el aparato se instala debajo y junto a estructuras seguras. • Los laterales del aparato deben colocarse junto a otros aparatos o muebles de la misma altura. Conexión eléctrica ADVERTENCIA Riesgo de incendios y descargas eléctricas. • Todas las conexiones eléctricas deben realizarse por electricistas cualificados. • El aparato debe quedar conectado a tierra.
www.aeg.com mables dentro, cerca o encima del aparato. ADVERTENCIA Podría dañar el aparato. • Para evitar daños o decoloraciones del esmalte: – no coloque recipientes ni otros objetos directamente sobre la base del aparato. – no coloque papel de aluminio directamente en la parte inferior del aparato. – No ponga agua directamente en el aparato caliente. – No deje platos húmedos ni comida en el aparato una vez finalizada la cocción. – Tenga cuidado al retirar o instalar los accesorios.
ESPAÑOL – Retirar cualquier mascota (especialmente pájaros) de las proximidades del horno durante y después de la limpieza pirolítica y use primero la temperatura máxima para una zona bien ventilada. • Las mascotas de pequeño tamaño también pueden ser muy sensibles a los cambios de temperatura localizados cerca de todos los hornos pirolíticos. • Las superficies antiadherentes de recipientes, sartenes, bandejas, utensilios, etc.
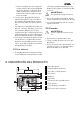
www.aeg.com 3.1 Accesorios Parrilla Para bandejas de horno, pastel en molde, asados. Bandeja Para pasteles y galletas. Bandeja combi Para pasteles y galletas. Para hornear y asar o como grasera. Sonda térmica Para medir cuánto se ha hecho el alimento. Carriles telescópicos Para parrillas y bandejas. 4. ANTES DEL PRIMER USO ADVERTENCIA Consulte los capítulos sobre seguridad. 4.1 Limpieza inicial • Retire todas las piezas del aparato. • Limpie el aparato antes del primer uso.
ESPAÑOL 3. 4.2 Ajuste y modificación de la hora Toque o para ajustar la hora. Toque o . para ajustar los mi- Toque o . La pantalla de Temperatura/Hora muestra la nueva hora. Cambio de la hora Se puede cambiar la hora solo cuando el aparato está apagado. Toque . parpadea en la pantalla. Para ajustar la nueva hora utilice el procedimiento anterior. Puesta en hora del reloj: 2. o 4.
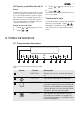
www.aeg.com Sensor 5 Función Descripción TEMPERATURA / Para ajustar y ver la temperatura de la CALENTAMIENTO cavidad o la de la sonda térmica (si RÁPIDO existe). Si se mantiene pulsada durante tres segundos, activa o desactiva la función de Calentamiento rápido. Acceso directo al ajuste de temperatura de la primera función del horno cuando el aparato está apagado. 6 ARRIBA, ABAJO 7 OK Para confirmar una selección o ajuste. Para desplazarse hacia abajo en el menú.
ESPAÑOL Símbolos / / Nombre 11 Descripción kg / gr Se usa un programa de horno con introducción de peso. h / min Se usa una función de reloj. Temperatura / Calentamiento rápido La función está activada. Temperatura Puede ver o cambiar la temperatura. Sonda térmica La sonda térmica se encuentra en la toma de la sonda. Cierre puerta Se usa la función de cierre de puerta. Bombilla del horno La luz se apaga. Avisador Se usa la función del avisador. 5.
www.aeg.com Función del horno Aplicación 5 Congelados Para preparar alimentos precocinados como patatas fritas, porciones o rollos de primavera crujientes. 6 Grill + Turbo Para asar piezas de carne grandes o aves con hueso en una posición de parrilla. También para gratinar y dorar. 7 Grill rápido Para asar al grill grandes cantidades de alimentos de poco espesor y tostar pan. 8 Grill 9 Turbo plus 10 Mantener caliente Para mantener calientes los alimentos.
ESPAÑOL 6.3 Consulta de la temperatura Puede ver la temperatura del aparato cuando esté en uso la función o el programa. 1. Toque . La pantalla de Temperatura/Hora muestra la temperatura del aparato. Si desea cambiar la temperatura del horno, toque una vez más y utilice o . 2. Toque para volver a la temperatura ajustada o bien la pantalla la mostrará automáticamente después de cinco segundos. 6.4 Función de calentamiento rápido La función de calentamiento rápido reduce el tiempo de precalentamiento.
www.aeg.com 7. FUNCIONES DE RELOJ SÍMBOLO PIROLÍTICA DESCRIPCIÓN TEMPORIZADOR Para ajustar el temporizador. Indica cuánto tiemDE AVANCE DEL po funciona el aparato. Esta función no influye en CONTADOR el funcionamiento del aparato. HORA Para examinar la hora. Para cambiar la hora consulte "Programación del reloj". DURACIÓN Para ajustar cuánto tiempo funciona el aparato. FIN Para configurar cuándo se desactiva el aparato.
ESPAÑOL 15 7.4 Compruebe el resultado (sólo los modelos seleccionados) función no afecta al funcionamiento del horno. Puede ajustar el AVISADOR en cualquier momento, incluso si el horno está apagado. Si se ajusta FIN o DURACIÓN, se emite una señal acústica dos minutos antes del final de la cocción y se enciende la lámpara. El aparato cambia al ajuste de la función FIN o DURACIÓN.
www.aeg.com Existen tres tipos de programas automáticos: • Recetas automáticas • Programas automáticos con introducción de peso • Programas automáticos con sonda térmica 8.1 MENU RECETAS La pantalla muestra la posición de la parrilla y los tiempos de cocción predeterminados para todas las recetas automáticas. 8.
ESPAÑOL 6. Toque un sensor o abra la puerta del aparato para detener la señal acústica. 8.4 Programas automáticos con introducción de peso Al ajustar el peso de la carne, el aparato calcula el tiempo de asado. 1. Active el aparato. 2. Toque 3. Toque o para ajustar el programa con peso (consulte el "Libro de recetas"). La pantalla muestra: el tiempo de cocción, el símbolo de duración , un peso por defecto y una unidad de medida (kg, g). . 4.
www.aeg.com 3. 4. 5. Coloque el enchufe de la sonda térmica en la toma de la parte frontal del aparato. La pantalla muestra y la temperatura interior programada predeterminada. La temperatura es de 60 °C durante el primer uso y el último valor ajustado para cada uso siguiente. Toque o para ajustar la temperatura interior. Toque o bien los ajustes se guardarán automáticamente después de 5 segundos. Información útil: Puede ajustar la temperatura interior solo cuando parpadee.
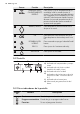
ESPAÑOL 19 9.2 Inserción de los accesorios Parrilla y bandeja honda juntas: La bandeja honda y la parrilla quedan enmarcadas por los bordes. Estos bordes y la forma de las guías son medidas de seguridad que impiden que los recipientes se resbalen. Parrilla: Inserte la parrilla entre las guías del carril y asegúrese de que las hendiduras apuntan hacia abajo. • Todos los accesorios tienen pequeñas hendiduras en la parte superior de los bordes derecho e izquierdo para incrementar la seguridad.
www.aeg.com Coloque la parrilla sobre los carriles telescópicos de forma que las patas apunten hacia abajo. El marco exterior realzado de la parrilla es un dispositivo especial contra el deslizamiento de los recipientes. 9.4 Introducción de la parrilla y de la bandeja honda conjuntamente Coloque la parrilla sobre la bandeja honda. Coloque la parrilla y la bandeja honda sobre los carriles telescópicos. 10. FUNCIONES ADICIONALES 10.
ESPAÑOL 10.3 Tecla de Bloqueo Puede activar la función únicamente cuando el aparato esté funcionando. La Tecla de Bloqueo impide un cambio accidental de la función del horno. Activación / desactivación de la función de Tecla de Bloqueo: 1. Encienda el aparato. 2. Active una función o ajuste del horno. 3. Mantenga pulsado y al mismo tiempo durante 2 segundos. Sonará una señal acústica. Loc aparece o desaparece en la pantalla.
www.aeg.com Temperatura Hora de apagado 30 °C - 115 °C 12,5 h 120 °C - 195 °C 8,5 h 200 °C - 245 °C 5,5 h 250 °C - máxima °C 3,0 h Después de un apagado automático, toque un sensor para utilizar de nuevo el aparato. El apagado automático funciona con todas las funciones del horno, excepto la Luz, Cocina a baja temperatura, Sonda térmica, Duración, Fin e Inicio diferido. 10.
ESPAÑOL • Si no encuentra los datos exactos para una receta concreta, siga los de una preparación similar. • El tiempo de cocción puede ampliarse unos 10-15 minutos cuando se hornea repostería en más de un nivel. 23 • Los pasteles y las pastas que se hornean a niveles diferentes no se doran de modo uniforme al principio. En este caso, no cambie el ajuste de temperatura. Las diferencias se compensarán durante el horneado. 11.
www.aeg.com 11.
ESPAÑOL 25 Tipo de horneado Función del horno Posición de la parrilla Temperatura (°C) Tiempo (min) Brazo relleno (pastel) de Navidad Calor superior + inferior 2 160 - 180 1) 50 - 70 Pan (pan de centeno): 1. Primera parte del proceso de horneado. 2. Segunda parte del proceso de horneado.
www.aeg.com Tipo de horneado Función del horno Bizcochos con levadura coronados de Calor superior guarniciones + inferior delicadas (por ej. requesón, crema, natillas) Posición de la parrilla Temperatura (°C) Tiempo (min) 3 160 - 180 1) 40 - 80 1) Precaliente el horno. 2) Utilice una bandeja honda.
ESPAÑOL 27 Tipo de horneado Función del horno Posición de la parrilla Temperatura (°C) Tiempo (min) Small cakes / Pastelillos (20 unidades por bandeja) Turbo 3 1501) 20 - 35 Small cakes / Pastelillos (20 unidades por bandeja) Calor superior + inferior 3 1701) 20 - 30 1) Precaliente el horno.
www.aeg.com Tipo de alimento Posición de la parrilla Temperatura (°C) Tiempo (min) Pastel de azúcar, seco 3 160 - 170 20 - 40 Galletas de masa con levadura 2 160 - 170 20 - 40 11.
ESPAÑOL 29 Turbo Tipo de horneado Posición de la parrilla 2 posiciones 3 posiciones 1/4 - Small cakes / Pastelillos (20 unidades por bandeja) Temperatura (°C) Tiempo (min) 1501) 25 - 40 1) Precaliente el horno. Cuando utilice esta función, cocine siempre con el recipiente descubierto sin tapa. 11.6 Cocina a baja temperatura Utilice esta función para preparar piezas de carne y pescado tiernas y magras con temperaturas internas de 65 °C como máximo.
www.aeg.com Tipo de horneado Posición de la parrilla Temperatura °C Tiempo (min) Pastel de manzana, cerrado 1 150 - 170 50 - 60 Pastel de verduras 1 160 - 180 50 - 60 Pan sin levadura 2 230 - 2501) 10 - 20 Empanada de masa de hojaldre 2 160 - 180 1) 45 - 55 Flammekuchen (plato típico de Alsacia) 2 230 - 2501) 12 - 20 Piroggen (versión rusa de la pizza calzone) 2 180 - 200 1) 15 - 25 1) Precaliente el horno. 2) Utilice una bandeja honda. 11.
ESPAÑOL Tipo de carne Cantidad Función del horno Posición de la parrilla Rosbif o solomillo entero: hecho al punto por cm de altura Grill + Turbo 1 Rosbif o solomillo entero: muy hecho por cm de altura Grill + Turbo 1 Temperatura °C 180 - 190 1) 170 - 180 31 Tiempo (min) 6-8 1) 8 - 10 1) Precaliente el horno.
www.aeg.
ESPAÑOL 33 Pescado (al vapor) Tipo de carne Cantidad Función del horno Posición de la parrilla Temperatura °C Tiempo (min) Pescado entero hasta 1 Kg 1 - 1,5 kg Calor superior + inferior 1 210 - 220 40 - 60 Cocine al grill sólo trozos de carne o pescado poco gruesos. Precaliente siempre el horno en vacío con la función de grill durante 5 minutos. 11.10 Grill Hornee al grill con el ajuste máximo de temperatura. Coloque la rejilla en el nivel recomendado en la tabla de uso.
www.aeg.com 11.11 Descongelación Extraiga el alimento del envase y colóquelo en un plato. Plato No lo cubra con ningún cuenco ni plato, ya que podría prolongar el tiempo de descongelación. Utilice el primer nivel desde abajo. Tiempo de Tiempo de desdescongela- congelación posción (min) terior (min) Observación Pollo, 1.000 g 100 - 140 20 - 30 Coloque el pollo encima de un plato pequeño puesto al revés en un plato grande. Dar la vuelta a media cocción. Carne, 1.
ESPAÑOL Comida precocinada Posición de la parrilla Temperatura (°C) Tiempo (min) Lasaña/Canelones, frescos 2 170 - 190 35 - 45 Lasaña/Canelones congelad 2 160 - 180 40 - 60 Queso gratinado al horno 3 170 - 190 20 - 30 Alitas de pollo 2 190 - 210 20 - 30 35 Platos preparados congelados Alimentos para cocinar Funciones del horno Posición de la parrilla Temperatura (°C) Tiempo (min) según las indi- según las indicaciones del caciones del fabricante fabricante Pizza congela- Calor su
www.aeg.com Fruta Alimentos para secar Posición de la parrilla 1 nivel 2 niveles Temperatura (°C) Tiempo (h) Ciruelas 3 1/4 60 - 70 8 - 10 Albaricoques 3 1/4 60 - 70 8 - 10 Manzana en rodajas 3 1/4 60 - 70 6-8 Peras 3 1/4 60 - 70 6-9 11.14 Conservar Consideraciones a tener en cuenta: • Utilice únicamente botes de conserva del mismo tamaño disponibles en el mercado. • No utilice botes con cierre hermético (twist-off) o de bayoneta ni latas metálicas.
ESPAÑOL 37 Temperatura en °C Tiempo de cocción hasta que empiece a hervir (min) Continuar la cocción a 100 °C (min). Encurtidos variados 160 - 170 50 - 60 5 - 10 Colinabos / guisantes / espárragos 160 - 170 50 - 60 15 - 20 Conservas 1) Deje reposar en el horno después de apagado. 11.
www.aeg.com Alimento Temperatura interna del alimento °C Lomo de corzo/ciervo 70 - 75 Pata de corzo/ciervo 70 - 75 Pescado Alimento Temperatura interna del alimento °C Salmón 65 - 70 Trucha 65 - 70 12. MANTENIMIENTO Y LIMPIEZA ADVERTENCIA Consulte los capítulos sobre seguridad. Notas sobre la limpieza: • Limpie la parte delantera del aparato con un paño suave humedecido en agua templada y jabón neutro. • Limpie las superficies metálicas con un producto no agresivo.
ESPAÑOL La puerta se desbloquea cuando la temperatura en el interior del horno está por debajo de las condiciones de seguridad y la limpieza pirolítica ha terminado. Durante la limpieza pirolítica, la lámpara permanece apagada. 39 despieza parpadea en la pantalla pués de cada desactivación del aparato durante los siguientes 10 segundos. El aviso de limpieza se apaga: • Cuando termina la limpieza pirolítica • Cuando lo desactiva en los ajustes básicos (consulte "Ajustes básicos").
www.aeg.com PRECAUCIÓN Coloque un paño sobre el fondo del interior del aparato. Así evitará que se dañe la tapa de vidrio de la lámpara y la cavidad. Utilice siempre una bombilla del mismo tipo. Cambio de la bombilla en el techo del horno: 1. Gire la tapa de cristal hacia la izquierda para extraerla. 2. Limpie la tapa de vidrio. 3. Cambie la bombilla por otra apropiada termorresistente hasta 300 °C. 4. Coloque la tapa de cristal. Cambio de la bombilla del lado izquierdo del horno. 1.
ESPAÑOL 6. 2 B 7. 1 8. 9. Instalación de la puerta y los paneles de cristal Cuando haya terminado la operación de limpieza, instale los paneles de cristal y 41 Sujete por ambos lados el acabado de la puerta (B), situado en el borde superior de ésta, y empuje hacia dentro para soltar el sello de resorte. Tire del borde de acabado de la puerta hacia delante para desengancharla. Uno tras otro, sujete los paneles de cristal de la puerta por su borde superior y extráigalos del carril.
www.aeg.com Problema Posible causa Solución La pantalla muestra C2. Desea iniciar la función Desconecte el enchufe de limpieza pirolítica, de la sonda térmica de la mantener caliente o des- toma de corriente. congelar, pero no ha retirado el enchufe de la sonda térmica de la toma. La pantalla muestra C3. Desea iniciar la limpieza pirolítica pero no ha cerrado completamente la puerta. Cierre completamente la puerta. La pantalla muestra F102. El cierre de la puerta está averiado.
ESPAÑOL 14. INFORMACIÓN TÉCNICA Tensión 220 - 240 V Frecuencia 50 Hz 15. ASPECTOS MEDIOAMBIENTALES Recicle los materiales con el símbolo . Coloque el material de embalaje en los contenedores adecuados para su reciclaje. Ayude a proteger el medio ambiente y la salud pública, así como a reciclar residuos de aparatos eléctricos y electrónicos. No deseche los aparatos marcados con el símbolo junto con los residuos domésticos.
892961924-A-362013 www.aeg.