BP7314621 CS TROUBA NÁVOD K POUŽITÍ
PRO DOKONALÉ VÝSLEDKY Děkujeme vám, že jste si zvolili výrobek značky AEG. Aby vám bezchybně sloužil mnoho let, vyrobili jsme jej s pomocí inovativních technologií, které usnadňují život, a vybavili jsme jej funkcemi, které u obyčejných spotřebičů nenajdete. Stačí věnovat pár minut čtení a zjistíte, jak z něho získat co nejvíce. PŘÍSLUŠENSTVÍ A SPOTŘEBNÍ MATERIÁL V e-shopu společnosti AEG naleznete vše, co potřebujte k udržování všech vašich spotřebičů AEG v perfektním stavu.
Obsah 3 OBSAH 4 8 10 11 13 15 17 18 21 24 27 29 29 Bezpečnostní informace Popis spotřebiče Před prvním použitím Ovládací panel Denní používání Funkce hodin Automatické programy Použití příslušenství Doplňkové funkce Čištění a údržba Co dělat, když... Technické údaje Poznámky k ochraně životního prostředí V tomto návodu pro uživatele se používají následující symboly: Důležité informace týkající se Vaší bezpečnosti a informace o ochraně spotřebiče před poškozením.
Bezpečnostní informace BEZPEČNOSTNÍ INFORMACE Tento návod si pečlivě přečtěte ještě před instalací spotřebiče a jeho prvním použitím. Vý‐ robce nezodpovídá za škody a zranění způsobená nesprávnou instalací či chybným použí‐ váním. Návod k použití vždy uchovávejte spolu se spotřebičem pro jeho budoucí použití. Bezpečnost dětí a postižených osob UPOZORNĚNÍ Hrozí nebezpečí udušení, úrazu nebo jiných trvalých následků.
Bezpečnostní informace 5 • Vždy používejte správně instalovanou síťovou zásuvku s ochranou proti úrazu elektric‐ kým proudem. • Nepoužívejte rozbočovací zástrčky ani prodlužovací kabely. • Dbejte na to, abyste nepoškodili napájecí kabel a síťovou zástrčku. Pro výměnu napáje‐ cího kabelu se obraťte na servisní středisko nebo elektrikáře. • Síťové kabely se nesmí dotýkat dvířek spotřebiče, obzvláště, jsou-li dvířka horká.
Bezpečnostní informace • Jak zabránit poškození nebo změně barvy smaltovaného povrchu: – Nepokládejte nádobí či jiné předměty přímo na dno spotřebiče. – Na dno spotřebiče nepokládejte hliníkovou fólii. – Nenalévejte vodu přímo do horkého spotřebiče. – Po dokončení vaření nenechávejte vlhká jídla ve spotřebiči. – Při vkládání nebo vyjímání příslušenství buďte opatrní. • Barevné změny na smaltovaném povrchu nemají vliv na výkon spotřebiče. Nejedná se o závadu z hlediska ustanovení záruky.
Bezpečnostní informace 7 • Malá domácí zvířata mohou být také velmi citlivá na místní změny teploty, ke kterým do‐ chází během samočisticího pyrolytického programu v blízkosti všech pyrolytických trub. • Při vysokoteplotním pyrolytickém čištění může u všech pyrolytických trub dojít k poškoze‐ ní nepřilnavého povrchu na hrncích, pánvích, plechách, náčiní apod. a může také vést ke tvorbě méně škodlivých výparů.
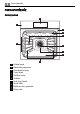
Popis spotřebiče POPIS SPOTŘEBIČE Celkový pohled 2 1 3 4 5 5 4 10 3 6 2 1 7 8 9 1 2 3 4 5 6 7 8 9 10 Ovládací panel Elektronický programátor Zásuvka pečicí sondy Topný článek Osvětlení trouby Ventilátor Zadní topný článek Spodní ohřev Drážky na rošty, vyjímatelné Polohy roštů
Popis spotřebiče Příslušenství trouby • Drátěný rošt Pro nádoby na pečení, dortové a koláčové formy, pečeně. • Plech na pečení Na koláče a sušenky. • Pekáč Pro pečení moučných jídel a masa, nebo k zachycování tuku. • Pečicí sonda Používá se k měření stupně propečenosti masa.
Před prvním použitím • Vysunovací kolejničky Pro rošty a plechy na pečení. PŘED PRVNÍM POUŽITÍM UPOZORNĚNÍ Viz kapitola „Bezpečnostní informace“. První čištění • Vyjměte ze spotřebiče všechno příslušenství. • Před prvním použitím spotřebič vyčistěte. Řiďte se částí „Čištění a údržba“. První připojení k elektrické síti Po prvním připojení spotřebiče k elektrické síti se na displeji na několik sekund rozsvítí vše‐ chny symboly. Následujících několik sekund se na displeji zobrazuje verze software.
Ovládací panel 11 OVLÁDACÍ PANEL Elektronický programátor 1 2 3 4 5 6 7 8 9 10 K ovládání spotřebiče používejte senzorová tlačítka. Senzorové tla‐ čítko Funkce - DISPLEJ Zobrazí aktuální nastavení spotřebiče. 2 ZAP/VYP Slouží k zapnutí a vypnutí spotřebiče. 3 FUNKCE Nastavení funkce či programu trouby. K přímému přístupu k funkcím trouby u vypnutého spotřebiče. 4 MŮJ OBLÍBENÝ PRO‐ GRAM K uložení vašich oblíbených programů.
Ovládací panel Displej 1 2 7 3 6 5 4 Symbol funkce trouby Displej teploty / času Displej hodin / zbytkového tepla (také funkce minutky a denního času) Ukazatel zbytkového tepla Ukazatele pro funkce hodin (viz tabulka „Funkce hodin“) Ukazatel ohřevu Číslo funkce nebo programu trouby 1 2 3 4 5 6 7 Ostatní ukazatele na displeji Symboly / / Název Popis Funkce Můžete zvolit funkci trouby. Automatické programy Můžete zvolit program trouby. Oblíbené programy Je spuštěný oblíbený program.
Denní používání 13 DENNÍ POUŽÍVÁNÍ UPOZORNĚNÍ Viz kapitola „Bezpečnostní informace“. Pro provoz spotřebiče můžete použít: • Manuální režim - manuální nastavení funkce trouby, teploty a doby vaření. • Automatické programy - k přípravě pokrmů, když neznáte jejich přípravu nebo nemáte dostatečné zkušenosti s vařením. Nastavení funkce trouby 1. 2. 3. Stiskněte . Na displeji se zobrazí přednastavená teplota, symbol a číslo funkce trouby. Na displeji bliká . nebo nastavte funkci trouby.
Denní používání Funkce trouby Použití 11 Spodní ohřev Pečení koláčů s křupavým spodkem a zavařování potravin. 12 Eco pečení Eco funkce nabízí optimální spotřebu energie během pečení. Proto je nutné nejdříve nastavit dobu pečení. Více informací o doporučených nastaveních viz tabulky pečení a odpovídají‐ cí funkce trouby. 13 Pyrolytické čištění Automatické pyrolytické čištění trouby. Teplota trouby je přibližně 500 °C. Spaluje zbytky nečistot v troubě.
Funkce hodin 15 – trouba je vypnutá: teplo můžete využít k udržení teploty jídla. Indikace: displej hodin / zbytkového tepla zobrazuje zbytkovou teplotu, stavové čárky ukazují klesající teplotu. • Vypnutí osvětlení trouby - stisknutím vypnete osvětlení trouby během pečení; , • Vypnutí displeje - v případě nutnosti vypněte spotřebič. Současně stiskněte a dokud se displeji nevypne (nezapne). • Eco funkce - viz „Funkce trouby“. FUNKCE HODIN SYMBOL FUNKCE POPIS MĚŘIČ ČASU Nastaví měření času.
Funkce hodin 7. Na displeji bliká symbol a nastavení času. Spotřebič se vypne. Zvukový signál vypnete stisknutím jakéhokoliv senzorového tlačítka nebo otevřením dvířek trouby. Vypněte spotřebič. Nastavení funkce UKONČENÍ 1. 2. 3. 4. 5. 6. Zapněte spotřebič a nastavte funkci trouby a teplotu. Opakovaně stiskněte , dokud se na displeji neobjeví . Na displeji bliká . nebo a nastavte funkci UKONČENÍ (nejprve nastavte minuty a poté Použijte nebo .
Automatické programy 17 Když je funkce Odloženého startu zapnutá, na displeji se zobrazuje statický symbol funkce trouby, s tečkou a . Tečka na displeji času / zbytkového tepla zobrazuje, která funkce hodin je zapnutá. Nastavení funkce MINUTKA Pomocí funkce MINUTKA nastavíte odpočet (maximálně 23 hodin a 59 minut). Tato funkce nemá žádný vliv na provoz trouby. Funkci MINUTKA můžete zapnout kdykoliv; i u vypnuté‐ ho spotřebiče. 1. Stiskněte . Na displeji bliká a „00“. nebo nastavte funkci MI‐ 2.
Použití příslušenství 5. Zvukový signál vypnete stisknutím jakéhokoliv senzorového tlačítka nebo otevřením dvířek trouby. Automatické programy se zadáním váhy Trouba vypočítá čas pečení podle zadané hmotnosti masa. 1. Opakovaně stiskněte , dokud se na displeji neobjeví . nebo program se zadáním váhy (viz „Recepty“). 2. Pomocí Na displeji se objeví: doba pečení, symbol trvání a přednastavená hmotnost a jed‐ notka hmotnosti (kg, g). nebo se nastavení automaticky uloží po pěti sekundách. 3. Stiskněte 4.
Použití příslušenství 19 Používejte pouze dodávanou pečicí sondu nebo originální náhradní díly. 1. 2. 3. 4. 5. Zapněte spotřebič. Umístěte hrot pečicí sondy (se symbo‐ na rukojeti) do středu masa. lem Zapojte zástrčku pečicí sondy do zásuv‐ ky na přední straně spotřebiče. Na displeji se zobrazí blikající symbol a přednastavená teplota středu ma‐ sa. Při prvním použitím je použita teplo‐ ta 60 °C a při dalším použití je použita poslední nastavená hodnota. nebo k nastavení teplo‐ Použijte ty středu masa.
Použití příslušenství Když pečete s pečicí sondou, můžete změnit teplotu zobrazenou na displeji teploty / času. Po zasunutí pečicí sondy do zásuvky a nastavení funkce trouby a teploty se na displeji zo‐ brazí aktuální teplota středu masa. Opětovným stisknutím zobrazíte další tři teploty: • Aktuální teplotu středu masa • Nastavenou teplotu trouby • Aktuální teplotu trouby. Nastavená teplota středu masa se mění na aktuální teplotu středu masa a aktuální teplota trouby se mění na nastavenou teplotu trouby.
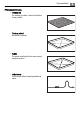
Doplňkové funkce 21 Vysunovací drážky - vložení příslušenství trouby Vložte mělký nebo hluboký plech na pečení do vy‐ sunovacích drážek. Zasuňte drátěný rošt do vysunovacích drážek tak, aby nožičky směřovaly dolů. Zvýšený okraj drátěného roštu je dalším zajiště‐ ním proti sklouznutí nádoby na pečení. Společné vložení drátěného roštu a hlubokého plechu Drátěný rošt položte na hluboký plech. Drátěný rošt a hluboký plech na pečení umístěte na vysu‐ novací drážky.
Doplňkové funkce Během spuštěné funkce lze měnit dobu přípravy jídla a teplotu. Dětská bezpečnostní pojistka Funkce dětské bezpečnostní pojistky brání náhodnému použití spotřebiče. Zapnutí či vypnutí funkce dětské bezpečnostní pojistky: 1. Pomocí spotřebič vypněte. Nenastavujte žádnou funkci trouby. . Zazní zvukový signál. 2. Na dvě sekundy se současně dotkněte a podržte a Na displeji se zobrazí či zmizí SAFE. Pokud je trouba vybavena funkcí pyrolytického čištění, dvířka jsou zamčená.
Doplňkové funkce Číslo nabídky nastavení Popis Hodnota SET8 OBNOVIT TOVÁRNÍ NASTA‐ VENÍ ON/OFF SET91) PRODLOUŽENÍ DOBY PEČE‐ NÍ ON/OFF 23 1) Pouze u vybraných modelů Nabídku nastavení můžete upravit pouze u vypnutého spotřebiče. Zapnutí nabídky nastavení: 1. V případě potřeby vypněte spotřebič . 2. Stiskněte a na tři sekundy podržte . Na displeji se objeví „SET1“ a začne blikat „1“. / zvolte nastavení. 3. Pomocí . 4. Stiskněte / změňte hodnotu nastavení. 5. Pomocí . 6.
Čištění a údržba Chladicí ventilátor Když je spotřebič v provozu, chladicí ventilátor se automaticky zapne, aby udržoval povrch spotřebiče chladný. Jestliže spotřebič vypnete, bude chladicí ventilátor pokračovat v chlaze‐ ní až do úplného ochlazení spotřebiče. ČIŠTĚNÍ A ÚDRŽBA UPOZORNĚNÍ Viz kapitola „Bezpečnostní informace“. Poznámky k čištění: • Přední stranu spotřebiče otřete měkkým hadříkem namočeným v roztoku teplé vody a či‐ sticího prostředku.
Čištění a údržba 25 Během pyrolytického čištění osvětlení nesvítí. Připomínka čištění Pro připomenutí nutnosti pyrolytického čištění začne vždy po vypnutí spotřebiče blikat po .
Čištění a údržba Žárovka trouby UPOZORNĚNÍ Hrozí nebezpečí úrazu elektrickým proudem. Žárovka trouby a její kryt mohou být horké. Před výměnou žárovky trouby: • Vypněte spotřebič. • Vytáhněte pojistky v pojistkové skříňce nebo vypněte jistič. POZOR Na dno vnitřku spotřebiče položte měkkou látku. Zabráníte tak poškození krytu žárovky a vnitřku trouby. Výměna žárovky trouby: 1. Skleněný kryt žárovky se nachází na stropě vnitřku trouby. Skleněným krytem otočte proti směru hodinových ručiček a sejměte jej.
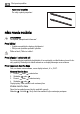
Co dělat, když... Vyjmutí dvířek 1. Dvířka úplně otevřete. 2. Stiskněte upínací páčky (A) na obou dveřních závěsech až na doraz. 3. Dvířka přivřete až k první zarážce (úhel přibl. 70°). 4. Oběma rukama podržte dvířka a vytáh‐ něte je směrem šikmo vzhůru od trouby. 27 A A Při instalaci dvířek proveďte stejný postup v opačném pořadí. Počet skleněných panelů se liší dle modelu. POZOR Dvířka položte vnější stranou dolů na měkkou a rovnou podložku, aby se nepoškrábala.
Co dělat, když... Problém Možná příčina Řešení Trouba nehřeje. Spotřebič je vypnutý Zapněte spotřebič Trouba nehřeje Není nastavený denní čas Nastavte hodiny Viz „První na‐ stavení denního času“ Trouba nehřeje Nejsou provedena nutná nasta‐ Zkontrolujte, zda jsou nastave‐ vení ní správná Trouba nehřeje Je zapnutá funkce Automatické vypnutí Viz „Automatické vypnutí“ Trouba nehřeje Je uvolněná pojistka Zkontrolujte, zda příčinou záva‐ dy není pojistka.
Technické údaje 29 Pokud problém nemůžete vyřešit sami, obraťte se prosím na svého prodejce nebo místní servisní středisko. Potřebné údaje pro servisní středisko najdete na typovém štítku. Typový štítek se nachází na předním rámu vnitřní části spotřebiče. Doporučujeme, abyste si údaje napsali zde: Model (MOD.) Výrobní číslo (PNC) Sériové číslo (S.N.) ......................................... ......................................... .........................................
www.aeg.