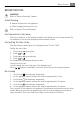
BP7614000 BP7714000 EN OVEN USER MANUAL
FOR PERFECT RESULTS Thank you for choosing this AEG product. We have created it to give you impeccable performance for many years, with innovative technologies that help make life simpler – features you might not find on ordinary appliances. Please spend a few minutes reading to get the very best from it. ACCESSORIES AND CONSUMABLES In the AEG webshop, you’ll find everything you need to keep all your AEG appliances looking spotless and working perfectly.
Contents 3 CONTENTS 4 8 9 10 12 14 16 18 20 22 26 27 29 Safety information Product description Before first use Control panel Daily use Clock functions Automatic programmes Using the accessories Additional functions Care and cleaning What to do if… Installation Environment concerns The following symbols are used in this user manual: Important information concerning your personal safety and information on how to avoid damaging the appliance.
Safety information SAFETY INFORMATION Before the installation and use, read this manual carefully: • For your personal safety and the safety of your property • For the respect of the environment • For the correct operation of the appliance. Always keep these instructions with the appliance also if you move or sell it. The manufacturer is not responsible if incorrect installation or use results in damage.
Safety information 5 • You must have correct isolation devices: line protecting cut-outs, fuses (screw type fuses removed from the holder), earth leakage trips and contactors. • The shock protection parts must be fixed in such a way that they cannot be undone without tools. • Before the installation, make sure that the kitchen cabinet has the recess dimensions applicable. • Make sure that the appliance is installed below and adjacent safe structures.
Safety information • Be careful when you remove or install the accessories to prevent damage to the oven enamel. • Always stay away from the appliance when you open the door while the appliance is in operation. Hot steam can release. There is the risk of skin burns. • Discoloration of the enamel has no effect on the performance of the appliance so it is not a defect in the sense of the warranty law.
Safety information 7 • During pyrolytic cleaning, stubborn dirt can cause discoloration to the enamel. Discoloration to the enamel has no effect on the performance of the appliance Risk of fire • Open the door carefully. The use of ingredients with alcohol can cause a mixture of alcohol and air. There is the risk of fire. • Do not let sparks or open flames come near the appliance when you open the door.
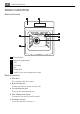
Product description PRODUCT DESCRIPTION General overview 1 2 3 7 4 5 6 1 2 3 4 5 6 7 Control panel Electronic programmer Grill Oven lamp Fan Rating plate Socket for the core temperature sensor Oven accessories • Wire shelf For cookware, cake tins, roasts. • Deep roasting pan To bake and roast or as pan to collect fat. • The roasting pan grid To put in the deep roasting pan. • Core Temperature Sensor To measure how far the food is cooked. • Telescopic runners To put the shelves or trays on it.
Before first use 9 BEFORE FIRST USE WARNING! Refer to "Safety information" chapter. Initial Cleaning • Remove all parts from the appliance. • Clean the appliance before first use. Refer to chapter "Care and Cleaning". First connection to the mains After first connection to the mains all symbols in the display are on for some seconds. For the subsequent few seconds the display shows software version. First setting the time of day After the software version goes off, the display shows "h" and "12:00".
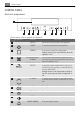
Control panel CONTROL PANEL Electronic programmer 1 2 3 4 5 6 7 8 9 10 Use the sensor fields to operate the appliance. Sensor Field Function - DISPLAY Shows the current settings of the appliance. 2 ON/OFF To activate and deactivate the appliance. 3 OPTIONS To set an oven function or programme. Straight access to the oven function when the appliance is off. 4 MY FAVOURITE PROGRAMME You can store your favourite programme.
Control panel Display 1 2 7 1 2 3 4 5 6 7 3 6 5 4 Oven function symbol Temperature/Time display Clock/Residual heat display (also Minute minder and Time of day) Residual heat indicator Indicators for the clock functions (refer to the table "Clock functions") Heat up indicator Number of oven function/programme Other indicators of display Symbols / / Name Description Function You can choose an oven function. Automatic programme You can choose an oven programme.
Daily use Residual heat indicator Display shows the residual heat indicator (residual heat symbol) after end of every cooking sessions when the temperature inside oven cavity is more then 40°C. Display also shows the oven temperature. DAILY USE WARNING! Refer to "Safety information" chapter. To operate the appliance you can use: • manual mode -to set an oven function, the temperature and the cooking time manually.
Daily use Oven function Application 8 Keep Warm To keep the food warm. The set temperature is 80 °C and you cannot change it. 9 Defrost To defrost frozen food. The set temperature is 30 °C and you cannot change it. 10 Bottom Heat To bake cakes with a crispy base, and to preserve food. 11 Pyro Cleaning For automatic pyrolytic cleaning of the oven. The oven temperature is at approximately 500° C. It burns off residual dirt in the oven.
Clock functions Energy saving The appliance has same features that help you save energy during everyday cooking: • Residual heat: – the oven function or programme operates: the heating elements are deactivated 10% time earlier (the lamp and fan continue to operate). The condition: the cooking time is longer then 30 minutes or you use the clock functions (Duration, End, Time delay). – the oven is off: you can use the heat to keep the food warm.
Clock functions 3. 4. 5. Use or to set minutes for DURATION. to confirm Touch or to set hours for DURATION. After 5 seconds the appliance starts. Use If you touch or during setting hours for DURATION, the appliance goes to setting of the END function. 6. When the set time ends, an acoustic signal operates for two minutes. symbol and time setting flash in the display. The appliance deactivates. Touch any sensor field or open the oven door to stop an acoustic signal. 7. Deactivate the appliance.
Automatic programmes Setting the MINUTE MINDER Use the MINUTE MINDER to set a countdown (maximum 23 h 59 min). This function has no effect on the operation of the oven. You can set the MINUTE MINDER any time, also if the appliance is off. 1. Touch . and "00" flash in the display. or to set MINUTE MINDER. 2. Use First you set seconds and then minutes and hours. or the MINUTE MINDER starts 3. Touch automatically after five seconds. 4.
Automatic programmes 2. 3. 4. 5. 6. 17 Touch or to set the weight programme (refer to "Recipe book"). The display shows: cooking time, duration symbol , a default weight, a unit of measurement (kg, g). or the settings save automatically after five seconds. Touch The appliance starts. A symbol of the weight unit flashes in the display. During this or . Touch . time you can change the default weight value with When set time ends, an acoustic signal operates for two minutes. flashes.
Using the accessories USING THE ACCESSORIES WARNING! Refer to "Safety information" chapter. The core temperature sensor The core temperature sensor measures the core temperature of the meat. When the meat is at the set temperature, the cooking programme deactivates. There are two temperatures to set: • The oven temperature: refer to the table for roasting in the recipe book. • The core temperature: refer to the table for the core temperature sensor in the recipe book.
Using the accessories 7. When the meat is at the set core temperature, the core temperature and The appliance deactivates. An acoustic signal sounds for two minutes. Touch on/off sensor field to deactivate the acoustic signal. 19 flash. WARNING! Be careful when you remove the core temperature sensor. The core temperature sensor and the appliance are hot. There is a risk of burns. 8. Remove the core temperature sensor from the socket and remove the meat from the appliance.
Additional functions 2. Put the oven shelf on the telescopic runners and carefully push them in the appliance. Make sure you push back the telescopic runners fully in the appliance before you close the oven door. °C CAUTION! Do not clean the telescopic runners in the dishwasher. Do not lubricate the telescopic runners. ADDITIONAL FUNCTIONS Child safety You cannot activate the appliance on if the child safety device operates. Activating/Deactivating the child safety device: 1.
Additional functions 21 tings (from SET1 to SET8). The number of the settings is different for different models. Look into the table below to see the possible value of each setting.
Care and cleaning • Day brightness: – when the appliance is on; – if you touch any of the sensor fields during night brightness (apart from ON/OFF), the display goes back to day brightness mode for next 10 seconds; – if the appliance is off and you set the minute minder. When the minute minder function ends, the display goes back to night brightness; Cooling fan When the appliance operates, the cooling fan activates automatically to keep the surfaces of the appliance cool.
Care and cleaning 23 The pyrolytic cleaning procedure cannot start: – If you do not remove the core temperature sensor plug from the socket, the display shows „C2“ – If you do not close the oven door correctly, the display shows „C3“. 2. Remove the worst of the residual dirt manually. 3. Set the Pyrolytic cleaning function (refer to "Oven functions"). to activate the Pyro cleaning function. 4. Touch or to set the duration of the cleaning procedure: 5.
Care and cleaning 2. Pull the telescopic runners from the rear side of the wall and remove the telescopic runners. 2 1 Installing the telescopic runners Install the telescopic runners in the opposite sequence. The retaining pins on the telescopic shelf runners must point to the front! CAUTION! Do not clean the telescopic runners in the dishwasher. Do not lubricate the telescopic runners.
Care and cleaning Removing the glass panels 1 2 3 4 Inserting the glass panels After the cleaning, install the panels of glass in the opposite sequence. The oven door is not reversible. BP7714000M BP7614000M Make sure you put the glass panels back in the correct order.
What to do if… First glass panel has a black frame, the second a small dot on a upper right corner and the third one has no marking. Refer to the illustration. When you assemble the panel with the black frame, make sure that the screen-printing (you can feel a roughness) on this panel faces the oven. Make sure that you put the stop rubber as in the illustration. WHAT TO DO IF… WARNING! Refer to "Safety information" chapter.
Installation Problem Possible cause 27 Solution The oven lamp does not operate The oven lamp is defective Replace the oven lamp. The display shows C2 You want to start the Pyrolytic cleaning, Keep warm or Defrost function but you did not remove core temperature sensor plug from the socket. Remove the core temperature sensor plug from the socket. The display shows C3 You want to start Pyrolytic cleaning but you did not close the oven door correctly. Close the door correctly.
Installation Building In Overall oven dimensions 1 Removable spacers 540 560 576 590 594 1 7 In column building-in Spacers removed Spacers not removed 50 580 50 min. 550 590 550 min 70 560-5 560-570 Building-in under kitchen counter Spacers removed 593 min. 550 560-570 80-100 Spacers not removed 80-100 600 20 550 min.
Environment concerns 29 Securing the appliance to the cabinet A B Electrical installation The manufacturer is not responsible if you do not obey the safety precautions from chapter "Safety". This appliance is only supplied with a main cable. Applicable types of cables for Europe: • Minimum size Cable/flex: 1,5mm² • Cable/ flex type: H07 RN-F, H05 RN-F, H05 RRF, H05 VV-F, H05 V2V2-F (T90), H05 BB-F • Fuse 13 A Applicable types of cables for UK only Connection via Min.
environment and human health, which could otherwise be caused by inappropriate waste handling of this product. For more detailed information about recycling of this product, please contact your local council, your household waste disposal service or the shop where you purchased the product. Packaging material The packaging material is environmentally-friendly and recyclable. Plastic parts are marked with international abbreviations such as PE, PS, etc.
www.aeg.