FR Notice d'utilisation Four BP831460W BP831462W
www.aeg.com TABLE DES MATIÈRES 1. CONSIGNES DE SÉCURITÉ........................................................................................... 3 2. INSTRUCTIONS DE SÉCURITÉ...................................................................................... 4 3. DESCRIPTION DE L'APPAREIL...................................................................................... 8 4. BANDEAU DE COMMANDE......................................................................................... 9 5.
FRANÇAIS 1. 3 CONSIGNES DE SÉCURITÉ Avant d'installer et d'utiliser cet appareil, lisez soigneusement les instructions fournies. Le fabricant ne peut être tenu pour responsable des dommages et blessures liés à une mauvaise installation ou utilisation. Conservez toujours cette notice avec votre appareil pour vous y référer ultérieurement. 1.
www.aeg.com • • • • • • • • des gants de cuisine pour retirer ou enfourner des accessoires ou des plats allant au four. Avant toute opération de maintenance, déconnectez l'alimentation électrique. Assurez-vous que l'appareil est éteint et débranché avant de remplacer l'éclairage afin d'éviter tout risque de choc électrique. N'utilisez pas de nettoyeur vapeur pour nettoyer l'appareil.
FRANÇAIS • L'ensemble des branchements électriques doit être effectué par un technicien qualifié. • L'appareil doit être relié à la terre. • Vérifiez que les données électriques figurant sur la plaque signalétique correspondent à celles de votre réseau. Si ce n'est pas le cas, contactez un électricien. • Utilisez toujours une prise de courant de sécurité correctement installée. • N'utilisez pas d'adaptateurs multiprises ni de rallonges.
www.aeg.com • • • • • – ne placez jamais de feuilles d'aluminium directement sur le fond de l'appareil. – ne versez jamais d'eau directement dans l'appareil lorsqu'il est chaud. – une fois la cuisson terminée, ne laissez jamais d'aliments ou de plats humides à l'intérieur de l'appareil. – faites attention lorsque vous retirez ou remettez en place les accessoires. La décoloration de l'émail est sans effet sur les performances de l'appareil. Il ne s'agit pas d'un défaut dans le cadre de la garantie.
FRANÇAIS • • • • des résidus alimentaires et des matériaux dont est fait le four. Par conséquent, nous recommandons à nos clients de suivre les conseils cidessous : – Assurez-vous que la ventilation de l'appareil est adéquate pendant et après chaque phase de nettoyage par pyrolyse. – Assurez-vous que la ventilation de l'appareil est adéquate pendant et après la première utilisation à température maximale.
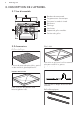
www.aeg.com 3. DESCRIPTION DE L'APPAREIL 3.1 Vue d'ensemble 1 2 3 4 5 5 4 8 3 6 2 1 1 2 3 4 5 6 7 8 Bandeau de commande Programmateur électronique Prise pour la sonde à viande Résistance Éclairage Ventilateur Support de grille amovible Position des grilles 7 3.2 Accessoires Plat à rôtir Grille métallique Permet de poser des plats (rôtis, gratins) et des moules à gâteau/pâtisserie. Pour cuire et griller ou à utiliser comme plat pour recueillir la graisse.
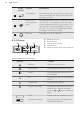
FRANÇAIS 9 Pour les grilles et plateaux de cuisson. 4. BANDEAU DE COMMANDE 4.1 Programmateur électronique 1 2 3 4 5 6 7 8 9 10 11 Les touches sensitives permettent de faire fonctionner l'appareil. 1 2 Touche sensitive Fonction Commentaire - Affichage Affiche les réglages actuels de l'appareil. MARCHE/ARRET Pour allumer et éteindre l'appareil.
www.aeg.com Touche sensitive Fonction Commentaire Touche Retour Pour remonter d'un niveau dans le menu. Pour afficher le menu principal, appuyez sur cette touche pendant 3 secondes. Heure et fonctions supplémentaires Pour régler d'autres fonctions. Lorsqu'un mode de cuisson est en cours, appuyez sur la touche sensitive pour régler la minuterie ou les fonctions : Touches Verrouil., Programmes préférés, Chaleur et tenir,Set + Go. Vous pouvez également modifier les réglages de la Sonde à viande.
FRANÇAIS Symbole 11 Fonction Indicateur de préchauffage rapide La fonction est activée. Elle permet de diminuer le temps de préchauffage. Cuisson par le poids Indique que le système de cuisson par le poids est actif ou que le poids peut être modifié. Chaleur et tenir La fonction est activée. 5. AVANT LA PREMIÈRE UTILISATION 5.2 Premier branchement AVERTISSEMENT! Reportez-vous aux chapitres concernant la sécurité. 5.
www.aeg.com Symbole Élément de menu Utilisation Modes de cuisson Contient une liste des modes de cuisson. Pyrolyse Nettoyage par pyrolyse. Réglages de base Vous pouvez utiliser cette fonction pour effectuer d'autres réglages. Programmes préférés Contient une liste des programmes de cuisson préférés de l'utilisateur, enregistrés par celui-ci. Sous-menu pour : Réglages de base Symbole Sous-menu Description Mise à l'heure Règle l'heure de l'horloge.
FRANÇAIS Symbole Sous-menu Description Filtre anti-odeurs Active et désactive cette fonction. Évite les odeurs de cuisson. Si le filtre est désactivé, il se nettoie périodiquement. Mode démo Code d'activation / de désactivation : 2468 Maintenance Affiche la version et la configuration du logiciel. Réglages usine Réinitialise tous les réglages aux réglages usine. 13 6.
www.aeg.com Mode de cuisson Utilisation Maintien au chaud Pour maintenir les aliments au chaud. Décongélation Vous pouvez utiliser cette fonction pour décongeler des aliments surgelés comme des légumes et des fruits. Le temps de décongélation dépend de la quantité et de l'épaisseur des aliments surgelés. Sole Pour cuire des gâteaux à fond croustillant et pour stériliser des aliments. Levée de Pâte/Pain Pour une levée contrôlée des pâtes à levure avant la cuisson. Pain Pour cuire du pain.
FRANÇAIS 6.6 Indicateur de préchauffage rapide Cette fonction diminue le temps de chauffe. Pour activer cette fonction, maintenez la 15 6.7 Chaleur résiduelle Lorsque vous arrêtez l'appareil, l'affichage indique la présence de chaleur résiduelle. Vous pouvez utiliser cette chaleur pour le maintien au chaud des aliments. touche enfoncée pendant 3 secondes. L'indicateur de chauffe apparaît de façon intermittente. 7. FONCTIONS DE L'HORLOGE 7.
www.aeg.com 7.2 Réglage des fonctions de l'horloge • Avant d'utiliser les fonctions : Durée, Fin, vous devez d'abord régler un mode de cuisson et une température. L'appareil s'éteint automatiquement. • Vous pouvez utiliser les fonctions : Durée et Fin simultanément si vous souhaitez que l'appareil s'allume et s'éteigne automatiquement à un moment donné. • Les fonctions : Durée et Fin ne fonctionnent pas lorsque vous utilisez la Sonde à viande. 1. Réglez un mode de cuisson. 2.
FRANÇAIS 8.1 Recettes en ligne Vous trouverez les recettes pour les programmes automatiques indiqués pour cet appareil sur notre site Internet. Pour trouver le livre de recettes approprié, vérifiez le code produit (PNC) sur la plaque signalétique qui se trouve sur le cadre avant de la cavité de l'appareil. 8.2 Cuisson assistée avec Recettes automatiques Cet appareil dispose d'un ensemble de recettes que vous pouvez utiliser. Les recettes sont fixes et vous ne pouvez pas les modifier. 1.
www.aeg.com La sonde à viande doit rester enfoncée dans la viande et branchée dans la prise pendant toute la durée de la cuisson. 1. Allumez l'appareil. 2. Insérez la pointe de la sonde à viande au cœur de la viande. 3. Insérez la fiche de la sonde à viande dans la prise située à l'avant de l'appareil. AVERTISSEMENT! Attention, la sonde à viande est très chaude ! Risque de brûlure ! Soyez particulièrement prudent lors du retrait de la pointe et de la fiche de la sonde à viande. 9.
FRANÇAIS 19 Plateau de cuisson ou plat à rôtir : • Tous les accessoires sont dotés de petites indentations en haut, à droite et à gauche, afin d'augmenter la sécurité. Les indentations sont également des dispositifs anti-bascule. • Le rebord élevé de la grille est un dispositif complémentaire pour empêcher les ustensiles de cuisine de glisser. 9.
www.aeg.com Enregistrement d'un programme 10.2 Utilisation de la Sécurité enfants 1. Allumez l'appareil. 2. Sélectionnez un mode de cuisson ou un programme automatique. La fonction Sécurité enfants permet d'éviter une utilisation involontaire de l'appareil. 3. Appuyez sur à plusieurs reprises jusqu'à ce que l'affichage indique : SAUVEGARDER. 4. Appuyez sur la touche pour confirmer. La première position mémoire libre s'affiche. pour 5. Appuyez sur la touche confirmer. 6.
FRANÇAIS de l'utiliser ultérieurement en appuyant une fois sur un symbole. 1. Allumez l'appareil. 2. Réglez un mode de cuisson. 3. Appuyez sur à plusieurs reprises jusqu'à ce que l'affichage indique : Durée. 4. Réglez l'heure. à plusieurs reprises 5. Appuyez sur jusqu'à ce que l'affichage indique : Set + Go. 21 Température (°C) Arrêt automatique au bout de (h) 200 - 245 5.5 250 - Maximum 1.5 L'arrêt automatique ne fonctionne pas avec les fonctions : Eclairage four, Sonde à viande,Fin, Durée. 6.
www.aeg.com 11.1 Intérieur de la porte Sur certains modèles, vous trouverez à l'intérieur de la porte du four : • Les numéros des niveaux d'enfournement. • Des informations sur les modes de cuisson, les niveaux d'enfournement et les températures recommandés pour des plats spécifiques. 11.2 Conseils pour les modes de cuisson spécifiques du four Maintien au chaud Utilisez cette fonction pour garder un plat au chaud. La température se règle automatiquement sur 80 °C.
FRANÇAIS Résultats de cuisson Cause probable 23 Solution Le gâteau s'effrite et devient La température du four est pâteux, plein de grumeaux, trop élevée. juteux. Réglez une température de cuisson légèrement inférieure la prochaine fois. Le gâteau s'effrite et devient Durée de cuisson trop courpâteux, plein de grumeaux, te. juteux. Réglez une durée de cuisson plus longue. Vous ne pouvez pas diminuer les temps de cuisson en augmentant la température.
www.aeg.
FRANÇAIS Plat Fonction Température (°C) Durée (min) Positions des grilles Gâteau roulé Convection naturelle 180 - 2001) 10 - 20 3 Gâteaux avec Chaleur tourgarniture de ty- nante pe crumble (sec) 150 - 160 20 - 40 3 Gâteau aux Convection naamandes et au turelle beurre / gâteaux au sucre 190 - 2101) 20 - 30 3 Gâteau aux fruits (pâte le- Chaleur tournante 150 35 - 55 3 Convection naturelle 170 35 - 55 3 Tartes aux fruits sur pâte sablée Chaleur tournante 160 - 170 40 - 80 3 Gât
www.aeg.
FRANÇAIS Plat Fonction Température (°C) Durée (min) Positions des grilles Gratins sucrés Convection naturelle 180 - 200 40 - 60 1 Gratins de poisson Convection naturelle 180 - 200 30 - 60 1 Légumes farcis Chaleur tournante 160 - 170 30 - 60 1 27 1) Préchauffez le four. 11.
www.aeg.
FRANÇAIS 29 Plat Température (°C) Durée (min) Positions des grilles Pain sans levain 230 - 2501) 10 - 20 2 Quiche à pâte feuilletée 160 - 1801) 45 - 55 2 Flammekuche (plat alsacien similaire à une pizza) 230 - 2501) 12 - 20 2 Piroggen (version russe de la calzone) 180 - 2001) 15 - 25 2 1) Préchauffez le four. 2) Utilisez un plat à rôtir. 11.10 Rôtissage • Utilisez des plats résistant à la chaleur pour le rôtissage (reportez-vous aux instructions du fabricant).
www.aeg.com Plat Quantité Fonction Température (°C) Durée (min) Positions des grilles Rôti ou filet de bœuf : bien cuit par cm d'épaisseur Turbo gril 170 - 1801) 8 - 10 1 1) Préchauffez le four.
FRANÇAIS Plat Quantité Fonction Température Durée (min) (°C) Positions des grilles Cuissot de chevreuil 1,5 - 2 kg Convection naturelle 180 - 200 1 Fonction Température Durée (min) (°C) Positions des grilles Morceaux de 200 - 250 g volaille chacun Turbo gril 200 - 220 30 - 50 1 Demi-poulet 400 - 500 g chacun Turbo gril 190 - 210 35 - 50 1 Poulet, poularde 1 - 1,5 kg Turbo gril 190 - 210 50 - 70 1 Canard 1,5 - 2 kg Turbo gril 180 - 200 80 - 100 1 Oie 3,5 - 5 kg Turbo gr
www.aeg.
FRANÇAIS Plat Température (°C) 33 Durée (min) Positions des grilles Galettes de pommes 210 - 230 de t.
www.aeg.com Plat Quantité Température (°C) Durée (min) Positions des grilles Rôti de bœuf 1000 - 1 500 g 120 120 - 150 1 Filet de bœuf 1000 - 1 500 g 120 90 - 150 3 Rôti de veau 1000 - 1 500 g 120 120 - 150 1 Steaks 200 - 300 g 120 20 - 40 3 11.15 Décongélation • Retirez l'emballage des aliments puis placez-les dans une assiette. • Utilisez la première position de grille en partant du bas.
FRANÇAIS d'environ 35 à 60 minutes pour des pots d'un litre), éteignez le four ou 35 réduisez la température à 100 °C (reportez-vous au tableau).
www.aeg.com Plat Température (°C) Durée (h) Poivrons 60 - 70 Légumes pour potage Positions des grilles 1 position 2 positions 5-6 3 1/4 60 - 70 5-6 3 1/4 Champignons 50 - 60 6-8 3 1/4 Fines herbes 40 - 50 2-3 3 1/4 Température (°C) Durée (h) Positions des grilles Prunes 60 - 70 Abricots Fruits Plat 1 position 2 positions 8 - 10 3 1/4 60 - 70 8 - 10 3 1/4 Pommes, lamelles 60 - 70 6-8 3 1/4 Poires 60 - 70 6-9 3 1/4 11.
FRANÇAIS Plat Température à cœur du plat (°C) Côte / filet : bien cuit 70 - 75 Porc Plat Température à cœur du plat (°C) Épaule/jambon/collet de porc 80 - 82 Côtelette (selle) / côte de porc fumée 75 - 80 Pâté à la viande 75 - 80 Veau Plat Température à cœur du plat (°C) Rôti de veau 75 - 80 Jarret de veau 85 - 90 Mouton / agneau Plat Température à cœur du plat (°C) Gigot de mouton 80 - 85 Selle de mouton 80 - 85 Gigot d'agneau/Rôti d'agneau 70 - 75 Gibier Plat Température à cœur
www.aeg.com 12.1 Remarques concernant l'entretien • Nettoyez la façade du four à l'aide d'une éponge humide additionnée d'eau savonneuse tiède. • Utilisez un produit courant destiné au nettoyage des surfaces en métal. • Nettoyez l'intérieur de l'appareil après chaque utilisation. L'accumulation de graisses ou d'autres résidus alimentaires peut provoquer un incendie. Ce risque est élevé pour la lèchefrite. • En cas de salissures importantes, nettoyez à l'aide d'un nettoyant pour four.
FRANÇAIS Option Description Rapide 1 h pour un four peu sale Normale 1 h 30 pour un four normalement sale Renforcée 2 h 30 pour un four très sale 4. Appuyez sur pour confirmer. La porte du four se verrouille lorsque le nettoyage par pyrolyse démarre et l'éclairage s'éteint. Pour interrompre le nettoyage par pyrolyse avant qu'il ne soit terminé, éteignez l'appareil. AVERTISSEMENT! Lorsque le nettoyage est terminé, l'appareil est très chaud. Laissez-le refroidir.
www.aeg.com Une fois le nettoyage terminé, remettez en place les panneaux de verre et la porte. Suivez les étapes ci-dessus dans l'ordre inverse. Installez d'abord le plus petit des panneaux, puis le plus grand. 12.5 Remplacement de l'éclairage Placez un chiffon au fond de la cavité de l'appareil. Cela évitera d'endommager le diffuseur en verre et la cavité. AVERTISSEMENT! Risque d'électrocution ! Déconnectez le fusible avant de remplacer l'ampoule.
FRANÇAIS 41 Problème Cause probable Solution Le four ne chauffe pas. Le four est éteint. Mettez le four en marche. Le four ne chauffe pas. L'horloge n'est pas réglée. Réglez l'horloge. Le four ne chauffe pas. Les réglages nécessaires n'ont pas été effectués. Vérifiez que les réglages sont corrects. Le four ne chauffe pas. La fonction d'arrêt automati- Reportez-vous à « Arrêt auque est activée. tomatique ». Le four ne chauffe pas. La sécurité enfants est activée.
www.aeg.com Nous vous recommandons de noter ces informations ici : Modèle (MOD.) ......................................... Référence du produit (PNC) ......................................... Numéro de série (S.N.) ......................................... 14. RENDEMENT ÉNERGÉTIQUE 14.1 Fiche du produit et informations conformément à la norme EU 65-66/2014 Nom du fournisseur AEG Identification du modèle BP831460WM BP831462WM Index d'efficacité énergétique 81.
FRANÇAIS cuisson avec la ventilation pour économiser de l'énergie. • Chaleur résiduelle – Avec certains modes de cuisson, si un programme avec réglage du temps (Durée, Fin) est activé et que la durée de cuisson est supérieure à 30 minutes, les éléments chauffants s'éteignent automatiquement 10 % plus tôt. L'éclairage et le ventilateur continuent de fonctionner. • Cuisson sans éclairage - désactivez l'éclairage durant la cuisson et activez-le uniquement si vous en avez besoin.
867325319-A-432015 www.aeg.