DE Benutzerinformation Backofen BP831460W BP831462W
www.aeg.com INHALTSVERZEICHNIS 1. SICHERHEITSINFORMATIONEN.................................................................................. 3 2. SICHERHEITSANWEISUNGEN...................................................................................... 4 3. GERÄTEBESCHREIBUNG...............................................................................................8 4. BEDIENFELD................................................................................................................... 9 5.
DEUTSCH 1. 3 SICHERHEITSINFORMATIONEN Lesen Sie vor der Montage und dem Gebrauch des Geräts zuerst die Gebrauchsanleitung. Der Hersteller übernimmt keine Verantwortung für Verletzungen und Beschädigungen durch unsachgemäße Montage. Bewahren Sie die Gebrauchsanleitung griffbereit auf. 1.
www.aeg.com • • • • • • • • Zubehörs und der Töpfe wärmeisolierende Handschuhe. Trennen Sie das Gerät vor Wartungsarbeiten von der Stromversorgung. Vergewissern Sie sich, dass das Gerät ausgeschaltet ist, bevor Sie die Lampe austauschen, um einen Stromschlag zu vermeiden. Benutzen Sie zum Reinigen des Geräts keinen Dampfreiniger. Benutzen Sie keine scharfen Scheuermittel oder Metallschwämmchen zum Reinigen der Glastür; sie könnten die Glasfläche verkratzen und zum Zersplittern der Scheibe führen.
DEUTSCH • Die Mindestabstände zu anderen Geräten und Küchenmöbeln sind einzuhalten. • Stellen Sie sicher, dass das Gerät unterhalb von bzw. zwischen sicheren Konstruktionen montiert wird. • Die Seiten des Geräts dürfen nur an Geräte oder Einheiten in gleicher Höhe angrenzen. 2.2 Elektrischer Anschluss WARNUNG! Brand- und Stromschlaggefahr. • Alle elektrischen Anschlüsse sind von einem geprüften Elektriker vorzunehmen. • Das Gerät muss geerdet sein.
www.aeg.com • Platzieren Sie keine entflammbaren Produkte oder Gegenstände, die mit entflammbaren Produkten benetzt sind, im Gerät, auf dem Gerät oder in der Nähe des Geräts. WARNUNG! Das Gerät könnte beschädigt werden. • Um Beschädigungen und Verfärbungen der Emailbeschichtung zu vermeiden: – Stellen Sie feuerfestes Geschirr oder andere Gegenstände nicht direkt auf den Boden des Geräts. – Legen Sie keine Alufolie direkt auf den Boden des Geräts. – Stellen Sie kein Wasser in das heiße Gerät.
DEUTSCH • • • • • • – Alle zum Gerät dazugehörigen herausnehmbaren Teile (Bleche, Einhängegitter) sowie Töpfe, Pfannen, Bleche und Utensilien mit Antihaftbeschichtung usw. Lesen Sie die Anleitung zur Pyrolyse sorgfältig durch. Halten Sie Kinder während der Pyrolyse vom Gerät fern. Das Gerät wird sehr heiß, und aus den vorderen Kühlungsöffnungen tritt heiße Luft aus. Die pyrolytische Reinigung erfolgt bei sehr hoher Temperatur und kann Dämpfe von Lebensmittelrückständen und Gerätematerialen freisetzen.
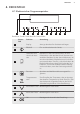
www.aeg.com 3. GERÄTEBESCHREIBUNG 3.1 Gesamtansicht 1 2 3 4 5 5 4 8 3 6 2 1 1 2 3 4 5 6 7 8 Bedienfeld Elektronischer Programmspeicher Buchse für den KT Sensor Heizelement Lampe Ventilator Einhängegitter, herausnehmbar Einschubebenen 7 3.2 Zubehör Kombirost Für Kochgeschirr, Kuchenformen, Braten. Backblech Für Kuchen und Plätzchen. Brat- und Fettpfanne Zum Backen und Braten oder zum Auffangen von austretendem Fett. Kerntemperatursensor Zum Messen des Garzustands.
DEUTSCH 9 4. BEDIENFELD 4.1 Elektronischer Programmspeicher 1 2 3 4 5 6 7 8 9 10 11 Bedienen Sie das Gerät über die Sensorfelder. Sensorfeld 1 2 - Funktion Anmerkung Display Anzeige der aktuellen Geräteeinstellungen. EIN/AUS Ein- und Ausschalten des Geräts. Ofenfunktionen oder Koch-Assistent Berühren Sie das Sensorfeld einmal, um eine Ofenfunktion oder das Menü Koch-Assistent auszuwählen.
www.aeg.com Sensorfeld Funktion Anmerkung Zurück-Taste Menünavigation eine Ebene zurück. Zum Anzeigen des Hauptmenüs das Feld 3 Sekunden lang berühren. Uhr- und Zusatzfunktionen Zum Einstellen verschiedener Funktionen. Bei aktivierter Ofenfunktion das Sensorfeld zur Einstellung des Timers oder der Funktionen Tastensperre, Favoriten, Heat + Hold, Set + Go. Sie können auch die Einstellungen des KT Sensors ändern. Kurzzeit-Wecker Einstellen der Funktion Kurzzeit-Wecker. 9 10 11 4.
DEUTSCH Symbol 11 Funktion Anzeige für die Schnellaufheizung Die Funktion ist eingeschaltet. Sie verkürzt die Aufheizzeit. Gewichtsautomatik Das Display zeigt, dass die Gewichtsautomatik eingeschaltet ist, oder dass das Gewicht geändert werden kann. Heat + Hold Die Funktion ist eingeschaltet. 5. VOR DER ERSTEN INBETRIEBNAHME WARNUNG! Siehe Kapitel "Sicherheitshinweise". 5.1 Erste Reinigung Nehmen Sie die Zubehörteile und die herausnehmbaren Einhängegitter aus dem Gerät.
www.aeg.com Symbol Menüpunkt Anwendung Pyrolyse Pyrolytische Reinigung. Grundeinstellungen Ermöglicht die Änderung weiterer Einstellungen. Favoriten Liste mit Ihren bevorzugten Garprogrammen. Untermenü von: Grundeinstellungen Symbol Untermenü Beschreibung Tageszeit einstellen Einstellen der aktuellen Uhrzeit. Zeitanzeige Steht diese Funktion auf EIN, wird die aktuelle Uhrzeit angezeigt, sobald das Gerät ausgeschaltet wird.
DEUTSCH Symbol Untermenü Beschreibung DEMO Modus Aktivierungs-/Deaktivierungscode: 2468 Service Zeigt die Softwareversion und die Konfiguration an. WERKSEINSTELLUNGEN Zurücksetzen aller Einstellungen auf die Werkseinstellungen. 13 6.3 Ofenfunktionen Ofenfunktion Anwendung Heißluft mit Ringheizkörper Zum Backen auf bis zu 3 Einschubebenen gleichzeitig und zum Dörren.Stellen Sie eine 20 - 40 °C niedrigere Backofentemperatur ein als für die Funktion Ober-/Unterhitze.
www.aeg.com Ofenfunktion Anwendung Warmhalten Zum Warmhalten von Speisen. Auftauen Diese Funktion kann zum Auftauen von Tiefkühlgerichten wie z. B. Gemüse und Obst verwendet werden. Die Auftauzeit hängt ab von der Menge und Größe der Tiefkühlgerichte. Unterhitze Zum Backen von Kuchen mit knusprigen Böden und zum Einkochen von Lebensmitteln. Gärstufe Zum kontrollierten gehen lassen eines Hefeteigs vor dem Backen. Brot backen Zum Backen von Brot.
DEUTSCH 6.7 Restwärme Sobald Sie das Gerät ausschalten, wird im Display die Restwärme angezeigt. Die 15 Restwärme kann zum Warmhalten von Speisen genutzt werden. 7. UHRFUNKTIONEN 7.1 Tabelle der Uhrfunktionen Uhrfunktion Anwendung Kurzzeit-Wecker Zum Einstellen eines Countdowns (max. 2 Std. 30 Min.). Diese Funktion hat keine Auswirkung auf den Gerätebetrieb. Sie können die Funktion auch einschalten, wenn das Gerät ausgeschaltet ist. Schalten Sie die Funktion mit en Sie tellen, und oder ein.
www.aeg.com 2. Drücken Sie wiederholt, bis im Display die gewünschte Uhrfunktion und das entsprechende Symbol anzeigt werden. 3. Drücken Sie oder , um die gewünschte Zeit einzustellen. bestätigen. 4. Mit Nach Ablauf der Zeit ertönt ein akustisches Signal. Das Gerät wird ausgeschaltet. Im Display erscheint eine Meldung. 5. Drücken Sie ein beliebiges Symbol, um das Signal abzustellen. 7.3 Heat + Hold Voraussetzungen für die Funktion: • Die eingestellte Temperatur beträgt mehr als 80 °C.
DEUTSCH Wenn Sie die Funktion Manuell verwenden, benutzt das Gerät automatische Einstellungen. Diese können Sie ändern. Gehen Sie dazu wie für andere Funktionen beschrieben vor. 8.3 Koch-Assistent mit Gewichtsautomatik Bei dieser Funktion wird die Gardauer automatisch berechnet. Dazu muss das Gewicht des Garguts eingegeben werden. 17 5. Berühren Sie oder , um das Gewicht der Lebensmittel einzugeben. Mit bestätigen. Das Automatikprogramm startet. 6.
www.aeg.com Im Display wird das Symbol für den KT Sensor angezeigt. 4. Drücken Sie oder innerhalb von weniger als 5 Sekunden, um die Kerntemperatur einzustellen. 5. Stellen Sie die Ofenfunktion und, falls notwendig, die Temperatur ein. Das Gerät berechnet das voraussichtliche Ende. Der ermittelte Wert variiert je nach Speisemenge, eingestellter Backofentemperatur (mindestens 120 °C) und ausgewählter Funktion. Das voraussichtliche Ende wird nach ca. 30 Minuten berechnet. 6.
DEUTSCH 19 Backblech oder tiefes Blech: • Alle Zubehörteile besitzen kleine Kerben oben auf der rechten und linken Seite, um die Sicherheit zu erhöhen. Diese Einkerbungen dienen auch als Kippsicherung. • Durch den umlaufend erhöhten Rahmen des Rostes ist das Kochgeschirr zusätzlich gegen Abrutschen gesichert. 9.3 Teleskopauszüge Einsetzen des Zubehörs Setzen Sie das Backblech oder das tiefe Blech auf die Auszüge. Kombirost und tiefes Blech zusammen: Legen Sie den Kombirost auf das tiefe Blech.
www.aeg.com Speichern eines Programms Während der Pyrolyse verriegelt die Tür automatisch. Im Display wird eine Meldung angezeigt, wenn Sie ein Symbol berühren. 1. Schalten Sie das Gerät ein. 2. Stellen Sie eine Ofenfunktion oder ein Automatikprogramm ein: 3. Berühren Sie wiederholt, bis das Display folgendes anzeigt: SPEICHERN. 4. Mit bestätigen. Im Display wird der erste freie Speicherplatz angezeigt. bestätigen. 5. Mit 6. Geben Sie den Namen für das Programm ein. Der erste Buchstabe blinkt. 7.
DEUTSCH Berühren eines beliebigen Symbols einschalten. 1. Schalten Sie das Gerät ein. 2. Stellen Sie eine Ofenfunktion ein. 3. Drücken Sie wiederholt, bis das Display folgendes anzeigt: Dauer. 4. Stellen Sie die Dauer ein. wiederholt, bis das 5. Drücken Sie Display folgendes anzeigt: Set + Go. 6. Mit bestätigen. Berühren Sie ein beliebiges Symbol (außer ) zum Starten der Funktion Set + Go. Die eingestellte Ofenfunktion wird gestartet. Nach Ablauf der Zeit ertönt ein akustisches Signal.
www.aeg.com 11.1 Innenseite der Tür Bei einigen Modellen finden Sie an der Innenseite der Tür: • Die Nummerierung der Einschubebenen. • Informationen über die Backofenfunktionen, Empfehlungen für Einschubebenen und Temperaturen für die Zubereitung gängiger Gerichte. 11.2 Anmerkungen zu besonderen Ofenfunktionen Warmhalten Verwenden Sie diese Funktion, um Speisen warm zu halten. Die Temperatur wird automatisch auf 80 °C gehalten. Teller wärmen Zum Vorwärmen von Tellern und Schüsseln.
DEUTSCH 23 Backergebnis Mögliche Ursache Abhilfe Der Kuchen fällt zusammen (wird feucht, klumpig oder streifig). Die Backofentemperatur ist zu hoch. Stellen Sie beim nächsten Kuchen eine etwas niedrigere Backofentemperatur ein. Der Kuchen fällt zusammen (wird feucht, klumpig oder streifig). Die Backzeit ist zu kurz. Stellen Sie eine längere Backzeit ein. Die Backzeit lässt sich nicht durch eine höhere Temperatur verringern. Der Kuchen fällt zusammen (wird feucht, klumpig oder streifig).
www.aeg.com Gargut Funktion Temperatur (°C) Dauer (Min.
DEUTSCH Gargut Funktion Temperatur (°C) Dauer (Min.) Ebene Streuselkuchen (trocken) Heißluft mit Ringheizkörper 150 - 160 20 - 40 3 Mandel-/Zucker- Ober-/Unterhikuchen tze 190 - 2101) 20 - 30 3 Obstkuchen (auf Heißluft mit Hefeteig/RührRingheizkörper 150 35 - 55 3 170 35 - 55 3 teig)2) Obstkuchen (auf Ober-/UnterhiHefeteig/Rührtze teig)2) Obstkuchen mit Mürbeteig Heißluft mit Ringheizkörper 160 - 170 40 - 80 3 Hefekuchen mit empfindlichen Belägen (z. B.
www.aeg.com Gargut Funktion Temperatur (°C) Dauer (Min.
DEUTSCH 11.7 Feuchte Heißluft Gargut Temperatur (°C) Dauer (Min.) Ebene Nudel-Auflauf 200 - 220 35 - 45 3 Kartoffelgratin 180 - 200 60 - 75 3 Moussaka 170 - 190 55 - 70 3 Lasagne 180 - 200 60 - 75 3 Cannelloni 170 - 190 55 - 70 3 Brotpudding 180 - 200 45 - 60 3 Milchreis 170 - 190 40 - 55 3 Apfelkuchen auf Rührteig (runde Kuchenform) 160 - 170 55 - 70 3 Weißbrot 190 - 200 40 - 50 3 11.
www.aeg.com Gargut Temperatur (°C) Dauer (Min.) Rührteigplätzchen 160 - 170 Eiweißgebäck, Baiser Ebene 2 Ebenen 3 Ebenen 25 - 40 1/4 - 80 - 100 130 - 170 1/4 - Makronen 100 - 120 40 - 80 1/4 - Hefekleingebäck 160 - 170 30 - 60 1/4 - Blätterteiggebäck 170 - 1801) 30 - 50 1/4 - Brötchen 180 20 - 30 1/4 - 23 - 40 1/4 - Small cakes / 1501) Törtchen (20 Stück pro Blech) 1) Backofen vorheizen. 11.9 Pizzastufe Gargut Temperatur (°C) Dauer (Min.
DEUTSCH Gargut Temperatur (°C) Dauer (Min.) Ebene Piroggen (Russische Version der Calzone) 180 - 2001) 15 - 25 2 29 1) Backofen vorheizen. 2) Verwenden Sie ein tiefes Blech. 11.10 Braten • Benutzen Sie zum Braten hitzebeständiges Geschirr (beachten Sie die Angaben des Herstellers). • Große Bratenstücke können direkt im tiefen Blech (falls vorhanden) oder auf dem Kombirost über dem tiefen Blech gebraten werden. • Braten Sie magere Fleischstücke in einem Bräter mit Deckel.
www.aeg.com Gargut Menge Funktion Temperatur (°C) Dauer (Min.) Ebene Kotelett/Rippchen 1 - 1,5 kg Heißluftgrill- 170 - 180 en 60 - 90 1 Hackbraten 750 g - 1 kg Heißluftgrill- 160 - 170 en 50 - 60 1 Schweinshaxe (vorgekocht) 750 g - 1 kg Heißluftgrill- 150 - 170 en 90 - 120 1 Kalb Gargut Menge (kg) Funktion Temperatur (°C) Dauer (Min.) Ebene Kalbsbraten 1 Heißluftgrillen 160 - 180 90 - 120 1 Kalbshaxe 1.
DEUTSCH Gargut Menge Funktion Temperatur (°C) Dauer (Min.) Ebene Halbes Hähn- je 400 - 500 g Heißluftgrillchen en 190 - 210 35 - 50 1 Hähnchen, Poularde 1 - 1,5 kg Heißluftgrillen 190 - 210 50 - 70 1 Ente 1,5 - 2 kg Heißluftgrillen 180 - 200 80 - 100 1 Gans 3,5 - 5 kg Heißluftgrillen 160 - 180 120 - 180 1 Pute 2,5 - 3,5 kg Heißluftgrillen 160 - 180 120 - 150 1 Pute 4 - 6 kg Heißluftgrillen 140 - 160 150 - 240 1 Temperatur (°C) Dauer (Min.
www.aeg.com Gargut Fisch, ganz, 500 - 1000 g Temperatur (°C) Dauer (Min.) Ebene Erste Seite Zweite Seite 210 - 230 15 - 30 15 - 30 3/4 Grillstufe 2 Gargut Dauer (Min.) Ebene Erste Seite Zweite Seite Burgers/Frikadellen 8 - 10 6-8 4 Schweinefilet 10 - 12 6 - 10 4 Würstchen 10 - 12 6-8 4 Filet/Kalbssteaks 7 - 10 6-8 4 Toast/Toast 1-3 1-3 5 Überbackener Toast 6-8 - 4 11.13 Tiefkühlgerichte Gargut Temperatur (°C) Dauer (Min.
DEUTSCH 33 Tiefgefrorene Fertiggerichte Gargut Funktion Temperatur (°C) Dauer (Min.
www.aeg.com Gargut Menge Auftauzeit (Min.) Zusätzliche Auftauzeit (Min.) Bemerkungen Hähnchen 1 kg 100 - 140 20 - 30 Legen Sie zunächst eine umgedrehte Untertasse auf einen großen Teller, und legen Sie dann das Hähnchen darauf. Nach der Hälfte der Zeit wenden. Fleisch 1 kg 100 - 140 20 - 30 Nach der Hälfte der Zeit wenden. Fleisch 500 g 90 - 120 20 - 30 Nach der Hälfte der Zeit wenden.
DEUTSCH 35 Steinobst Gargut Temperatur (°C) Einkochen bis Perlbeginn (Min.) Weiterkochen bei 100 °C (Min.) Birnen/Quitten/ Zwetschgen 160 - 170 35 - 45 10 - 15 Gargut Temperatur (°C) Einkochen bis Perlbeginn (Min.) Weiterkochen bei 100 °C (Min.) Karotten1) 160 - 170 50 - 60 5 - 10 Gurken 160 - 170 50 - 60 - Mixed Pickles 160 - 170 50 - 60 5 - 10 Kohlrabi/Erbsen/ Spargel 160 - 170 50 - 60 15 - 20 Gemüse 1) Nach dem Ausschalten im Backofen stehen lassen. 11.
www.aeg.com 11.18 Brot backen Das Vorheizen des Backofens wird nicht empfohlen. Gargut Temperatur (°C) Dauer (Min.) Ebene Weißbrot 180 - 200 40 - 60 2 Baguette 200 - 220 35 - 45 2 Brioche 180 - 200 40 - 60 2 Ciabatta 200 - 220 35 - 45 2 Roggenbrot 190 - 210 50 - 70 2 Dunkles Brot 180 - 200 50 - 70 2 Vollkornbrot 170 - 190 60 - 90 2 11.
DEUTSCH Gargut Kerntemperatur (°C) Lammbraten / Lammkeule 70 - 75 37 Wild Gargut Kerntemperatur (°C) Hasenrücken 70 - 75 Hasenkeule 70 - 75 Hase, ganz 70 - 75 Reh-/Hirschrücken 70 - 75 Reh-/Hirschkeule 70 - 75 Fisch Gargut Kerntemperatur (°C) Lachs 65 - 70 Forellen 65 - 70 12. REINIGUNG UND PFLEGE WARNUNG! Siehe Kapitel "Sicherheitshinweise". 12.
www.aeg.com Option Beschreibung Kurz 1 Std. bei geringer Verschmutzung Normal 1 Std. 30 Min. bei normaler Verschmutzung Stark 2 Std. 30 Min. bei starker Verschmutzung 2 1 Führen Sie zum Einsetzen der Einhängegitter die obigen Schritte in umgekehrter Reihenfolge durch. Die Haltestifte der Teleskopauszüge müssen nach vorne zeigen. 12.3 Pyrolyse ACHTUNG! Entfernen Sie alle Zubehörteile und die herausnehmbaren Einhängegitter.
DEUTSCH 39 WARNUNG! Gehen Sie beim Aushängen der Tür vorsichtig vor. Die Tür ist schwer. 1. Öffnen Sie die Tür vollständig. 2. Drücken Sie auf die Klemmhebel (A) an beiden Türscharnieren. A A 3. Schließen Sie die Backofentür bis zur ersten Öffnungsstellung (Winkel ca. 70 Grad). 4. Fassen Sie die Tür mit beiden Händen seitlich an und ziehen Sie sie schräg nach oben vom Gerät weg. 5.
www.aeg.com 2. Reinigen Sie die Glasabdeckung. 3. Ersetzen Sie die Lampe durch eine geeignete, bis 300 °C hitzebeständige Lampe. 4. Bringen Sie die Glasabdeckung wieder an. Seitliche Lampe 1. Entfernen Sie das linke Einhängegitter, um Zugang zur Ofenlampe zu bekommen. 2. Benutzen Sie einen schmalen, stumpfen Gegenstand (z. B. einen Teelöffel), um die Glasabdeckung abzunehmen. 3. Reinigen Sie die Glasabdeckung. 4. Ersetzen Sie die Lampe durch eine geeignete, bis 300 °C hitzebeständige Lampe. 5.
DEUTSCH 41 Störung Mögliche Ursache Abhilfe Der Backofen heizt nicht. Die Kindersicherung ist eingeschaltet. Siehe „Verwenden der Kindersicherung“. Der Backofen heizt nicht. Die Tür ist nicht richtig geschlossen. Schließen Sie die Tür sorgfältig. Der Backofen heizt nicht. Die Sicherung ist durchgebrannt. Vergewissern Sie sich, dass die Sicherung der Grund für die Störung ist. Brennt die Sicherung wiederholt durch, wenden Sie sich an eine zugelassene Elektrofachkraft.
www.aeg.com 14. ENERGIEEFFIZIENZ 14.1 Produktdatenblatt und Informationen gemäß EU 65-66/2014 Herstellername AEG Modellidentifikation BP831460WM BP831462WM Energieeffizienzindex 81.2 Energieeffizienzklasse A+ Energieverbrauch bei Standardbeladung, Ober-/ Unterhitze 0.99 kWh/Programm Energieverbrauch bei Standardbeladung, Heißluft 0.
DEUTSCH • Warmhalten von Speisen - wenn Sie die Restwärme zum Warmhalten von Speisen nutzen möchte, wählen Sie die niedrigste Temperatureinstellung. Das Display zeigt die Restwärmetemperatur an. • Öko-Funktionen - schlagen Sie unter „Ofenfunktionen“ nach. • Wenn Sie die Funktion Feuchte Heißluft verwenden, wird die Lampe 43 nach 30 Sekunden ausgeschaltet. Sie können sie Ihren Wünschen entsprechend erneut einschalten. • Wenn Sie die Öko-Funktionen verwenden, erlischt die Backofenlampe.
867325318-A-432015 www.aeg.