ES Manual de instrucciones Horno BP831460S BP831460W
www.aeg.com CONTENIDO 1. INFORMACIÓN SOBRE SEGURIDAD...........................................................................3 2. INSTRUCCIONES DE SEGURIDAD............................................................................... 4 3. DESCRIPCIÓN DEL PRODUCTO...................................................................................7 4. PANEL DE MANDOS...................................................................................................... 8 5. ANTES DEL PRIMER USO..........
ESPAÑOL 1. 3 INFORMACIÓN SOBRE SEGURIDAD Antes de instalar y utilizar el aparato, lea atentamente las instrucciones facilitadas. El fabricante no se hace responsable de los daños y lesiones causados por una instalación y uso incorrectos. Guarde siempre las instrucciones junto con el aparato para futuras consultas. 1.
www.aeg.com • • • • • • • • Antes de realizar tareas de mantenimiento, corte la corriente eléctrica. Asegúrese de que el aparato está desconectado antes de reemplazar la lámpara con el fin de impedir que se produzca una descarga eléctrica. No utilice un limpiador a vapor para limpiar el aparato. No utilice limpiadores abrasivos ásperos ni rascadores de metal afilado para limpiar la puerta de cristal si no quiere arañar su superficie, lo que podría hacer que el cristal se hiciese añicos.
ESPAÑOL • • • • • • • • • • • eléctrico de su hogar. En caso contrario, póngase en contacto con un electricista. Utilice siempre una toma con aislamiento de conexión a tierra correctamente instalada. No utilice adaptadores de enchufes múltiples ni cables prolongadores. Asegúrese de no provocar daños en el enchufe ni en el cable de red. El centro de servicio autorizado es quien debe cambiar el cable de alimentación en caso necesario.
www.aeg.com • Utilice una bandeja honda para pasteles húmedos. Los jugos de las frutas podrían ocasionar manchas permanentes. • Este aparato está diseñado exclusivamente para cocinar. No debe utilizarse para otros fines, por ejemplo, como calefacción. • Cocine siempre con la puerta del horno cerrada. • Si el aparato se instala detrás de un panel de un mueble (por ejemplo una puerta) asegúrese de que la puerta nunca esté cerrada mientras funciona el aparato.
ESPAÑOL máxima para una zona bien ventilada. • Las mascotas de pequeño tamaño también pueden ser muy sensibles a los cambios de temperatura localizados cerca de los hornos mientras se realiza el programa de autolimpieza pirolítica. • Las superficies antiadherentes de recipientes, sartenes, bandejas, utensilios, etc., pueden dañarse por las altas temperaturas de la limpieza pirolítica y también pueden ser fuente de humos dañinos de baja intensidad.
www.aeg.com 3.2 Accesorios Para hornear y asar o como bandeja grasera. Parrilla Sonda térmica Para bandejas de horno, pastel en molde, asados. Para medir cuánto se ha hecho el alimento. Bandeja Carriles telescópicos Para bizcochos y galletas. Para parrillas y bandejas. Bandeja honda 4. PANEL DE MANDOS 4.
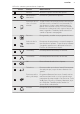
ESPAÑOL 9 Utilice los sensores para accionar el aparato. Sensor Función Observaciones Pantalla Muestra los ajustes actuales del aparato. 2 ENCENDIDO / APAGADO Para activar y desactivar el aparato. 3 Funciones de coc- Toque el sensor una vez para seleccionar una función o Cocción ción de cocción o el menú: Cocción asistida. Toasistida que de nuevo el sensor para cambiar entre los menús: Funciones de cocción, Cocción asistida. Para activar o desactivar la luz, toque el sensor durante 3 segundos.
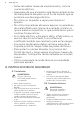
www.aeg.com 4.2 Pantalla A B C E D A) B) C) D) E) Función de cocción Hora del día Indicador de calentamiento Temperatura Tiempo de duración u hora de finalización de una función Otros indicadores de la pantalla: Símbolo Función Avisador La función está activada. Hora del día La pantalla muestra la hora actual. Duración La pantalla muestra el tiempo de cocción necesario. Hora de fin La pantalla indica cuándo termina la duración de la cocción.
ESPAÑOL Consulte el capítulo "Mantenimiento y limpieza". Limpie el horno antes de utilizarlo por primera vez. Coloque los accesorios y carriles laterales extraíbles en su posición inicial. 11 interrupción del suministro eléctrico, debe seleccionar el idioma, el contraste y la luminosidad de la pantalla, y la hora del día. 1. Pulse o 2. Pulse para confirmar. para ajustar el valor. 5.2 Primera conexión Al conectar el aparato a la red por primera vez o después de producirse una 6. USO DIARIO 2.
www.aeg.com Símbolo Submenú Descripción Ajustar + Empezar Si está activado puede elegir la función en la ventana de selección de opciones: Ajustar + Empezar. Calentar y Mantener Si está activado puede elegir la función en la ventana de selección de opciones: Calentar y Mantener. Añadir tiempo Activa y desactiva la función Tiempo adicional. Contraste de la pantalla Ajusta gradualmente el contraste de la pantalla. Brillo de la pantalla Ajusta gradualmente el brillo de la pantalla.
ESPAÑOL Función de cocción 13 Aplicación Cocina a baja temperatura Para preparar asados tiernos y jugosos. Calor superior + inferior Para hornear y asar en una posición de parrilla. Congelados Para productos precocinados como patatas fritas, porciones o rollitos de primavera crujientes. Grill + Turbo Para asar piezas de carne grandes o aves con hueso en una posición de parrilla. También para gratinar y dorar.
www.aeg.com Función de cocción Aplicación Calentar vajilla Para precalentar el plato antes de servir. ECO-grill Las funciones ECO le permiten optimizar el consumo energético durante la cocción. Es necesario ajustar primero el tiempo de cocción. Para obtener más información sobre los ajustes recomendados, consulte las tablas de cocción con la función equivalente. 6.4 Activación de una función de cocción 6.6 Indicador de calentamiento rápido 1. Encienda el horno. 2.
ESPAÑOL Si programa la duración de una función de reloj, la cuenta atrás comienza al cabo de 5 segundos. Si utiliza las funciones de reloj: Duración, Hora de fin, el aparato apaga las resistencias al transcurrir el 90 % del tiempo programado. El aparato hace uso del calor residual para continuar el proceso de cocción hasta que se acabe el tiempo (3 - 20 minutos). 7.
www.aeg.com 8. PROGRAMAS AUTOMÁTICOS 8.3 Cocción asistida con Peso automático ADVERTENCIA! Consulte los capítulos sobre seguridad. Esta función calcula automáticamente el tiempo de asado. Si se desea hacer uso de esta función, es necesario introducir el peso de los alimentos. 8.1 Recetas online Encontrará las recetas para los programas automáticos propias de este aparato en nuestra página web.
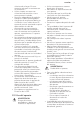
ESPAÑOL La sonda térmica debe permanecer introducida en la carne y en la toma durante el proceso de cocción. 1. Encienda el horno. 2. Inserte la punta de la sonda térmica en el centro de la carne. 3. Coloque el enchufe de la sonda térmica en la toma de la parte frontal del aparato. 17 9.2 Inserción de los accesorios Parrilla: Inserte la parrilla entre las guías del carril y asegúrese de que las hendiduras apuntan hacia abajo.
www.aeg.com Bandeja o bandeja honda: • Todos los accesorios tienen pequeñas hendiduras en la parte superior de los bordes derecho e izquierdo para incrementar la seguridad. Las hendiduras también son dispositivos antivuelco. • El borde elevado que rodea la bandeja es un dispositivo para evitar que los utensilios de cocina se resbalen. 9.3 Carriles telescópicos: colocación de los accesorios del horno Coloque la bandeja o bandeja honda en los carriles telescópicos.
ESPAÑOL Para guardar un programa 1. Encienda el aparato. 2. Ajuste una función de cocción o un programa automático. 3. Toque repetidamente hasta que la pantalla muestre: GUARDAR. 4. Pulse para confirmar. La pantalla mostrará la primera posición de memoria libre. para confirmar. 5. Pulse 6. Introduzca el nombre del programa. La primera letra parpadea. 7. Toque letra. o para cambiar la . 8. Pulse La siguiente letra parpadeará. 9. Repita el paso 7 las veces que sea necesario. para guardar. 10.
www.aeg.com 10.4 Ajustar + Empezar La función le permite definir una función (o programa) y utilizarla después pulsando una vez el sensor. 1. Encienda el horno. 2. Seleccione una función de cocción. 3. Toque repetidamente hasta que la pantalla muestre: Duración. 4. Ajuste el tiempo deseado. 5. Toque repetidamente hasta que la pantalla muestre: Ajustar + Empezar. 6. Pulse para confirmar. Pulse un sensor (excepto ) para iniciar la función: Ajustar + Empezar.
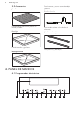
ESPAÑOL La temperatura y los tiempos de cocción de las tablas son meramente orientativos; dependen de la receta, la calidad y la cantidad de los ingredientes utilizados en cada caso. 11.1 Cara interior de la puerta En algunos modelos, la cara interior de la puerta contiene: • los números de las posiciones de la parrilla. • información sobre las funciones de cocción, posiciones recomendadas de las parrillas y temperatura apropiada para algunos platos. 11.
www.aeg.com 11.4 Consejos para hornear Resultado Causa posible Solución La base de la tarta no se ha dorado lo suficiente. La parrilla no está en una posición correcta. Coloque la tarta en un nivel más bajo. La tarta se hunde y se queda La temperatura del horno es pegajosa o muestra estrías demasiado alta. de agua. La próxima vez, seleccione una temperatura ligeramente más baja para el horno. La tarta se hunde y se queda El tiempo de horneado es pegajosa o muestra estrías insuficiente. de agua.
ESPAÑOL Alimento Función Temperatura (°C) Tiempo (min) Posición de la parrilla Tarta de Madeira/pastel de fruta Turbo 140 - 160 70 - 90 1 Fatless sponge cake / Bizcocho sin grasa Turbo 140 - 150 35 - 50 2 Fatless sponge cake / Bizcocho sin grasa Calor superior + 160 inferior 35 - 50 2 Masa brisé - ma- Turbo sa quebrada 170 - 1801) 10 - 25 2 Masa brisé: bizcocho Turbo 150 - 170 20 - 25 2 Apple pie / Tarta de manzana (2 moldes, Ø 20 cm, decalados en diagonal) Turbo 160 60 - 90
www.aeg.com Alimento Función Pan (pan de centeno): 1. Primera parte del proceso de horneado. 2. Segunda parte del proceso de horneado. Calor superior + 1. inferior 2.
ESPAÑOL Galletas Alimento Función Temperatura (°C) Tiempo (min) Posición de la parrilla Galletas de masa quebrada Turbo 150 - 160 10 - 20 3 Short bread / Pan pequeño / Masa quebrada Turbo 140 20 - 35 3 Short bread / Pan pequeño / Masa quebrada Calor superior + 1601) inferior 20 - 30 3 Galletas de ma- Turbo sa batida esponjosa 150 - 160 15 - 20 3 Hojaldres con clara de huevo / Merengues Turbo 80 - 100 120 - 150 3 Almendrados Turbo 100 - 120 30 - 50 3 Galletas de masa con lev
www.aeg.com Alimento Función Lasaña Gratinado de Temperatura (°C) Tiempo (min) Posición de la parrilla Calor superior + 180 - 200 inferior 25 - 40 1 Grill + Turbo 160 - 170 15 - 30 1 160 - 170 15 - 30 1 Dulces horneados Calor superior + 180 - 200 inferior 40 - 60 1 Pescado al horno Calor superior + 180 - 200 inferior 30 - 60 1 Verduras rellenas Turbo 30 - 60 1 verduras1) Barras de pan Turbo cortadas a lo largo y cubiertas de queso fundido 160 - 170 1) Precaliente el horno.
ESPAÑOL 27 Tartas / pastas / pan en bandejas Alimento Temperatura (°C) Tiempo (min) Buñuelos / Bollos rellenos de crema 160 - 1801) Pastel Streusel, seco 150 - 160 Posición de la parrilla 2 posiciones 3 posiciones 25 - 45 1/4 - 30 - 45 1/4 - 1) Precaliente el horno.
www.aeg.com Los 10 primeros minutos puede ajustar una temperatura del horno entre 80 °C y 150 °C. El valor por defecto es de 90 °C. Una vez ajustada la temperatura, el horno sigue cocinando a 80 °C. No utilice esta función para las aves. Cocine siempre sin tapar cuando utilice esta función. 2. Coloque la carne junto con la bandeja caliente en el horno en la parrilla. 3. Introduzca la sonda térmica en la carne. 4.
ESPAÑOL Alimento Temperatura (°C) Piroggen (versión ru- 180 - 2001) sa de la pizza calzone) Tiempo (min) Posición de la parrilla 15 - 25 2 29 1) Precaliente el horno. 2) Utilice una bandeja honda. 11.11 Asado • Utilice recipientes resistentes al calor (consulte las instrucciones del fabricante). • Los asados grandes se pueden preparar directamente en la bandeja honda (en su caso) o en una parrilla colocada sobre la bandeja honda. • Prepare las carnes magras en una fuente de asado tapada.
www.aeg.
ESPAÑOL Aves Alimento Cantidad Función Temperatura Tiempo (°C) (min) Posición de la parrilla Aves troceadas 200 - 250 g cada trozo Grill + Turbo 200 - 220 30 - 50 1 Medio pollo 400 - 500 g cada trozo Grill + Turbo 190 - 210 35 - 50 1 Pollo, pularda 1 - 1,5 kg Grill + Turbo 190 - 210 50 - 70 1 Pato 1,5 - 2 kg Grill + Turbo 180 - 200 80 - 100 1 Ganso 3,5 - 5 kg Grill + Turbo 160 - 180 120 - 180 1 Pavo 2,5 - 3,5 kg Grill + Turbo 160 - 180 120 - 150 1 Pavo 4 - 6 kg Gr
www.aeg.com Alimento Pescado entero 500-1.000 g Temperatura (°C) Tiempo (min) 1ª cara 2ª cara 210 - 230 15 - 30 15 - 30 Posición de la parrilla 3/4 Grill rápido Alimento Tiempo (min) Posición de la parrilla 1ª cara 2ª cara Burgers / Hamburguesas 8 - 10 6-8 4 Solomillo de cerdo 10 - 12 6 - 10 4 Salchichas 10 - 12 6-8 4 Filetes de ternera 7 - 10 6-8 4 Toast / Tostar1) 1-3 1-3 5 - 4 Tostadas con guarni- 6 - 8 ción 1) Precaliente el horno. 11.
ESPAÑOL Alimento Temperatura (°C) Tiempo (min) Posición de la parrilla Queso gratinado al horno 170 - 190 20 - 30 3 Alitas de pollo 190 - 210 20 - 30 2 33 Platos preparados congelados Alimento Función Temperatura (°C) Tiempo (min) Temperatura (°C) Pizza congelada Calor superior + según las indica- según las indica- 3 inferior ciones del fabri- ciones del fabricante cante Patatas fritas1) (300 - 600 g) Calor superior + 200 - 220 inferior o Grill + Turbo Baguettes Calor superior + segú
www.aeg.com Alimento Cantidad Tiempo de Tiempo de Comentarios descongela- descongelación (min) ción posterior (minutos) Nata 2 x 200 g 80 - 100 10 - 15 Monte la nata aunque queden puntos ligeramente congelados. Pasteles 1,4 kg 60 60 - 11.16 Conservar • Utilice únicamente botes de conserva del mismo tamaño disponibles en el mercado. • No utilice botes con cierre hermético (twist-off) o de bayoneta ni latas metálicas. • Utilice el nivel de parrilla más bajo para esta función.
ESPAÑOL 35 Alimento Temperatura (°C) Tiempo de cocción Continuar la cochasta que empiecen ción a 100 °C (min) a subir burbujas (min) Pepinos 160 - 170 50 - 60 - Encurtidos variados 160 - 170 50 - 60 5 - 10 Colinabos/ Guisantes/Espárragos 160 - 170 50 - 60 15 - 20 1) Deje reposar en el horno después de apagarlo. 11.17 Secar • Cubra las bandejas con papel vegetal o de hornear.
www.aeg.com Alimento Temperatura (°C) Tiempo (min) Posición de la parrilla Pan blanco 180 - 200 40 - 60 2 Baguette 200 - 220 35 - 45 2 Brioche 180 - 200 40 - 60 2 Chapata 200 - 220 35 - 45 2 Pan de centeno 190 - 210 50 - 70 2 Pan negro 180 - 200 50 - 70 2 Pan de semillas 170 - 190 60 - 90 2 11.
ESPAÑOL 37 Caza Alimento Temperatura interna del alimento (°C) Lomo de liebre 70 - 75 Muslos de liebre 70 - 75 Liebre entera 70 - 75 Lomo de corzo/ciervo 70 - 75 Pata de corzo/ciervo 70 - 75 Pescado Alimento Temperatura interna del alimento (°C) Salmón 65 - 70 Trucha 65 - 70 12. MANTENIMIENTO Y LIMPIEZA ADVERTENCIA! Consulte los capítulos sobre seguridad. 1. Tire de la parte delantera del carril lateral para separarlo de la pared. 12.
www.aeg.com 12.3 Pirólisis PRECAUCIÓN! Retire todos los accesorios y carriles laterales extraíbles. El procedimiento de limpieza pirolítica no se iniciará: • si no ha desconectado el enchufe de la sonda térmica de la toma de corriente. • si no ha cerrado completamente la puerta del horno. Retire manualmente los restos de suciedad más gruesa. PRECAUCIÓN! Si hay otros aparatos instalados en el mismo armario, no los utilice al mismo tiempo que la función: Pirólisis. El aparato podría dañarse. 1.
ESPAÑOL (aproximadamente a un ángulo de 70°). 4. Sostenga la puerta con una mano a cada lado y tire de ella hacia arriba y hacia afuera. 5. Ponga la puerta con el lado exterior hacia abajo sobre un paño suave en una superficie nivelada. De esta forma evitará arañazos. 6. Sujete por ambos lados el acabado de la puerta (B), situado en el borde superior de ésta, y empuje hacia dentro para soltar el sello de resorte. 39 ADVERTENCIA! Hay peligro de electrocución.
www.aeg.com 3. Limpie la tapa de vidrio. 4. Cambie la bombilla por otra apropiada termorresistente hasta 300 °C. 5. Coloque la tapa de cristal. 6. Coloque el carril lateral izquierdo. 13. SOLUCIÓN DE PROBLEMAS ADVERTENCIA! Consulte los capítulos sobre seguridad. 13.1 Qué hacer si... Problema Posible causa Solución El horno no calienta. El horno está apagado. Encienda el horno. El horno no calienta. El reloj no está en hora. Ajuste la hora. El horno no calienta.
ESPAÑOL Problema Posible causa Solución La pantalla muestra un códi- Hay un fallo eléctrico. go de error que no figura en esta tabla. Se acumula vapor y condensación en los alimentos y en la cavidad del horno. 41 • Apague el horno con el fusible doméstico o el interruptor de seguridad de la caja de fusibles y enciéndalo de nuevo • Si vuelve a aparecer el código de error en la pantalla, consulte al Departamento de atención al cliente.
www.aeg.com Número de cavidades 1 Fuente de calor Electricidad Volumen 71 l Tipo de horno Horno empotrado Masa 40.5 kg EN 60350-1 - Aparatos electrodomésticos - Parte 1: Placas, hornos, hornos de vapor y parrillas Métodos para medir el rendimiento. • 14.2 Bajo consumo energético El aparato tiene características que le ayudan a ahorrar energía durante la cocina de cada día.
ESPAÑOL 43
867303690-D-102015 www.aeg.